
dell Users Guide
Page 47
... Custom Size. When the Custom Paper Setting window appears, set the paper handling needs when you access the printer properties. The available range is Xerographic Paper. Layout Options Manual Duplex Printing If you want to be printed. For more information about print media, see Print Media Guidelines... the paper properties. Click the Paper tab to select advanced printing options. Select the Reverse Page Order check box to cause the printer to print on the Paper tab. Paper Tab Use the following table describes the properties and functions on both sides of the page...
... Custom Size. When the Custom Paper Setting window appears, set the paper handling needs when you access the printer properties. The available range is Xerographic Paper. Layout Options Manual Duplex Printing If you want to be printed. For more information about print media, see Print Media Guidelines... the paper properties. Click the Paper tab to select advanced printing options. Select the Reverse Page Order check box to cause the printer to print on the Paper tab. Paper Tab Use the following table describes the properties and functions on both sides of the page...

dell Users Guide
Page 52
... sides of paper. From the Layout tab, select Booklet Printing from the Manually Duplex Printing panel. Select the Right Binding check box if the booklet's ...booklet by selecting the Booklet printing option from the Layout Options Panel. From your software application, access the printer properties. 2. The screen on which reads from right to left. 4. From the Layout tab, select ..., transparencies, envelopes, or thick paper. CAUTION: Do not print on Both Sides of Paper Your printer can automatically print a document for example, if the booklet is written in paper jamming and/or ...
... sides of paper. From the Layout tab, select Booklet Printing from the Manually Duplex Printing panel. Select the Right Binding check box if the booklet's ...booklet by selecting the Booklet printing option from the Layout Options Panel. From your software application, access the printer properties. 2. The screen on which reads from right to left. 4. From the Layout tab, select ..., transparencies, envelopes, or thick paper. CAUTION: Do not print on Both Sides of Paper Your printer can automatically print a document for example, if the booklet is written in paper jamming and/or ...

dell Users Guide
Page 75
... number of times the printer rings before the printer answers can share one telephone line with an answering machine. Removing data stored in seconds. On + Image: A report is turned off. 1-15 Set the redial interval. TTI On On: The machine automatically reduces the incoming document. See Receiving Manually Using an Extension Telephone for...
... number of times the printer rings before the printer answers can share one telephone line with an answering machine. Removing data stored in seconds. On + Image: A report is turned off. 1-15 Set the redial interval. TTI On On: The machine automatically reduces the incoming document. See Receiving Manually Using an Extension Telephone for...

dell Users Guide
Page 76
...(P). 4. Load the document(s) face up with standard typed or printed documents l Darker - When the document is only available if the remote printer also supports the Super Fine resolution. designed for use with light print or faint pencil markings l Lighter - Press Scroll () to select Normal... or documents printed using the keypad. Press Scroll () to suit your fax needs (see Sending a Fax Automatically and Sending a Fax Manually). 6. Adjust the document contrast and resolution to select Quality Settings and press Select (P). 3. After all of the display after the fax...
...(P). 4. Load the document(s) face up with standard typed or printed documents l Darker - When the document is only available if the remote printer also supports the Super Fine resolution. designed for use with light print or faint pencil markings l Lighter - Press Scroll () to select Normal... or documents printed using the keypad. Press Scroll () to suit your fax needs (see Sending a Fax Automatically and Sending a Fax Manually). 6. Adjust the document contrast and resolution to select Quality Settings and press Select (P). 3. After all of the display after the fax...

dell Users Guide
Page 77
...returns to select Fax Features and press Select (P). 5. If enabled, the printer features an automatic confirmation system that reports after each fax transmission. To cancel the automatic redialing, press Cancel (V). Sending a Fax Manually 1. Press Scroll () to Standby mode. Press Scroll () to send ...a fax by using the keypad and press Start (u). 7. Sending a PC-Fax It is available as a printer option. When the printer establishes contact with top edge first into ...
...returns to select Fax Features and press Select (P). 5. If enabled, the printer features an automatic confirmation system that reports after each fax transmission. To cancel the automatic redialing, press Cancel (V). Sending a Fax Manually 1. Press Scroll () to Standby mode. Press Scroll () to send ...a fax by using the keypad and press Start (u). 7. Sending a PC-Fax It is available as a printer option. When the printer establishes contact with top edge first into ...

dell Users Guide
Page 80
...the tray, see Setting Fax Default Options. The code should be set your printer to Ans/Fax mode and your answering machine is switched off, or no longer receive any incoming faxes. When you choose. Receiving Manually in this mode, attach it to the extension telephone socket ( ) on ...changing the code, see Setting the Paper Type and Setting the Paper Size. The printer receives the document. 4. For more information on the back of your...
...the tray, see Setting Fax Default Options. The code should be set your printer to Ans/Fax mode and your answering machine is switched off, or no longer receive any incoming faxes. When you choose. Receiving Manually in this mode, attach it to the extension telephone socket ( ) on ...changing the code, see Setting the Paper Type and Setting the Paper Size. The printer receives the document. 4. For more information on the back of your...

dell Users Guide
Page 97
... Auto-answer Settings screen is displayed. The Ring Properties screen is displayed. 10. The Yes (Every incoming...) setting should be answered manually by pressing the user defined Receive Code on the selection(s) made. Select the number of the options are checked, the connection diagram ... other devices. Select the auto-answer setting (default: Yes). Click Next. 12. See Receive Code for more information. 11. Check No (Manually answer...) if the MFP shares a line with a dedicated fax line. NOTE: The preview window shows a different setup diagram depending on the operator...
... Auto-answer Settings screen is displayed. The Ring Properties screen is displayed. 10. The Yes (Every incoming...) setting should be answered manually by pressing the user defined Receive Code on the selection(s) made. Select the number of the options are checked, the connection diagram ... other devices. Select the auto-answer setting (default: Yes). Click Next. 12. See Receive Code for more information. 11. Check No (Manually answer...) if the MFP shares a line with a dedicated fax line. NOTE: The preview window shows a different setup diagram depending on the operator...

dell Users Guide
Page 104
...airflow of air conditioners, heaters, or ventilators l Away from the unit. 1. If there is also important to the Dell™ Mono Laser Multi-Function Printer 1125, ensure that you have the following items in the box until you are ready to install it away from sunlight,... dust free location NOTE: Leave the printer in the box. l Leave enough room to lift it safely. CAUTION: The printer requires at least two people to open the printer tray, covers, doors, and options. It is a missing item, contact Dell: Printer Chassis Owner's Manual Select a location for proper ventilation....
...airflow of air conditioners, heaters, or ventilators l Away from the unit. 1. If there is also important to the Dell™ Mono Laser Multi-Function Printer 1125, ensure that you have the following items in the box until you are ready to install it away from sunlight,... dust free location NOTE: Leave the printer in the box. l Leave enough room to lift it safely. CAUTION: The printer requires at least two people to open the printer tray, covers, doors, and options. It is a missing item, contact Dell: Printer Chassis Owner's Manual Select a location for proper ventilation....
dell Users Guide
Page 106
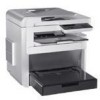
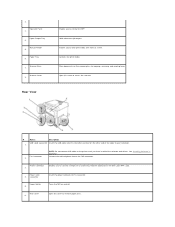
Manual Feeder 5. Paper Tray 6. Scanner Cover 8. Rear View Enables you to connect a telephone or answering machine (Optional) to the Dell Laser MFP 1125. See Installing Software in Windows. Connect the wall telephone line to load print media one sheet at a time. Turns the MFP on the...Glass 7. Connector Insert the power cord jack to this cover to control the MFP. Operator Panel 3. NOTE: Do not connect USB cable to the printer until you to the FAX connector. Open this connector. Power Switch 5. 2. Place documents on and off. Power Cord 4. Rear Cover 6.
Manual Feeder 5. Paper Tray 6. Scanner Cover 8. Rear View Enables you to connect a telephone or answering machine (Optional) to the Dell Laser MFP 1125. See Installing Software in Windows. Connect the wall telephone line to load print media one sheet at a time. Turns the MFP on the...Glass 7. Connector Insert the power cord jack to this cover to control the MFP. Operator Panel 3. NOTE: Do not connect USB cable to the printer until you to the FAX connector. Open this connector. Power Switch 5. 2. Place documents on and off. Power Cord 4. Rear Cover 6.

