
User Manual
Page 2
... and numbers. D-Link VWR User Manual I It's easy to get started with installation or troubleshooting common problems, please refer to this User Manual or Quick Start Guide. Please visit www.vonage.com/vwr to enter all of the latest VWR features. Activation If you purchased your Vonage VWR Device from a ...step-by visiting www.vonage.com/activate. Be sure to obtain the most up your Vonage VWR Device. After you must first activate your Vonage VWR Device! Welcome to -date User Manual and a description of the characters. The MAC ID is located on your equipment....
... and numbers. D-Link VWR User Manual I It's easy to get started with installation or troubleshooting common problems, please refer to this User Manual or Quick Start Guide. Please visit www.vonage.com/vwr to enter all of the latest VWR features. Activation If you purchased your Vonage VWR Device from a ...step-by visiting www.vonage.com/activate. Be sure to obtain the most up your Vonage VWR Device. After you must first activate your Vonage VWR Device! Welcome to -date User Manual and a description of the characters. The MAC ID is located on your equipment....
User Manual
Page 3
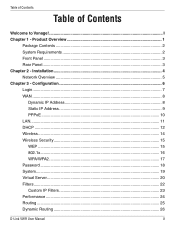
Product Overview 1 Package Contents 2 System Requirements 2 Front Panel ...3 Rear Panel...3 Chapter 2 - Configuration 6 Login...7 WAN ...8 Dynamic IP Address 8 Static IP Address 9 PPPoE ...10 LAN...11 DHCP ...12 Wireless...14 Wireless Security 15 WEP ...15 802.1x...16 WPA/WPA2 17 Password ...18 System...19 Virtual Server...20 Filters...22 Custom IP Filters 23 Performance ...24 Routing ...25 Dynamic Routing 26 D-Link VWR User Manual II Installation 4 Network Overview 5 Chapter 3 - Table of Contents Table of Contents Welcome to Vonage! ...I Chapter 1 -
Product Overview 1 Package Contents 2 System Requirements 2 Front Panel ...3 Rear Panel...3 Chapter 2 - Configuration 6 Login...7 WAN ...8 Dynamic IP Address 8 Static IP Address 9 PPPoE ...10 LAN...11 DHCP ...12 Wireless...14 Wireless Security 15 WEP ...15 802.1x...16 WPA/WPA2 17 Password ...18 System...19 Virtual Server...20 Filters...22 Custom IP Filters 23 Performance ...24 Routing ...25 Dynamic Routing 26 D-Link VWR User Manual II Installation 4 Network Overview 5 Chapter 3 - Table of Contents Table of Contents Welcome to Vonage! ...I Chapter 1 -

User Manual
Page 4
Troubleshooting 40 IVR Messages 43 Appendix B - Technical Specifications 44 D-Link VWR User Manual III DMZ...27 Misc ...28 UPnP ...29 DDNS ...30 SSH Access Control 31 Web Access Control 32 Network Statistics 33 Connection Status 34 DDNS Status ...35 DHCP Client ...36 Product Info ...37 Ping Test ...38 Logout...39 Appendix A -
Troubleshooting 40 IVR Messages 43 Appendix B - Technical Specifications 44 D-Link VWR User Manual III DMZ...27 Misc ...28 UPnP ...29 DDNS ...30 SSH Access Control 31 Web Access Control 32 Network Statistics 33 Connection Status 34 DDNS Status ...35 DHCP Client ...36 Product Info ...37 Ping Test ...38 Logout...39 Appendix A -

User Manual
Page 5
Product Overview Product Overview 1 D-Link VWR User Manual 1 Chapter 1 - Product Overview Chapter 1 -
Product Overview Product Overview 1 D-Link VWR User Manual 1 Chapter 1 - Product Overview Chapter 1 -

User Manual
Page 6
D-Link VWR User Manual 2 Product Overview Package Contents Vonage VWR Wireless Router Yellow Ethernet Cable RJ-11 Phone Cable Blue Ethernet Cable CD-ROM with User Guide Power Adapter System Requirements Any high speed DSL or Cable connection A valid Vonage account If you purchased your D-Link VWR at a retail location, make sure to first activate your device at www.vonage.com/activate. Please wait 30 minutes before checking for a dial tone. Chapter 1 -
D-Link VWR User Manual 2 Product Overview Package Contents Vonage VWR Wireless Router Yellow Ethernet Cable RJ-11 Phone Cable Blue Ethernet Cable CD-ROM with User Guide Power Adapter System Requirements Any high speed DSL or Cable connection A valid Vonage account If you purchased your D-Link VWR at a retail location, make sure to first activate your device at www.vonage.com/activate. Please wait 30 minutes before checking for a dial tone. Chapter 1 -

User Manual
Page 7
... a phone call. Internet Wireless A solid light indicates A solid light indicates connection on ports Vonage Internet 1-4. Rear Panel Phone (1 & 2) Plug your adapter has started up for computer on the that both the power light and the phone light must be solid in the supplied power adapter. Ethernet (1-4) Connect to the default settings. D-Link VWR User Manual 3 during...
... a phone call. Internet Wireless A solid light indicates A solid light indicates connection on ports Vonage Internet 1-4. Rear Panel Phone (1 & 2) Plug your adapter has started up for computer on the that both the power light and the phone light must be solid in the supplied power adapter. Ethernet (1-4) Connect to the default settings. D-Link VWR User Manual 3 during...

User Manual
Page 8
Chapter 1 - Product Overview Installation 2 D-Link VWR User Manual 4
Chapter 1 - Product Overview Installation 2 D-Link VWR User Manual 4

User Manual
Page 9
Chapter 2 - Installation Network Overview Please refer to your Quick Start Guide included with your Vonage VWR Device for basic installation instructions. D-Link VWR User Manual 5
Chapter 2 - Installation Network Overview Please refer to your Quick Start Guide included with your Vonage VWR Device for basic installation instructions. D-Link VWR User Manual 5

User Manual
Page 10
Configuration Chapter 3 - Configuration Configuration 3 D-Link VWR User Manual 6 Chapter 3 -
Configuration Chapter 3 - Configuration Configuration 3 D-Link VWR User Manual 6 Chapter 3 -
User Manual
Page 11
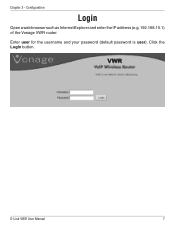
Configuration Login Open a web browser such as Internet Explorer and enter the IP address (e.g.192.168.15.1) of the Vonage VWR router. Chapter 3 - D-Link VWR User Manual 7 Enter user for the username and your password (default password is user). Click the Login button.
Configuration Login Open a web browser such as Internet Explorer and enter the IP address (e.g.192.168.15.1) of the Vonage VWR router. Chapter 3 - D-Link VWR User Manual 7 Enter user for the username and your password (default password is user). Click the Login button.

User Manual
Page 12
Name - D-Link VWR User Manual 8 Apply ISP DNS and SNTP - It is commonly used for cable modem and satellite services. Select this box to use . This option is not recommended that you any IP numbers to the Internet port's physical interface MAC address on the Vonage Router. The host name is set to use the...
Name - D-Link VWR User Manual 8 Apply ISP DNS and SNTP - It is commonly used for cable modem and satellite services. Select this box to use . This option is not recommended that you any IP numbers to the Internet port's physical interface MAC address on the Vonage Router. The host name is set to use the...

User Manual
Page 13
... the IP address if it is provided to you by your ISP. Enter the Subnet Mask assigned by your ISP. Apply ISP DNS and SNTP - D-Link VWR User Manual 9 Configuration Static IP Address If you by your ISP. You will be in the IP address, subnet mask, gateway address, and DNS...
... the IP address if it is provided to you by your ISP. Enter the Subnet Mask assigned by your ISP. Apply ISP DNS and SNTP - D-Link VWR User Manual 9 Configuration Static IP Address If you by your ISP. You will be in the IP address, subnet mask, gateway address, and DNS...

User Manual
Page 14
Your ISP will provide you may have issues accessing some Internet sites. Username - Keep Alive - MTU - Enter the MTU value. D-Link VWR User Manual 10 Enter your PPPoE password. Authentication - Check this box to use the DNS servers and time server (SNTP) supplied by changing TCP...conform with a username and password. Select the authentication type for longer than the defined time, then the connection will not work through a router. If it is disabled, you with PPP MTU by your ISP (Auto, CHAP, or PAP). Configuration PPPoE Select PPPoE (Point to remove...
Your ISP will provide you may have issues accessing some Internet sites. Username - Keep Alive - MTU - Enter the MTU value. D-Link VWR User Manual 10 Enter your PPPoE password. Authentication - Check this box to use the DNS servers and time server (SNTP) supplied by changing TCP...conform with a username and password. Select the authentication type for longer than the defined time, then the connection will not work through a router. If it is disabled, you with PPP MTU by your ISP (Auto, CHAP, or PAP). Configuration PPPoE Select PPPoE (Point to remove...
User Manual
Page 15
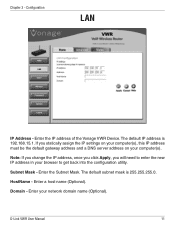
... default gateway address and a DNS server address on your network domain name (Optional). The default IP address is 255.255.255.0. Enter the Subnet Mask. D-Link VWR User Manual 11 Enter the IP address of the Vonage...
... default gateway address and a DNS server address on your network domain name (Optional). The default IP address is 255.255.255.0. Enter the Subnet Mask. D-Link VWR User Manual 11 Enter the IP address of the Vonage...

User Manual
Page 16
...must specify the starting and ending address of the IP address pool. Chapter 3 - D-Link VWR User Manual 12 The DHCP Server will automatically assign an IP address to be DHCP clients by the Vonage VWR Device. The DHCP Server will automatically allocate an unused IP address from the IP address pool... to "Obtain an IP Address Automatically." The Vonage VWR Device has a built-in DHCP server. When you turn your computers to the computers on , they will automatically load the proper TCP...
...must specify the starting and ending address of the IP address pool. Chapter 3 - D-Link VWR User Manual 12 The DHCP Server will automatically assign an IP address to be DHCP clients by the Vonage VWR Device. The DHCP Server will automatically allocate an unused IP address from the IP address pool... to "Obtain an IP Address Automatically." The Vonage VWR Device has a built-in DHCP server. When you turn your computers to the computers on , they will automatically load the proper TCP...

User Manual
Page 17
... IP - LAN Clients - Note: If you statically (manually) assign IP addresses to . When DHCP relay is enabled, the Vonage VWR Device is already listed, simply check the reserve box and click Apply. Lease Time - Chapter 3 - Configuration Enable DHCP ... of every host on the same subnet as the other hosts. If you can create a DHCP reservation. The Vonage VWR Device will be within the DHCP IP Address Range. Enter IP Address - Enter the IP address you want to enable... have an IP conflict. Enter the MAC address of the computer. D-Link VWR User Manual 13
... IP - LAN Clients - Note: If you statically (manually) assign IP addresses to . When DHCP relay is enabled, the Vonage VWR Device is already listed, simply check the reserve box and click Apply. Lease Time - Chapter 3 - Configuration Enable DHCP ... of every host on the same subnet as the other hosts. If you can create a DHCP reservation. The Vonage VWR Device will be within the DHCP IP Address Range. Enter IP Address - Enter the IP address you want to enable... have an IP conflict. Enter the MAC address of the computer. D-Link VWR User Manual 13

User Manual
Page 18
... the SSID over the network. Select if using all 802.11b wireless devices. Select if using both 802.11b and b+ wireless devices. D-Link VWR User Manual 14 Channel - All devices on a network must share the same channel. (Note: The wireless adapters will automatically scan and match the wireless setting.) For best results, use channels 1, 6, or 11. 802.11...
... the SSID over the network. Select if using all 802.11b wireless devices. Select if using both 802.11b and b+ wireless devices. D-Link VWR User Manual 14 Channel - All devices on a network must share the same channel. (Note: The wireless adapters will automatically scan and match the wireless setting.) For best results, use channels 1, 6, or 11. 802.11...

User Manual
Page 19
... encryption desired: 64, 128, or 256-bit. Encryption Key - Note: If you enable encryption on all the wireless clients or wireless connection will not be established. Enter a WEP key. D-Link VWR User Manual 15 Select Open or Shared. Chapter 3 - Authentication Type - Configuration Wireless Security WEP Wired Equivalent Privacy (WEP) is sent over the WLAN.
... encryption desired: 64, 128, or 256-bit. Encryption Key - Note: If you enable encryption on all the wireless clients or wireless connection will not be established. Enter a WEP key. D-Link VWR User Manual 15 Select Open or Shared. Chapter 3 - Authentication Type - Configuration Wireless Security WEP Wired Equivalent Privacy (WEP) is sent over the WLAN.

User Manual
Page 20
Enter the port your RADIUS server is using. 1812 is the default setting. Chapter 3 - Group Key Interval - Server IP Address - Secret - Enter the secret or key. Configuration 802.1x Select 802.1x when authenticating to a RADIUS server. Port - This secret must be used by your RADIUS server. Enter the IP address of your wireless clients. D-Link VWR User Manual 16 Enter the Group Key Interval. 3600 is the default setting.
Enter the port your RADIUS server is using. 1812 is the default setting. Chapter 3 - Group Key Interval - Server IP Address - Secret - Enter the secret or key. Configuration 802.1x Select 802.1x when authenticating to a RADIUS server. Port - This secret must be used by your RADIUS server. Enter the IP address of your wireless clients. D-Link VWR User Manual 16 Enter the Group Key Interval. 3600 is the default setting.

User Manual
Page 21
... (AES). RADIUS Server - To use a passphrase for Wireless Local Area Networks (WLAN). Enter the Group Key Interval. 3600 is a wireless security protocol for authentication, click the radio button and then enter the PSK String (WPA passphrase). D-Link VWR User Manual 17 Configuration WPA/WPA2 Wi-Fi Protected ... server's IP address, Port, and Secret (key). Chapter 3 - Group Key Interval - If you enable encryption on the Vonage VWR Device make sure to also enable encryption on all the wireless clients or wireless connection will not be established. Pre-Shared Key -
... (AES). RADIUS Server - To use a passphrase for Wireless Local Area Networks (WLAN). Enter the Group Key Interval. 3600 is a wireless security protocol for authentication, click the radio button and then enter the PSK String (WPA passphrase). D-Link VWR User Manual 17 Configuration WPA/WPA2 Wi-Fi Protected ... server's IP address, Port, and Secret (key). Chapter 3 - Group Key Interval - If you enable encryption on the Vonage VWR Device make sure to also enable encryption on all the wireless clients or wireless connection will not be established. Pre-Shared Key -


