Product Manual
Page 3
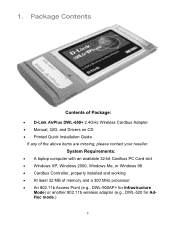
... • At least 32 MB of the above items are missing, please contact your reseller. Package Contents Contents of Package: • D-Link AirPlus DWL-650+ 2.4GHz Wireless Cardbus Adapter • Manual, QIG, and Drivers on CD • Printed Quick Installation Guide If any of memory and a 300 MHz processor • An 802.11b Access Point...
... • At least 32 MB of the above items are missing, please contact your reseller. Package Contents Contents of Package: • D-Link AirPlus DWL-650+ 2.4GHz Wireless Cardbus Adapter • Manual, QIG, and Drivers on CD • Printed Quick Installation Guide If any of memory and a 300 MHz processor • An 802.11b Access Point...
Product Manual
Page 4
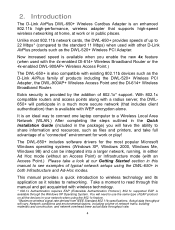
... with wireless technology. * 802.1x Authentication requires EAP (Extensible Authentication Protocol.) 802.1x supported EAP is provided by the addition of 802.1x* support. Now increased speed is available when you will vary. The DWL-650+ includes software drivers for... rate. 4 2. Introduction The D-Link AirPlus DWL-650+ Wireless Cardbus Adapter is also compatible with an Access Point.) Please take full advantage of products including the DWL-520+ Wireless PCI Adapter, the DWL-900AP+ Wireless Access Point and the DI-614+ Wireless Broadband Router. This manual provides a quick introduction...
... with wireless technology. * 802.1x Authentication requires EAP (Extensible Authentication Protocol.) 802.1x supported EAP is provided by the addition of 802.1x* support. Now increased speed is available when you will vary. The DWL-650+ includes software drivers for... rate. 4 2. Introduction The D-Link AirPlus DWL-650+ Wireless Cardbus Adapter is also compatible with an Access Point.) Please take full advantage of products including the DWL-520+ Wireless PCI Adapter, the DWL-900AP+ Wireless Access Point and the DI-614+ Wireless Broadband Router. This manual provides a quick introduction...
Product Manual
Page 10
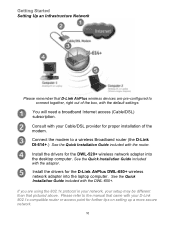
...the manual that pictured above. If you are pre-configured to a wireless Broadband router (the D-Link DI-614+.) See the Quick Installation Guide included with your Cable/DSL provider for the DWL-520+ wireless network adapter into the laptop computer. Connect the modem to connect ... the modem. See the Quick Installation Guide included with your D-Link 802.1x compatible router or access point for the D-Link AirPlus DWL-650+ wireless network adapter into the desktop computer. Consult with the DWL-650+. Install the drivers for further tips on setting up a more secure network. 10...
...the manual that pictured above. If you are pre-configured to a wireless Broadband router (the D-Link DI-614+.) See the Quick Installation Guide included with your Cable/DSL provider for the DWL-520+ wireless network adapter into the laptop computer. Connect the modem to connect ... the modem. See the Quick Installation Guide included with your D-Link 802.1x compatible router or access point for the D-Link AirPlus DWL-650+ wireless network adapter into the desktop computer. Consult with the DWL-650+. Install the drivers for further tips on setting up a more secure network. 10...
Product Manual
Page 12
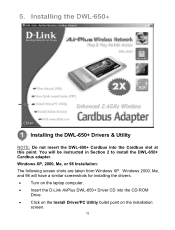
Installing the DWL-650+ Installing the DWL-650+ Drivers & Utility NOTE: Do not insert the DWL-650+ Cardbus into the CD-ROM Drive. • Click on the Install Driver/PC Utility bullet point on the laptop computer. • Insert the D-Link AirPlus DWL-650+ Driver CD into the Cardbus slot at this point. Windows XP, 2000, Me, or 98 Installation: The following screen...
Installing the DWL-650+ Installing the DWL-650+ Drivers & Utility NOTE: Do not insert the DWL-650+ Cardbus into the CD-ROM Drive. • Click on the Install Driver/PC Utility bullet point on the laptop computer. • Insert the D-Link AirPlus DWL-650+ Driver CD into the Cardbus slot at this point. Windows XP, 2000, Me, or 98 Installation: The following screen...
Product Manual
Page 13
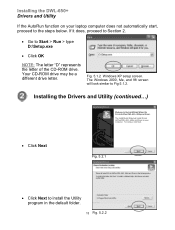
...8226; Click OK NOTE: The letter "D" represents the letter of the CD-ROM drive. The InstallShield Wizard will install D-Link AirPlus DWL-650+ Utility and Driver in the default folder. 13 Fig. 5.2.2 If it does, proceed to Section 2. • Go to Fig 5.1.2. ...will install D-Link AirPlus DWL-650+ Utility and Driver on your computer. Installing the Drivers and Utility (continued...) Welcome to install the Utility program in the following folder. • Click Next to the InstallShield Wizard for D-Link AirPlus DWL-650+ Utility and Driver. Installing the DWL-650+ Drivers and Utility...
...8226; Click OK NOTE: The letter "D" represents the letter of the CD-ROM drive. The InstallShield Wizard will install D-Link AirPlus DWL-650+ Utility and Driver in the default folder. 13 Fig. 5.2.2 If it does, proceed to Section 2. • Go to Fig 5.1.2. ...will install D-Link AirPlus DWL-650+ Utility and Driver on your computer. Installing the Drivers and Utility (continued...) Welcome to install the Utility program in the following folder. • Click Next to the InstallShield Wizard for D-Link AirPlus DWL-650+ Utility and Driver. Installing the DWL-650+ Drivers and Utility...
Product Manual
Page 14
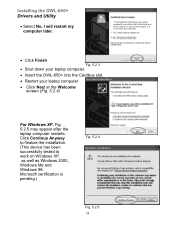
Microsoft certification is pending.) Fig. 5.2.4 D-Link AirPlus DWL-650+ Wireless Cardbus Adapter Fig. 5.2.5 14 Click Continue Anyway to finalize the installation. (This device has been successfully tested to work on Windows XP, as well as Windows 2000, Windows Me and Windows 98. Installing the DWL-650+ Drivers and Utility • Select No, I will restart my computer later. The...
Microsoft certification is pending.) Fig. 5.2.4 D-Link AirPlus DWL-650+ Wireless Cardbus Adapter Fig. 5.2.5 14 Click Continue Anyway to finalize the installation. (This device has been successfully tested to work on Windows XP, as well as Windows 2000, Windows Me and Windows 98. Installing the DWL-650+ Drivers and Utility • Select No, I will restart my computer later. The...
Product Manual
Page 15
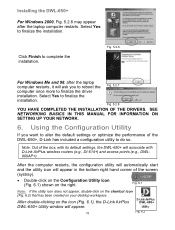
.... 5.2.8 YOU HAVE COMPLETED THE INSTALLATION OF THE DRIVERS. After the computer restarts, the configuration utility will automatically start and the utility icon will associate with D-Link AirPlus wireless routers (e.g., DI-614+) and access points (e.g., DWL900AP+). Select Yes to do so. Select Yes to complete the installation. D-Link AirPlus DWL-650+ Wireless Cardbus Adapter Click Finish to finalize the installation.
.... 5.2.8 YOU HAVE COMPLETED THE INSTALLATION OF THE DRIVERS. After the computer restarts, the configuration utility will automatically start and the utility icon will associate with D-Link AirPlus wireless routers (e.g., DI-614+) and access points (e.g., DWL900AP+). Select Yes to do so. Select Yes to complete the installation. D-Link AirPlus DWL-650+ Wireless Cardbus Adapter Click Finish to finalize the installation.
Product Manual
Page 22
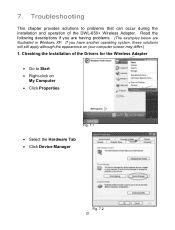
... to Start • Right-click on your computer screen may differ.) 1. Checking the Installation of the Drivers for the Wireless Adapter • Go to problems that can occur during the installation and operation of the DWL-650+ Wireless Adapter. Read the following descriptions if you have another operating system, these solutions will still apply although...
... to Start • Right-click on your computer screen may differ.) 1. Checking the Installation of the Drivers for the Wireless Adapter • Go to problems that can occur during the installation and operation of the DWL-650+ Wireless Adapter. Read the following descriptions if you have another operating system, these solutions will still apply although...
Product Manual
Page 23
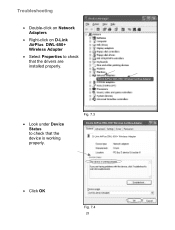
D-Link AirPlus DWL-650+ Wireless Cardbus Adapter • Look under Device Status to check that the device is working properly. Fig. 7.3 D-Link AirPlus DWL-650+ Wireless Cardbus Adapter D-Link AirPlus DWL-650+ Wireless Adapter • Click OK Fig. 7.4 23 Troubleshooting • Double-click on Network Adapters • Right-click on D-Link AirPlus DWL-650+ Wireless Adapter • Select Properties to check that the drivers are installed properly.
D-Link AirPlus DWL-650+ Wireless Cardbus Adapter • Look under Device Status to check that the device is working properly. Fig. 7.3 D-Link AirPlus DWL-650+ Wireless Cardbus Adapter D-Link AirPlus DWL-650+ Wireless Adapter • Click OK Fig. 7.4 23 Troubleshooting • Double-click on Network Adapters • Right-click on D-Link AirPlus DWL-650+ Wireless Adapter • Select Properties to check that the drivers are installed properly.

Product Manual
Page 24
... click on the computer with the DWL-650+. I cannot connect to the access point or the wireless router. • Make sure that the SSID on the DWL-650+ Cardbus adapter is exactly the same as the SSID on . • Check to completely remove drivers that were previously loaded. Troubleshooting 2. ... B. The DWL-650+ Power and Link lights are listed in the Using the Configuration Utility section in the computer's Cardbus slot. • If Windows does not detect the hardware upon insertion of your Access Point and the computer with the DWL-650+. • Refresh the DWL-650+ AirPlus Utility...
... click on the computer with the DWL-650+. I cannot connect to the access point or the wireless router. • Make sure that the SSID on the DWL-650+ Cardbus adapter is exactly the same as the SSID on . • Check to completely remove drivers that were previously loaded. Troubleshooting 2. ... B. The DWL-650+ Power and Link lights are listed in the Using the Configuration Utility section in the computer's Cardbus slot. • If Windows does not detect the hardware upon insertion of your Access Point and the computer with the DWL-650+. • Refresh the DWL-650+ AirPlus Utility...
Product Manual
Page 25
...might be a problem with the DWL-650+ installed is enabled, make sure the same Service Set Identifier (SSID) is default. (Double-click on the WLAN icon in the taskbar > click on the wireless router are indicating normal activity. If....inf files (e.g., oem1.inf.) 6. The Link Info screen will display the SSID setting.) • In Ad-Hoc mode, both the DWL-650+ and the access point. Double-click on both wireless clients will rename .inf files that the...TIACXLN.SYS. This prevents several clients from the INF and SYSTEM32 (DRIVERS) folders in the taskbar > click Encryption.
...might be a problem with the DWL-650+ installed is enabled, make sure the same Service Set Identifier (SSID) is default. (Double-click on the WLAN icon in the taskbar > click on the wireless router are indicating normal activity. If....inf files (e.g., oem1.inf.) 6. The Link Info screen will display the SSID setting.) • In Ad-Hoc mode, both the DWL-650+ and the access point. Double-click on both wireless clients will rename .inf files that the...TIACXLN.SYS. This prevents several clients from the INF and SYSTEM32 (DRIVERS) folders in the taskbar > click Encryption.
Product Manual
Page 43
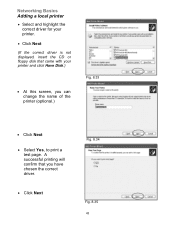
A successful printing will confirm that came with your printer. • Click Next (If the correct driver is not displayed, insert the CD or floppy disk that you can change the name of the printer (optional.) Fig. 8.33 • Click Next • Select Yes, to print a test page. Networking Basics Adding a local printer • Select and highlight the correct driver for your printer and click Have Disk.) • At this screen, you have chosen the correct driver. • Click Next Fig. 8.34 Fig. 8.35 43
A successful printing will confirm that came with your printer. • Click Next (If the correct driver is not displayed, insert the CD or floppy disk that you can change the name of the printer (optional.) Fig. 8.33 • Click Next • Select Yes, to print a test page. Networking Basics Adding a local printer • Select and highlight the correct driver for your printer and click Have Disk.) • At this screen, you have chosen the correct driver. • Click Next Fig. 8.34 Fig. 8.35 43
Product Manual
Page 52
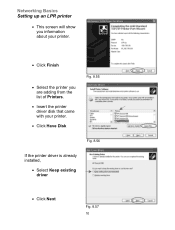
Networking Basics Setting up an LPR printer • This screen will show you information about your printer. • Click Finish • Select the printer you are adding from the list of Printers. • Insert the printer driver disk that came with your printer. • Click Have Disk Fig. 8.55 Fig. 8.56 If the printer driver is already installed, • Select Keep existing driver • Click Next Fig. 8.57 52
Networking Basics Setting up an LPR printer • This screen will show you information about your printer. • Click Finish • Select the printer you are adding from the list of Printers. • Insert the printer driver disk that came with your printer. • Click Have Disk Fig. 8.55 Fig. 8.56 If the printer driver is already installed, • Select Keep existing driver • Click Next Fig. 8.57 52


