Product Manual
Page 2
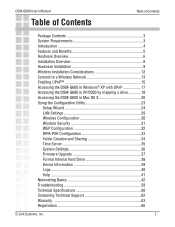
DSM-G600 User's Manual Table of Contents Table of Contents Package Contents 3 System Requirements 3 Introduction 4 Features and Benefits 5 Hardware Overview 6 Installation Overview 8 Hardware Installation 9 Wireless Installation Considerations 12 Connect to a Wireless Network 13 Enabling UPnP 15 Accessing the DSM-G600 in Windows® XP with UPnP 17 Accessing the DSM-G600 in XP/2000 by mapping a drive 18 Accessing...
DSM-G600 User's Manual Table of Contents Table of Contents Package Contents 3 System Requirements 3 Introduction 4 Features and Benefits 5 Hardware Overview 6 Installation Overview 8 Hardware Installation 9 Wireless Installation Considerations 12 Connect to a Wireless Network 13 Enabling UPnP 15 Accessing the DSM-G600 in Windows® XP with UPnP 17 Accessing the DSM-G600 in XP/2000 by mapping a drive 18 Accessing...
Product Manual
Page 3
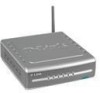
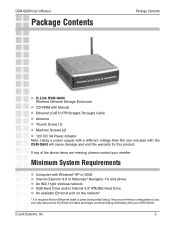
... Windows® XP or 2000 Internet Explorer 6.0 or Netscape® Navigator 7.0 and above items are missing, please contact your DSM-G600. DSM-G600 User's Manual Package Contents Package Contents D-Link DSM-G600 Wireless Network Storage Enclosure CD-ROM with Manual Ethernet (CAT5 UTP/Straight-Through) Cable Antenna Thumb Screw (1) Machine Screws (2) 12V DC 3A Power...
... Windows® XP or 2000 Internet Explorer 6.0 or Netscape® Navigator 7.0 and above items are missing, please contact your DSM-G600. DSM-G600 User's Manual Package Contents Package Contents D-Link DSM-G600 Wireless Network Storage Enclosure CD-ROM with Manual Ethernet (CAT5 UTP/Straight-Through) Cable Antenna Thumb Screw (1) Machine Screws (2) 12V DC 3A Power...

Product Manual
Page 4
...® X v10.2/ v10.3 will vary. With the DSM-G600, you can conveniently share documents, files, and digital media such as an Access Point. The DSM-G600 supports WEP and WPA-PSK for your wired router. DSM-G600 User's Manual Introduction Introduction D-Link, an industry leader in networking, introduces the DSM-G600 Wireless Network Storage Enclosure. Maximum wireless signal rate based on your own external USB...
...® X v10.2/ v10.3 will vary. With the DSM-G600, you can conveniently share documents, files, and digital media such as an Access Point. The DSM-G600 supports WEP and WPA-PSK for your wired router. DSM-G600 User's Manual Introduction Introduction D-Link, an industry leader in networking, introduces the DSM-G600 Wireless Network Storage Enclosure. Maximum wireless signal rate based on your own external USB...
Product Manual
Page 5
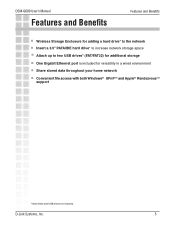
DSM-G600 User's Manual Features and Benefits Features and Benefits Wireless Storage Enclosure for adding a hard drive* to the network Insert a 3.5" PATA/IDE hard drive* to increase network storage space Attach up to two USB drives* (FAT/FAT32) for additional storage One Gigabit Ethernet port is included for versatility in a wired environment ...
DSM-G600 User's Manual Features and Benefits Features and Benefits Wireless Storage Enclosure for adding a hard drive* to the network Insert a 3.5" PATA/IDE hard drive* to increase network storage space Attach up to two USB drives* (FAT/FAT32) for additional storage One Gigabit Ethernet port is included for versatility in a wired environment ...
Product Manual
Page 6
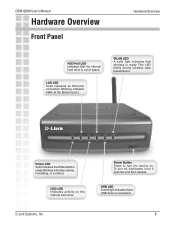
... that a USB drive is ready. HDD LED Indicates activity on . To turn the device on the internal hard drive. D-Link Systems, Inc. 6 Blinking indicates traffic at the Ethernet port. LAN LED Solid indicates an Ethernet connection. Power Button Press...and then release. This LED blinks during wireless data transmission. Blinking indicates startup, formatting, or a reboot. USB LED A solid light indicates that wireless is connected. Power LED Solid indicates the DSM-G600 is out of space. DSM-G600 User's Manual Hardware Overview Front Panel Hardware Overview HDD-...
... that a USB drive is ready. HDD LED Indicates activity on . To turn the device on the internal hard drive. D-Link Systems, Inc. 6 Blinking indicates traffic at the Ethernet port. LAN LED Solid indicates an Ethernet connection. Power Button Press...and then release. This LED blinks during wireless data transmission. Blinking indicates startup, formatting, or a reboot. USB LED A solid light indicates that wireless is connected. Power LED Solid indicates the DSM-G600 is out of space. DSM-G600 User's Manual Hardware Overview Front Panel Hardware Overview HDD-...
Product Manual
Page 7
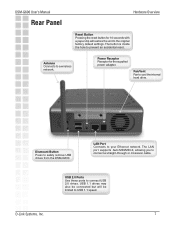
... a wireless network. Antenna Connects to connect USB 2.0 drives. Dismount Button Press to connect a straight-through or crossover cable. The LAN port supports Auto MDI/MDI-X, allowing you to safely remove USB drives from the DSM-G600. The button is inside the hole to your Ethernet network. LAN Port Connects to prevent an accidental reset. DSM-G600 User's Manual...
... a wireless network. Antenna Connects to connect USB 2.0 drives. Dismount Button Press to connect a straight-through or crossover cable. The LAN port supports Auto MDI/MDI-X, allowing you to safely remove USB drives from the DSM-G600. The button is inside the hole to your Ethernet network. LAN Port Connects to prevent an accidental reset. DSM-G600 User's Manual...

Product Manual
Page 8
DSM-G600 User's Manual Installation Overview Installation Overview When you have completed the steps in this Quick Installation Guide, your connected network may look similar to this: D-Link Systems, Inc. 8
DSM-G600 User's Manual Installation Overview Installation Overview When you have completed the steps in this Quick Installation Guide, your connected network may look similar to this: D-Link Systems, Inc. 8
Product Manual
Page 9
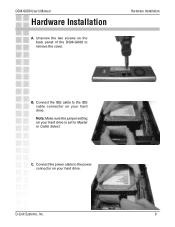
DSM-G600 User's Manual Hardware Installation A. Note: Make sure the jumper setting on your hard drive. Connect the power cable to the power connector on your hard drive. Unscrew the two screws on your hard drive is set to remove the cover. C. Connect the IDE cable to the IDE cable connector on the back panel of the DSM-G600 to Master or Cable Select. D-Link Systems, Inc. 9 Hardware Installation B.
DSM-G600 User's Manual Hardware Installation A. Note: Make sure the jumper setting on your hard drive. Connect the power cable to the power connector on your hard drive. Unscrew the two screws on your hard drive is set to remove the cover. C. Connect the IDE cable to the IDE cable connector on the back panel of the DSM-G600 to Master or Cable Select. D-Link Systems, Inc. 9 Hardware Installation B.
Product Manual
Page 10
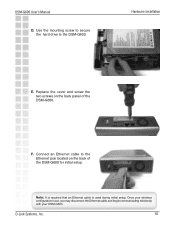
D-Link Systems, Inc. 10 Hardware Installation E. Note: It is required that an Ethernet cable is set, you may disconnect the Ethernet cable and begin communicating wirelessly with your DSM-G600. F. Once your wireless configuration is used during initial setup. Connect an Ethernet cable to the DSM-G600. Replace the cover and screw the two screws on the back of the DSM-G600. DSM-G600 User's Manual D. Use the mounting screw to secure the hard drive to the Ethernet jack located on the back panel of the DSM-G600 for initial setup.
D-Link Systems, Inc. 10 Hardware Installation E. Note: It is required that an Ethernet cable is set, you may disconnect the Ethernet cable and begin communicating wirelessly with your DSM-G600. F. Once your wireless configuration is used during initial setup. Connect an Ethernet cable to the DSM-G600. Replace the cover and screw the two screws on the back of the DSM-G600. DSM-G600 User's Manual D. Use the mounting screw to secure the hard drive to the Ethernet jack located on the back panel of the DSM-G600 for initial setup.
Product Manual
Page 11
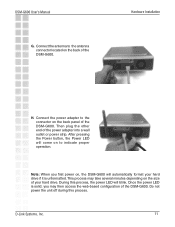
... to indicate proper operation. This process may then access the web-based configuration of the DSM-G600. During this process. D-Link Systems, Inc. 11 Then plug the other end of the DSM-G600. Do not power the unit off during this process, the power LED will blink. Note: When...power strip. After pressing the Power button, the Power LED will automatically format your hard drive. Once the power LED is unformatted. DSM-G600 User's Manual G. Connect the power adapter to the connector on to the antenna connector located on the size of your hard drive if it is ...
... to indicate proper operation. This process may then access the web-based configuration of the DSM-G600. During this process. D-Link Systems, Inc. 11 Then plug the other end of the DSM-G600. Do not power the unit off during this process, the power LED will blink. Note: When...power strip. After pressing the Power button, the Power LED will automatically format your hard drive. Once the power LED is unformatted. DSM-G600 User's Manual G. Connect the power adapter to the connector on to the antenna connector located on the size of your hard drive if it is ...

Product Manual
Page 12
... basic guidelines: 1 Keep the number of walls and ceilings between network devices. D-Link Systems, Inc. 12 each wall or ceiling can reduce your DSM-G600's range from virtually anywhere within the operating range of your wireless network. DSM-G600 User's Manual Wireless Installation Considerations Wireless Installation Considerations The DSM-G600 lets you are using a wireless connection from 3-90 feet (1-30 meters.) Position your devices...
... basic guidelines: 1 Keep the number of walls and ceilings between network devices. D-Link Systems, Inc. 12 each wall or ceiling can reduce your DSM-G600's range from virtually anywhere within the operating range of your wireless network. DSM-G600 User's Manual Wireless Installation Considerations Wireless Installation Considerations The DSM-G600 lets you are using a wireless connection from 3-90 feet (1-30 meters.) Position your devices...
Product Manual
Page 13
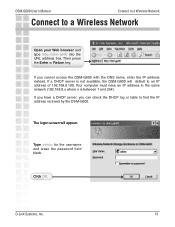
DSM-G600 User's Manual Connect to a Wireless Network Connect to an IP address of 192.168.0.100. Type admin for the username and leave the password field blank. If a DHCP server is between 1 and 254). The logon screen will default to a Wireless Network Open your Web browser and type http://dsm-g600... into the URL address box. Your computer must have a DHCP server, you cannot access the DSM-G600 with the DNS name, enter the IP address instead. D-Link Systems, Inc. 13 Then press...
DSM-G600 User's Manual Connect to a Wireless Network Connect to an IP address of 192.168.0.100. Type admin for the username and leave the password field blank. If a DHCP server is between 1 and 254). The logon screen will default to a Wireless Network Open your Web browser and type http://dsm-g600... into the URL address box. Your computer must have a DHCP server, you cannot access the DSM-G600 with the DNS name, enter the IP address instead. D-Link Systems, Inc. 13 Then press...
Product Manual
Page 14
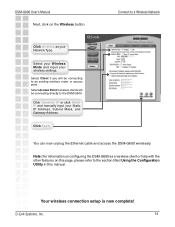
... access the DSM-G600 wirelessly. Select Client if you will be connecting to an existing wireless router or access point. Your wireless connection setup is now complete! Select your Wireless Mode and input your Network Type. DSM-G600 User's Manual Next, click on this page, please refer to the section titled Using the Configuration Utility in this manual. D-Link Systems...
... access the DSM-G600 wirelessly. Select Client if you will be connecting to an existing wireless router or access point. Your wireless connection setup is now complete! Select your Wireless Mode and input your Network Type. DSM-G600 User's Manual Next, click on this page, please refer to the section titled Using the Configuration Utility in this manual. D-Link Systems...
Product Manual
Page 15
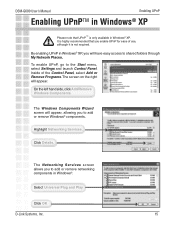
...is highly recommended that TM UPnP is not required. Select Universal Plug and Play Click OK D-Link Systems, Inc. 15 To enable UPnP, go to shared folders through My Network Places. Highlight Networking Services. By enabling UPnP in Windows® XP, you enable UPnP for ease of the ...Control Panel, select Add or Remove Programs. The screen on the right will have easy access to the Start menu, select Settings and launch Control Panel. DSM-G600 User's Manual ...
...is highly recommended that TM UPnP is not required. Select Universal Plug and Play Click OK D-Link Systems, Inc. 15 To enable UPnP, go to shared folders through My Network Places. Highlight Networking Services. By enabling UPnP in Windows® XP, you enable UPnP for ease of the ...Control Panel, select Add or Remove Programs. The screen on the right will have easy access to the Start menu, select Settings and launch Control Panel. DSM-G600 User's Manual ...

Product Manual
Page 16
Click Finish. D-Link Systems, Inc. 16 DSM-G600 User's Manual Enabling UPnP Enabling UPnPTM in Windows® XP (continued) Click Next. UPnPTM is now enabled!
Click Finish. D-Link Systems, Inc. 16 DSM-G600 User's Manual Enabling UPnP Enabling UPnPTM in Windows® XP (continued) Click Next. UPnPTM is now enabled!
Product Manual
Page 17
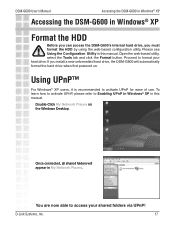
Proceed to access your hard drive. Double-Click My Network Places on . Using UPnP™ For Windows® XP users, it is recommended to Enabling UPnP in Windows® XP in this manual. D-Link Systems, Inc. 17 If you must format the HDD by using the web-based... for ease of use. DSM-G600 User's Manual Accessing the DSM-G600 in Windows® XP Accessing the DSM-G600 in Windows® XP Format the HDD Before you can access the DSM-G600's internal hard drive, you install a new unformatted hard drive, the DSM-G600 will appear in My Network Places. Please see Using ...
Proceed to access your hard drive. Double-Click My Network Places on . Using UPnP™ For Windows® XP users, it is recommended to Enabling UPnP in Windows® XP in this manual. D-Link Systems, Inc. 17 If you must format the HDD by using the web-based... for ease of use. DSM-G600 User's Manual Accessing the DSM-G600 in Windows® XP Accessing the DSM-G600 in Windows® XP Format the HDD Before you can access the DSM-G600's internal hard drive, you install a new unformatted hard drive, the DSM-G600 will appear in My Network Places. Please see Using ...
Product Manual
Page 18
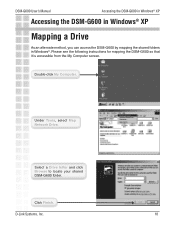
Click Finish. Please see the following instructions for mapping the DSM-G600 so that it is accessible from the My Computer screen. Under Tools, select Map Network Drive. Select a Drive letter and click Browse to locate your shared DSM-G600 folder. D-Link Systems, Inc. 18 Double-click My Computer. DSM-G600 User's Manual Accessing the DSM-G600 in Windows® XP Accessing the DSM-G600 in Windows® XP Mapping a Drive As an alternate method, you can access the DSM-G600 by mapping the shared folders in Windows®.
Click Finish. Please see the following instructions for mapping the DSM-G600 so that it is accessible from the My Computer screen. Under Tools, select Map Network Drive. Select a Drive letter and click Browse to locate your shared DSM-G600 folder. D-Link Systems, Inc. 18 Double-click My Computer. DSM-G600 User's Manual Accessing the DSM-G600 in Windows® XP Accessing the DSM-G600 in Windows® XP Mapping a Drive As an alternate method, you can access the DSM-G600 by mapping the shared folders in Windows®.
Product Manual
Page 19
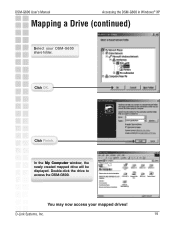
D-Link Systems, Inc. 19 Click OK. Click Finish. Double-click the drive to access the DSM-G600. In the My Computer window, the newly created mapped drive will be displayed. DSM-G600 User's Manual Accessing the DSM-G600 in Windows® XP Mapping a Drive (continued) Select your mapped drives! You may now access your DSM-G600 share folder.
D-Link Systems, Inc. 19 Click OK. Click Finish. Double-click the drive to access the DSM-G600. In the My Computer window, the newly created mapped drive will be displayed. DSM-G600 User's Manual Accessing the DSM-G600 in Windows® XP Mapping a Drive (continued) Select your mapped drives! You may now access your DSM-G600 share folder.

Product Manual
Page 20
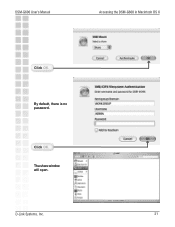
D-Link Systems, Inc. 20 DSM-G600 User's Manual Accessing the DSM-G600 in Macintosh OS X Accessing the DSM-G600 in Macintosh OS X From the desktop Go menu, select Connect to Server. Click DSM-G600. Click Browse.
D-Link Systems, Inc. 20 DSM-G600 User's Manual Accessing the DSM-G600 in Macintosh OS X Accessing the DSM-G600 in Macintosh OS X From the desktop Go menu, select Connect to Server. Click DSM-G600. Click Browse.
Product Manual
Page 21
DSM-G600 User's Manual Accessing the DSM-G600 in Macintosh OS X Click OK. The share window will open. Click OK. D-Link Systems, Inc. 21 By default, there is no password.
DSM-G600 User's Manual Accessing the DSM-G600 in Macintosh OS X Click OK. The share window will open. Click OK. D-Link Systems, Inc. 21 By default, there is no password.