Product Manual
Page 2
Contents Introduction 3 Features and Benefits 4 Package Contents 5 Hardware Overview 6 Getting Started 7 Hardware Installation 8 Enabling UPnP 9 Using the Configuration Utility 11 Accessing the DSM-622H/624H in Windows XP/Me 21 Accessing the DSM-622H/624H in Windows 2000 22 Accessing the DSM-622H/624H in Windows 98SE 25 Accessing the DSM-622H/624H in Macintosh OS X 27 Networking Basics 30 Technical Specifications 41 Technical Support 42 Warranty 43 Registration 46 2
Contents Introduction 3 Features and Benefits 4 Package Contents 5 Hardware Overview 6 Getting Started 7 Hardware Installation 8 Enabling UPnP 9 Using the Configuration Utility 11 Accessing the DSM-622H/624H in Windows XP/Me 21 Accessing the DSM-622H/624H in Windows 2000 22 Accessing the DSM-622H/624H in Windows 98SE 25 Accessing the DSM-622H/624H in Macintosh OS X 27 Networking Basics 30 Technical Specifications 41 Technical Support 42 Warranty 43 Registration 46 2
Product Manual
Page 3
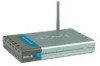
... add high performance storage capacity to extra data storage and file sharing! 3 For added convenience, these digital media storage devices are also hot-swappable and their Fast Ethernet ports are ideal for sharing archived digital photos of standard Ethernet cable - With Mac OS X, the DSM-622H/624H uses Apple's Rendezvous for instantaneous discovery with Windows, Mac OS X and Linux-based computers. Introduction The D-Link MediaLoungeTM Wireless 802.11g Central Home Drive is a versatile 20 Gigabyte (DSM-622H) or a 40 Gigabyte (DSM-624H) portable HDD (Hard Disk Drive) device...
... add high performance storage capacity to extra data storage and file sharing! 3 For added convenience, these digital media storage devices are also hot-swappable and their Fast Ethernet ports are ideal for sharing archived digital photos of standard Ethernet cable - With Mac OS X, the DSM-622H/624H uses Apple's Rendezvous for instantaneous discovery with Windows, Mac OS X and Linux-based computers. Introduction The D-Link MediaLoungeTM Wireless 802.11g Central Home Drive is a versatile 20 Gigabyte (DSM-622H) or a 40 Gigabyte (DSM-624H) portable HDD (Hard Disk Drive) device...
Product Manual
Page 4
... DSM-622H provides up to 20GB of storage space. The DSM-624H provides up to 40GB of storage space. „ High-speed 802.11g wireless data transfer for large media files „ Optional Fast 10/100Base-TX Ethernet Performance „ Instant Discovery of the DSM-622H/624H on UPnP™ or Rendezvous-Enabled Networked Computers „ Versatile, Stackable, Compact size „ Optional Configuration via Web browser for additional storage „ Instant Network Storage and File Sharing...
... DSM-622H provides up to 20GB of storage space. The DSM-624H provides up to 40GB of storage space. „ High-speed 802.11g wireless data transfer for large media files „ Optional Fast 10/100Base-TX Ethernet Performance „ Instant Discovery of the DSM-622H/624H on UPnP™ or Rendezvous-Enabled Networked Computers „ Versatile, Stackable, Compact size „ Optional Configuration via Web browser for additional storage „ Instant Network Storage and File Sharing...
Product Manual
Page 5
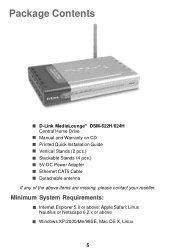
Minimum System Requirements: „ Internet Explorer 5.0 or above „ Windows XP/2000/Me/98SE, Mac OS X, Linux 5 Linux Nautilus or Netscape 6.2.x or above ; Package Contents „ D-Link MediaLoungeTM DSM-622H/624H Central Home Drive „ Manual and Warranty on CD „ Printed Quick Installation Guide „ Vertical Stands (2 pcs.) „ Stackable Stands (4 pcs.) „ 5V DC Power Adapter „ Ethernet CAT5 Cable „ Detachable antenna If any of the above items are missing, please contact your reseller. Apple Safari;
Minimum System Requirements: „ Internet Explorer 5.0 or above „ Windows XP/2000/Me/98SE, Mac OS X, Linux 5 Linux Nautilus or Netscape 6.2.x or above ; Package Contents „ D-Link MediaLoungeTM DSM-622H/624H Central Home Drive „ Manual and Warranty on CD „ Printed Quick Installation Guide „ Vertical Stands (2 pcs.) „ Stackable Stands (4 pcs.) „ 5V DC Power Adapter „ Ethernet CAT5 Cable „ Detachable antenna If any of the above items are missing, please contact your reseller. Apple Safari;
Product Manual
Page 6
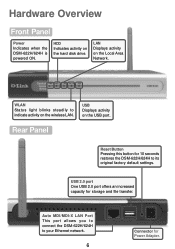
... wireless LAN. Hardware Overview Front Panel Power Indicates when the DSM-622H/624H is powered ON. WLAN Status light blinks steadily to indicate activity on the USB port. Auto MDI/MDI-X LAN Port This port allows you to connect the DSM-622H/624H to its original factory default settings. USB 2.0 port One USB 2.0 port offers an increased capacity for Power Adapter. HDD Indicates activity on the Local Area Network. LAN Displays activity on the hard disk drive. Rear Panel Reset Button Pressing this button for 10 seconds restores the DSM-622H...
... wireless LAN. Hardware Overview Front Panel Power Indicates when the DSM-622H/624H is powered ON. WLAN Status light blinks steadily to indicate activity on the USB port. Auto MDI/MDI-X LAN Port This port allows you to connect the DSM-622H/624H to its original factory default settings. USB 2.0 port One USB 2.0 port offers an increased capacity for Power Adapter. HDD Indicates activity on the Local Area Network. LAN Displays activity on the hard disk drive. Rear Panel Reset Button Pressing this button for 10 seconds restores the DSM-622H...
Product Manual
Page 8
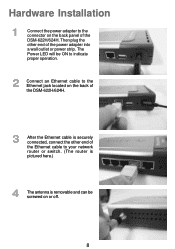
Hardware Installation 1 Connect the power adapter to your network router or switch. (The router is pictured here.) 4 The antenna is securely connected, connect the other end of the DSM-622H/624H. The Power LED will be ON to indicate proper operation. 2 Connect an Ethernet cable to the Ethernet jack located on the back of the DSM-622H/624H. 3 After the Ethernet cable is removable and can be screwed on the back panel of the power adapter into a wall outlet or power strip. Then plug the other end of the Ethernet cable to the connector on or off. 8
Hardware Installation 1 Connect the power adapter to your network router or switch. (The router is pictured here.) 4 The antenna is securely connected, connect the other end of the DSM-622H/624H. The Power LED will be ON to indicate proper operation. 2 Connect an Ethernet cable to the Ethernet jack located on the back of the DSM-622H/624H. 3 After the Ethernet cable is removable and can be screwed on the back panel of the power adapter into a wall outlet or power strip. Then plug the other end of the Ethernet cable to the connector on or off. 8
Product Manual
Page 11
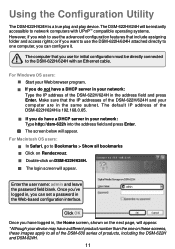
... connected to use for initial configuration must be instantly accessible to network computers with UPnP™ compatible operating systems. However, if you wish to the DSM-622H/624H with an Ethernet cable. Enter the user name: admin and leave the password field blank. Using the Configuration Utility The DSM-622H/624H is 192.168.0.65. „ If you do not have a DHCP server in your network: Type the IP address of the DSM-622H...
... connected to use for initial configuration must be instantly accessible to network computers with UPnP™ compatible operating systems. However, if you wish to the DSM-622H/624H with an Ethernet cable. Enter the user name: admin and leave the password field blank. Using the Configuration Utility The DSM-622H/624H is 192.168.0.65. „ If you do not have a DHCP server in your network: Type the IP address of the DSM-622H...

Product Manual
Page 12
.... DNS is an Internet service that translates domain names into IP addresses Apply: Click Apply to obtain an IP address from a DHCP server. Static IP Address: Enter the address here. When you select No, you through a simple setup. Gateway Address: Enter the address here. Dynamic IP: Select to save the changes. 12 Click Run Wizard and the utility will guide you will appear. Home > Wizard Home > LAN Set as Default Interface: Select Yes for Wireless...
.... DNS is an Internet service that translates domain names into IP addresses Apply: Click Apply to obtain an IP address from a DHCP server. Static IP Address: Enter the address here. When you select No, you through a simple setup. Gateway Address: Enter the address here. Dynamic IP: Select to save the changes. 12 Click Run Wizard and the utility will guide you will appear. Home > Wizard Home > LAN Set as Default Interface: Select Yes for Wireless...
Product Manual
Page 14
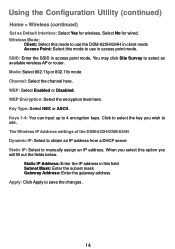
... a DHCP server Static IP: Select to 4 encryption keys. WEP Encryption: Select the encryption level here. Wireless Mode: Client: Select this mode to use the DSM-622H/624H in access point mode. WEP: Select Enabled or Disabled. Keys 1-4: You can input up to manually assign an IP address. When you wish to use . You may click Site Survey to save the changes. 14 Key Type: Select HEX or ASCII. Using the Configuration Utility (continued) Home > Wireless (continued) Set...
... a DHCP server Static IP: Select to 4 encryption keys. WEP Encryption: Select the encryption level here. Wireless Mode: Client: Select this mode to use the DSM-622H/624H in access point mode. WEP: Select Enabled or Disabled. Keys 1-4: You can input up to manually assign an IP address. When you wish to use . You may click Site Survey to save the changes. 14 Key Type: Select HEX or ASCII. Using the Configuration Utility (continued) Home > Wireless (continued) Set...
Product Manual
Page 15
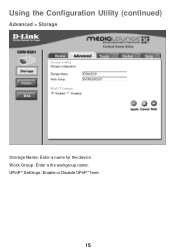
Using the Configuration Utility (continued) Advanced > Storage Storage Name: Enter a name for the device. Work Group: Enter a the workgroup name. UPnP™ Settings: Enable or Disable UPnP™ here. 15
Using the Configuration Utility (continued) Advanced > Storage Storage Name: Enter a name for the device. Work Group: Enter a the workgroup name. UPnP™ Settings: Enable or Disable UPnP™ here. 15

Product Manual
Page 16
... share all the contents of the DSM-622H/624H, the USB LED will light up solidly. Share: Click to safely unplug the USB drive from the DSM-622H/624H. USB Sharing System Unplug: Click to share the folder on the DSM-622H/624H and the USB portable drive. Share Whole Disk: Click to remove the USB device. (When you can create new folders and provide writing or sharing privileges for the folder. Read privileges are enabled by default. Using the Configuration Utility (continued) Advanced > Folder...
... share all the contents of the DSM-622H/624H, the USB LED will light up solidly. Share: Click to safely unplug the USB drive from the DSM-622H/624H. USB Sharing System Unplug: Click to share the folder on the DSM-622H/624H and the USB portable drive. Share Whole Disk: Click to remove the USB device. (When you can create new folders and provide writing or sharing privileges for the folder. Read privileges are enabled by default. Using the Configuration Utility (continued) Advanced > Folder...
Product Manual
Page 17
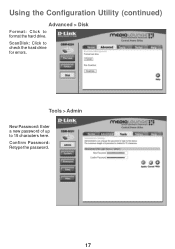
ScanDisk: Click to 15 characters here. Confirm Password: Retype the password. 17 Tools > Admin New Password: Enter a new password of up to check the hard drive for errors. Using the Configuration Utility (continued) Advanced > Disk Format: Click to format the hard drive.
ScanDisk: Click to 15 characters here. Confirm Password: Retype the password. 17 Tools > Admin New Password: Enter a new password of up to check the hard drive for errors. Using the Configuration Utility (continued) Advanced > Disk Format: Click to format the hard drive.
Product Manual
Page 18
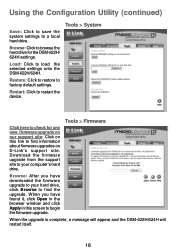
... DSM-622H/624H will restart itself. 18 Download the firmware upgrade from the support site to factory default settings. Browse: Click to browse the hard drive for any new firmware upgrade on our support site: Click on D-Link's support site. When you have found it, click Open in the browser window and click Apply in this link to begin the firmware upgrade. Restart: Click to load the selected settings onto the DSM-622H/624H. Load: Click to restart...
... DSM-622H/624H will restart itself. 18 Download the firmware upgrade from the support site to factory default settings. Browse: Click to browse the hard drive for any new firmware upgrade on our support site: Click on D-Link's support site. When you have found it, click Open in the browser window and click Apply in this link to begin the firmware upgrade. Restart: Click to load the selected settings onto the DSM-622H/624H. Load: Click to restart...
Product Manual
Page 19
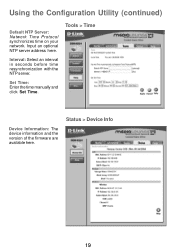
Tools > Time Device Information: The device information and the version of the firmware are available here. Input an optional NTP server address here. Set Time: Enter the time manually and click Set Time. Status > Device Info 19 Using the Configuration Utility (continued) Default NTP Server: Network Time Protocol synchronizes time on your network. Interval: Select an interval in seconds before time resynchronization with the NTP server.
Tools > Time Device Information: The device information and the version of the firmware are available here. Input an optional NTP server address here. Set Time: Enter the time manually and click Set Time. Status > Device Info 19 Using the Configuration Utility (continued) Default NTP Server: Network Time Protocol synchronizes time on your network. Interval: Select an interval in seconds before time resynchronization with the NTP server.
Product Manual
Page 21
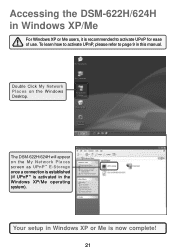
Double Click My Network Places on the My Network Places screen as UPnP™ E-Storage once a connection is established (if UPnP™ is now complete! 21 Your setup in Windows XP or Me is activated in this manual. To learn how to activate UPnP, please refer to activate UPnP for ease of use. The DSM-622H/624H will appear on the Windows Desktop. Accessing the DSM-622H/624H in Windows XP/Me For Windows XP or Me users, it is recommended to page 9 in the Windows XP/Me operating system).
Double Click My Network Places on the My Network Places screen as UPnP™ E-Storage once a connection is established (if UPnP™ is now complete! 21 Your setup in Windows XP or Me is activated in this manual. To learn how to activate UPnP, please refer to activate UPnP for ease of use. The DSM-622H/624H will appear on the Windows Desktop. Accessing the DSM-622H/624H in Windows XP/Me For Windows XP or Me users, it is recommended to page 9 in the Windows XP/Me operating system).
Product Manual
Page 22
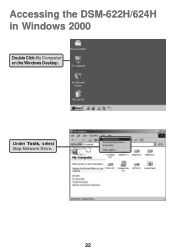
Under Tools, select Map Network Drive. 22 Accessing the DSM-622H/624H in Windows 2000 Double Click My Computer on the Windows Desktop.
Under Tools, select Map Network Drive. 22 Accessing the DSM-622H/624H in Windows 2000 Double Click My Computer on the Windows Desktop.
Product Manual
Page 26
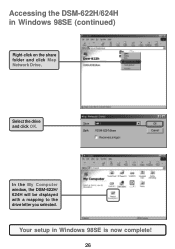
Select the drive and click OK. In the My Computer window, the DSM-622H/ 624H will be displayed with a mapping to the drive letter you selected. Your setup in Windows 98SE (continued) Right-click on the share folder and click Map Network Drive. Accessing the DSM-622H/624H in Windows 98SE is now complete! 26
Select the drive and click OK. In the My Computer window, the DSM-622H/ 624H will be displayed with a mapping to the drive letter you selected. Your setup in Windows 98SE (continued) Right-click on the share folder and click Map Network Drive. Accessing the DSM-622H/624H in Windows 98SE is now complete! 26
Product Manual
Page 29
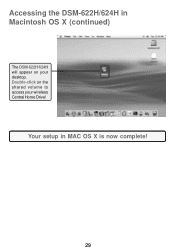
Your setup in Macintosh OS X (continued) The DSM-622H/624H will appear on the shared volume to access your desktop. Accessing the DSM-622H/624H in MAC OS X is now complete! 29 Double-click on your wireless Central Home Drive!
Your setup in Macintosh OS X (continued) The DSM-622H/624H will appear on the shared volume to access your desktop. Accessing the DSM-622H/624H in MAC OS X is now complete! 29 Double-click on your wireless Central Home Drive!
Product Manual
Page 34
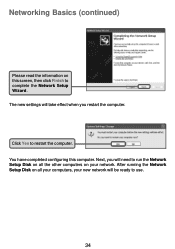
You have completed configuring this screen, then click Finish to use. 34 Next, you restart the computer. After running the Network Setup Disk on all your computers, your network. Click Yes to run the Network Setup Disk on all the other computers on your new network will need to restart the computer. The new settings will take effect when you will be ready to complete the Network Setup Wizard. Networking Basics (continued) Please read the information on this computer.
You have completed configuring this screen, then click Finish to use. 34 Next, you restart the computer. After running the Network Setup Disk on all your computers, your network. Click Yes to run the Network Setup Disk on all the other computers on your new network will need to restart the computer. The new settings will take effect when you will be ready to complete the Network Setup Wizard. Networking Basics (continued) Please read the information on this computer.

Product Manual
Page 44
.... Damage that occurs in the operating manual for the product, and normal maintenance; Expedited shipping is not contemplated in the documentation for the product, or if the model or serial number has been altered, tampered with, defaced or removed; THE SOLE REMEDY FOR A BREACH OF THE FOREGOING LIMITED WARRANTY IS REPAIR, REPLACEMENT OR REFUND OF THE DEFECTIVE OR...
.... Damage that occurs in the operating manual for the product, and normal maintenance; Expedited shipping is not contemplated in the documentation for the product, or if the model or serial number has been altered, tampered with, defaced or removed; THE SOLE REMEDY FOR A BREACH OF THE FOREGOING LIMITED WARRANTY IS REPAIR, REPLACEMENT OR REFUND OF THE DEFECTIVE OR...


