Product Manual
Page 2
Contents Introduction 3 Features and Benefits 3 Package Contents 4 Hardware Overview 5 Getting Started 6 Hardware Installation 7 Accessing the DSM-602H/604H in Windows XP/Me 8 Accessing the DSM-602H/604H in Windows 2000/98 9 Accessing the DSM-602H/604H in Mac OS X 11 Enabling UPnPTM 14 Using the Configuration Utility 16 Networking Basics 22 Technical Specifications 35 Contacting Technical Support 36 Warranty 37 2
Contents Introduction 3 Features and Benefits 3 Package Contents 4 Hardware Overview 5 Getting Started 6 Hardware Installation 7 Accessing the DSM-602H/604H in Windows XP/Me 8 Accessing the DSM-602H/604H in Windows 2000/98 9 Accessing the DSM-602H/604H in Mac OS X 11 Enabling UPnPTM 14 Using the Configuration Utility 16 Networking Basics 22 Technical Specifications 35 Contacting Technical Support 36 Warranty 37 2
Product Manual
Page 3
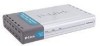
... a DHCP server. all the computers in your LAN will have instant access to home, small business or school networks. These Digital Media Storage devices are ideal for instant detection with Windows, Mac OS X and Linuxbased computers. Introduction The D-Link MediaLoungeTM 10/100Base-TX Fast Ethernet Digital Media Storage is a 20 Gigabyte (DSM-602H) or a 40 Gigabyte (DSM-604H) portable HDD (Hard Disk Drive) device that connects to a hub, switch, or router on your network. For added convenience, these digital media storage devices...
... a DHCP server. all the computers in your LAN will have instant access to home, small business or school networks. These Digital Media Storage devices are ideal for instant detection with Windows, Mac OS X and Linuxbased computers. Introduction The D-Link MediaLoungeTM 10/100Base-TX Fast Ethernet Digital Media Storage is a 20 Gigabyte (DSM-602H) or a 40 Gigabyte (DSM-604H) portable HDD (Hard Disk Drive) device that connects to a hub, switch, or router on your network. For added convenience, these digital media storage devices...
Product Manual
Page 4
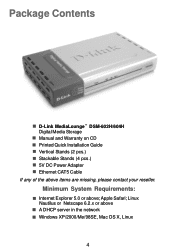
Linux Nautilus or Netscape 6.2.x or above ; Minimum System Requirements: Internet Explorer 5.0 or above A DHCP server in the network Windows XP/2000/Me/98SE, Mac OS X, Linux 4 Apple Safari; Package Contents D-Link MediaLoungeTM DSM-602H/604H Digital Media Storage Manual and Warranty on CD Printed Quick Installation Guide Vertical Stands (2 pcs.) Stackable Stands (4 pcs.) 5V DC Power Adapter Ethernet CAT5 Cable If any of the above items are missing, please contact your reseller.
Linux Nautilus or Netscape 6.2.x or above ; Minimum System Requirements: Internet Explorer 5.0 or above A DHCP server in the network Windows XP/2000/Me/98SE, Mac OS X, Linux 4 Apple Safari; Package Contents D-Link MediaLoungeTM DSM-602H/604H Digital Media Storage Manual and Warranty on CD Printed Quick Installation Guide Vertical Stands (2 pcs.) Stackable Stands (4 pcs.) 5V DC Power Adapter Ethernet CAT5 Cable If any of the above items are missing, please contact your reseller.
Product Manual
Page 5
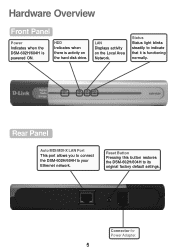
LAN Displays activity on the hard disk drive. Connector for Power Adapter. 5 Rear Panel Auto MDI/MDI-X LAN Port This port allows you to connect the DSM-602H/604H to indicate that it is functioning normally. Status Status light blinks steadily to your Ethernet network. Reset Button Pressing this button restores the DSM-602H/604H to its original factory default settings. HDD Indicates when there is powered ON. Hardware Overview Front Panel Power Indicates when the DSM-602H/604H is activity on the Local Area Network.
LAN Displays activity on the hard disk drive. Connector for Power Adapter. 5 Rear Panel Auto MDI/MDI-X LAN Port This port allows you to connect the DSM-602H/604H to indicate that it is functioning normally. Status Status light blinks steadily to your Ethernet network. Reset Button Pressing this button restores the DSM-602H/604H to its original factory default settings. HDD Indicates when there is powered ON. Hardware Overview Front Panel Power Indicates when the DSM-602H/604H is activity on the Local Area Network.
Product Manual
Page 6
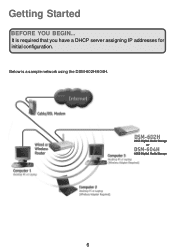
Getting Started BEFORE YOU BEGIN... It is a sample network using the DSM-602H/604H. 20GB Digital Media Storage or DSM-604H 40GB Digital Media Storage 6 Below is required that you have a DHCP server assigning IP addresses for initial configuration.
Getting Started BEFORE YOU BEGIN... It is a sample network using the DSM-602H/604H. 20GB Digital Media Storage or DSM-604H 40GB Digital Media Storage 6 Below is required that you have a DHCP server assigning IP addresses for initial configuration.
Product Manual
Page 7
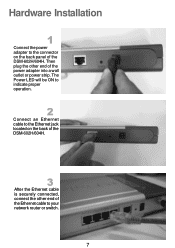
Then plug the other end of the Ethernet cable to the connector on the back of the DSM-602H/604H. 3 After the Ethernet cable is securely connected, connect the other end of the DSM-602H/604H. Hardware Installation 1 Connect the power adapter to your network router or switch. 7 The Power LED will be ON to indicate proper operation. 2 Connect an Ethernet cable to the Ethernet jack located on the back panel of the power adapter into a wall outlet or power strip.
Then plug the other end of the Ethernet cable to the connector on the back of the DSM-602H/604H. 3 After the Ethernet cable is securely connected, connect the other end of the DSM-602H/604H. Hardware Installation 1 Connect the power adapter to your network router or switch. 7 The Power LED will be ON to indicate proper operation. 2 Connect an Ethernet cable to the Ethernet jack located on the back panel of the power adapter into a wall outlet or power strip.
Product Manual
Page 8
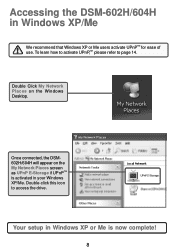
Your setup in your Windows XP/Me. Once connected, the DSM602H/604H will appear on the Windows Desktop. Accessing the DSM-602H/604H in Windows XP/Me We recommend that Windows XP or Me users activate UPnPTM for ease of use. Double Click My Network Places on the My Network Places screen as UPnP E-Storage if UPnPTM is activated in Windows XP or Me is now complete! 8 Double-click this icon to page 14. To learn how to activate UPnP,TM please refer to access the drive.
Your setup in your Windows XP/Me. Once connected, the DSM602H/604H will appear on the Windows Desktop. Accessing the DSM-602H/604H in Windows XP/Me We recommend that Windows XP or Me users activate UPnPTM for ease of use. Double Click My Network Places on the My Network Places screen as UPnP E-Storage if UPnPTM is activated in Windows XP or Me is now complete! 8 Double-click this icon to page 14. To learn how to activate UPnP,TM please refer to access the drive.
Product Manual
Page 9
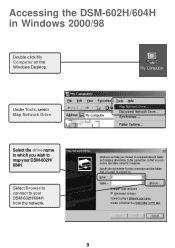
Select Browse to connect to map your DSM-602H/604H from the network. 9 Accessing the DSM-602H/604H in Windows 2000/98 Double-click My Computer on the Windows Desktop. Select the drive name to which you wish to your DSM-602H/ 604H. Under Tools, select Map Network Drive.
Select Browse to connect to map your DSM-602H/604H from the network. 9 Accessing the DSM-602H/604H in Windows 2000/98 Double-click My Computer on the Windows Desktop. Select the drive name to which you wish to your DSM-602H/ 604H. Under Tools, select Map Network Drive.

Product Manual
Page 13
Accessing the DSM-602H/604H in Mac OS X is no password. Double-click on your Digital Media Storage! Your setup in Mac OS X (continued) Click OK By default there is now complete! 13 Click OK The DSM-602H/604H will appear on the shared drive to access your desktop.
Accessing the DSM-602H/604H in Mac OS X is no password. Double-click on your Digital Media Storage! Your setup in Mac OS X (continued) Click OK By default there is now complete! 13 Click OK The DSM-602H/604H will appear on the shared drive to access your desktop.
Product Manual
Page 16
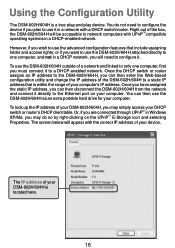
... Web-based configuration utility and change the IP address of the DSM-602H/604H to a static IP address that include assigning folder and access rights; Once the DHCP switch or router assigns an IP address to the DSM-602H/604H, you wish to use the advanced configuration features that is within the range of the box, the DSM-602H/604H will be accessible to configure it. Once you have assigned the static IP address...
... Web-based configuration utility and change the IP address of the DSM-602H/604H to a static IP address that include assigning folder and access rights; Once the DHCP switch or router assigns an IP address to the DSM-602H/604H, you wish to use the advanced configuration features that is within the range of the box, the DSM-602H/604H will be accessible to configure it. Once you have assigned the static IP address...

Product Manual
Page 17
... external hard drive ideal for additional storage capacity over the network. The screen below on the "Run Wizard" button and follow the setup wizard to configure the DSM-604H. *Although your IP address may have logged in, the Home screen will appear. Please click below will appear. Leave the password field blank. Once you wish. Type the IP address of products, including the DSM-602H and DSM-604H. 17 Using the Configuration Utility...
... external hard drive ideal for additional storage capacity over the network. The screen below on the "Run Wizard" button and follow the setup wizard to configure the DSM-604H. *Although your IP address may have logged in, the Home screen will appear. Please click below will appear. Leave the password field blank. Once you wish. Type the IP address of products, including the DSM-602H and DSM-604H. 17 Using the Configuration Utility...
Product Manual
Page 18
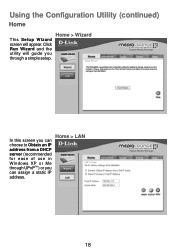
Home > Wizard The DSM-604H is a portable external hard drive ideal for ease of use in Windows XP or Me through UPnPTM ) or you through a simple setup. Home > LAN 18 Please click below on the "Run Wizard" button and follow the setup wizard to Obtain an IP address from a DHCP server (recommended for additional storage capacity over the network. In this screen you can assign a static IP address. Click Run Wizard and the utility will appear. Using the Configuration Utility (continued) Home This Setup Wizard screen will guide you can choose to configure the DSM-604H.
Home > Wizard The DSM-604H is a portable external hard drive ideal for ease of use in Windows XP or Me through UPnPTM ) or you through a simple setup. Home > LAN 18 Please click below on the "Run Wizard" button and follow the setup wizard to Obtain an IP address from a DHCP server (recommended for additional storage capacity over the network. In this screen you can assign a static IP address. Click Run Wizard and the utility will appear. Using the Configuration Utility (continued) Home This Setup Wizard screen will guide you can choose to configure the DSM-604H.
Product Manual
Page 19
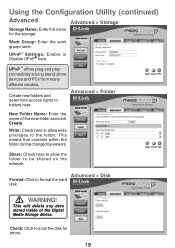
Work Group: Enter the work group name. Advanced > Disk Format: Click to scan the disk for the storage. Using the Configuration Utility (continued) Advanced Advanced > Storage Storage Name: Enter the name for errors. 19 UPnP TM Settings: Enable or Disable UPnPTM here. This means that contents within the folder can be shared on the network. Create new folders and determine access rights to folders here: Advanced > Folder New Folder Name: Enter the name of the Digital Media Storage device. This will delete any data stored inside...
Work Group: Enter the work group name. Advanced > Disk Format: Click to scan the disk for the storage. Using the Configuration Utility (continued) Advanced Advanced > Storage Storage Name: Enter the name for errors. 19 UPnP TM Settings: Enable or Disable UPnPTM here. This means that contents within the folder can be shared on the network. Create new folders and determine access rights to folders here: Advanced > Folder New Folder Name: Enter the name of the Digital Media Storage device. This will delete any data stored inside...
Product Manual
Page 20
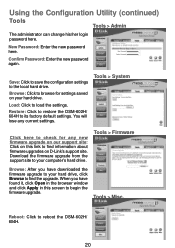
... upgrade. New Password: Enter the new password here. Tools > System Click here to check for settings saved on this screen to find information about firmware upgrades on D-Link's support site. Download the firmware upgrade from the support site to its factory default settings. Confirm Password: Enter the new password again. Restore: Click to restore the DSM-602H/ 604H to your hard drive. Browse: Click to browse for any current settings. Using the Configuration Utility (continued) Tools Tools > Admin The administrator can change...
... upgrade. New Password: Enter the new password here. Tools > System Click here to check for settings saved on this screen to find information about firmware upgrades on D-Link's support site. Download the firmware upgrade from the support site to its factory default settings. Confirm Password: Enter the new password again. Restore: Click to restore the DSM-602H/ 604H to your hard drive. Browse: Click to browse for any current settings. Using the Configuration Utility (continued) Tools Tools > Admin The administrator can change...

Product Manual
Page 21
Using the Configuration Utility (continued) Device information can be viewed here. Help For additional help, click on an item in the Help menu. 21 Status > Device Info Status > Stats Refresh: Click Refresh to update the disk volume information.
Using the Configuration Utility (continued) Device information can be viewed here. Help For additional help, click on an item in the Help menu. 21 Status > Device Info Status > Stats Refresh: Click Refresh to update the disk volume information.

Product Manual
Page 26
In this disk on each of the computers on your needs. You will run this example, Create a Network Setup Disk has been selected. Insert a disk into the disk drive, in this window, select the option that fits your network. Click Next. Click Next. 26 Networking Basics (continued) In this case drive A.
In this disk on each of the computers on your needs. You will run this example, Create a Network Setup Disk has been selected. Insert a disk into the disk drive, in this window, select the option that fits your network. Click Next. Click Next. 26 Networking Basics (continued) In this case drive A.
Product Manual
Page 28
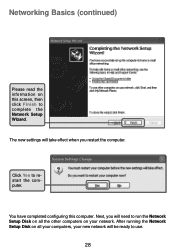
You have completed configuring this screen, then click Finish to run the Network Setup Disk on all your computers, your network. Next, you restart the computer. The new settings will take effect when you will be ready to restart the computer. Click Yes to use. 28 After running the Network Setup Disk on all the other computers on your new network will need to complete the Network Setup Wizard. Networking Basics (continued) Please read the information on this computer.
You have completed configuring this screen, then click Finish to run the Network Setup Disk on all your computers, your network. Next, you restart the computer. The new settings will take effect when you will be ready to restart the computer. Click Yes to use. 28 After running the Network Setup Disk on all the other computers on your new network will need to complete the Network Setup Wizard. Networking Basics (continued) Please read the information on this computer.

Product Manual
Page 35
... Power Input: External Power Supply DC 5V, 2.5A Safety & Emissions: FCC Part 15 Class B UL Physical Dimensions: L = 7.56 inches (192mm) W = 4.57 inches (116mm) H = 1.18 inches (30mm) Weight: 0.86 lbs (388g) Warranty: One year 35 Internet Explorer 5.0 or above, Apple Safari, Linux Nautilus, or Netscape 6.2.x or above. Technical Specifications Standards IEEE 802.3 IEEE 802.3u UPnPTM (Windows/UPnPTM-enabled) Rendezvous (Mac OS X) Management LEDs Web...
... Power Input: External Power Supply DC 5V, 2.5A Safety & Emissions: FCC Part 15 Class B UL Physical Dimensions: L = 7.56 inches (192mm) W = 4.57 inches (116mm) H = 1.18 inches (30mm) Weight: 0.86 lbs (388g) Warranty: One year 35 Internet Explorer 5.0 or above, Apple Safari, Linux Nautilus, or Netscape 6.2.x or above. Technical Specifications Standards IEEE 802.3 IEEE 802.3u UPnPTM (Windows/UPnPTM-enabled) Rendezvous (Mac OS X) Management LEDs Web...

Product Manual
Page 37
Military Installations, addresses with software that substantially conforms to D-Link's functional specifications for the Software or to refund at an Authorized D-Link Service Office. Such repair or replacement will be rendered by D-Link at D-Link's sole discretion. The replacement Hardware need not be free of the defective Hardware. D-Link may in its return policy. Limited Software Warranty: D-Link warrants that the software portion of Columbia, U.S. Submitting A Claim: The customer shall return...
Military Installations, addresses with software that substantially conforms to D-Link's functional specifications for the Software or to refund at an Authorized D-Link Service Office. Such repair or replacement will be rendered by D-Link at D-Link's sole discretion. The replacement Hardware need not be free of the defective Hardware. D-Link may in its return policy. Limited Software Warranty: D-Link warrants that the software portion of Columbia, U.S. Submitting A Claim: The customer shall return...

Product Manual
Page 38
... REPAIR, REPLACEMENT OR REFUND OF THE DEFECTIVE OR NON-CONFORMING PRODUCT. • The customer must submit with the product as part of the claim a written description of the Hardware defect or Software nonconformance in sufficient detail to allow D-Link to confirm the same. • The original product owner must obtain a Return Material Authorization ("RMA") number from the Authorized D-Link Service...
... REPAIR, REPLACEMENT OR REFUND OF THE DEFECTIVE OR NON-CONFORMING PRODUCT. • The customer must submit with the product as part of the claim a written description of the Hardware defect or Software nonconformance in sufficient detail to allow D-Link to confirm the same. • The original product owner must obtain a Return Material Authorization ("RMA") number from the Authorized D-Link Service...


