Product Manual
Page 1
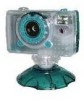
... using or connecting any of the DSC-350. MGI Imaging software 10.User's manual - 1 - Refer to further chapters for purchasing the DSC-350 Dual Mode Camera. The figures below show you want in CD 3. 2xAAA Alkaline Battery 4. Camera Pouch 5. Introduction Thanks for information on installing and using the TWAIN driver interface. DSC-350 2. The User Guide contains information about installing and using the DSC-350 and using the DSC-350. TWAIN Driver in a digital camera and it's easy to Know the Digital Camera The DSC-350...
... using or connecting any of the DSC-350. MGI Imaging software 10.User's manual - 1 - Refer to further chapters for purchasing the DSC-350 Dual Mode Camera. The figures below show you want in CD 3. 2xAAA Alkaline Battery 4. Camera Pouch 5. Introduction Thanks for information on installing and using the TWAIN driver interface. DSC-350 2. The User Guide contains information about installing and using the DSC-350 and using the DSC-350. TWAIN Driver in a digital camera and it's easy to Know the Digital Camera The DSC-350...

Product Manual
Page 2
Front View -Focus Ring -View finder -Lens -LED light -USB connector Rear View -LED light -View finder Top View -Delete/Remain button -Mode/Power button -Shutter release button - 2 -
Front View -Focus Ring -View finder -Lens -LED light -USB connector Rear View -LED light -View finder Top View -Delete/Remain button -Mode/Power button -Shutter release button - 2 -

Product Manual
Page 3
Bottom View -Battery compartment -Cradle hole or Tripod hole Indications Inside the Status LCD display Status LCD Indicators 1.Single snap shot 2.Continuous snap shots (4 images) 3.Self timer 4.Video Recording 5.Frame rate 6.Photo number - 3 -
Bottom View -Battery compartment -Cradle hole or Tripod hole Indications Inside the Status LCD display Status LCD Indicators 1.Single snap shot 2.Continuous snap shots (4 images) 3.Self timer 4.Video Recording 5.Frame rate 6.Photo number - 3 -
Product Manual
Page 4
The image is full. 10.Delete single picture 11. Delete all pictures. 12.USB connected sign 13.SHI - 1024x768 pixels resolution (interpolation) 14.HI - 640 x 480 pixels resolution 15.S - 320x 240 pixels resolution 16.Batteries are drained 2. Installing the DSC-350 System Requirements To take advantage of the full-functionality of the DSC-350, your computer must meet or exceed the system requirements listed below: IBM-PC/AT or compatible with USB port - 4 - 7.REM% - Batteries are fully charged 17. Memory left (percentage) 8.BUSY - Memory is being saved. 9.FULL -
The image is full. 10.Delete single picture 11. Delete all pictures. 12.USB connected sign 13.SHI - 1024x768 pixels resolution (interpolation) 14.HI - 640 x 480 pixels resolution 15.S - 320x 240 pixels resolution 16.Batteries are drained 2. Installing the DSC-350 System Requirements To take advantage of the full-functionality of the DSC-350, your computer must meet or exceed the system requirements listed below: IBM-PC/AT or compatible with USB port - 4 - 7.REM% - Batteries are fully charged 17. Memory left (percentage) 8.BUSY - Memory is being saved. 9.FULL -
Product Manual
Page 5
the bundled imaging software) before downloading pictures to your PC. (1) Turn on your computer. - 5 - Autorun Program You will see the drawing below while you insert the DSC-350 Driver CD into the CD-ROM (3) There are two ways to communicate with 16MB RAM 2.VGA color display (TRUE color mode support is shown on 2 x AAA batteries. 1. Install the TWAIN & Device Drivers The TWAIN driver allows other applications to install the...
the bundled imaging software) before downloading pictures to your PC. (1) Turn on your computer. - 5 - Autorun Program You will see the drawing below while you insert the DSC-350 Driver CD into the CD-ROM (3) There are two ways to communicate with 16MB RAM 2.VGA color display (TRUE color mode support is shown on 2 x AAA batteries. 1. Install the TWAIN & Device Drivers The TWAIN driver allows other applications to install the...
Product Manual
Page 6
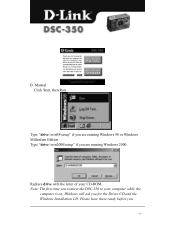
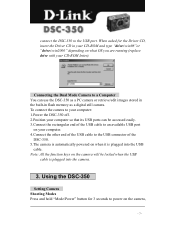
B. Type "drive:\win98\setup" if you are running Windows 2000. Please have these ready before you for the Driver CD and the Windows Installation CD. Type "drive:\win2000\setup" if you are running Windows 98 or Windows Millenium Edition. Note: The first time you connect the DSC-350 to your CD-ROM. Replace drive with the letter of your computer while the computer is on, Windows will ask you - 6 - Manual Click Start, then Run.
B. Type "drive:\win98\setup" if you are running Windows 2000. Please have these ready before you for the Driver CD and the Windows Installation CD. Type "drive:\win2000\setup" if you are running Windows 98 or Windows Millenium Edition. Note: The first time you connect the DSC-350 to your CD-ROM. Replace drive with the letter of your computer while the computer is on, Windows will ask you - 6 - Manual Click Start, then Run.
Product Manual
Page 7
... USB cable. Using the DSC-350 Setting Camera Shooting Modes Press and hold "Mode/Power" button for the Driver CD, insert the Driver CD in flash memory as a PC camera or retrieve/edit images stored in the built-in your CD-ROM and type "drive:\win98"or "drive:\win2000" depending on what OS you are running (replace drive with your CD-ROM letter). To connect the camera to your computer: 1.Power the DSC-350...
... USB cable. Using the DSC-350 Setting Camera Shooting Modes Press and hold "Mode/Power" button for the Driver CD, insert the Driver CD in flash memory as a PC camera or retrieve/edit images stored in the built-in your CD-ROM and type "drive:\win98"or "drive:\win2000" depending on what OS you are running (replace drive with your CD-ROM letter). To connect the camera to your computer: 1.Power the DSC-350...
Product Manual
Page 8
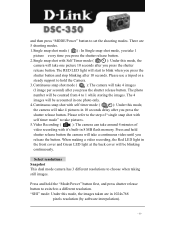
... to set the shooting modes. "SHI" mode: Under this mode, the images taken are 5 shooting modes. 1.Single snap shot mode ( ) : In Single snap shot mode, you take 1 picture every time you press the shutter release button. 2.Single snap shot with Self Timer mode ( ): Under this mode, the camera will start to take pictures. 5.Video Recording ( ): The camera can take 4 pictures in 8 MB flash memory. The 4 images will take 4 images (1image per second) after you press the shutter release button. Press and hold the Camera. 3.Continuous snap shot mode ( ): The camera will...
... to set the shooting modes. "SHI" mode: Under this mode, the images taken are 5 shooting modes. 1.Single snap shot mode ( ) : In Single snap shot mode, you take 1 picture every time you press the shutter release button. 2.Single snap shot with Self Timer mode ( ): Under this mode, the camera will start to take pictures. 5.Video Recording ( ): The camera can take 4 pictures in 8 MB flash memory. The 4 images will take 4 images (1image per second) after you press the shutter release button. Press and hold the Camera. 3.Continuous snap shot mode ( ): The camera will...
Product Manual
Page 9
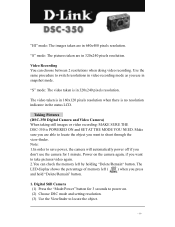
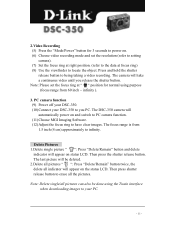
...'t use in snapshot mode. The LED display shows the percentage of memory left ( ) when you want to shoot through the view-finder. "S" mode: The pictures taken are in 640x480 pixels resolution. The video taken is in 160x120 pixels resolution when there is POWERED ON and SET AT THE MODE YOU NEED. Taking Pictures (DSC-350 Digital Camera and Video Camera) When taking still images or video recording: MAKE SURE THE DSC-350 is no resolution indicator in the status LCD. "S" mode...
...'t use in snapshot mode. The LED display shows the percentage of memory left ( ) when you want to shoot through the view-finder. "S" mode: The pictures taken are in 640x480 pixels resolution. The video taken is in 160x120 pixels resolution when there is POWERED ON and SET AT THE MODE YOU NEED. Taking Pictures (DSC-350 Digital Camera and Video Camera) When taking still images or video recording: MAKE SURE THE DSC-350 is no resolution indicator in the status LCD. "S" mode...
Product Manual
Page 10
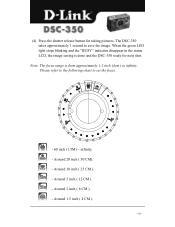
Note: The focus range is done and the DSC-350 ready for taking pictures. Around 1.5 inch ( 4 CM ). - 10 - (4) Press the shutter release button for next shot. When the green LED light stops blinking and the "BUSY" indicator disappear in the status LCD, the image saving is from approximately 1.5 inch (4cm ) to set the focus. - 60 inch (1.5M) ~ infinity. - Around 10 inch ( 25 CM ). - Around 5 inch ( 12 CM ). - Around 2 inch ( 6 CM ). - Please refer to the following chart to infinity. The DSC-350 takes approximately 1 second to save the image. Around 20 inch ( 50 CM). -
Note: The focus range is done and the DSC-350 ready for taking pictures. Around 1.5 inch ( 4 CM ). - 10 - (4) Press the shutter release button for next shot. When the green LED light stops blinking and the "BUSY" indicator disappear in the status LCD, the image saving is from approximately 1.5 inch (4cm ) to set the focus. - 60 inch (1.5M) ~ infinity. - Around 10 inch ( 25 CM ). - Around 5 inch ( 12 CM ). - Around 2 inch ( 6 CM ). - Please refer to the following chart to infinity. The DSC-350 takes approximately 1 second to save the image. Around 20 inch ( 50 CM). -
Product Manual
Page 11
... deleted. 2.Delete all pictures " ": Press "Delete/Remain" button twice, the delete all the pictures. The DSC-350 camera will appear on and switch to PC camera function. (11)Choose MGI Imaging Software. (12)Adjust the focus ring to have clear images. Delete Pictures 1.Delete single picture " ": Press "Delete/Remain" button and delete indicator will automatically power on status LCD. Then press shutter release button to erase all indicator will take a continuous video until you PC. Then press the shutter release button. The last picture will be done using purpose (focus...
... deleted. 2.Delete all pictures " ": Press "Delete/Remain" button twice, the delete all the pictures. The DSC-350 camera will appear on and switch to PC camera function. (11)Choose MGI Imaging Software. (12)Adjust the focus ring to have clear images. Delete Pictures 1.Delete single picture " ": Press "Delete/Remain" button and delete indicator will automatically power on status LCD. Then press shutter release button to erase all indicator will take a continuous video until you PC. Then press the shutter release button. The last picture will be done using purpose (focus...
Product Manual
Page 12
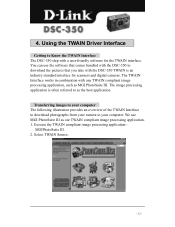
... application is often referred to download the pictures that you take with the DSC-350 TWAIN is an industry standard interface for the TWAIN interface. We use the software that comes bundled with the DSC-350 to as MGI PhotoSuite III. The TWAIN Interface works in combination with a user-friendly software for scanners and digital cameras. Execute the TWAIN compliant image processing application : MGIPhotoSuite III...
... application is often referred to download the pictures that you take with the DSC-350 TWAIN is an industry standard interface for the TWAIN interface. We use the software that comes bundled with the DSC-350 to as MGI PhotoSuite III. The TWAIN Interface works in combination with a user-friendly software for scanners and digital cameras. Execute the TWAIN compliant image processing application : MGIPhotoSuite III...
Product Manual
Page 13
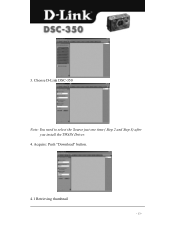
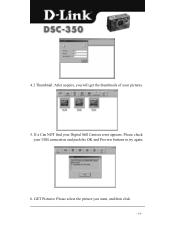
3. Choose D-Link DSC-350 Note: You need to select the Source just one time ( Step 2 and Step 3) after you install the TWAIN Driver. 4. Acquire: Push "Download" button. 4.1 Retrieving thumbnail - 13 -
3. Choose D-Link DSC-350 Note: You need to select the Source just one time ( Step 2 and Step 3) after you install the TWAIN Driver. 4. Acquire: Push "Download" button. 4.1 Retrieving thumbnail - 13 -
Product Manual
Page 14
GET Pictures: Please select the picture you will get the thumbnails of your USB connection and push the OK and Preview buttons to try again. 6. 4.2 Thumbnail: After acquire, you want, and then click - 14 - If a Can NOT find your Digital Still Camera error appears: Please check your pictures. 5.
GET Pictures: Please select the picture you will get the thumbnails of your USB connection and push the OK and Preview buttons to try again. 6. 4.2 Thumbnail: After acquire, you want, and then click - 14 - If a Can NOT find your Digital Still Camera error appears: Please check your pictures. 5.
Product Manual
Page 15
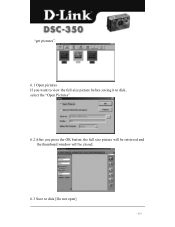
"get pictures". 6.1 Open pictures If you want to view the full-size picture before saving it to disk, select the "Open Pictures" 6.2 After you press the OK button, the full size picture will be retrieved and the thumbnail window will be closed. 6.3 Save to disk [Do not open] - 15 -
"get pictures". 6.1 Open pictures If you want to view the full-size picture before saving it to disk, select the "Open Pictures" 6.2 After you press the OK button, the full size picture will be retrieved and the thumbnail window will be closed. 6.3 Save to disk [Do not open] - 15 -
Product Manual
Page 16
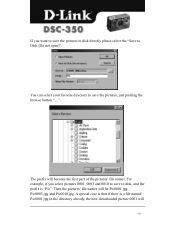
Then the pictures' file names will become the first part of the pictures' file names. You can select your favorite directory to save to disk, and the prefix is a file named Pic0001.jpg in the directory already, the new downloaded picture 0001 will - 16 - The prefix will be Pic0001 jpg, Pic0003.jpg and Pic0010.jpg. For example, if you want to save the pictures to disk directly please select the "Save to Disk [Do not open]". A special case is that if there is "Pic". If you select pictures 0001, 0003 and 0010 to save the pictures, just pushing the browse button "...".
Then the pictures' file names will become the first part of the pictures' file names. You can select your favorite directory to save to disk, and the prefix is a file named Pic0001.jpg in the directory already, the new downloaded picture 0001 will - 16 - The prefix will be Pic0001 jpg, Pic0003.jpg and Pic0010.jpg. For example, if you want to save the pictures to disk directly please select the "Save to Disk [Do not open]". A special case is that if there is "Pic". If you select pictures 0001, 0003 and 0010 to save the pictures, just pushing the browse button "...".
Product Manual
Page 17
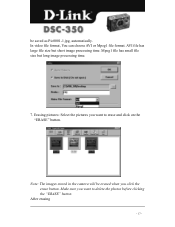
be erased when you want to delete the photos before clicking the "ERASE" button. In video file format, You can choose AVI or Mpeg1 file format. Erasing pictures: Select the pictures you want to erase and click on the "ERASE" button. Make sure you click the erase button. Note: The images stored in the camera will be saved as Pic0001-1.jpg, automatically. After erasing - 17 - Mpeg1 file has small file size but short image processing time. AVI file has large file size but long image processing time. 7.
be erased when you want to delete the photos before clicking the "ERASE" button. In video file format, You can choose AVI or Mpeg1 file format. Erasing pictures: Select the pictures you want to erase and click on the "ERASE" button. Make sure you click the erase button. Note: The images stored in the camera will be saved as Pic0001-1.jpg, automatically. After erasing - 17 - Mpeg1 file has small file size but short image processing time. AVI file has large file size but long image processing time. 7.
Product Manual
Page 18
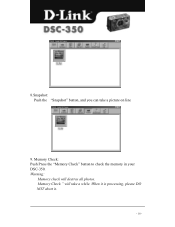
When it is processing, please DO NOT abort it. - 18 - 8.Snapshot: Push the "Snapshot" button, and you can take a while. Memory Check " will destroy all photos. Warning: Memory check will take a picture on line 9. Memory Check: Push Press the "Memory Check" button to check the memory in your DSC-350.
When it is processing, please DO NOT abort it. - 18 - 8.Snapshot: Push the "Snapshot" button, and you can take a while. Memory Check " will destroy all photos. Warning: Memory check will take a picture on line 9. Memory Check: Push Press the "Memory Check" button to check the memory in your DSC-350.
Product Manual
Page 19
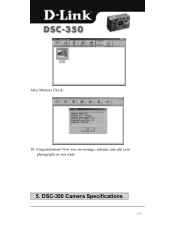
Now you can manage, enhance and edit your photographs as you want. 5. DSC-350 Camera Specifications - 19 - After Memory Check: 10. Congratulations!
Now you can manage, enhance and edit your photographs as you want. 5. DSC-350 Camera Specifications - 19 - After Memory Check: 10. Congratulations!
Product Manual
Page 20
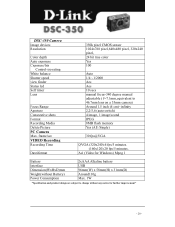
... improvement" - 20 - DSC-350 Camera Image devices Resolution Color depth Auto exposure Cxposure/lris Control-iso rating White balance Shutter speed view finder Status lcd Self timer Lens Focus Range Aperture Consecutive shots Format Recording Media Delete Picture PC Camera Max. frame/sec VIDEO Recording Recording Time Dateiformat 350k pixel CMOS sensor 1024x768 pixel,640x480 pixel, 320x240 pixel, 24 bit true color Yes 100 Auto 1/4 ~1/2000 Aes Aes 10 secs manual focus-340 degree manual adjustable ( f=7.1mm,equivalent to change without Battery) Power Consumption USB 96mm(W) x 58mm(H) x 31mm...
... improvement" - 20 - DSC-350 Camera Image devices Resolution Color depth Auto exposure Cxposure/lris Control-iso rating White balance Shutter speed view finder Status lcd Self timer Lens Focus Range Aperture Consecutive shots Format Recording Media Delete Picture PC Camera Max. frame/sec VIDEO Recording Recording Time Dateiformat 350k pixel CMOS sensor 1024x768 pixel,640x480 pixel, 320x240 pixel, 24 bit true color Yes 100 Auto 1/4 ~1/2000 Aes Aes 10 secs manual focus-340 degree manual adjustable ( f=7.1mm,equivalent to change without Battery) Power Consumption USB 96mm(W) x 58mm(H) x 31mm...

