D-Link DSB-C310 - VisualStream Web Camera Support and Manuals
Get Help and Manuals for this D-Link item
View All Support Options Below
Free D-Link DSB-C310 manuals!
Problems with D-Link DSB-C310?
Ask a Question
Free D-Link DSB-C310 manuals!
Problems with D-Link DSB-C310?
Ask a Question
Most Recent D-Link DSB-C310 Questions

I Need A Driver For Windows 7 64 Bit For The Webcam Model Dlink Dsb-c310
(Posted by glayones 11 years ago)

I Want Connect Pc Camera D-link Dsb-c310
(Posted by jmana 12 years ago)
Popular D-Link DSB-C310 Manual Pages
Product Manual - Page 2
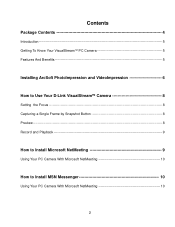
... PC Camera 5 Features And Benefits 5
Installing ArcSoft PhotoImpression and VideoImpression 6
How to Use Your D-Link VisualStreamTM Camera 8
Setting the Focus 8 Capturing a Single Frame by Snapshot Button 8 Preview 8 Record and Playback 9
How to Install Microsoft NetMeeting 9
Using Your PC Camera With Microsoft NetMeeting 10
How to Install MSN Messenger 10
Using Your PC Camera...
Product Manual - Page 4
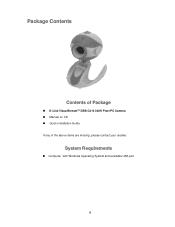
System Requirements
„ Computer with Windows Operating System and available USB port
4 Package Contents
Contents of Package
„ D-Link VisualStreamTM DSB-C310 300K Pixel PC Camera „ Manual on CD „ Quick Installation Guide If any of the above items are missing, please contact your reseller.
Product Manual - Page 5

... software. This manual will guide you through the features of your new PC Camera and provides step by step instructions for getting you for all of your e-communications. Introduction
Thank you started with Microsoft NetMeeting
„
Add Video Messages to start creating digital content and enabling video communication is a complete audio visual solution for purchasing the D-Link DSB...
Product Manual - Page 8
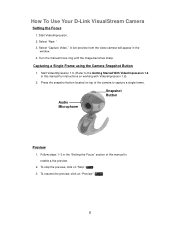
... of this manual for instructions on top of the camera to capture a single frame.
Audio Microphone
Snapshot Button
Preview
1.
To stop the preview, click on "Preview" ( ).
8 How To Use Your D-Link VisualStream Camera
Setting the Focus
1. Start VideoImpression. 2. Select "New. A live preview.
2. To resume the preview, click on "Stop" ( ). 3. Follow steps 1~3 in the
window...
Product Manual - Page 9

...Install Microsoft NetMeeting
For Windows 98SE/Me Users
Click Start, point to Programs, point to Accessories, point to the Edit Board.
4.
NOTE: The Location and Comments information is optional), and then type the name of the directory server in the dialog box and click OK.
Follow steps 1~3 in the "Setting...a live preview.
2. Click Next, follow the instructions in this is optional.
2.
Product Manual - Page 10
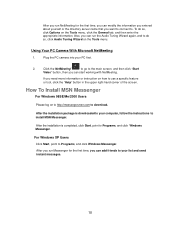
... "Start
Video" button, then you want to connect to Programs, and click Windows Messenger.
After the installation is downloaded to your computer, follow the instructions to Programs, and click Windows Messenger.
Plug the PC camera into your list and send instant messages.
10 Using Your PC Camera With Microsoft NetMeeting
1.
After you run Messenger for the first time, you...
Product Manual - Page 12

...), AVI, MOV, or MPEG (PC only) format (See
the Save As windows below). - Control Buttons (1) Tips ("!") toggles pop-up tool tips on the following :
1. You can create movies by using Help. (3) Minimize ("-") moves VideoImpression to specific frames in the Windows
taskbar. (4) Close ("x") closes VideoImpression. Working with Albums
You can learn more about program functions...
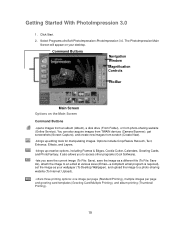
Product Manual - Page 13

... Capture -
After clicking this icon, select the device you to use, and follow the procedures provided for supported file formats on the Storyboard. ( Note: You can play, save, and email your computer to add ...through your movie.
13
allows you íd like digital cameras and scanners.
opens a window that device. Acquire - Selecting "New" will bring up a new, empty album.
Product Manual - Page 19
...Software).
-lets you save the current image (To File: Save), save the image as a different file (To File: Save As), attach the image to an email at various sizes (Email-a compliant email program is required), set... devices (Camera/Scanner), get screenshots (Screen Capture), and create new images from photo-sharing website (Online Service). Command Buttons
Navigation Window
Magnification Controls...
Product Manual - Page 21

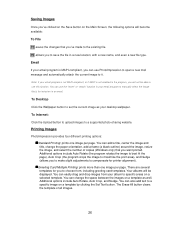
... The Internet
1. Follow the instructions onscreen to download images from the supported photosharing website.
4. A Browse for acquired images, setting the save directory, and specifying the file name prefix.
5. Thumbnails of the images within the selected folder will appear.
3.
From the added. Click the Get Photo button.
2. Click the Online Service button, and then click the...
Product Manual - Page 26
...on a template as your email program to a supported photo-sharing website. Additional options include Auto Rotate, ...set the current image as well. The Erase All button clears the template of copies (Windows...:
Click the Upload button to upload images to manually select the image file(s) for inclusion in a ... templates. Note: If your album to specific areas on a selected template. There are...
Product Manual - Page 28
... to D-Link's then current functional specifications for the Software, as set forth below applicable to the product type ("Warranty Period"), except as follows:
· Hardware (excluding power supplies and fans) One (1) Year · Power Supplies and Fans One (1) Year · Spare parts and spare kits Ninety (90) days
D-Link's sole obligation shall be to repair or replace the...
Product Manual - Page 29

..., the sellers, or the liquidators expressly disclaim their warranty obligation pertaining to the product. Any hardware, software, firmware or other products or services provided by anyone other than D-Link; Repair by anyone other than D-Link or an Authorized D-Link Service Office will void this limited warranty must be packaged securely in the original or other suitable shipping package...
Product Manual - Page 30
... A BREACH OF THE FOREGOING LIMITED WARRANTY IS REPAIR, REPLACEMENT OR REFUND OF THE DEFECTIVE OR NON-CONFORMING PRODUCT. Other trademarks or registered trademarks are subject to change without permission from state to take adequate measures.
Copyright Statement: No part of 1976. THE MAXIMUM LIABILITY OF DLINK UNDER THIS WARRANTY IS LIMITED TO THE PURCHASE...
Product Manual - Page 32

and Canadian customers can find software updates and user documentation on this product.
D-Link Technical Support over the Internet: http://support.dlink.com email:support@dlink.com
Tech Support for customers within Canada:
D-Link Technical Support over the Telephone: (800) 361-5265 Monday to Friday 7:30am to 12:00am EST D-Link Technical Support over the Telephone: (877) 453-5465 24 hours...
D-Link DSB-C310 Reviews
We have not received any reviews for D-Link yet.