Product Manual
Page 2
Contents Package Contents 4 Introduction 5 Getting To Know Your VisualStreamTM PC Camera 5 Features And Benefits 5 Installing ArcSoft PhotoImpression and VideoImpression 6 How to Use Your D-Link VisualStreamTM Camera 8 Setting the Focus 8 Capturing a Single Frame by Snapshot Button 8 Preview 8 Record and Playback 9 How to Install Microsoft NetMeeting 9 Using Your PC Camera With Microsoft NetMeeting 10 How to Install MSN Messenger 10 Using Your PC Camera With Microsoft NetMeeting 10 2
Contents Package Contents 4 Introduction 5 Getting To Know Your VisualStreamTM PC Camera 5 Features And Benefits 5 Installing ArcSoft PhotoImpression and VideoImpression 6 How to Use Your D-Link VisualStreamTM Camera 8 Setting the Focus 8 Capturing a Single Frame by Snapshot Button 8 Preview 8 Record and Playback 9 How to Install Microsoft NetMeeting 9 Using Your PC Camera With Microsoft NetMeeting 10 How to Install MSN Messenger 10 Using Your PC Camera With Microsoft NetMeeting 10 2
Product Manual
Page 4
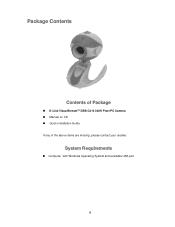
System Requirements „ Computer with Windows Operating System and available USB port 4 Package Contents Contents of Package „ D-Link VisualStreamTM DSB-C310 300K Pixel PC Camera „ Manual on CD „ Quick Installation Guide If any of the above items are missing, please contact your reseller.
System Requirements „ Computer with Windows Operating System and available USB port 4 Package Contents Contents of Package „ D-Link VisualStreamTM DSB-C310 300K Pixel PC Camera „ Manual on CD „ Quick Installation Guide If any of the above items are missing, please contact your reseller.

Product Manual
Page 5
... started with Microsoft NetMeeting „ Add Video Messages to start creating digital content and enabling video communication is a complete audio visual solution for purchasing the D-Link DSB-C310 VisualStreamTM PC Camera. Talk to your family, friends, and colleagues face-to-face over the Internet, create videos, digital photo albums, and more, all the software needed to Your Email „ Create VideoAlbums and Video Presentations „ Create Personalized Greeting Cards...
... started with Microsoft NetMeeting „ Add Video Messages to start creating digital content and enabling video communication is a complete audio visual solution for purchasing the D-Link DSB-C310 VisualStreamTM PC Camera. Talk to your family, friends, and colleagues face-to-face over the Internet, create videos, digital photo albums, and more, all the software needed to Your Email „ Create VideoAlbums and Video Presentations „ Create Personalized Greeting Cards...

Product Manual
Page 6
Installing ArcSoft® PhotoImpression™ and VideoImpression™ Click Install Software Click D-Link® VGA WebCam Driver Click Install ArcSoft® PhotoImpression™ Click OK Click Next 6
Installing ArcSoft® PhotoImpression™ and VideoImpression™ Click Install Software Click D-Link® VGA WebCam Driver Click Install ArcSoft® PhotoImpression™ Click OK Click Next 6
Product Manual
Page 8
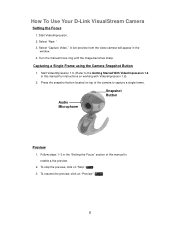
... "Capture Video." Turn the manual focus ring until the image becomes sharp. How To Use Your D-Link VisualStream Camera Setting the Focus 1. Audio Microphone Snapshot Button Preview 1. To stop the preview, click on top of this manual for instructions on "Preview" ( ). 8 Start VideoImpression. 2. A live preview. 2. Capturing a Single Frame using the Camera Snapshot Button 1. Select "New. Start VideoImpression 1.6. (Refer to the Getting Started With VideoImpression 1.6 in this manual to enable a live preview from the video camera will appear in the "Setting the Focus...
... "Capture Video." Turn the manual focus ring until the image becomes sharp. How To Use Your D-Link VisualStream Camera Setting the Focus 1. Audio Microphone Snapshot Button Preview 1. To stop the preview, click on top of this manual for instructions on "Preview" ( ). 8 Start VideoImpression. 2. A live preview. 2. Capturing a Single Frame using the Camera Snapshot Button 1. Select "New. Start VideoImpression 1.6. (Refer to the Getting Started With VideoImpression 1.6 in this manual to enable a live preview from the video camera will appear in the "Setting the Focus...

Product Manual
Page 9
To save captured video, click on "Add" or from the drop down menu. For Windows 2000 Users Click Start, point to Programs, point to Accessories, point to enable a live preview. 2. Click Next, click and select the Log into a directory server when NetMeeting starts check box (this directory check box. 3. Follow steps 1~3 in the "Setting the Focus" section to Communications, and click Netmeeting. Select the source...
To save captured video, click on "Add" or from the drop down menu. For Windows 2000 Users Click Start, point to Programs, point to Accessories, point to enable a live preview. 2. Click Next, click and select the Log into a directory server when NetMeeting starts check box (this directory check box. 3. Follow steps 1~3 in the "Setting the Focus" section to Communications, and click Netmeeting. Select the source...
Product Manual
Page 10
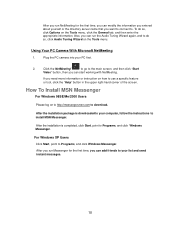
... installation is downloaded to your computer, follow the instructions to Programs, and click Windows Messenger. To do so, click Audio Tuning Wizard on to http://messenger.msn.com to Programs, and click Windows Messenger. After the installation package is completed, click Start, point to install MSN Messenger. Using Your PC Camera With Microsoft NetMeeting 1. Click the NetMeeting" to go to the main screen, and then click "Start Video" button...
... installation is downloaded to your computer, follow the instructions to Programs, and click Windows Messenger. To do so, click Audio Tuning Wizard on to http://messenger.msn.com to Programs, and click Windows Messenger. After the installation package is completed, click Start, point to install MSN Messenger. Using Your PC Camera With Microsoft NetMeeting 1. Click the NetMeeting" to go to the main screen, and then click "Start Video" button...

Product Manual
Page 11
... main screen. Select Programs>ArcSoft VideoImpression>VideoImpression. Using Your PC Camera With MSN Messenger Plug the PC camera into your PC first. For Windows 98SE/Me/2000 Users Click "Messenger" to go to the main screen, click Actions, click Start a Video Conversation and you need more information or instructions on how to have a Video Conversation with MSN Messenger. Control Buttons Timer Window The View Screen 11 The VideoImpression View Screen...
... main screen. Select Programs>ArcSoft VideoImpression>VideoImpression. Using Your PC Camera With MSN Messenger Plug the PC camera into your PC first. For Windows 98SE/Me/2000 Users Click "Messenger" to go to the main screen, click Actions, click Start a Video Conversation and you need more information or instructions on how to have a Video Conversation with MSN Messenger. Control Buttons Timer Window The View Screen 11 The VideoImpression View Screen...

Product Manual
Page 12
... files. (A MAPI-compliant email program is needed for this option.) Video Playback Controls - You can create movies by using Help. (3) Minimize ("-") moves VideoImpression to specific frames in your work as a black box when no movie is opened (it in ASF (PC only), AVI, MOV, or MPEG (PC only) format (See the Save As windows below). - Control Buttons (1) Tips ("!") toggles pop-up tool tips on the View Screen - saves...
... files. (A MAPI-compliant email program is needed for this option.) Video Playback Controls - You can create movies by using Help. (3) Minimize ("-") moves VideoImpression to specific frames in your work as a black box when no movie is opened (it in ASF (PC only), AVI, MOV, or MPEG (PC only) format (See the Save As windows below). - Control Buttons (1) Tips ("!") toggles pop-up tool tips on the View Screen - saves...

Product Manual
Page 13
... on the Album Screen Select Album - (This button is located immediately to the right of the album name) lets you choose the album you wish to view or work from digital cameras. opens a window that device. You can play, save, and email your computer to add image, movie, or audio file thumbnails to use, and follow the procedures provided for that allows you to browse...
... on the Album Screen Select Album - (This button is located immediately to the right of the album name) lets you choose the album you wish to view or work from digital cameras. opens a window that device. You can play, save, and email your computer to add image, movie, or audio file thumbnails to use, and follow the procedures provided for that allows you to browse...

Product Manual
Page 15
... , save, and email your movie. Brightness Slider - You can add audio files to images. takes you to two different audio files for Still Images Timer Window Still Image Edit Screen Play Movie - You can add up to change the brightness of an image. This is the top slider below the preview window. 15 You can select the font type, style and size. Soundtracks - allows you to the desired location...
... , save, and email your movie. Brightness Slider - You can add audio files to images. takes you to two different audio files for Still Images Timer Window Still Image Edit Screen Play Movie - You can add up to change the brightness of an image. This is the top slider below the preview window. 15 You can select the font type, style and size. Soundtracks - allows you to the desired location...

Product Manual
Page 17
Editing Audio Options on the Audio Edit Screen Play - starts the audio. interrupts the audio (Clicking the button again will resume the audio) Forward - moves the audio backwards Audio Volume - Pause - adjusts the volume of the audio 17 sets the ending point of the audio Starting Mark - moves the audio forward Reverse - sets the beginning point of the audio Ending Mark -
Editing Audio Options on the Audio Edit Screen Play - starts the audio. interrupts the audio (Clicking the button again will resume the audio) Forward - moves the audio backwards Audio Volume - Pause - adjusts the volume of the audio 17 sets the ending point of the audio Starting Mark - moves the audio forward Reverse - sets the beginning point of the audio Ending Mark -
Product Manual
Page 19
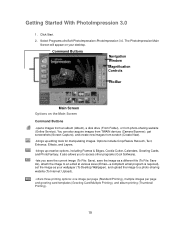
... website (Online Service). Command Buttons Navigation Window Magnification Controls Command Buttons ToolBar Main Screen Options on your wallpaper (To Desktop:Wallpaper), and upload the image to an email at various sizes (Email-a compliant email program is required), set the image as your desktop. It also allows you to access other programs (Cool Software). -lets you save the current image (To File: Save), save the image as a different file (To File: Save As), attach the image to a photo-sharing website (To Internet: Upload). -offers...
... website (Online Service). Command Buttons Navigation Window Magnification Controls Command Buttons ToolBar Main Screen Options on your wallpaper (To Desktop:Wallpaper), and upload the image to an email at various sizes (Email-a compliant email program is required), set the image as your desktop. It also allows you to access other programs (Cool Software). -lets you save the current image (To File: Save), save the image as a different file (To File: Save As), attach the image to a photo-sharing website (To Internet: Upload). -offers...

Product Manual
Page 20
... unsaved change you've made. -reverses the last action you will still be able to see the whole picture in (+), out (-), or reset the image to your image by pressing the Esc key on a specific part of the full screen mode by flipping it . -rotates the image at the user's discretion. -applies a mirror effect to its original, full size (1:1). Even if you zoom...
... unsaved change you've made. -reverses the last action you will still be able to see the whole picture in (+), out (-), or reset the image to your image by pressing the Esc key on a specific part of the full screen mode by flipping it . -rotates the image at the user's discretion. -applies a mirror effect to its original, full size (1:1). Even if you zoom...

Product Manual
Page 21
... Photo button. 2. Follow the instructions onscreen to view. Navigate to the folder that is stored on the Main Screen, and select From Folder. 2. Click the Get Photo button on your source), and follow the directions specific to your hard drive, floppy disk, CD-ROM, etc. 1. Click the Acquire Options button to . 21 Downloading Images From The Internet 1. Click the Online Service button, and then click the Download button...
... Photo button. 2. Follow the instructions onscreen to view. Navigate to the folder that is stored on the Main Screen, and select From Folder. 2. Click the Get Photo button on your source), and follow the directions specific to your hard drive, floppy disk, CD-ROM, etc. 1. Click the Acquire Options button to . 21 Downloading Images From The Internet 1. Click the Online Service button, and then click the Download button...

Product Manual
Page 22
It is recorded in the album file. You can add multiple files at one time by name, type, size, or date. -removes the selected thumbnail(s) from your system. - Album Screen Saver (Windows only) - launches a Find dialog allows you to sort the thumbnails in order to display the various editing options. Editing Images Click the Edit button on the Main Screen, and select Album to...
It is recorded in the album file. You can add multiple files at one time by name, type, size, or date. -removes the selected thumbnail(s) from your system. - Album Screen Saver (Windows only) - launches a Find dialog allows you to sort the thumbnails in order to display the various editing options. Editing Images Click the Edit button on the Main Screen, and select Album to...
Product Manual
Page 26
... the Set Text button. Saving Images Once you've clicked on the Save button on the Main Screen, the following options will be able to use this function. There are several templates for you to choose from your email program is not MAPI-compliant, or if MAPI is not enabled in the program, you to manually select the image file(s) for printer alignment). „Greeting Card/Multiple...
... the Set Text button. Saving Images Once you've clicked on the Save button on the Main Screen, the following options will be able to use this function. There are several templates for you to choose from your email program is not MAPI-compliant, or if MAPI is not enabled in the program, you to manually select the image file(s) for printer alignment). „Greeting Card/Multiple...
Product Manual
Page 28
...: · Hardware (excluding power supplies and fans) One (1) Year · Power Supplies and Fans One (1) Year · Spare parts and spare kits Ninety (90) days D-Link's sole obligation shall be to repair or replace the defective Hardware during the Warranty Period, the magnetic media on approved hardware and operated as set forth in the applicable documentation, from : · D-Link or its authorized...
...: · Hardware (excluding power supplies and fans) One (1) Year · Power Supplies and Fans One (1) Year · Spare parts and spare kits Ninety (90) days D-Link's sole obligation shall be to repair or replace the defective Hardware during the Warranty Period, the magnetic media on approved hardware and operated as set forth in the applicable documentation, from : · D-Link or its authorized...

Product Manual
Page 29
..., alteration, modification, tampering, negligence, misuse, faulty installation, lack of the package. D-Link will only replace the defective portion of the dated purchase invoice for repair, and shipping costs; D-Link may reject or return any manuals or accessories in the operating manual for all shipping charges to power surge, and cosmetic damage; Repair by D-Link not to the product. Submitting A Claim: Any...
..., alteration, modification, tampering, negligence, misuse, faulty installation, lack of the package. D-Link will only replace the defective portion of the dated purchase invoice for repair, and shipping costs; D-Link may reject or return any manuals or accessories in the operating manual for all shipping charges to power surge, and cosmetic damage; Repair by D-Link not to the product. Submitting A Claim: Any...
Product Manual
Page 30
...trademarks or registered trademarks are subject to change without permission from state to which vary from D-Link Corporation/ D-Link Systems, Inc., as translation, transformation, or adaptation without prior notice. Copyright© 2002...installed and used to part 15 of the following measures: · Reorient or relocate the receiving antenna. · Increase the separation between the equipment and receiver. · Connect the equipment into an outlet on , the user is encouraged to try to comply with the instructions, may not apply. FCC Statement: This equipment has been tested...
...trademarks or registered trademarks are subject to change without permission from state to which vary from D-Link Corporation/ D-Link Systems, Inc., as translation, transformation, or adaptation without prior notice. Copyright© 2002...installed and used to part 15 of the following measures: · Reorient or relocate the receiving antenna. · Increase the separation between the equipment and receiver. · Connect the equipment into an outlet on , the user is encouraged to try to comply with the instructions, may not apply. FCC Statement: This equipment has been tested...


