Product Manual
Page 1
D-Link DP-G321 AirPlus G Wireless Print Server Manual Building Networks for People
D-Link DP-G321 AirPlus G Wireless Print Server Manual Building Networks for People
Product Manual
Page 2
... 4 Wireless Basics 8 Installation Considerations 9 Setting up the DP-G321 10 Power On Self Test 11 Using the Web Configuration 12 TCP/IP Printing for Windows XP 30 TCP/IP Printing for Windows 2000 39 TCP/IP Printing for Windows 98SE/Me 49 Unix/Linux Printing (See PS Admin Manual on CD-ROM 61 Setting up AppleTalk or...
... 4 Wireless Basics 8 Installation Considerations 9 Setting up the DP-G321 10 Power On Self Test 11 Using the Web Configuration 12 TCP/IP Printing for Windows XP 30 TCP/IP Printing for Windows 2000 39 TCP/IP Printing for Windows 98SE/Me 49 Unix/Linux Printing (See PS Admin Manual on CD-ROM 61 Setting up AppleTalk or...

Product Manual
Page 3
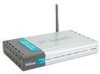
Package Contents Contents of Package: „ D-Link DP-G321 Wireless Multi-port Print Server „ Manual and Warranty on CD „ Printed Quick Installation Guide If any of computers with JavaScript enabled „ The printer must support the required Operating System 3 System Requirements: „ A computer with an ...
Package Contents Contents of Package: „ D-Link DP-G321 Wireless Multi-port Print Server „ Manual and Warranty on CD „ Printed Quick Installation Guide If any of computers with JavaScript enabled „ The printer must support the required Operating System 3 System Requirements: „ A computer with an ...

Product Manual
Page 17
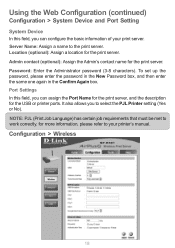
Click the Save button on your printers owner manual for the PJL (Printer Job Language) and print speed supported on the bottom of the main screen to configure the DP-G321 Print Server. Consult your printer. Using the Web Configuration (continued) Configuration Click on the Configuration tab from the tools bar of the configuration page to ensure the settings are updated and saved. 17 System Device and Port Setting This option will show you settings required to enter the configuration page; it provides the configuration options that include System Device and Port Setting.
Click the Save button on your printers owner manual for the PJL (Printer Job Language) and print speed supported on the bottom of the main screen to configure the DP-G321 Print Server. Consult your printer. Using the Web Configuration (continued) Configuration Click on the Configuration tab from the tools bar of the configuration page to ensure the settings are updated and saved. 17 System Device and Port Setting This option will show you settings required to enter the configuration page; it provides the configuration options that include System Device and Port Setting.
Product Manual
Page 18
... the New Password box, and then enter the same one again in the Confirm Again box. NOTE: PJL (Print Job Language) has certain job requirements that must be met to the print server. Configuration > Wireless 18 Password: Enter the Administrator password (3-8 characters). Admin contact (optional): Assign the Admin's ... (continued) Configuration > System Device and Port Setting System Device In this field, you can configure the basic information of your printer's manual. Location (optional): Assign a location for the print server. Port Settings In this field, you to your...
... the New Password box, and then enter the same one again in the Confirm Again box. NOTE: PJL (Print Job Language) has certain job requirements that must be met to the print server. Configuration > Wireless 18 Password: Enter the Administrator password (3-8 characters). Admin contact (optional): Assign the Admin's ... (continued) Configuration > System Device and Port Setting System Device In this field, you can configure the basic information of your printer's manual. Location (optional): Assign a location for the print server. Port Settings In this field, you to your...
Product Manual
Page 19
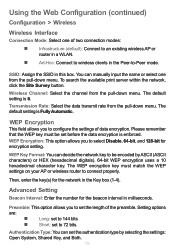
... Automatic. The WEP encryption key must be encoded by selecting the settings: Open System, Shared Key, and Both. 19 To search the available print server within the network, click the Site Survey button. Transmission Rate: Select the data transmit rate from the pull-down menu. WEP Key Format: ...set to 72 bits. WEP Encryption: This option allows you to select Disable, 64-bit, and 128-bit for encryption setting. You can manually input the name or select one of the preamble. WEP Encryption This field allows you to configure the settings of data encryption. Please remember...
... Automatic. The WEP encryption key must be encoded by selecting the settings: Open System, Shared Key, and Both. 19 To search the available print server within the network, click the Site Survey button. Transmission Rate: Select the data transmit rate from the pull-down menu. WEP Key Format: ...set to 72 bits. WEP Encryption: This option allows you to select Disable, 64-bit, and 128-bit for encryption setting. You can manually input the name or select one of the preamble. WEP Encryption This field allows you to configure the settings of data encryption. Please remember...
Product Manual
Page 21
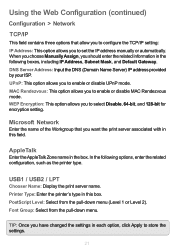
...the following options, enter the related configuration, such as the printer type. USB1 / USB2 / LPT Chooser Name: Display the print server name. When you choose Manually Assign, you should enter the related information in the box. In the following boxes, including IP Address, Subnet Mask, and ... menu. UPnP: This option allows you to set the IP address manually or automatically. Using the Web Configuration (continued) Configuration > Network TCP/IP This field contains three options that you want the print server associated with in this field. TIP: Once you have changed the...
...the following options, enter the related configuration, such as the printer type. USB1 / USB2 / LPT Chooser Name: Display the print server name. When you choose Manually Assign, you should enter the related information in the box. In the following boxes, including IP Address, Subnet Mask, and ... menu. UPnP: This option allows you to set the IP address manually or automatically. Using the Web Configuration (continued) Configuration > Network TCP/IP This field contains three options that you want the print server associated with in this field. TIP: Once you have changed the...

Product Manual
Page 30
... devices to communicate. (For example, if your computer's IP Address should be in the same subnet as the Print Server's IP Address for Windows XP Open the web browser, and type in this manual to find out how to change an IP Address. 30 For example, type http://192.168.0.10 into the....168.0.x, where x is a value between 1-254, excluding 10.) See Networking Basics: Assigning a Static IP Address in the IP Address of 255.255.255.0, then your Print Server's IP Address is 192.168.0.10, with a subnet mask of the DP-G321.
... devices to communicate. (For example, if your computer's IP Address should be in the same subnet as the Print Server's IP Address for Windows XP Open the web browser, and type in this manual to find out how to change an IP Address. 30 For example, type http://192.168.0.10 into the....168.0.x, where x is a value between 1-254, excluding 10.) See Networking Basics: Assigning a Static IP Address in the IP Address of 255.255.255.0, then your Print Server's IP Address is 192.168.0.10, with a subnet mask of the DP-G321.

Product Manual
Page 61
Unix/Linux Printing Please refer to the PS Admin Manual on the CD included with your purchase for information on setting up the Print Server in Unix/Linux. 61
Unix/Linux Printing Please refer to the PS Admin Manual on the CD included with your purchase for information on setting up the Print Server in Unix/Linux. 61
Product Manual
Page 62
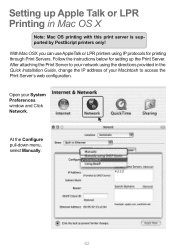
After attaching the Print Server to your network using IP protocols for setting up Apple Talk or LPR Printing in the Quick Installation Guide, change the IP address of your System Preferences window and Click Network. With Mac...printers using the directions provided in Mac OS X Note: Mac OS printing with this print server is supported by PostScript printers only! At the Configure pull-down menu, select Manually. 62 Open your Macintosh to access the Print Server's web configuration. Follow the instructions below for printing through Print Servers. Setting up the Print Server.
After attaching the Print Server to your network using IP protocols for setting up Apple Talk or LPR Printing in the Quick Installation Guide, change the IP address of your System Preferences window and Click Network. With Mac...printers using the directions provided in Mac OS X Note: Mac OS printing with this print server is supported by PostScript printers only! At the Configure pull-down menu, select Manually. 62 Open your Macintosh to access the Print Server's web configuration. Follow the instructions below for printing through Print Servers. Setting up the Print Server.

Product Manual
Page 63
Select the AppleTalk tab in Mac OS X (continued) The default IP address of the Print Server is the IP Address of the Print Server.) The IP Addresses and Subnet Mask shown here are examples only. Setting up Apple Talk or LPR Printing in this window and check Make AppleTalk Active. 63 Manually change your IP Address to 102.168.0.x, where x is any number between 1 and 254 (except 10 which is 192.168.0.10.
Select the AppleTalk tab in Mac OS X (continued) The default IP address of the Print Server is the IP Address of the Print Server.) The IP Addresses and Subnet Mask shown here are examples only. Setting up Apple Talk or LPR Printing in this window and check Make AppleTalk Active. 63 Manually change your IP Address to 102.168.0.x, where x is any number between 1 and 254 (except 10 which is 192.168.0.10.

Product Manual
Page 67
... as its Port Name. The Port Names shown in . Your Print Server can print from any number between 11-254. „ Type 192.168.0.10 into the address field of your Web browser. 192.168.0.10 is the default IP Address of the DP-G321. „ Select the Network tab and scroll to the bottom... to the AppleTalk protocol section. „ If your AppleTalk network is the same as most of the network printers in your AppleTalk zone. You can be used with this manual are using the EtherTalk transport...
... as its Port Name. The Port Names shown in . Your Print Server can print from any number between 11-254. „ Type 192.168.0.10 into the address field of your Web browser. 192.168.0.10 is the default IP Address of the DP-G321. „ Select the Network tab and scroll to the bottom... to the AppleTalk protocol section. „ If your AppleTalk network is the same as most of the network printers in your AppleTalk zone. You can be used with this manual are using the EtherTalk transport...

Product Manual
Page 86
... request. The repaired or replaced packages will not be rejected by anyone other suitable shipping package to D-Link. Operational adjustments covered in the operating manual for the product, and normal maintenance; Products that it will either be held responsible for any product ...REPAIR, REPLACEMENT OR REFUND OF THE DEFECTIVE OR NONCONFORMING PRODUCT. D-Link will be packaged securely in the original or other than D-Link or an Authorized D-Link Service Office will not ship back any manuals or accessories in the shipping package. THE FOREGOING EXPRESS WRITTEN WARRANTIES...
... request. The repaired or replaced packages will not be rejected by anyone other suitable shipping package to D-Link. Operational adjustments covered in the operating manual for the product, and normal maintenance; Products that it will either be held responsible for any product ...REPAIR, REPLACEMENT OR REFUND OF THE DEFECTIVE OR NONCONFORMING PRODUCT. D-Link will be packaged securely in the original or other than D-Link or an Authorized D-Link Service Office will not ship back any manuals or accessories in the shipping package. THE FOREGOING EXPRESS WRITTEN WARRANTIES...


