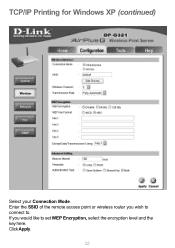
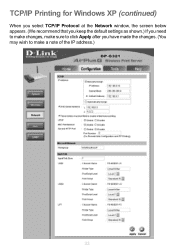
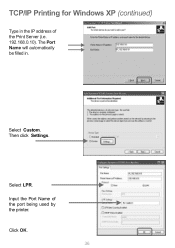
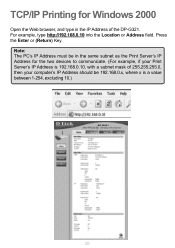
Product Manual
Page 2
Contents Package Contents 3 Introduction 4 Wireless Basics 8 Installation Considerations 9 Setting up the DP-G321 10 Power On Self Test 11 Using the Web Configuration 12 TCP/IP Printing for Windows XP 30 TCP/IP Printing for Windows 2000 39 TCP/IP Printing for Windows 98SE/Me 49 Unix/Linux Printing (See PS Admin Manual on CD-ROM 61 Setting up AppleTalk...
Product Manual
Page 3
...; Windows XP/2000/Me/98SE, Mac OS with AppleTalk , or Linux A computer or a network of the above , with JavaScript enabled The printer must support the required Operating System 3 Package Contents Contents of Package: D-Link DP-G321 Wireless Multi-port Print Server ... Manual and Warranty on CD Printed Quick Installation Guide If any of computers with wireless capability Internet Explorer 6.0, or Netscape ...
Product Manual
Page 4
... one standard parallel port, the DP-G321 is very portable and inexpensive compared to a PC-based print server, and the Print Server connects to your file servers and allows the file servers' full capacity to be deployed to locations of maximum convenience to users. 4 Introduction The D-Link DP-G321 Print Server is an 802.11g wireless Multi-Port Print Server that allows you to connect...
Product Manual
Page 5
... rear panel. The DP-G321 offers extraordinary flexibility, operating with all major network operating systems and protocols: TCP/IP UNIX lpr/lpd Windows NT/2000, Windows 95/98SE/Me, Windows XP NetWare 5.x NDPS LPR Remote Printing NetBEUI Windows 2000/XP, Windows 95/98SE/Me, Microsoft LAN Manager, IBM LAN Server AppleTalk MacOS EtherTalk Windows-based setup and...
Product Manual
Page 30
... be 192.168.0.x, where x is a value between 1-254, excluding 10.) See Networking Basics: Assigning a Static IP Address in the same subnet as the Print Server's IP Address for Windows XP Open the web browser, and type in the IP Address of 255.255.255.0, then your computer's IP Address should be in this...
Product Manual
Page 31
You will need this information later in the configuration process. 31 TCP/IP Printing for Windows XP (continued) At the Configuration window, write down the Port Names for future reference.
Product Manual
Page 32
Enter the SSID of the remote access point or wireless router you would like to . Click Apply. 32 If you wish to connect to set WEP Encryption, select the encryption level and the key here. TCP/IP Printing for Windows XP (continued) Select your Connection Mode.
Product Manual
Page 33
TCP/IP Printing for Windows XP (continued) When you select TCP/IP Protocol at the Network window, the screen below appears. (We recommend that you keep the default settings as shown.) If you need to make changes, make sure to click Apply after you have made the changes. (You may wish to make a note of the IP address.) 33
Product Manual
Page 34
TCP/IP Printing for Windows XP (continued) Go to Start > Settings > Printers and Faxes > Add a Printer Click Next. 34
Product Manual
Page 35
TCP/IP Printing for Windows XP (continued) Select Local Printer. Click Next. At the pull-down menu, highlight Standard TCP/IP Port. Click Next. Click Next. 35 Deselect Automatically detect and install my Plug and Play printer. Select Create a new port.
Product Manual
Page 36
Click OK. 36 The Port Name will automatically be filled in the IP address of the port being used by the printer. Select LPR. Then click Settings. Select Custom. Input the Port Name of the Print Server (i.e. 192.168.0.10). TCP/IP Printing for Windows XP (continued) Type in .
Product Manual
Page 37
Click Next. 37 TCP/IP Printing for Windows XP (continued) Click Next. If the desired printer is not on the list, click Have Disk and insert the printer driver disk that came with your printer to install the printer drivers. Highlight the printer, as shown. Click Finish.
Product Manual
Page 38
TCP/IP Printing for Windows XP (continued) At this screen, you can input a name for the printer. Click Next. Click Finish. 38 Click Next.
Product Manual
Page 39
Press the Enter or (Return) Key. For example, type http://192.168.0.10 into the Location or Address field. Note: The PC's IP Address must be in the IP Address of 255.255.255.0, then your computer's IP Address should be 192.168.0.x, where x is a value between 1-254, excluding 10.) 39 TCP/IP Printing for Windows 2000 Open the Web browser, and type in the same subnet as the Print Server's IP Address for the two devices to communicate. (For example, if your Print Server's IP Address is 192.168.0.10, with a subnet mask of the DP-G321.
Product Manual
Page 40
You will need this information later in the configuration process. 40 TCP/IP Printing for Windows 2000 (continued) At the Configuration window, write down the Port Names for future reference.
Product Manual
Page 41
Enter the SSID of the remote access point or wireless router to which you would like to connect. Click Apply. 41 If you wish to set WEP Encryption, select the encryption level and the key here. TCP/IP Printing for Windows 2000 (continued) Select your Connection Mode.
Product Manual
Page 42
TCP/IP Printing for Windows 2000 (continued) When you select TCP/IP Protocol at the Network window, the screen below appears. (We recommend that you keep the default settings as shown.) If you need to make changes, make sure to click Apply after you have made the changes. (You may wish to make a note of the IP Address.) 42
Product Manual
Page 43
Click Next. 43 Double-click on the Add Printer icon. TCP/IP Printing for Windows 2000 (continued) Go to Start > Settings > Printers.
Product Manual
Page 44
Click Next. 44 TCP/IP Printing for Windows 2000 (continued) Select Local Printer. Click Next. Select Create a new port at the pull-down menu, highlight Standard TCP/IP Port.
Product Manual
Page 45
Select "Custom." Type in the IP address of the Print Server in . Then click on Settings. 45 TCP/IP Printing for Windows 2000 (continued) Click Next. Click Next. The Port Name field will automatically be filled in the Printer Name or IP Address field.