
Product Manual
Page 2
Contents Package Contents 3 Introduction 4 Wireless Basics 8 Setting up the DP-311U 10 Getting Started 12 Using the Web Configuration 13 TCP/IP Printing for Windows XP 21 TCP/IP Printing for Windows 2000 29 TCP/IP Printing for Windows 98SE/Me 38 Unix/Linux Printing (See PS Admin Manual on CD-ROM 49 Setting up AppleTalk or LPR Printing in MAC OSX 50 Setting up AppleTalk Printing in MAC OS9 55 Networking Basics 58 Technical Specifications 70 Contacting Technical Support 71 Warranty and Registration 72 Appendix: DP-311U Printer Compatibility List 75 2
Contents Package Contents 3 Introduction 4 Wireless Basics 8 Setting up the DP-311U 10 Getting Started 12 Using the Web Configuration 13 TCP/IP Printing for Windows XP 21 TCP/IP Printing for Windows 2000 29 TCP/IP Printing for Windows 98SE/Me 38 Unix/Linux Printing (See PS Admin Manual on CD-ROM 49 Setting up AppleTalk or LPR Printing in MAC OSX 50 Setting up AppleTalk Printing in MAC OS9 55 Networking Basics 58 Technical Specifications 70 Contacting Technical Support 71 Warranty and Registration 72 Appendix: DP-311U Printer Compatibility List 75 2
Product Manual
Page 3
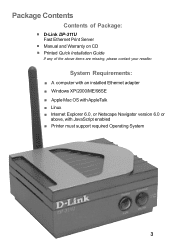
Package Contents Contents of Package: „ D-Link DP-311U Fast Ethernet Print Server „ Manual and Warranty on CD „ Printed Quick Installation Guide If any of the above , with JavaScript enabled „ Printer must support required Operating System 3 System Requirements: „ A computer with an installed Ethernet adapter „ Windows XP/2000/ME/98SE „ Apple Mac OS with AppleTalk „ Linux „ Internet Explorer 6.0, or Netscape Navigator version 6.0 or above items are missing, please contact your reseller.
Package Contents Contents of Package: „ D-Link DP-311U Fast Ethernet Print Server „ Manual and Warranty on CD „ Printed Quick Installation Guide If any of the above , with JavaScript enabled „ Printer must support required Operating System 3 System Requirements: „ A computer with an installed Ethernet adapter „ Windows XP/2000/ME/98SE „ Apple Mac OS with AppleTalk „ Linux „ Internet Explorer 6.0, or Netscape Navigator version 6.0 or above items are missing, please contact your reseller.

Product Manual
Page 4
Introduction The D-Link DP-311U Print Server is very portable and inexpensive compared to a PC-based print server, and the Print Server connects to your home or office. With one USB (v1.1) port, the DP-311U can locate USB printer services virtually anywhere in your file servers and allows the... without increasing the load of another workstation or server. „ The DP-311U's USB port, version 1.1, can transmit to high-speed laser printers much faster than a PC's parallel printer port. „ Because the DP-311U is an 802.11b wireless print server that allows users to easily configure...
Introduction The D-Link DP-311U Print Server is very portable and inexpensive compared to a PC-based print server, and the Print Server connects to your home or office. With one USB (v1.1) port, the DP-311U can locate USB printer services virtually anywhere in your file servers and allows the... without increasing the load of another workstation or server. „ The DP-311U's USB port, version 1.1, can transmit to high-speed laser printers much faster than a PC's parallel printer port. „ Because the DP-311U is an 802.11b wireless print server that allows users to easily configure...

Product Manual
Page 10
... this procedure to the USB port of the Print Server. 8. While the printer is powered OFF, install the USB printer cable to connect the printer's USB port to avoid complications at the configuration stage. 1. Connect the DP-311U RJ-45 Connector to the DP-311U, 2. Setting up without first establishing its network connection. This will proceed. 10...
... this procedure to the USB port of the Print Server. 8. While the printer is powered OFF, install the USB printer cable to connect the printer's USB port to avoid complications at the configuration stage. 1. Connect the DP-311U RJ-45 Connector to the DP-311U, 2. Setting up without first establishing its network connection. This will proceed. 10...

Product Manual
Page 12
... to easily configure and manage their print queue through TCP/IP. The compatibility list is a sample network using the DP-311U. For a list of the DP-301U; in Web-based management feature that allows users to the USB port of printers that are compatible with the DP-311U. 12 Warning! Getting Started Below is not comprehensive.
... to easily configure and manage their print queue through TCP/IP. The compatibility list is a sample network using the DP-311U. For a list of the DP-301U; in Web-based management feature that allows users to the USB port of printers that are compatible with the DP-311U. 12 Warning! Getting Started Below is not comprehensive.

Product Manual
Page 14
... tab from the tools bar of the main screen to the Print Server. Server Name: The name assigned to display information of the DP-311U's System Status and Printer Status. MAC Address: The MAC address of the Print Server. IP Address: The IP Address of the Ethernet port. Firmware Version:...The version of the hardware on the Print Server. Model: The model of time the Print Server has been up. 14 System Status and Printer Status When you the system information (see below), providing general information regarding the Print Server. Hardware Version: The version of the firmware and ...
... tab from the tools bar of the main screen to the Print Server. Server Name: The name assigned to display information of the DP-311U's System Status and Printer Status. MAC Address: The MAC address of the Print Server. IP Address: The IP Address of the Ethernet port. Firmware Version:...The version of the hardware on the Print Server. Model: The model of time the Print Server has been up. 14 System Status and Printer Status When you the system information (see below), providing general information regarding the Print Server. Hardware Version: The version of the firmware and ...
Product Manual
Page 15
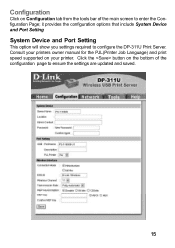
Consult your printers owner manual for the PJL(Printer Job Language) and print speed supported on the bottom of the main screen to enter the Configuration Page; Configuration Click on Configuration tab from the tools bar of the configuration page to ensure the settings are updated and saved. 15 it provides the configuration options that include System Device and Port Setting System Device and Port Setting This option will show you settings required to configure the DP-311U Print Server. Click the button on your printer.
Consult your printers owner manual for the PJL(Printer Job Language) and print speed supported on the bottom of the main screen to enter the Configuration Page; Configuration Click on Configuration tab from the tools bar of the configuration page to ensure the settings are updated and saved. 15 it provides the configuration options that include System Device and Port Setting System Device and Port Setting This option will show you settings required to configure the DP-311U Print Server. Click the button on your printer.

Product Manual
Page 16
...The WEP encryption key must all lower case. Password: By default the DP-311U does not have the default SSID of your AP or wireless router to an 802.11 network in this field. 16 PJL Printer: This feature is used to communicate on your Wireless Network. Port ...Name: This is located. Make sure your the setting here matches the setting on your usage and environment. This is recommended that you wish to the Print Server. All D-Link Wireless devices have...
...The WEP encryption key must all lower case. Password: By default the DP-311U does not have the default SSID of your AP or wireless router to an 802.11 network in this field. 16 PJL Printer: This feature is used to communicate on your Wireless Network. Port ...Name: This is located. Make sure your the setting here matches the setting on your usage and environment. This is recommended that you wish to the Print Server. All D-Link Wireless devices have...
Product Manual
Page 19
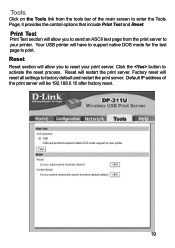
Print Test Print Test section will allow you to reset your printer. Reset Reset section will allow you to send an ASCII text page from the tools bar of the print server will have to support native ... process. Factory reset will restart the print server. Default IP address of the main screen to enter the Tools Page; Tools Click on the Tools link from the print server to your print server. Your USB printer will be 192.168.0.10 after factory reset. 19
Print Test Print Test section will allow you to reset your printer. Reset Reset section will allow you to send an ASCII text page from the tools bar of the print server will have to support native ... process. Factory reset will restart the print server. Default IP address of the main screen to enter the Tools Page; Tools Click on the Tools link from the print server to your print server. Your USB printer will be 192.168.0.10 after factory reset. 19
Product Manual
Page 24
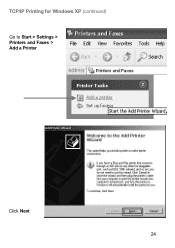
TCP/IP Printing for Windows XP (continued) Go to Start > Settings > Printers and Faxes > Add a Printer Click Next 24
TCP/IP Printing for Windows XP (continued) Go to Start > Settings > Printers and Faxes > Add a Printer Click Next 24
Product Manual
Page 25
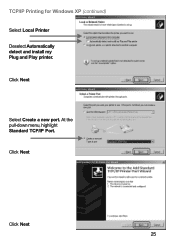
Click Next Click Next 25 At the pull-down menu, highlight Standard TCP/IP Port. TCP/IP Printing for Windows XP (continued) Select Local Printer Deselect Automatically detect and install my Plug and Play printer. Click Next Select Create a new port.
Click Next Click Next 25 At the pull-down menu, highlight Standard TCP/IP Port. TCP/IP Printing for Windows XP (continued) Select Local Printer Deselect Automatically detect and install my Plug and Play printer. Click Next Select Create a new port.
Product Manual
Page 26
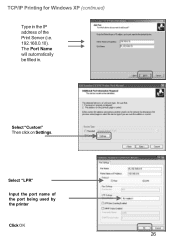
Select "Custom" Then click on Settings. The Port Name will automatically be filled in the IP address of the port being used by the printer Click OK 26 TCP/IP Printing for Windows XP (continued) Type in . Select "LPR" Input the port name of the Print Server (i.e. 192.168.0.10).
Select "Custom" Then click on Settings. The Port Name will automatically be filled in the IP address of the port being used by the printer Click OK 26 TCP/IP Printing for Windows XP (continued) Type in . Select "LPR" Input the port name of the Print Server (i.e. 192.168.0.10).
Product Manual
Page 27
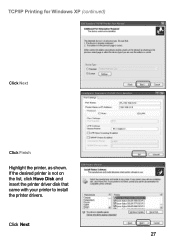
TCP/IP Printing for Windows XP (continued) Click Next Click Finish Highlight the printer, as shown. Click Next 27 If the desired printer is not on the list, click Have Disk and insert the printer driver disk that came with your printer to install the printer drivers.
TCP/IP Printing for Windows XP (continued) Click Next Click Finish Highlight the printer, as shown. Click Next 27 If the desired printer is not on the list, click Have Disk and insert the printer driver disk that came with your printer to install the printer drivers.

Product Manual
Page 28
TCP/IP Printing for Windows XP (continued) At this screen, you can input a name for the printer. Click Next Click Next Click Finish 28
TCP/IP Printing for Windows XP (continued) At this screen, you can input a name for the printer. Click Next Click Next Click Finish 28
Product Manual
Page 32
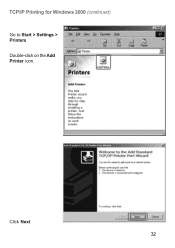
TCP/IP Printing for Windows 2000 (continued) Go to Start > Settings > Printers Double-click on the Add Printer icon. Click Next 32
TCP/IP Printing for Windows 2000 (continued) Go to Start > Settings > Printers Double-click on the Add Printer icon. Click Next 32
Product Manual
Page 33
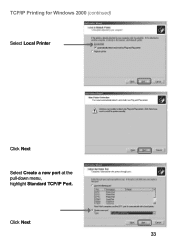
Click Next 33 TCP/IP Printing for Windows 2000 (continued) Select Local Printer Click Next Select Create a new port at the pull-down menu, highlight Standard TCP/IP Port.
Click Next 33 TCP/IP Printing for Windows 2000 (continued) Select Local Printer Click Next Select Create a new port at the pull-down menu, highlight Standard TCP/IP Port.
Product Manual
Page 34
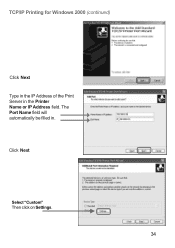
The Port Name field will automatically be filled in the Printer Name or IP Address field. Click Next Select "Custom" Then click on Settings. 34 TCP/IP Printing for Windows 2000 (continued) Click Next Type in the IP Address of the Print Server in .
The Port Name field will automatically be filled in the Printer Name or IP Address field. Click Next Select "Custom" Then click on Settings. 34 TCP/IP Printing for Windows 2000 (continued) Click Next Type in the IP Address of the Print Server in .
Product Manual
Page 35
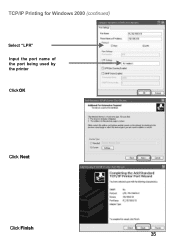
TCP/IP Printing for Windows 2000 (continued) Select "LPR" Input the port name of the port being used by the printer Click OK Click Next Click Finish 35
TCP/IP Printing for Windows 2000 (continued) Select "LPR" Input the port name of the port being used by the printer Click OK Click Next Click Finish 35
Product Manual
Page 36
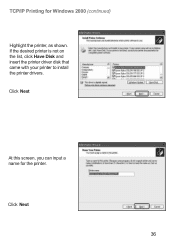
TCP/IP Printing for the printer. Click Next 36 If the desired printer is not on the list, click Have Disk and insert the printer driver disk that came with your printer to install the printer drivers. Click Next At this screen, you can input a name for Windows 2000 (continued) Highlight the printer, as shown.
TCP/IP Printing for the printer. Click Next 36 If the desired printer is not on the list, click Have Disk and insert the printer driver disk that came with your printer to install the printer drivers. Click Next At this screen, you can input a name for Windows 2000 (continued) Highlight the printer, as shown.

Product Manual
Page 37
TCP/IP Printing for printing with Windows 2000 on your network. 37 Click Next Select Yes to print a test page Click Next Click Finish The printer is now ready for Windows 2000 (continued) Select Do not share this printer .
TCP/IP Printing for printing with Windows 2000 on your network. 37 Click Next Select Yes to print a test page Click Next Click Finish The printer is now ready for Windows 2000 (continued) Select Do not share this printer .

