
Product Manual
Page 2
Contents Package Contents 3 Introduction 4 Getting to know the DP-311P 5 Getting Started 6 Using the Web Configuration 7 Printing with Windows XP/2000 17 Printing with Windows 98SE/Me 24 Setting up AppleTalk or LPR Printing with MAC OS X 32 Setting up AppleTalk or LPR Printing with MAC OS 9 39 Printing from MAC OS Client Workstations 40 Networking Basics 42 Technical Specifications...
Contents Package Contents 3 Introduction 4 Getting to know the DP-311P 5 Getting Started 6 Using the Web Configuration 7 Printing with Windows XP/2000 17 Printing with Windows 98SE/Me 24 Setting up AppleTalk or LPR Printing with MAC OS X 32 Setting up AppleTalk or LPR Printing with MAC OS 9 39 Printing from MAC OS Client Workstations 40 Networking Basics 42 Technical Specifications...
Product Manual
Page 3
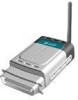
System Requirements: ! Printer must support required Operating System 3 Printed Quick Installation Guide If any of Package: ! Apple Mac OS with JavaScript enabled ! Manual, PS Admin Utility and Warranty on CD ! NetWare 5.x (Native NDS) ! Internet Explorer 6.0, or Netscape Navigator version 6.0 or above items are missing, please contact your reseller. D-Link DP-311P Wireless Print Server ! Windows XP/2000/Me/98SE ! Package Contents Contents of the above , with AppleTalk !
System Requirements: ! Printer must support required Operating System 3 Printed Quick Installation Guide If any of Package: ! Apple Mac OS with JavaScript enabled ! Manual, PS Admin Utility and Warranty on CD ! NetWare 5.x (Native NDS) ! Internet Explorer 6.0, or Netscape Navigator version 6.0 or above items are missing, please contact your reseller. D-Link DP-311P Wireless Print Server ! Windows XP/2000/Me/98SE ! Package Contents Contents of the above , with AppleTalk !

Product Manual
Page 4
... The D-Link DP-311P Print Server is a wireless print server with the familiar D-Link interface. The DP-311P also supports all major network operating systems and protocols. No additional printer cable will be used to most printers available on your purchase). With the DP-311P you have the ability and convenience of sharing a printer beyond the wired network. PS Admin, a Windows-based configuration...
... The D-Link DP-311P Print Server is a wireless print server with the familiar D-Link interface. The DP-311P also supports all major network operating systems and protocols. No additional printer cable will be used to most printers available on your purchase). With the DP-311P you have the ability and convenience of sharing a printer beyond the wired network. PS Admin, a Windows-based configuration...
Product Manual
Page 16
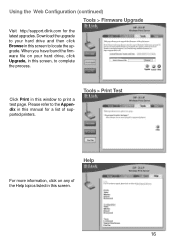
Please refer to print a test page. Tools > Print Test Help For more information, click on your hard drive and then click Browse in this manual for the latest upgrades. Using the Web Configuration (continued) Tools > Firmware Upgrade Visit http://support.dlink.com for a list of the Help topics listed in this screen, to locate the upgrade. When you have found the firmware file on any of supported printers. Download the upgrade to your hard drive, click Upgrade, in this screen. 16 Click Print in this window to the Appendix in this screen to complete the process.
Please refer to print a test page. Tools > Print Test Help For more information, click on your hard drive and then click Browse in this manual for the latest upgrades. Using the Web Configuration (continued) Tools > Firmware Upgrade Visit http://support.dlink.com for a list of the Help topics listed in this screen, to locate the upgrade. When you have found the firmware file on any of supported printers. Download the upgrade to your hard drive, click Upgrade, in this screen. 16 Click Print in this window to the Appendix in this screen to complete the process.

Product Manual
Page 17
...(For D-Link network adapters, you can open the web-based configuration utility and go to Config mode on changing the IP Address, please refer to Disable. Restart the computer. Open your wireless print server. For instructions on the rear panel of your web browser and input the IP Address of the DP-311P. The ...make sure that it is set to the Networking Basics section in the same IP Address range as the DP-311P (192.168.0.x). The subnet mask is 192.168.0.10. 17 Printing with Windows XP/2000 Set the switch to the Site Survey function and select the SSID named WLAN-PS. The ...
...(For D-Link network adapters, you can open the web-based configuration utility and go to Config mode on changing the IP Address, please refer to Disable. Restart the computer. Open your wireless print server. For instructions on the rear panel of your web browser and input the IP Address of the DP-311P. The ...make sure that it is set to the Networking Basics section in the same IP Address range as the DP-311P (192.168.0.x). The subnet mask is 192.168.0.10. 17 Printing with Windows XP/2000 Set the switch to the Site Survey function and select the SSID named WLAN-PS. The ...

Product Manual
Page 18
Input WEP settings if applicable. Change the IP Address and change the other settings of your network. 18 Input or select the SSID of the DP-311P to conform to your network. 1 After you have configured the DP-311P, set the rear panel switch back to Infrastructure. Printing with Windows XP/2000 (continued) Change the mode to Normal mode. 2 Change your wireless network adapter settings (IP Address, Infrastructure mode) so that they match your wireless router or AP.
Input WEP settings if applicable. Change the IP Address and change the other settings of your network. 18 Input or select the SSID of the DP-311P to conform to your network. 1 After you have configured the DP-311P, set the rear panel switch back to Infrastructure. Printing with Windows XP/2000 (continued) Change the mode to Normal mode. 2 Change your wireless network adapter settings (IP Address, Infrastructure mode) so that they match your wireless router or AP.

Product Manual
Page 19
Printing with Windows XP/2000 (continued) For Windows XP: Go to Start > Printers and Faxes > Add a Printer Double-click on the "Add Printer" icon Click Next 19
Printing with Windows XP/2000 (continued) For Windows XP: Go to Start > Printers and Faxes > Add a Printer Double-click on the "Add Printer" icon Click Next 19

Product Manual
Page 20
Click Next Select "Create a new port." At the pull-down menu, highlight "Standard TCP/IP Port." Click Next Click Next 20 Printing with Windows XP/2000 (continued) Select "Local Printer."
Click Next Select "Create a new port." At the pull-down menu, highlight "Standard TCP/IP Port." Click Next Click Next 20 Printing with Windows XP/2000 (continued) Select "Local Printer."

Product Manual
Page 21
Then click "Settings." Click Settings Select "LPR" Enter "lp1" for the Queue Name. Click OK 21 Click Next Select "Custom." Printing with Windows XP/2000 (continued) Type in the IP address of the print server. (i.e. 192.168.0.10) The port name will automatically be filled in.
Then click "Settings." Click Settings Select "LPR" Enter "lp1" for the Queue Name. Click OK 21 Click Next Select "Custom." Printing with Windows XP/2000 (continued) Type in the IP address of the print server. (i.e. 192.168.0.10) The port name will automatically be filled in.
Product Manual
Page 22
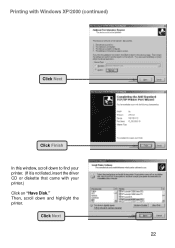
Click Next 22 Printing with your printer.) Click on "Have Disk." Then, scroll down to find your printer. (If it is not listed, insert the driver CD or diskette that came with Windows XP/2000 (continued) Click Next Click Finish In this window, scroll down and highlight the printer.
Click Next 22 Printing with your printer.) Click on "Have Disk." Then, scroll down to find your printer. (If it is not listed, insert the driver CD or diskette that came with Windows XP/2000 (continued) Click Next Click Finish In this window, scroll down and highlight the printer.

Product Manual
Page 23
Click Next Yes Select "No" Click Next The printer is now ready for this screen, you can input a name for printing with Windows XP/2000 (continued) At this printer. Printing with Windows XP, on your network. Click Finish 23
Click Next Yes Select "No" Click Next The printer is now ready for this screen, you can input a name for printing with Windows XP/2000 (continued) At this printer. Printing with Windows XP, on your network. Click Finish 23

Product Manual
Page 24
...Link network adapters, you can open the web-based configuration utility and go to the Networking Basics section in your wireless print server. Restart the computer. Printing with Windows 98SE/Me Set the switch to Ad-Hoc mode in this manual. The Channel is 1 and WEP is in the same IP Address range as the DP-311P... (192.168.0.x). Open your web browser and input the IP Address of the DP-311P....
...Link network adapters, you can open the web-based configuration utility and go to the Networking Basics section in your wireless print server. Restart the computer. Printing with Windows 98SE/Me Set the switch to Ad-Hoc mode in this manual. The Channel is 1 and WEP is in the same IP Address range as the DP-311P... (192.168.0.x). Open your web browser and input the IP Address of the DP-311P....

Product Manual
Page 25
Configuration > Network Change the IP Address and change the other settings of your network 25 Input WEP settings if applicable. Input or select the SSID of the DP-311P to conform to your network 1 After you have configured the DP-311P, set the rear panel switch back to Infrastructure. Printing with Windows 98SE/Me (continued) Configuration > Wireless Change the mode to Normal mode 2 Change your wireless network adapter settings (IP Address, Infrastructure mode) so that they match your wireless router or AP.
Configuration > Network Change the IP Address and change the other settings of your network 25 Input WEP settings if applicable. Input or select the SSID of the DP-311P to conform to your network 1 After you have configured the DP-311P, set the rear panel switch back to Infrastructure. Printing with Windows 98SE/Me (continued) Configuration > Wireless Change the mode to Normal mode 2 Change your wireless network adapter settings (IP Address, Infrastructure mode) so that they match your wireless router or AP.

Product Manual
Page 26
Printing with Windows 98SE/Me (continued) Please insert the DP-311P CD into your CD-ROM drive and click Install PS Admin This picture will appear. Click Next Click Next 26
Printing with Windows 98SE/Me (continued) Please insert the DP-311P CD into your CD-ROM drive and click Install PS Admin This picture will appear. Click Next Click Next 26

Product Manual
Page 27
Printing with Windows 98SE/Me (continued) Select the program you want to install DP-311P PSAdmin is a windows based management utility, only Administrators need to install this program D-Link Print Monitor is the driver for print servers in Windows 95/98/Me.You will need to install this program Click Next Click Finish 27
Printing with Windows 98SE/Me (continued) Select the program you want to install DP-311P PSAdmin is a windows based management utility, only Administrators need to install this program D-Link Print Monitor is the driver for print servers in Windows 95/98/Me.You will need to install this program Click Next Click Finish 27

Product Manual
Page 28
Printing with Windows 98SE/Me (continued) Go to Start > Settings > Printer> Add printer or Go to Start> Control Panel> Printers Double click the Add Printer icon Click Next Select Local printer Click Next 28
Printing with Windows 98SE/Me (continued) Go to Start > Settings > Printer> Add printer or Go to Start> Control Panel> Printers Double click the Add Printer icon Click Next Select Local printer Click Next 28
Product Manual
Page 29
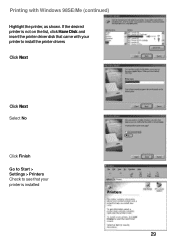
If the desired printer is installed 29 Printing with your printer to install the printer drivers Click Next Click Next Select No Click Finish Go to Start > Settings > Printers Check to see that your printer is not on the list, click Have Disk and insert the printer driver disk that came with Windows 98SE/Me (continued) Highlight the printer, as shown.
If the desired printer is installed 29 Printing with your printer to install the printer drivers Click Next Click Next Select No Click Finish Go to Start > Settings > Printers Check to see that your printer is not on the list, click Have Disk and insert the printer driver disk that came with Windows 98SE/Me (continued) Highlight the printer, as shown.

Product Manual
Page 30
Select Properties > Details > Click Add Port HP LaserJet Series II HP LaserJet Series II Select Other > D-link Print Port Click OK 30 Printing with Windows 98SE/Me (continued) After the printer installation is completed, right-click on the Printer icon.
Select Properties > Details > Click Add Port HP LaserJet Series II HP LaserJet Series II Select Other > D-link Print Port Click OK 30 Printing with Windows 98SE/Me (continued) After the printer installation is completed, right-click on the Printer icon.

Product Manual
Page 31
HP LaserJet Series II 192.168.0.10 HP LaserJet Series II 31 Printing with Windows 98SE/Me (continued) Select your DP-311P wireless print server Click OK 192.168.0.10 Click Apply > OK You have completed setting up your printer in Win 98SE/Me!
HP LaserJet Series II 192.168.0.10 HP LaserJet Series II 31 Printing with Windows 98SE/Me (continued) Select your DP-311P wireless print server Click OK 192.168.0.10 Click Apply > OK You have completed setting up your printer in Win 98SE/Me!

Product Manual
Page 34
Follow the instructions below for printing through Print Servers. After attaching the Print Server to access the Print Server's web configuration. Setting up the Print Server. Open your Macintosh to your network using IP protocols for setting up Apple Talk or LPR Printing in the Quick Installation Guide, change the IP Address of your System Preferences window and Click Network At the...
Follow the instructions below for printing through Print Servers. After attaching the Print Server to access the Print Server's web configuration. Setting up the Print Server. Open your Macintosh to your network using IP protocols for setting up Apple Talk or LPR Printing in the Quick Installation Guide, change the IP Address of your System Preferences window and Click Network At the...

