User Manual
Page 4
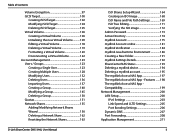
... Quotas 151 Network Shares 155 Adding/Modifying Network Shares Wizard 156 Deleting a Network Share 162 Resetting the Network Shares 163 D-Link ShareCenter DNS-340L User Manual ISO Shares Setup Wizard 164 Creating an ISO Image 168 ISO Name and File Path Settings 169 ISO Tree Editing... Details 192 ShareCenter NAS Status 193 Deleting a mydlink device 194 Deleting a mydlink account 195 The mydlink Access NAS App 197 The mydlink Access NAS App - Features....... 198 The mydlink Access NAS App Compatibility 199 Network Management 200 LAN Setup 200 IPv6 Settings 203 Link Speed and LLTD...
... Quotas 151 Network Shares 155 Adding/Modifying Network Shares Wizard 156 Deleting a Network Share 162 Resetting the Network Shares 163 D-Link ShareCenter DNS-340L User Manual ISO Shares Setup Wizard 164 Creating an ISO Image 168 ISO Name and File Path Settings 169 ISO Tree Editing... Details 192 ShareCenter NAS Status 193 Deleting a mydlink device 194 Deleting a mydlink account 195 The mydlink Access NAS App 197 The mydlink Access NAS App - Features....... 198 The mydlink Access NAS App Compatibility 199 Network Management 200 LAN Setup 200 IPv6 Settings 203 Link Speed and LLTD...
User Manual
Page 8
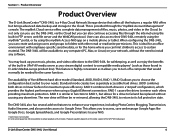
... the built-in linear fashion for a drive to your network, without causing any software. The DNS-340L will then be available to any computer (PC, Mac, or Linux) on features to enhance your NAS. 1 Hard Drive(s) not included. 2 D-Link cannot guarantee full compatibility or proper playback with employee-specific sensitive data, or for the...
... the built-in linear fashion for a drive to your network, without causing any software. The DNS-340L will then be available to any computer (PC, Mac, or Linux) on features to enhance your NAS. 1 Hard Drive(s) not included. 2 D-Link cannot guarantee full compatibility or proper playback with employee-specific sensitive data, or for the...

User Manual
Page 11
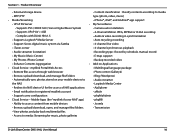
... My files (Web File Server) • WebDAV • FTP server • Mobile device access (mydlink Access NAS) • User/Group Management • User/Group assignment for network sharing and FTP server • Quota for user...multiple groups • Create user/Import user(s) batch files • Backup Management • Scheduled backup from PC to NAS (ShareCenter Sync) • Remote network backup (Rsync, Remote Snapshot) • Apple Time Machine® support •...; USB Port Support • Print server • UPS monitoring D-Link ShareCenter DNS-340L User Manual 9 Section 1 -
... My files (Web File Server) • WebDAV • FTP server • Mobile device access (mydlink Access NAS) • User/Group Management • User/Group assignment for network sharing and FTP server • Quota for user...multiple groups • Create user/Import user(s) batch files • Backup Management • Scheduled backup from PC to NAS (ShareCenter Sync) • Remote network backup (Rsync, Remote Snapshot) • Apple Time Machine® support •...; USB Port Support • Print server • UPS monitoring D-Link ShareCenter DNS-340L User Manual 9 Section 1 -
User Manual
Page 12
... Media Center • AjaXplorer • aMule • phpMyAdmin • phpBB • Joomla • Transmission D-Link ShareCenter DNS-340L User Manual 10 Mobile Apps (the "mydlink Access-NAS" app) • Ability to access content from mobile devices • Browse, upload/download, open, and manage ...• E-map support • Backup recorded video • Add-on your mobile devices to the NAS • Redirect to NAS device UI for the access of NAS applications • Email notification to registered mydlink account • Supports zero configuration • Cloud Service ...
... Media Center • AjaXplorer • aMule • phpMyAdmin • phpBB • Joomla • Transmission D-Link ShareCenter DNS-340L User Manual 10 Mobile Apps (the "mydlink Access-NAS" app) • Ability to access content from mobile devices • Browse, upload/download, open, and manage ...• E-map support • Backup recorded video • Add-on your mobile devices to the NAS • Redirect to NAS device UI for the access of NAS applications • Email notification to registered mydlink account • Supports zero configuration • Cloud Service ...
User Manual
Page 20
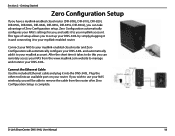
... manage and monitor your mydlink account. Plug the other end into the DNS-340L. D-Link ShareCenter DNS-340L User Manual 18 Zero Configuration automatically configures your NAS's settings for you can remotely access your router. Connect your NAS to your mydlink-enabled cloud router and Zero Configuration will be able to...DIR-836L), you , and adds it into an available port on your NAS from the router after Zero Configuration Setup is complete. If you wish to use your NAS wirelessly, you to set up your DNS-340L by simply plugging it in and connecting it to your mydlink account. ...
... manage and monitor your mydlink account. Plug the other end into the DNS-340L. D-Link ShareCenter DNS-340L User Manual 18 Zero Configuration automatically configures your NAS's settings for you can remotely access your router. Connect your NAS to your mydlink-enabled cloud router and Zero Configuration will be able to...DIR-836L), you , and adds it into an available port on your NAS from the router after Zero Configuration Setup is complete. If you wish to use your NAS wirelessly, you to set up your DNS-340L by simply plugging it in and connecting it to your mydlink account. ...
User Manual
Page 21
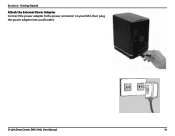
D-Link ShareCenter DNS-340L User Manual 19 Section 2 - Getting Started Attach the External Power Adapter Connect the power adapter to the power connector on your NAS, then plug the power adapter into a wall outlet.
D-Link ShareCenter DNS-340L User Manual 19 Section 2 - Getting Started Attach the External Power Adapter Connect the power adapter to the power connector on your NAS, then plug the power adapter into a wall outlet.

User Manual
Page 23
... configuring RAID over the mydlink service will depend on the speed of your NAS using mydlink. Please be able to format your network connection and client CPU. Click Yes to format, or No to return to complete. Section 2 - D-Link ShareCenter DNS-340L User Manual 21 From this service will slow your system down list...
... configuring RAID over the mydlink service will depend on the speed of your NAS using mydlink. Please be able to format your network connection and client CPU. Click Yes to format, or No to return to complete. Section 2 - D-Link ShareCenter DNS-340L User Manual 21 From this service will slow your system down list...
User Manual
Page 25
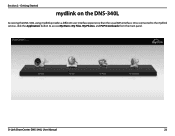
D-Link ShareCenter DNS-340L User Manual 23 Getting Started mydlink on the DNS-340L Accessing the DNS-340L using mydlink provides a different user interface experience than the usual NAS interface. Section 2 - Once connected to the mydlink service, click the Application button to access My Music, My Files, My Photos, and P2P Downloads from the main panel.
D-Link ShareCenter DNS-340L User Manual 23 Getting Started mydlink on the DNS-340L Accessing the DNS-340L using mydlink provides a different user interface experience than the usual NAS interface. Section 2 - Once connected to the mydlink service, click the Application button to access My Music, My Files, My Photos, and P2P Downloads from the main panel.
User Manual
Page 26
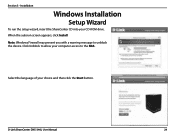
Click Unblock to allow your computer access to unblock the device. When the autorun screen appears, click Install Note: Windows Firewall may present you with a warning message to the NAS. D-Link ShareCenter DNS-340L User Manual 24 Select the language of your CD-ROM drive. Section 3 - Installation Windows Installation Setup Wizard To run the setup wizard, insert the ShareCenter CD into your choice and then click the Start button.
Click Unblock to allow your computer access to unblock the device. When the autorun screen appears, click Install Note: Windows Firewall may present you with a warning message to the NAS. D-Link ShareCenter DNS-340L User Manual 24 Select the language of your CD-ROM drive. Section 3 - Installation Windows Installation Setup Wizard To run the setup wizard, insert the ShareCenter CD into your choice and then click the Start button.
User Manual
Page 30
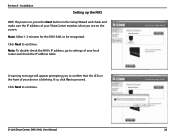
... Yes to continue. Note: To double-check the NAS's IP address, go to continue. Click Next to settings of your local router and check the IP address table. Note: Allow 1-2 minutes for the DNS-340L to confirm that the LED on the screen. D-Link ShareCenter DNS-340L User Manual 28 A warning message will appear prompting you...
... Yes to continue. Note: To double-check the NAS's IP address, go to continue. Click Next to settings of your local router and check the IP address table. Note: Allow 1-2 minutes for the DNS-340L to confirm that the LED on the screen. D-Link ShareCenter DNS-340L User Manual 28 A warning message will appear prompting you...
User Manual
Page 31
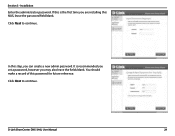
If this is recommended you set a password, however you can create a new admin password. In this NAS, leave the password field blank. It is the first time you are installing this step, you may also leave the fields blank. Click Next to continue. Installation Enter the administrator password. D-Link ShareCenter DNS-340L User Manual 29 Section 3 - Click Next to continue. You should make a record of this password for future reference.
If this is recommended you set a password, however you can create a new admin password. In this NAS, leave the password field blank. It is the first time you are installing this step, you may also leave the fields blank. Click Next to continue. Installation Enter the administrator password. D-Link ShareCenter DNS-340L User Manual 29 Section 3 - Click Next to continue. You should make a record of this password for future reference.
User Manual
Page 35
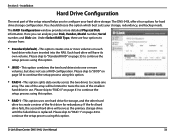
... and the other hard drive to continue the setup process using this option. This option uses one array. Section 3 - yy RAID 0 - D-Link ShareCenter DNS-340L User Manual 33 You should choose the option which are four options to twice the size of the array will be limited to choose from...This option combines the two hard drives into the NAS. yy RAID 1 - Please skip to "RAID 0" on each hard drive which best suits your hard drive storage. The size of the smallest hard drive in use a RAID configuration. The DNS-340L offers four options for redundancy. Here you to continue...
... and the other hard drive to continue the setup process using this option. This option uses one array. Section 3 - yy RAID 0 - D-Link ShareCenter DNS-340L User Manual 33 You should choose the option which are four options to twice the size of the array will be limited to choose from...This option combines the two hard drives into the NAS. yy RAID 1 - Please skip to "RAID 0" on each hard drive which best suits your hard drive storage. The size of the smallest hard drive in use a RAID configuration. The DNS-340L offers four options for redundancy. Here you to continue...

User Manual
Page 37
Please refer to "Mapping a Drive" on page 59 for you and users on your network to communicate with your NAS. D-Link ShareCenter DNS-340L User Manual 35 This window makes it possible for further information on your configured volumes. After doing this step. Map Drive to ...continue. The Map Drive assigns a letter to the volumes in your NAS directly. Section 3 - Click Next to Network. Use the drop-down menus to assign ...
Please refer to "Mapping a Drive" on page 59 for you and users on your network to communicate with your NAS. D-Link ShareCenter DNS-340L User Manual 35 This window makes it possible for further information on your configured volumes. After doing this step. Map Drive to ...continue. The Map Drive assigns a letter to the volumes in your NAS directly. Section 3 - Click Next to Network. Use the drop-down menus to assign ...
User Manual
Page 42
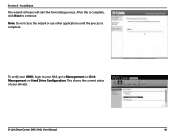
Section 3 - Installation The wizard software will start the formatting process. Note: Do not close the wizard or use other applications until the process is complete, click Next to Management >> Disk Management >> Hard Drive Configuration. To verify your JBOD, login to your drive(s). D-Link ShareCenter DNS-340L User Manual 40 This shows the current status of your NAS, go to continue. After this is complete.
Section 3 - Installation The wizard software will start the formatting process. Note: Do not close the wizard or use other applications until the process is complete, click Next to Management >> Disk Management >> Hard Drive Configuration. To verify your JBOD, login to your drive(s). D-Link ShareCenter DNS-340L User Manual 40 This shows the current status of your NAS, go to continue. After this is complete.
User Manual
Page 43
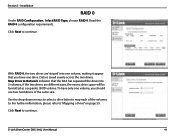
... indicates that the NAS has separated the drive into one volume, making it appear that you should use two hard drives of the volumes to map each of the same size. Map Drive to continue. Read the RAID 0 configuration requirements. Data is saved evenly across the two drives. D-Link ShareCenter DNS-340L User Manual...
... indicates that the NAS has separated the drive into one volume, making it appear that you should use two hard drives of the volumes to map each of the same size. Map Drive to continue. Read the RAID 0 configuration requirements. Data is saved evenly across the two drives. D-Link ShareCenter DNS-340L User Manual...
User Manual
Page 45
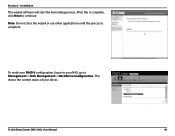
Section 3 - To verify your RAID 0 configuration, log in to your drives. D-Link ShareCenter DNS-340L User Manual 43 After this is complete. Installation The wizard software will start the formatting process. This shows the current status of your NAS, go to continue. Note: Do not close the wizard or use other applications until the process is complete, click Next to Management>>Disk Management>>Hard Drive Configuration.
Section 3 - To verify your RAID 0 configuration, log in to your drives. D-Link ShareCenter DNS-340L User Manual 43 After this is complete. Installation The wizard software will start the formatting process. This shows the current status of your NAS, go to continue. Note: Do not close the wizard or use other applications until the process is complete, click Next to Management>>Disk Management>>Hard Drive Configuration.
User Manual
Page 46
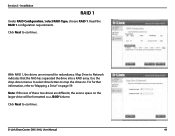
Note: If the size of these two drives are mirrored for redundancy. D-Link ShareCenter DNS-340L User Manual 44 Click Next to . For further information, refer to "Mapping a Drive" on the larger drive will be formatted as a JBOD Volume. Section 3 - Installation ... the drop-down menus to select drive letters to map the drives to continue. Map Drive to continue. Click Next to Network indicates that the NAS has separated the drive into a RAID array. With RAID 1, the drives are different, the excess space on page 59.
Note: If the size of these two drives are mirrored for redundancy. D-Link ShareCenter DNS-340L User Manual 44 Click Next to . For further information, refer to "Mapping a Drive" on the larger drive will be formatted as a JBOD Volume. Section 3 - Installation ... the drop-down menus to select drive letters to map the drives to continue. Map Drive to continue. Click Next to Network indicates that the NAS has separated the drive into a RAID array. With RAID 1, the drives are different, the excess space on page 59.

User Manual
Page 48
To verify your RAID 1, login to your drives. After this is complete. This shows the current status of your NAS, go to continue. Installation The wizard software will start the formatting process. Note: Do not close the wizard or use other applications until the process is complete, click Next to Management>>Disk Management>>Hard Drive Configuration. Section 3 - D-Link ShareCenter DNS-340L User Manual 46
To verify your RAID 1, login to your drives. After this is complete. This shows the current status of your NAS, go to continue. Installation The wizard software will start the formatting process. Note: Do not close the wizard or use other applications until the process is complete, click Next to Management>>Disk Management>>Hard Drive Configuration. Section 3 - D-Link ShareCenter DNS-340L User Manual 46
User Manual
Page 49
... menus to select drive letters to map the drives to continue. D-Link ShareCenter DNS-340L User Manual 47 Map Drive to "Mapping a Drive" on the larger drives will be formatted as a JBOD Volume. For further information, refer to Network indicates that the NAS has separated the drive into a RAID array. Click Next to continue...
... menus to select drive letters to map the drives to continue. D-Link ShareCenter DNS-340L User Manual 47 Map Drive to "Mapping a Drive" on the larger drives will be formatted as a JBOD Volume. For further information, refer to Network indicates that the NAS has separated the drive into a RAID array. Click Next to continue...

User Manual
Page 51
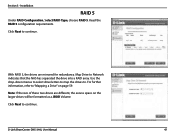
Section 3 - D-Link ShareCenter DNS-340L User Manual 49 Note: Do not close the wizard or use other applications until the process is complete, click Next to continue. To verify your RAID 1, login to Management>>Disk Management>>Hard Drive Configuration. After this is complete. Installation The wizard software will start the formatting process. This shows the current status of your NAS, go to your drives.
Section 3 - D-Link ShareCenter DNS-340L User Manual 49 Note: Do not close the wizard or use other applications until the process is complete, click Next to continue. To verify your RAID 1, login to Management>>Disk Management>>Hard Drive Configuration. After this is complete. Installation The wizard software will start the formatting process. This shows the current status of your NAS, go to your drives.

