User Manual
Page 2
... the United States or other company or product names mentioned herein are trademarks or registered trademarks of D-Link Corporation or its subsidiaries in the content hereof without prior expressed written permission from D-Link Systems, Inc. All other countries. Manual Revisions Revision 1.0 Date Dec 09, 2014 Description • Initial release for Revision A1 Trademarks...
... the United States or other company or product names mentioned herein are trademarks or registered trademarks of D-Link Corporation or its subsidiaries in the content hereof without prior expressed written permission from D-Link Systems, Inc. All other countries. Manual Revisions Revision 1.0 Date Dec 09, 2014 Description • Initial release for Revision A1 Trademarks...
User Manual
Page 3
... Configuration Wizard 81 Upgrading from Standard Mode to RAID 1 or RAID 5 87 SMART Test 93 Creating a Schedule 94 Scan Disk 95 D-Link ShareCenter DNS-340L User Manual i Table of Contents Table of Contents Preface 2 Manual Revisions 2 Trademarks 2 Product Overview 6 Before you Begin 7 System Requirements 7 Package Contents 7 Features 8 Checking the Hardware Requirements 11 Hardware Overview 12...
... Configuration Wizard 81 Upgrading from Standard Mode to RAID 1 or RAID 5 87 SMART Test 93 Creating a Schedule 94 Scan Disk 95 D-Link ShareCenter DNS-340L User Manual i Table of Contents Table of Contents Preface 2 Manual Revisions 2 Trademarks 2 Product Overview 6 Before you Begin 7 System Requirements 7 Package Contents 7 Features 8 Checking the Hardware Requirements 11 Hardware Overview 12...
User Manual
Page 4
...Group 150 Quotas 151 Network Shares 155 Adding/Modifying Network Shares Wizard 156 Deleting a Network Share 162 Resetting the Network Shares 163 D-Link ShareCenter DNS-340L User Manual ISO Shares Setup Wizard 164 Creating an ISO Image 168 ISO Name and File Path Settings 169 ISO Tree Editing 171 Verifying the ISO... Access NAS App - Features....... 198 The mydlink Access NAS App Compatibility 199 Network Management 200 LAN Setup 200 IPv6 Settings 203 Link Speed and LLTD Settings 205 Port Bonding Settings 206 Dynamic DNS 207 Port Forwarding 208 Application Management 211 ii
...Group 150 Quotas 151 Network Shares 155 Adding/Modifying Network Shares Wizard 156 Deleting a Network Share 162 Resetting the Network Shares 163 D-Link ShareCenter DNS-340L User Manual ISO Shares Setup Wizard 164 Creating an ISO Image 168 ISO Name and File Path Settings 169 ISO Tree Editing 171 Verifying the ISO... Access NAS App - Features....... 198 The mydlink Access NAS App Compatibility 199 Network Management 200 LAN Setup 200 IPv6 Settings 203 Link Speed and LLTD Settings 205 Port Bonding Settings 206 Dynamic DNS 207 Port Forwarding 208 Application Management 211 ii
User Manual
Page 5
... Firmware Upgrade 239 SNMP 240 USB Devices 241 UPS Settings 241 USB Storage Information 242 Printer Information 243 System Status 244 System Info 244 D-Link ShareCenter DNS-340L User Manual Hard Drive Info 244 Resource Monitor 245 System Services 247 Home 248 My Photos 249 Photo Albums 249 Creating an Album 250 Managing Photos...
... Firmware Upgrade 239 SNMP 240 USB Devices 241 UPS Settings 241 USB Storage Information 242 Printer Information 243 System Status 244 System Info 244 D-Link ShareCenter DNS-340L User Manual Hard Drive Info 244 Resource Monitor 245 System Services 247 Home 248 My Photos 249 Photo Albums 249 Creating an Album 250 Managing Photos...

User Manual
Page 6
... 320 My Surveillance - Viewing Preset Points 324 My Surveillance - Live Video/Playback Settings.325 My Surveillance - Recording Information........... 329 My Surveillance - Motion Detection Camera D-Link ShareCenter DNS-340L User Manual Mode 321 My Surveillance - Audio and Video......... 342 My Surveillance - Event Setup 352 My Surveillance - The Interface 297 My Music - Playback Music on your...
... 320 My Surveillance - Viewing Preset Points 324 My Surveillance - Live Video/Playback Settings.325 My Surveillance - Recording Information........... 329 My Surveillance - Motion Detection Camera D-Link ShareCenter DNS-340L User Manual Mode 321 My Surveillance - Audio and Video......... 342 My Surveillance - Event Setup 352 My Surveillance - The Interface 297 My Music - Playback Music on your...
User Manual
Page 7
... RAID Options 431 UPS Connectivity 433 Deleting a UPS Slave 437 USB Print Server 438 Setting up a Printer Using Mac OS 10.8 441 Technical Specifications 446 D-Link ShareCenter DNS-340L User Manual v Table of Contents Time Machine 379 Time Machine Setup Wizard 380 Time Machine Setup -
... RAID Options 431 UPS Connectivity 433 Deleting a UPS Slave 437 USB Print Server 438 Setting up a Printer Using Mac OS 10.8 441 Technical Specifications 446 D-Link ShareCenter DNS-340L User Manual v Table of Contents Time Machine 379 Time Machine Setup Wizard 380 Time Machine Setup -
User Manual
Page 8
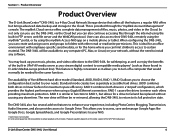
.../write permissions. You may back up your music, photos, and video collections to the DNS-340L for safekeeping, as well as enjoy the benefits of the built-in D-Link's MediaLounge product line). RAID 5 is highly convenient as those found in UPnP AV media...a 4-Bay Cloud Network Storage device that would normally be re-mirrored, allowing the DNS-340L to return to certain material. D-Link ShareCenter DNS-340L User Manual 6 Product Overview Product Overview The D-Link ShareCenter™ DNS-340L is ideal for an office environment with all the features a regular NAS offers but...
.../write permissions. You may back up your music, photos, and video collections to the DNS-340L for safekeeping, as well as enjoy the benefits of the built-in D-Link's MediaLounge product line). RAID 5 is highly convenient as those found in UPnP AV media...a 4-Bay Cloud Network Storage device that would normally be re-mirrored, allowing the DNS-340L to return to certain material. D-Link ShareCenter DNS-340L User Manual 6 Product Overview Product Overview The D-Link ShareCenter™ DNS-340L is ideal for an office environment with all the features a regular NAS offers but...
User Manual
Page 9
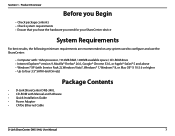
... Pack 2), Windows Vista®, Windows® 7, Windows® 8, or Mac OS® X 10.5.6 or higher • Up to four 3.5" SATA Hard Drive(s) Package Contents • D-Link ShareCenter DNS-340L • CD-ROM with Manual and Software • Quick Installation Guide • Power Adapter • CAT5e Ethernet Cable...
... Pack 2), Windows Vista®, Windows® 7, Windows® 8, or Mac OS® X 10.5.6 or higher • Up to four 3.5" SATA Hard Drive(s) Package Contents • D-Link ShareCenter DNS-340L • CD-ROM with Manual and Software • Quick Installation Guide • Power Adapter • CAT5e Ethernet Cable...

User Manual
Page 10
Section 1 - Product Overview Features The ShareCenter DNS-340L is an easy to install data storage platform used for both Samba and FTP server • ...FTP support FXP • IP blocking • Disk Management • Hot swappable • RAID: Standard, JBOD, 0, 1, 5 • RAID 1/5 Auto/Manual rebuild • RAID migration: Standard to RAID 1 • RAID migration: Standard to RAID 5 • RAID migration: RAID 1 to a local network or... remote access to RAID 5 • SMART Disk Status Monitoring • HDD SMART test • Scandisk D-Link ShareCenter DNS-340L User Manual 8
Section 1 - Product Overview Features The ShareCenter DNS-340L is an easy to install data storage platform used for both Samba and FTP server • ...FTP support FXP • IP blocking • Disk Management • Hot swappable • RAID: Standard, JBOD, 0, 1, 5 • RAID 1/5 Auto/Manual rebuild • RAID migration: Standard to RAID 1 • RAID migration: Standard to RAID 5 • RAID migration: RAID 1 to a local network or... remote access to RAID 5 • SMART Disk Status Monitoring • HDD SMART test • Scandisk D-Link ShareCenter DNS-340L User Manual 8

User Manual
Page 11
... Management • HTTP/FTP schedule download • Peer-to-peer (P2P) downloads, aMule and Transmission support • System Management • Supports mydlink portal • Supports D-Link storage utility/setup wizard • OS Support: Windows XP, Vista, 7, 8, and Mac OS X • Two access modes supported: Open (Share) mode and Account (User) mode.../off • Auto-shutdown on UPS low battery • Smart Fan control • Network UPS • USB Port Support • Print server • UPS monitoring D-Link ShareCenter DNS-340L User Manual 9 Section 1 -
... Management • HTTP/FTP schedule download • Peer-to-peer (P2P) downloads, aMule and Transmission support • System Management • Supports mydlink portal • Supports D-Link storage utility/setup wizard • OS Support: Windows XP, Vista, 7, 8, and Mac OS X • Two access modes supported: Open (Share) mode and Account (User) mode.../off • Auto-shutdown on UPS low battery • Smart Fan control • Network UPS • USB Port Support • Print server • UPS monitoring D-Link ShareCenter DNS-340L User Manual 9 Section 1 -
User Manual
Page 12
...Audio streamer • Logitech Media Center • AjaXplorer • aMule • phpMyAdmin • phpBB • Joomla • Transmission D-Link ShareCenter DNS-340L User Manual 10 Product Overview • External storage device • MTP/PTP • Media Streaming • UPnP AV Server • Supports PS3 /...8226; Auto recycling recording • 4-channel live video • 4-channel synchronous playback • Recording type : Record by schedule, manual record • E-map support • Backup recorded video • Add-on your mobile devices to the NAS • Redirect...
...Audio streamer • Logitech Media Center • AjaXplorer • aMule • phpMyAdmin • phpBB • Joomla • Transmission D-Link ShareCenter DNS-340L User Manual 10 Product Overview • External storage device • MTP/PTP • Media Streaming • UPnP AV Server • Supports PS3 /...8226; Auto recycling recording • 4-channel live video • 4-channel synchronous playback • Recording type : Record by schedule, manual record • E-map support • Backup recorded video • Add-on your mobile devices to the NAS • Redirect...
User Manual
Page 13
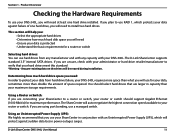
... (1000 Mbit/s) for a router or switch Selecting hard drives: You can use RAID 1, which will be erased during installation. D-Link ShareCenter DNS-340L User Manual 11 Product Overview Checking the Hardware Requirements To use a managed switch. Using an Uninterrupted Power Supply (UPS): We highly recommend that ...are using port bonding, use your DNS-340L, you will need at least one hard drive, you will need to ...
... (1000 Mbit/s) for a router or switch Selecting hard drives: You can use RAID 1, which will be erased during installation. D-Link ShareCenter DNS-340L User Manual 11 Product Overview Checking the Hardware Requirements To use a managed switch. Using an Uninterrupted Power Supply (UPS): We highly recommend that ...are using port bonding, use your DNS-340L, you will need at least one hard drive, you will need to ...
User Manual
Page 14
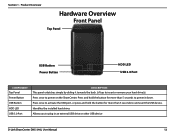
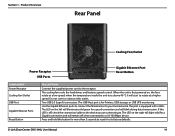
Press once to plug in an external USB drive or other USB device D-Link ShareCenter DNS-340L User Manual 12 Identifies the installed hard drives Allows you to power on the ShareCenter. Section 1 - Lift up to power it towards the back. Press and hold ...
Press once to plug in an external USB drive or other USB device D-Link ShareCenter DNS-340L User Manual 12 Identifies the installed hard drives Allows you to power on the ShareCenter. Section 1 - Lift up to power it towards the back. Press and hold ...
User Manual
Page 15
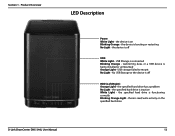
... hard drive has a problem No Light - USB Storage is being installed or unmounted Orange Light - the specified hard drive is on the specified hard drive D-Link ShareCenter DNS-340L User Manual 13 Section 1 -
... hard drive has a problem No Light - USB Storage is being installed or unmounted Orange Light - the specified hard drive is on the specified hard drive D-Link ShareCenter DNS-340L User Manual 13 Section 1 -
User Manual
Page 16
... button for a good connection and will remain off , check the connection/cable to the device you are connecting to rotate at a higher speed. Section 1 - D-Link ShareCenter DNS-340L User Manual 14 The cooling fan cools the hard drives and features speed control. Use the Gigabit Ethernet ports to connect the ShareCenter to the receptor...
... button for a good connection and will remain off , check the connection/cable to the device you are connecting to rotate at a higher speed. Section 1 - D-Link ShareCenter DNS-340L User Manual 14 The cooling fan cools the hard drives and features speed control. Use the Gigabit Ethernet ports to connect the ShareCenter to the receptor...
User Manual
Page 17
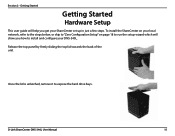
Once the lid is unlatched, remove it to install and configure your DNS-340L. D-Link ShareCenter DNS-340L User Manual 15 Getting Started Getting Started Hardware Setup This user guide will show you get your local network, refer to the steps below, or skip to "Zero Configuration Setup" on your ShareCenter set up in just a few steps. Section 2 - To install the ShareCenter on page 18 to run the setup wizard which will help you how to expose the hard drive bays. Release the top panel by firmly sliding the top lid towards the back of the unit.
Once the lid is unlatched, remove it to install and configure your DNS-340L. D-Link ShareCenter DNS-340L User Manual 15 Getting Started Getting Started Hardware Setup This user guide will show you get your local network, refer to the steps below, or skip to "Zero Configuration Setup" on your ShareCenter set up in just a few steps. Section 2 - To install the ShareCenter on page 18 to run the setup wizard which will help you how to expose the hard drive bays. Release the top panel by firmly sliding the top lid towards the back of the unit.
User Manual
Page 18
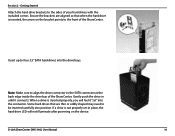
... the drive in until it "set in place, the hard drive LED will feel it connects. When a drive is not properly set " into the connector. D-Link ShareCenter DNS-340L User Manual 16 Ensure the brackets are aligned so that are thin or oddly shaped may need to the sides of the ShareCenter. Section 2 -
... the drive in until it "set in place, the hard drive LED will feel it connects. When a drive is not properly set " into the connector. D-Link ShareCenter DNS-340L User Manual 16 Ensure the brackets are aligned so that are thin or oddly shaped may need to the sides of the ShareCenter. Section 2 -
User Manual
Page 19
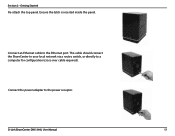
Section 2 - Ensure the latch is inserted inside the panel. Connect the power adapter to the Ethernet port. Connect an Ethernet cable to the power receptor. This cable should connect the ShareCenter to your local network via a router, switch, or directly to a computer for configuration (cross-over cable required). D-Link ShareCenter DNS-340L User Manual 17 Getting Started Re-attach the top panel.
Section 2 - Ensure the latch is inserted inside the panel. Connect the power adapter to the Ethernet port. Connect an Ethernet cable to the power receptor. This cable should connect the ShareCenter to your local network via a router, switch, or directly to a computer for configuration (cross-over cable required). D-Link ShareCenter DNS-340L User Manual 17 Getting Started Re-attach the top panel.
User Manual
Page 20
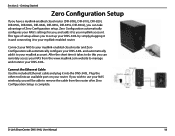
D-Link ShareCenter DNS-340L User Manual 18 After the short time it takes to do this you can take advantage of setup allows you can remotely access your router. Connect the Ethernet Cable Use the included Ethernet cable and plug it to your mydlink account. Plug the other end into the DNS-340L...., DIR-810L, DIR-820L DIR-850L, DIR-860L, DIR-868L, DIR-865L, DIR-855L, DIR-836L), you to set up your DNS-340L by simply plugging it in and connecting it to your mydlink account. Zero Configuration automatically configures your NAS's settings for you will automatically configure your...
D-Link ShareCenter DNS-340L User Manual 18 After the short time it takes to do this you can take advantage of setup allows you can remotely access your router. Connect the Ethernet Cable Use the included Ethernet cable and plug it to your mydlink account. Plug the other end into the DNS-340L...., DIR-810L, DIR-820L DIR-850L, DIR-860L, DIR-868L, DIR-865L, DIR-855L, DIR-836L), you to set up your DNS-340L by simply plugging it in and connecting it to your mydlink account. Zero Configuration automatically configures your NAS's settings for you will automatically configure your...
User Manual
Page 21
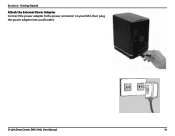
Section 2 - D-Link ShareCenter DNS-340L User Manual 19 Getting Started Attach the External Power Adapter Connect the power adapter to the power connector on your NAS, then plug the power adapter into a wall outlet.
Section 2 - D-Link ShareCenter DNS-340L User Manual 19 Getting Started Attach the External Power Adapter Connect the power adapter to the power connector on your NAS, then plug the power adapter into a wall outlet.