
Product Manual
Page 2
DNS-120 User's Manual Table of Contents Table of Contents Package Contents 3 Introduction 4 Features and Benefits 5 Hardware Overview 6 Getting Started 8 Hardware Installation 9 Mapping a Drive 10 Using the ... Using the Configuration Utility 14 Setup Wizard 15 IP Settings 18 Device Settings 19 User Creation 20 Network Access 21 FTP Server 23 Admin Password 27 Time Server 28 System Settings 29 Upgrade Firmware 30 Device Information 31 Help Screen 32 Download Scheduling 33 Scheduling Status 36 Networking Basics 37...
DNS-120 User's Manual Table of Contents Table of Contents Package Contents 3 Introduction 4 Features and Benefits 5 Hardware Overview 6 Getting Started 8 Hardware Installation 9 Mapping a Drive 10 Using the ... Using the Configuration Utility 14 Setup Wizard 15 IP Settings 18 Device Settings 19 User Creation 20 Network Access 21 FTP Server 23 Admin Password 27 Time Server 28 System Settings 29 Upgrade Firmware 30 Device Information 31 Help Screen 32 Download Scheduling 33 Scheduling Status 36 Networking Basics 37...

Product Manual
Page 3
If any of the above USB Hard Drive(s) An available Ethernet port on the network D-Link Systems, Inc. 3 DNS-120 User's Manual Package Contents Package Contents D-Link DNS-120 Network Storage Adapter CD-ROM with Manual and Software Ethernet (CAT5 UTP/Straight-Through) Cable 5V 2.5A Power Supply Note: Using a ... version 6.0 or Netscape Navigator version 7.0 and above items are missing, please contact your reseller. Minimum System Requirements Computer with the DNS-120 will cause damage and void the warranty for this product.
If any of the above USB Hard Drive(s) An available Ethernet port on the network D-Link Systems, Inc. 3 DNS-120 User's Manual Package Contents Package Contents D-Link DNS-120 Network Storage Adapter CD-ROM with Manual and Software Ethernet (CAT5 UTP/Straight-Through) Cable 5V 2.5A Power Supply Note: Using a ... version 6.0 or Netscape Navigator version 7.0 and above items are missing, please contact your reseller. Minimum System Requirements Computer with the DNS-120 will cause damage and void the warranty for this product.

Product Manual
Page 4
... are accessible over the Internet, making it convenient to access your network has never been easier. DNS-120 User's Manual Introduction Introduction The D-Link DNS-120 Network Storage Adapter connects USB drives* to the network, and provides authorized users access to their USB drives. Additional setup options can be configured using the "Disconnect" button on the...
... are accessible over the Internet, making it convenient to access your network has never been easier. DNS-120 User's Manual Introduction Introduction The D-Link DNS-120 Network Storage Adapter connects USB drives* to the network, and provides authorized users access to their USB drives. Additional setup options can be configured using the "Disconnect" button on the...

Product Manual
Page 5
... Remove USB Drives The DNS-120 does not require you 're away. DNS-120 User's Manual Features and Benefits Features and Benefits Connect USB 2.0/1.1 Add extra storage space to the network, thus eliminating downtime. Simply connect the DNS-120 to all stored files. Built-in FTP Server The DNS-120 can schedule the DNS-120 to access your USB drives...
... Remove USB Drives The DNS-120 does not require you 're away. DNS-120 User's Manual Features and Benefits Features and Benefits Connect USB 2.0/1.1 Add extra storage space to the network, thus eliminating downtime. Simply connect the DNS-120 to all stored files. Built-in FTP Server The DNS-120 can schedule the DNS-120 to access your USB drives...

Product Manual
Page 6
Solid green indicates the USB drive is initially connected to the DNS-120. Power LED Solid green indicates a good power source connection. D-Link Systems, Inc. 6 USB LED Blinking green indicates when an USB drive is ready for use. DNS-120 User's Manual Hardware Overview Front Panel Hardware Overview Ethernet LED Solid green indicates an Ethernet connection. Blinking green indicates activity on the Ethernet network.
Solid green indicates the USB drive is initially connected to the DNS-120. Power LED Solid green indicates a good power source connection. D-Link Systems, Inc. 6 USB LED Blinking green indicates when an USB drive is ready for use. DNS-120 User's Manual Hardware Overview Front Panel Hardware Overview Ethernet LED Solid green indicates an Ethernet connection. Blinking green indicates activity on the Ethernet network.
Product Manual
Page 7
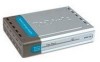
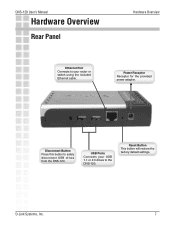
D-Link Systems, Inc. 7 Power Receptor Receptor for the provided power adapter. Reset Button This button will restore the factory default settings. DNS-120 User's Manual Hardware Overview Rear Panel Hardware Overview Ethernet Port Connects to your USB 1.1 or 2.0 drives to safely disconnect USB drives from the DNS-120. USB Ports Connects your router or switch using the included Ethernet cable. Disconnect Button Press this button to the DNS-120.
D-Link Systems, Inc. 7 Power Receptor Receptor for the provided power adapter. Reset Button This button will restore the factory default settings. DNS-120 User's Manual Hardware Overview Rear Panel Hardware Overview Ethernet Port Connects to your USB 1.1 or 2.0 drives to safely disconnect USB drives from the DNS-120. USB Ports Connects your router or switch using the included Ethernet cable. Disconnect Button Press this button to the DNS-120.

Product Manual
Page 8
DNS-120 User's Manual Getting Started Getting Started When you have completed the steps in this Quick Installation Guide, your connected network may look similar to this: D-Link Systems, Inc. 8
DNS-120 User's Manual Getting Started Getting Started When you have completed the steps in this Quick Installation Guide, your connected network may look similar to this: D-Link Systems, Inc. 8
Product Manual
Page 9
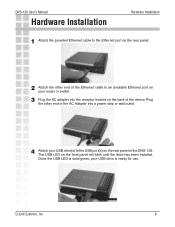
DNS-120 User's Manual Hardware Installation Hardware Installation 1 Attach the provided Ethernet cable to the Ethernet port on the rear panel. 2 Attach the other end of the AC Adapter into the receptor located on the front panel will blink until the drive has been installed. Once the USB LED is solid ...a power strip or wall outlet. 4 Attach your USB drive(s) to an available Ethernet port on your USB drive is ready for use. D-Link Systems, Inc. 9 The USB LED on the back of the DNS-120. Plug the other end of the Ethernet cable to the USB port(s) on the rear panel of the device....
DNS-120 User's Manual Hardware Installation Hardware Installation 1 Attach the provided Ethernet cable to the Ethernet port on the rear panel. 2 Attach the other end of the AC Adapter into the receptor located on the front panel will blink until the drive has been installed. Once the USB LED is solid ...a power strip or wall outlet. 4 Attach your USB drive(s) to an available Ethernet port on your USB drive is ready for use. D-Link Systems, Inc. 9 The USB LED on the back of the DNS-120. Plug the other end of the Ethernet cable to the USB port(s) on the rear panel of the device....
Product Manual
Page 10
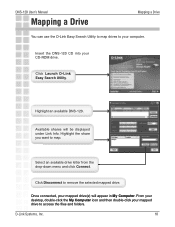
... from the drop-down menu and click Connect. Once connected, your CD-ROM drive. Insert the DNS-120 CD into your mapped drive(s) will be displayed under Link Info. Highlight an available DNS-120. DNS-120 User's Manual Mapping a Drive Mapping a Drive You can use the D-Link Easy Search Utility to map drives to remove the selected mapped drive.
... from the drop-down menu and click Connect. Once connected, your CD-ROM drive. Insert the DNS-120 CD into your mapped drive(s) will be displayed under Link Info. Highlight an available DNS-120. DNS-120 User's Manual Mapping a Drive Mapping a Drive You can use the D-Link Easy Search Utility to map drives to remove the selected mapped drive.

Product Manual
Page 11
...My Computer screen. DNS-120 User's Manual Mapping a Drive Mapping a Drive (continued) As an alternate method, you entered into the Setup Wizard or in the Home>LAN screen in Windows. Please see the following instructions for mapping a USB drive so that you can access the DNS-120's USB drive(s) by ...mapping the shared folders as drives in the Configuration Utility. Click Finish D-Link Systems, Inc. \\DNS-120\Shared folder 11
...My Computer screen. DNS-120 User's Manual Mapping a Drive Mapping a Drive (continued) As an alternate method, you entered into the Setup Wizard or in the Home>LAN screen in Windows. Please see the following instructions for mapping a USB drive so that you can access the DNS-120's USB drive(s) by ...mapping the shared folders as drives in the Configuration Utility. Click Finish D-Link Systems, Inc. \\DNS-120\Shared folder 11
Product Manual
Page 12
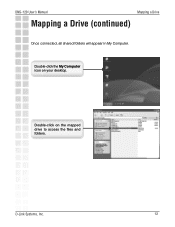
Double-click the My Computer icon on the mapped drive to access the files and folders. D-Link Systems, Inc. 12 DNS-120 User's Manual Mapping a Drive Mapping a Drive (continued) Once connected, all shared folders will appear in My Computer. Double-click on your desktop.
Double-click the My Computer icon on the mapped drive to access the files and folders. D-Link Systems, Inc. 12 DNS-120 User's Manual Mapping a Drive Mapping a Drive (continued) Once connected, all shared folders will appear in My Computer. Double-click on your desktop.
Product Manual
Page 13
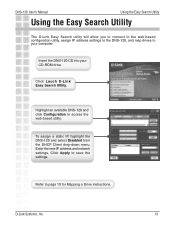
... select Disabled from the DHCP Client drop-down menu. Insert the DNS-120 CD into your computer. D-Link Systems, Inc. 13 Enter the new IP address and network settings. DNS-120 User's Manual Using the Easy Search Utility Using the Easy Search Utility The D-Link Easy Search utility will allow you to connect to the web-based...
... select Disabled from the DHCP Client drop-down menu. Insert the DNS-120 CD into your computer. D-Link Systems, Inc. 13 Enter the new IP address and network settings. DNS-120 User's Manual Using the Easy Search Utility Using the Easy Search Utility The D-Link Easy Search utility will allow you to connect to the web-based...

Product Manual
Page 14
... the password field blank. Click Config Once you may run the Easy Search Utility included on the next page, will appear. DNS-120 User's Manual Using the Configuration Utility Using the Configuration Utility To log into the web-based configuration of the... DNS-120, you have logged in, the Home screen, shown on your Web browser and type http://DNS-120 into the URL address box and then press the Enter or Return key. Open your CD or type http://DNS-120 into a web browser. The logon screen will appear. D-Link Systems, Inc. 14...
... the password field blank. Click Config Once you may run the Easy Search Utility included on the next page, will appear. DNS-120 User's Manual Using the Configuration Utility Using the Configuration Utility To log into the web-based configuration of the... DNS-120, you have logged in, the Home screen, shown on your Web browser and type http://DNS-120 into the URL address box and then press the Enter or Return key. Open your CD or type http://DNS-120 into a web browser. The logon screen will appear. D-Link Systems, Inc. 14...
Product Manual
Page 15
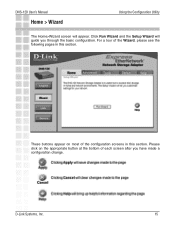
DNS-120 User's Manual Home > Wizard Using the Configuration Utility The Home>Wizard screen will guide you have made a configuration change. Please click on most of each screen after you through the basic configuration. These buttons appear on the appropriate button at the bottom of the configuration screens in this section. For a tour of the Wizard, please see the following pages in this section. D-Link Systems, Inc. 15 Click Run Wizard and the Setup Wizard will appear.
DNS-120 User's Manual Home > Wizard Using the Configuration Utility The Home>Wizard screen will guide you have made a configuration change. Please click on most of each screen after you through the basic configuration. These buttons appear on the appropriate button at the bottom of the configuration screens in this section. For a tour of the Wizard, please see the following pages in this section. D-Link Systems, Inc. 15 Click Run Wizard and the Setup Wizard will appear.

Product Manual
Page 16
Using the Configuration Utility 16 Additional settings Click Next Create a new password for your Time Zone from the drop-down menu. DNS-120 User's Manual Using the Setup Wizard The Wizard will guide you through five steps: - Time Zone - Click Next Select your DNS-120. Password - Click Next D-Link Systems, Inc. LAN Connection -
Using the Configuration Utility 16 Additional settings Click Next Create a new password for your Time Zone from the drop-down menu. DNS-120 User's Manual Using the Setup Wizard The Wizard will guide you through five steps: - Time Zone - Click Next Select your DNS-120. Password - Click Next D-Link Systems, Inc. LAN Connection -

Product Manual
Page 17
DNS-120 User's Manual Using the Setup Wizard (continued) Leave DHCP Client enabled if your network. Click Next Click Restart You have completed the basic configuration of your network. Using the Configuration Utility Click Next Enter the workgroup name of the DNS-120 using the setup wizard! If not, select Static IP and enter the IP address information to be in the same range as your network contains a DHCP server or router. The IP address must be used. Enter a name and a description for the DNS-120. D-Link Systems, Inc. 17
DNS-120 User's Manual Using the Setup Wizard (continued) Leave DHCP Client enabled if your network. Click Next Click Restart You have completed the basic configuration of your network. Using the Configuration Utility Click Next Enter the workgroup name of the DNS-120 using the setup wizard! If not, select Static IP and enter the IP address information to be in the same range as your network contains a DHCP server or router. The IP address must be used. Enter a name and a description for the DNS-120. D-Link Systems, Inc. 17
Product Manual
Page 18
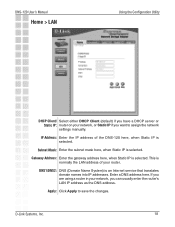
... is selected. D-Link Systems, Inc. 18 This is an Internet service that translates domain names into IP addresses. DNS1/DNS2: DNS (Domain Name System) is normally the LAN address of the DNS-120 here, when Static IP is selected. Apply: Click Apply to assign the network settings manually. If you are.... Subnet Mask: Enter the subnet mask here, when Static IP is selected. DNS-120 User's Manual Home > LAN Using the Configuration Utility DHCP Client/ Select either DHCP Client (default) if you have a DHCP server or Static IP: router on your network, or Static IP if you can ...
... is selected. D-Link Systems, Inc. 18 This is an Internet service that translates domain names into IP addresses. DNS1/DNS2: DNS (Domain Name System) is normally the LAN address of the DNS-120 here, when Static IP is selected. Apply: Click Apply to assign the network settings manually. If you are.... Subnet Mask: Enter the subnet mask here, when Static IP is selected. DNS-120 User's Manual Home > LAN Using the Configuration Utility DHCP Client/ Select either DHCP Client (default) if you have a DHCP server or Static IP: router on your network, or Static IP if you can ...

Product Manual
Page 19
Description: Enter a description of your network. D-Link Systems, Inc. 19 This is useful if you have more than one DNS-120 devices on the network. DNS-120 User's Manual Home > Device Using the Configuration Utility Workgroup: Enter the name of the workgroup of the DNS-120. Name: Enter a name for the DNS-120 device.
Description: Enter a description of your network. D-Link Systems, Inc. 19 This is useful if you have more than one DNS-120 devices on the network. DNS-120 User's Manual Home > Device Using the Configuration Utility Workgroup: Enter the name of the workgroup of the DNS-120. Name: Enter a name for the DNS-120 device.

Product Manual
Page 20
... List. Comfirm Password: Enter the password again for the user. To change a current user's password, click the icon next to save any changes. DNS-120 User's Manual Advanced > User Using the Configuration Utility User Name: Enter a user name. D-Link Systems, Inc. 20 Password: Enter a password for confirmation.
... List. Comfirm Password: Enter the password again for the user. To change a current user's password, click the icon next to save any changes. DNS-120 User's Manual Advanced > User Using the Configuration Utility User Name: Enter a user name. D-Link Systems, Inc. 20 Password: Enter a password for confirmation.

Product Manual
Page 21
DNS-120 User's Manual Advanced > Network Access Using the Configuration Utility User: Select a user from the drop-down menu. Comment: Enter a comment regarding the rule. By default, all users on your local network will be formatted with NTFS. D-Link Systems, Inc. 21 To assign read /write permissions...down menu or check All Accounts. Note: Currently, you would like to the DNS-120. This "rule" will have read /write permissions, the drive(s) must be displayed in the list similar to the USB drive(s) if formatted with FAT or FAT32. Authority: Select Read Only or Read...
DNS-120 User's Manual Advanced > Network Access Using the Configuration Utility User: Select a user from the drop-down menu. Comment: Enter a comment regarding the rule. By default, all users on your local network will be formatted with NTFS. D-Link Systems, Inc. 21 To assign read /write permissions...down menu or check All Accounts. Note: Currently, you would like to the DNS-120. This "rule" will have read /write permissions, the drive(s) must be displayed in the list similar to the USB drive(s) if formatted with FAT or FAT32. Authority: Select Read Only or Read...
