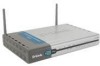
Product Manual
Page 4
... of an Infrastructure network using the DI-714P+. *Maximum wireless signal rate derived from IEEE Standard 802.11b specifications. It is compatible with other DLink AirPlus products such as share a printer wirelessly on your network. Actual data throughput will have the ability to your package) you connect the Router and D-Link AirPlus 2.4GHz Wireless Adapters into a large network. Unlike most...
... of an Infrastructure network using the DI-714P+. *Maximum wireless signal rate derived from IEEE Standard 802.11b specifications. It is compatible with other DLink AirPlus products such as share a printer wirelessly on your network. Actual data throughput will have the ability to your package) you connect the Router and D-Link AirPlus 2.4GHz Wireless Adapters into a large network. Unlike most...

Product Manual
Page 5
... security Advanced Firewall features for added network security DHCP server support enables all networked computers to automatically receive IP addresses Wireless connection of up to 22Mbps Web-based interface for Management Access Control to manage users on how to the Troubleshooting section... to a network printer WAN and LAN ports auto detect cable types (straight-through or cross-over ) UPnP supported Note: Please refer to use the Reset button 5 Most printers will work with a bidirectional port. Connections Pressing the Reset Button restores the router to Ethernetenabled devices....
... security Advanced Firewall features for added network security DHCP server support enables all networked computers to automatically receive IP addresses Wireless connection of up to 22Mbps Web-based interface for Management Access Control to manage users on how to the Troubleshooting section... to a network printer WAN and LAN ports auto detect cable types (straight-through or cross-over ) UPnP supported Note: Please refer to use the Reset button 5 Most printers will work with a bidirectional port. Connections Pressing the Reset Button restores the router to Ethernetenabled devices....
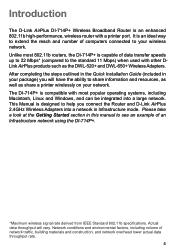
Product Manual
Page 7
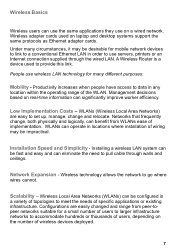
... range from WLANs ease of wireless devices deployed. 7 Network Expansion - Wireless technology allows the network to provide this link. People use wireless LAN technology for mobile network devices to link to a conventional Ethernet LAN ... range of specific applications or existing infrastructure. Scalability - Wireless Basics Wireless users can use the same applications they use servers, printers or an Internet connection supplied through walls and ceilings. Productivity... many different purposes: Mobility - A Wireless Router is a device used on a wired network.
... range from WLANs ease of wireless devices deployed. 7 Network Expansion - Wireless technology allows the network to provide this link. People use wireless LAN technology for mobile network devices to link to a conventional Ethernet LAN ... range of specific applications or existing infrastructure. Scalability - Wireless Basics Wireless users can use the same applications they use servers, printers or an Internet connection supplied through walls and ceilings. Productivity... many different purposes: Mobility - A Wireless Router is a device used on a wired network.
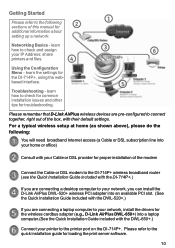
Product Manual
Page 10
... the DI-714P+ wireless broadband router (see the Quick Installation Guide included with the DI-714P+.) If you are connecting a desktop computer to your network, you can install the D-Link AirPlus DWL-520+ wireless PCI adapter into a laptop computer.(See the Quick Installation Guide included with their default settings. Please remember that D-Link AirPlus wireless devices are connecting a laptop computer to the printer...
... the DI-714P+ wireless broadband router (see the Quick Installation Guide included with the DI-714P+.) If you are connecting a desktop computer to your network, you can install the D-Link AirPlus DWL-520+ wireless PCI adapter into a laptop computer.(See the Quick Installation Guide included with their default settings. Please remember that D-Link AirPlus wireless devices are connecting a laptop computer to the printer...
Product Manual
Page 40
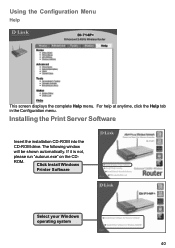
If it is not, please run "autorun.exe" on the CD- Using the Configuration Menu Help This screen displays the complete Help menu. The following window will be shown automatically. Installing the Print Server Software Insert the installation CD-ROM into the CD-ROM drive. For help at anytime, click the Help tab in the Configuration menu. Click Install Windows Printer Software Select your Windows operating system 40 ROM.
If it is not, please run "autorun.exe" on the CD- Using the Configuration Menu Help This screen displays the complete Help menu. The following window will be shown automatically. Installing the Print Server Software Insert the installation CD-ROM into the CD-ROM drive. For help at anytime, click the Help tab in the Configuration menu. Click Install Windows Printer Software Select your Windows operating system 40 ROM.
Product Manual
Page 42
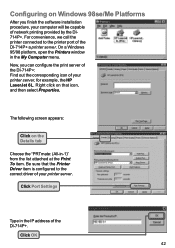
... in the IP address of the DI-714P+. For convenience, we call the printer connected to the correct driver of your printer server, for example, the HP LaserJet 6L. The following screen appears: Click on that the Printer Driver item is configured to the printer port of the DI-714P+ a printer server. Click Port Settings Type in the My... To item. Be sure that icon, and then select Properties. Configuring on Windows 98se/Me Platforms After you can configure the print server of the DI-714P+: Find out the corresponding icon of your printer server.
... in the IP address of the DI-714P+. For convenience, we call the printer connected to the correct driver of your printer server, for example, the HP LaserJet 6L. The following screen appears: Click on that the Printer Driver item is configured to the printer port of the DI-714P+ a printer server. Click Port Settings Type in the My... To item. Be sure that icon, and then select Properties. Configuring on Windows 98se/Me Platforms After you can configure the print server of the DI-714P+: Find out the corresponding icon of your printer server.

Product Manual
Page 43
Configuring on Windows 2000/XP Platforms Click Port The configuration procedure for a Windows 2000/XP platform is similar to that of Windows 95/98 except the screen of the DI-714P+. Click OK (Note: Screen shots are taken in Windows 2000, similar screens will appear in the IP address of printer Properties: Click Configure Port Type in Windows XP.) 43
Configuring on Windows 2000/XP Platforms Click Port The configuration procedure for a Windows 2000/XP platform is similar to that of Windows 95/98 except the screen of the DI-714P+. Click OK (Note: Screen shots are taken in Windows 2000, similar screens will appear in the IP address of printer Properties: Click Configure Port Type in Windows XP.) 43
Product Manual
Page 59
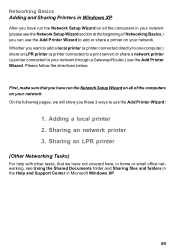
... on all of Networking Basics,) you want to add a local printer (a printer connected directly to one computer,) share an LPR printer (a printer connected to a print server) or share a network printer (a printer connected to your network through a Gateway/Router,) use the Add Printer Wizard: 1. Networking Basics Adding and Sharing Printers in Windows XP After you have run the Network Setup...
... on all of Networking Basics,) you want to add a local printer (a printer connected directly to one computer,) share an LPR printer (a printer connected to a print server) or share a network printer (a printer connected to your network through a Gateway/Router,) use the Add Printer Wizard: 1. Networking Basics Adding and Sharing Printers in Windows XP After you have run the Network Setup...

Product Manual
Page 60
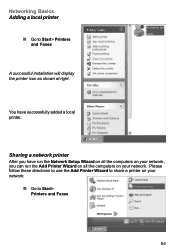
Go to Start> Printers and Faxes Click on the network and is connected directly to one computer. Networking Basics Adding a local printer (a printer connected directly to a computer) A printer that is not shared on Add a printer 60 If you do not need to share your printer on a network, follow these directions to add the printer to one computer is called a local printer.
Go to Start> Printers and Faxes Click on the network and is connected directly to one computer. Networking Basics Adding a local printer (a printer connected directly to a computer) A printer that is not shared on Add a printer 60 If you do not need to share your printer on a network, follow these directions to add the printer to one computer is called a local printer.

Product Manual
Page 61
Networking Basics Adding a local printer Click Next Select Local printer attached to this computer (Deselect Automatically detect and install my Plug and Play printer if it has been selected.) Click Next Select Use the following port: From the pull-down menu select the correct port for your printer (Most computers use the LPT1: port, as shown in the illustration.) Click Next 61
Networking Basics Adding a local printer Click Next Select Local printer attached to this computer (Deselect Automatically detect and install my Plug and Play printer if it has been selected.) Click Next Select Use the following port: From the pull-down menu select the correct port for your printer (Most computers use the LPT1: port, as shown in the illustration.) Click Next 61

Product Manual
Page 62
Networking Basics Adding a local printer Select and highlight the correct driver for your printer and click Have Disk.) At this screen, you have chosen the correct driver. Click Next 62 A successful printing will confirm that came with your printer. Click Next (If the correct driver is not displayed, insert the CD or floppy disk that you can change the name of the printer (optional.) Click Next Select Yes, to print a test page.
Networking Basics Adding a local printer Select and highlight the correct driver for your printer and click Have Disk.) At this screen, you have chosen the correct driver. Click Next 62 A successful printing will confirm that came with your printer. Click Next (If the correct driver is not displayed, insert the CD or floppy disk that you can change the name of the printer (optional.) Click Next Select Yes, to print a test page.

Product Manual
Page 63
Networking Basics Adding a local printer This screen gives you information about your printer. Click Finish When the test page has printed, Click OK 63
Networking Basics Adding a local printer This screen gives you information about your printer. Click Finish When the test page has printed, Click OK 63
Product Manual
Page 64
You have run the Network Setup Wizard on all the computers on your network, you can run the Add Printer Wizard on all the computers on your network. Networking Basics Adding a local printer Go to Start> Printers and Faxes 64 Sharing a network printer After you have successfully added a local printer. Please follow these directions to use the Add Printer Wizard to share a printer on your network: Go to Start> Printers and Faxes A successful installation will display the printer icon as shown at right.
You have run the Network Setup Wizard on all the computers on your network, you can run the Add Printer Wizard on all the computers on your network. Networking Basics Adding a local printer Go to Start> Printers and Faxes 64 Sharing a network printer After you have successfully added a local printer. Please follow these directions to use the Add Printer Wizard to share a printer on your network: Go to Start> Printers and Faxes A successful installation will display the printer icon as shown at right.

Product Manual
Page 65
Networking Basics Sharing a network printer Click on Add a printer Click Next Select Network Printer Click Next 65
Networking Basics Sharing a network printer Click on Add a printer Click Next Select Network Printer Click Next 65

Product Manual
Page 66
Networking Basics Sharing a network printer Select Browse for a printer Click Next Select the printer you would like to share Click Next Click Finish 66
Networking Basics Sharing a network printer Select Browse for a printer Click Next Select the printer you would like to share Click Next Click Finish 66
Product Manual
Page 67
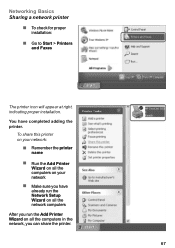
Networking Basics Sharing a network printer To check for proper installation: Go to Start > Printers and Faxes The printer icon will appear at right, indicating proper installation. To share this printer on your network: Remember the printer name Run the Add Printer Wizard on your network Make sure you can share the printer. 67 You have already run the Network Setup Wizard on all the network computers After you run the Add Printer Wizard on all the computers on all the computers in the network, you have completed adding the printer.
Networking Basics Sharing a network printer To check for proper installation: Go to Start > Printers and Faxes The printer icon will appear at right, indicating proper installation. To share this printer on your network: Remember the printer name Run the Add Printer Wizard on your network Make sure you can share the printer. 67 You have already run the Network Setup Wizard on all the network computers After you run the Add Printer Wizard on all the computers on all the computers in the network, you have completed adding the printer.
Product Manual
Page 68
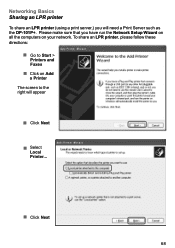
To share an LPR printer, please follow these directions: Go to Start > Printers and Faxes Click on your network. Networking Basics Sharing an LPR printer To share an LPR printer (using a print server,) you have run the Network Setup Wizard on all the computers on Add a Printer The screen to the right will need a Print Server such as the DP-101P+. Click Next 68 Please make sure that you will appear Click Next Select Local Printer...
To share an LPR printer, please follow these directions: Go to Start > Printers and Faxes Click on your network. Networking Basics Sharing an LPR printer To share an LPR printer (using a print server,) you have run the Network Setup Wizard on all the computers on Add a Printer The screen to the right will need a Print Server such as the DP-101P+. Click Next 68 Please make sure that you will appear Click Next Select Local Printer...

Product Manual
Page 69
Click Next Please read the instructions on this screen Click Next Enter the Printer IP Address and the Port Name, as shown. Click Next 69 Networking Basics Sharing an LPR printer Select Create a new port From the pull-down menu, select Standard TCP/IP Port, as shown.
Click Next Please read the instructions on this screen Click Next Enter the Printer IP Address and the Port Name, as shown. Click Next 69 Networking Basics Sharing an LPR printer Select Create a new port From the pull-down menu, select Standard TCP/IP Port, as shown.

Product Manual
Page 70
Select LPR Enter a Queue Name (if your Print-Server/ Gateway has more than one port, you will need a Queue name.) Click OK 70 Networking Basics Sharing an LPR printer In this screen, select Custom Click Settings Enter the Port Name and the Printer Name or IP Address.
Select LPR Enter a Queue Name (if your Print-Server/ Gateway has more than one port, you will need a Queue name.) Click OK 70 Networking Basics Sharing an LPR printer In this screen, select Custom Click Settings Enter the Port Name and the Printer Name or IP Address.
Product Manual
Page 71
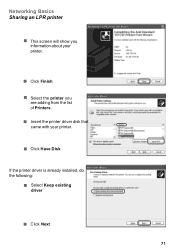
Click Finish Select the printer you information about your printer. Insert the printer driver disk that came with your printer. Click Have Disk If the printer driver is already installed, do the following: Select Keep existing driver Click Next 71 Networking Basics Sharing an LPR printer This screen will show you are adding from the list of Printers.
Click Finish Select the printer you information about your printer. Insert the printer driver disk that came with your printer. Click Have Disk If the printer driver is already installed, do the following: Select Keep existing driver Click Next 71 Networking Basics Sharing an LPR printer This screen will show you are adding from the list of Printers.
