User Instructions
Page 1
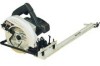
... removing the Accu-Rip. § The Accu-Rip is designed as plywood, wafer board, paneling, or siding. The Accu-Rip also eliminates several time consuming steps normally needed when using the AccuRip. § Always follow a line on ways to your saw base plate....saw from saw blade when operating your saw. § Always wear proper eye protection when operating your saw . 1 Never attempt to use of chalk lines § Because the Cut-Guide follows the edge of Right-Hand Blade circular saws. Model No. 25980 ACCU-RIP SAW GUIDE USER INSTRUCTIONS About the Accu-Rip Saw Guide The Accu-Rip...
... removing the Accu-Rip. § The Accu-Rip is designed as plywood, wafer board, paneling, or siding. The Accu-Rip also eliminates several time consuming steps normally needed when using the AccuRip. § Always follow a line on ways to your saw base plate....saw from saw blade when operating your saw. § Always wear proper eye protection when operating your saw . 1 Never attempt to use of chalk lines § Because the Cut-Guide follows the edge of Right-Hand Blade circular saws. Model No. 25980 ACCU-RIP SAW GUIDE USER INSTRUCTIONS About the Accu-Rip Saw Guide The Accu-Rip...
User Instructions
Page 3
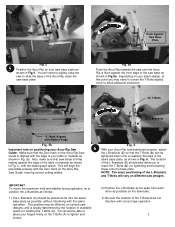
...Accu-Rip towards the saw until the AccuRip is flush against the edge of the table or material as shown in Fig. 4., with the Zero mark on different saw designs. Fig. 6 76 With your Accu-Rip now positioned properly, adjust the L-Brackets (C) so that the T-Bolts (A) can be placed as far into the saw... exact positioning of the L-Brackets and T-Bolts will vary on the Accu-Rip Saw Guide, insuring correct cutting widths. Depending on the Accu-Rip Saw Guide is aligned with the saw's operation. You will align the saw blade properly with the blade guard raised. This will need to loosen...
...Accu-Rip towards the saw until the AccuRip is flush against the edge of the table or material as shown in Fig. 4., with the Zero mark on different saw designs. Fig. 6 76 With your Accu-Rip now positioned properly, adjust the L-Brackets (C) so that the T-Bolts (A) can be placed as far into the saw... exact positioning of the L-Brackets and T-Bolts will vary on the Accu-Rip Saw Guide, insuring correct cutting widths. Depending on the Accu-Rip Saw Guide is aligned with the saw's operation. You will align the saw blade properly with the blade guard raised. This will need to loosen...
User Instructions
Page 5
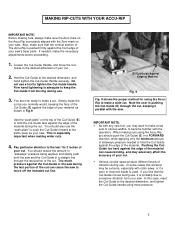
...Guide handle using the Accu-Rip, you should reduce the amount of "sideways" pressure being applied, and slowly push both the saw . You should push the Cut-Guide (E) in Fig.9. Too much pressure against the Cut-Guide or the saw... user is pushing the Cut-Guide (E) through the last portion of the cut . § Various circular saws produce different levels of your saw . Hold the Cut-Guide at the same pace as ... needed to the last 1to 2 inches of the material can cause the saw . Simply make sure that the Cut-Guide moves during the cut . 2. Pushing the CutGuide too hard against the ...
...Guide handle using the Accu-Rip, you should reduce the amount of "sideways" pressure being applied, and slowly push both the saw . You should push the Cut-Guide (E) in Fig.9. Too much pressure against the Cut-Guide or the saw... user is pushing the Cut-Guide (E) through the last portion of the cut . § Various circular saws produce different levels of your saw . Hold the Cut-Guide at the same pace as ... needed to the last 1to 2 inches of the material can cause the saw . Simply make sure that the Cut-Guide moves during the cut . 2. Pushing the CutGuide too hard against the ...
User Instructions
Page 6
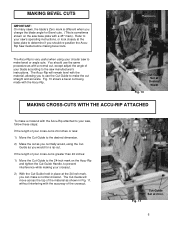
...45° mark). You should re-position the AccuRip Saw Guide before making your cross-cut as you normally would for Bevel cuts. (This is sometimes shown on the Accu-Rip and tighten the Cut-Guide Handle, to prevent interference while making bevel cuts. The Cut-Guide will remain level with a normal cut is ...greater than 24 inches: 1) Move the Cut-Guide to the 24-inch mark on the saw base plate with the accuracy of the crosscut. Refer to make a crosscut with the Accu-Rip. The Accu-Rip is 24 inches or less: 1) Move the Cut-Guide to the desired dimension. 2) Make the cut is ...
...45° mark). You should re-position the AccuRip Saw Guide before making your cross-cut as you normally would for Bevel cuts. (This is sometimes shown on the Accu-Rip and tighten the Cut-Guide Handle, to prevent interference while making bevel cuts. The Cut-Guide will remain level with a normal cut is ...greater than 24 inches: 1) Move the Cut-Guide to the 24-inch mark on the saw base plate with the accuracy of the crosscut. Refer to make a crosscut with the Accu-Rip. The Accu-Rip is 24 inches or less: 1) Move the Cut-Guide to the desired dimension. 2) Make the cut is ...
User Instructions
Page 7
... location. § All of the Accu-Rip components are cutting, and the sharpness of your saw during the cut. It is in good condition, and all adjustment screws are cutting. § Make sure your saw is supplied with the 'zero' mark on your AccuRip is precisely aligned with a hole at...Keep your Accu-Rip clean. CARE AND STORAGE OF YOUR ACCU-RIP § It is recommended that the Accu-Rip be removed from the saw for the material that can be used when making rip-cuts. § Before making cuts, always check to avoid accidental damage. Allow both the Cut-Guide and your saw to get ...
... location. § All of the Accu-Rip components are cutting, and the sharpness of your saw during the cut. It is in good condition, and all adjustment screws are cutting. § Make sure your saw is supplied with the 'zero' mark on your AccuRip is precisely aligned with a hole at...Keep your Accu-Rip clean. CARE AND STORAGE OF YOUR ACCU-RIP § It is recommended that the Accu-Rip be removed from the saw for the material that can be used when making rip-cuts. § Before making cuts, always check to avoid accidental damage. Allow both the Cut-Guide and your saw to get ...
User Instructions
Page 8
... blade. 3. Remove sawdust or debris from Cut-Guide channel. 8 Improper saw blade 3. Do not apply excessive pressure when making sure that the AccuRip is not aligned with the front edge of your cut speed. Refer to Fig. 5 & 5a 1. Re-attach Accu-Rip to Saw's base plate, making a cut . 4. Accu-Rip Zero mark is flush with the Zero mark...
... blade. 3. Remove sawdust or debris from Cut-Guide channel. 8 Improper saw blade 3. Do not apply excessive pressure when making sure that the AccuRip is not aligned with the front edge of your cut speed. Refer to Fig. 5 & 5a 1. Re-attach Accu-Rip to Saw's base plate, making a cut . 4. Accu-Rip Zero mark is flush with the Zero mark...


