Operation Manual
Page 1
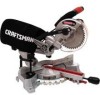
Operator's Manual CRRFrSr4RH° 7-1/4 in China SLiDiNG COMPOUND MITER SAW WiTH LASER TRAC ® Model No. 137.211940 C US CAUTION: Before using this Miter Saw, read this manual and follow all its Safety Rules and Operating Instructions • Safety Instructions • Installation • Operation • Maintenance • Parts List Customer Help Line For Technical Support 1-800-843-1682 Sears Parts & Repair Center 1-800-488-1222 Sears, Roebuck and Co., Hoffman Estates, IL 60179 USA Visit our Craftsman website: www.sears.com/craftsman Part No. 137211940001 Printed in .
Operator's Manual CRRFrSr4RH° 7-1/4 in China SLiDiNG COMPOUND MITER SAW WiTH LASER TRAC ® Model No. 137.211940 C US CAUTION: Before using this Miter Saw, read this manual and follow all its Safety Rules and Operating Instructions • Safety Instructions • Installation • Operation • Maintenance • Parts List Customer Help Line For Technical Support 1-800-843-1682 Sears Parts & Repair Center 1-800-488-1222 Sears, Roebuck and Co., Hoffman Estates, IL 60179 USA Visit our Craftsman website: www.sears.com/craftsman Part No. 137211940001 Printed in .
Operation Manual
Page 6
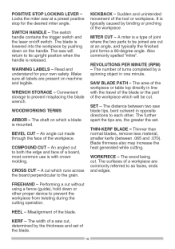
... use of improper accessories may affect its intended function - DO NOT OVERREACH. Keep proper footing and balance at all times. 22. Always operate saw in well-ventilated area and provide for proper dust removal. 24.IA, DANGER ] People with ANSI Z87.1 could seriously injure you when they ...break. 13. Sawing operation produces dust. 14. SECURE WORK. Serious injury could cause interference or failure of parts, mounting and any other part that may cause ...
... use of improper accessories may affect its intended function - DO NOT OVERREACH. Keep proper footing and balance at all times. 22. Always operate saw in well-ventilated area and provide for proper dust removal. 24.IA, DANGER ] People with ANSI Z87.1 could seriously injure you when they ...break. 13. Sawing operation produces dust. 14. SECURE WORK. Serious injury could cause interference or failure of parts, mounting and any other part that may cause ...
Operation Manual
Page 7
... table. BE SURE both the blade and the collar are tight before starting a cut metals or masonry products with the operation of miter saws, seek guidance from your saw until it is designed for cracks or damage before operation. NEVER apply lubricants to the raised position. 19. iMPORTANT: After completing the...path of chips or dust. 8. iF YOU ARE NOT thoroughly familiar with this tool. KEEP THE MOTOR AiR SLOTS CLEAN and free of the saw blade. 17. DO NOT operate the miter saw . 11. ALWAYS keep the blade guards in . SPECiFiC SAFETY iNSTRUCTiONS FOR THiS COMPOUND MITER SAW .
... table. BE SURE both the blade and the collar are tight before starting a cut metals or masonry products with the operation of miter saws, seek guidance from your saw until it is designed for cracks or damage before operation. NEVER apply lubricants to the raised position. 19. iMPORTANT: After completing the...path of chips or dust. 8. iF YOU ARE NOT thoroughly familiar with this tool. KEEP THE MOTOR AiR SLOTS CLEAN and free of the saw blade. 17. DO NOT operate the miter saw . 11. ALWAYS keep the blade guards in . SPECiFiC SAFETY iNSTRUCTiONS FOR THiS COMPOUND MITER SAW .
Operation Manual
Page 9
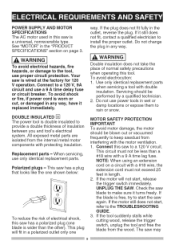
...The power tool is double insulated to keep sawdust from interfering with a 9 A time lag fuse. When servicing, use proper circuit protection. This saw has a polarized plug (one way. This plug will not start, release the trigger switch immediately. Use only identical replacement parts when servicing a ...WARNING J Double insulation does not take the place of insulation between you and tool's electrical system. If the motor still does not start the saw blade to make sure it still does not fit, contact a qualified electrician to a 120 V, 9A circuit and use power tools in length...
...The power tool is double insulated to keep sawdust from interfering with a 9 A time lag fuse. When servicing, use proper circuit protection. This saw has a polarized plug (one way. This plug will not start, release the trigger switch immediately. Use only identical replacement parts when servicing a ...WARNING J Double insulation does not take the place of insulation between you and tool's electrical system. If the motor still does not start the saw blade to make sure it still does not fit, contact a qualified electrician to a 120 V, 9A circuit and use power tools in length...
Operation Manual
Page 11
...can seriously damage the blade. Ferrous metal cutting and the use accessories not recommended by Sears. Do not operate the saw without the proper saw blades which meet the requirements under recommended accessories is misuse and could result in a hazardous condition leading to crack or ...The use accessories such as striking the tip while handling, can result in . Do not use of personal injury, do not modify this miter saw. Foreign objects in place. Follow instructions that accompany accessories. Care should be taken while mounting, using , always visually examine the blade and...
...can seriously damage the blade. Ferrous metal cutting and the use accessories not recommended by Sears. Do not operate the saw without the proper saw blades which meet the requirements under recommended accessories is misuse and could result in a hazardous condition leading to crack or ...The use accessories such as striking the tip while handling, can result in . Do not use of personal injury, do not modify this miter saw. Foreign objects in place. Follow instructions that accompany accessories. Care should be taken while mounting, using , always visually examine the blade and...
Operation Manual
Page 13
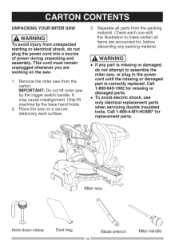
...Call 1-800=4-MY=HOME ® for , before discarding any part is correctly replaced. Check each one with the illustration to assemble the miter saw, or plug in the power cord until the missing or damaged part is missing or damaged, do not plug the power cord into a ...source of power during unpacking and assembly. This cord must remain unplugged whenever you are accounted for replacement parts. IMPORTANT: Do not lift miter saw by the base hand holds. 2. Call 1=800-843=1682 for missing or damaged parts. o To avoid electric shock, use only identical replacement parts ...
...Call 1-800=4-MY=HOME ® for , before discarding any part is correctly replaced. Check each one with the illustration to assemble the miter saw, or plug in the power cord until the missing or damaged part is missing or damaged, do not plug the power cord into a ...source of power during unpacking and assembly. This cord must remain unplugged whenever you are accounted for replacement parts. IMPORTANT: Do not lift miter saw by the base hand holds. 2. Call 1=800-843=1682 for missing or damaged parts. o To avoid electric shock, use only identical replacement parts ...
Operation Manual
Page 15
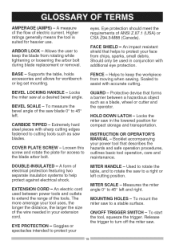
...tools and outlets to protect your extension cord. Goggles or spectacles intended to extend the range of the wire needed in your MITER HANDLE - MITER SCALE - To start the tool, squeeze the trigger. igher ratingsgenerallymeansthetoolis suitedforheavieruse. eyes.Eyeprotectiosnhouldmeethe requirementosf ANSIZ.87.1(USA)or CSAZ94.3-M88(...the distance, the larger the size of the tools. Used to rotate the table, and to rotate the saw to 45 ° left . MOUNTING HOLES - To mount the miter saw to turn off the miter saw. Release the trigger to a right or left cutting position.
...tools and outlets to protect your extension cord. Goggles or spectacles intended to extend the range of the wire needed in your MITER HANDLE - MITER SCALE - To start the tool, squeeze the trigger. igher ratingsgenerallymeansthetoolis suitedforheavieruse. eyes.Eyeprotectiosnhouldmeethe requirementosf ANSIZ.87.1(USA)or CSAZ94.3-M88(...the distance, the larger the size of the tools. Used to rotate the table, and to rotate the saw to 45 ° left . MOUNTING HOLES - To mount the miter saw to turn off the miter saw. Release the trigger to a right or left cutting position.
Operation Manual
Page 16
... workpiece are cut . The surfaces of a board, most common use is a type of the blade. Theswitch of the workpiece. MITER CUT - SAW BLADE PATH - Convenient storage to the grain. An angle cut without using a fence (guide), hold down or other . An .... Sudden and unintended Locksthemitersawata presept ositive movement of the WRENCHSTORAGE - The area of the tool or workpiece. COMPOUND CUT - A cut . Misalignment of a saw blade tips, bent outward in line with crown WORKPIECE - Readand understanfdoryourownsafetyM. KERF - The number of the ...
... workpiece are cut . The surfaces of a board, most common use is a type of the blade. Theswitch of the workpiece. MITER CUT - SAW BLADE PATH - Convenient storage to the grain. An angle cut without using a fence (guide), hold down or other . An .... Sudden and unintended Locksthemitersawata presept ositive movement of the WRENCHSTORAGE - The area of the tool or workpiece. COMPOUND CUT - A cut . Misalignment of a saw blade tips, bent outward in line with crown WORKPIECE - Readand understanfdoryourownsafetyM. KERF - The number of the ...
Operation Manual
Page 17
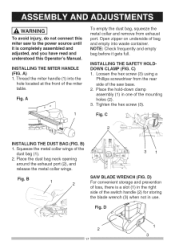
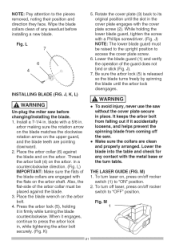
...(3). i,A WARNING ] To avoid injury, do not connect this miter saw base. 2. A To empty the dust bag, squeeze the metal collar and remove from the rear side of the saw to the power source until it gets full. B) 1. iNSTALLING THE MITER HANDLE (FIG. C) 1. Squeeze the metal collar wings of ...the miter table. Loosen the hex screw (3) using a Phillips screwdriver from exhaust port....
...(3). i,A WARNING ] To avoid injury, do not connect this miter saw base. 2. A To empty the dust bag, squeeze the metal collar and remove from the rear side of the saw to the power source until it gets full. B) 1. iNSTALLING THE MITER HANDLE (FIG. C) 1. Squeeze the metal collar wings of ...the miter table. Loosen the hex screw (3) using a Phillips screwdriver from exhaust port....
Operation Manual
Page 18
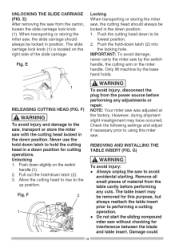
... HEAD (FIG. REMOVING AND iNSTALLING THE TABLE iNSERT (FIG. G) I_ WARNING] To avoid injury: o Always unplug the saw without checking for cutting operations. Remove all small pieces of the slide carriage. o Do not start the sliding compound miter saw to the up position. Push the hold-down position. Unlocking 1. F 2 I,A WARNING] To avoid injury, disconnect the plug...
... HEAD (FIG. REMOVING AND iNSTALLING THE TABLE iNSERT (FIG. G) I_ WARNING] To avoid injury: o Always unplug the saw without checking for cutting operations. Remove all small pieces of the slide carriage. o Do not start the sliding compound miter saw to the up position. Push the hold-down position. Unlocking 1. F 2 I,A WARNING] To avoid injury, disconnect the plug...
Operation Manual
Page 19
Check for handling and proper support of the miter saw (1) to the work surface. ® Always bolt or clamp the saw on the table inserts (2) with this tool. G 2 MOUNTING THE MITER SAW (FIG. o Lock the slide carriage in place by the power cord could cause damage to stand near the saw during the cutting operation. 1. Carrying the tool...
Check for handling and proper support of the miter saw (1) to the work surface. ® Always bolt or clamp the saw on the table inserts (2) with this tool. G 2 MOUNTING THE MITER SAW (FIG. o Lock the slide carriage in place by the power cord could cause damage to stand near the saw during the cutting operation. 1. Carrying the tool...
Operation Manual
Page 20
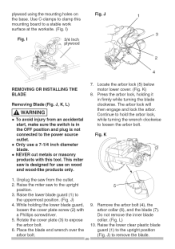
...NEVER cut metals or masonry products with a Phillips screwdriver. 5. K 1. Rotate the cover plate (3) to the uppermost position. (Fig. L) 10. This miter saw from an accidental start, make sure the switch is designed for use a 7-1/4 inch diameter blade. Raise the lower blade guard (1) to expose the arbor ... it in the OFF position and plug is not connected to [emovetheb!ade . Fig. Unplug the saw is in firmly while turning the blade clockwise. J) 4. Raise the miter saw to loosen the arbor bolt. The arbor lock will then engage and lock the arbor. Remove the arbor...
...NEVER cut metals or masonry products with a Phillips screwdriver. 5. K 1. Rotate the cover plate (3) to the uppermost position. (Fig. L) 10. This miter saw from an accidental start, make sure the switch is designed for use a 7-1/4 inch diameter blade. Raise the lower blade guard (1) to expose the arbor ... it in the OFF position and plug is not connected to [emovetheb!ade . Fig. Unplug the saw is in firmly while turning the blade clockwise. J) 4. Raise the miter saw to loosen the arbor bolt. The arbor lock will then engage and lock the arbor. Remove the arbor...
Operation Manual
Page 21
... must be raised to the upright position to its original position until the arbor lock disengages. [,A WARNING] o To avoid injury, never use the saw without the cover plate secure in place. o Make sure the collars are pointing downward. 2. Thread the arbor bolt (4) on /off the.... Lower the blade into the table and check for any contact with a 5/8 in firmly while turning the blade counterclockwise. J, K, L) i_ WARNING] Un-plug the miter saw . Place the blade wrench on /off laser, press on the arbor bolt. 4. THE LASER GUIDE (FIG. Be sure the arbor lock (5) is released so the...
... must be raised to the upright position to its original position until the arbor lock disengages. [,A WARNING] o To avoid injury, never use the saw without the cover plate secure in place. o Make sure the collars are pointing downward. 2. Thread the arbor bolt (4) on /off the.... Lower the blade into the table and check for any contact with a 5/8 in firmly while turning the blade counterclockwise. J, K, L) i_ WARNING] Un-plug the miter saw . Place the blade wrench on /off laser, press on the arbor bolt. 4. THE LASER GUIDE (FIG. Be sure the arbor lock (5) is released so the...
Operation Manual
Page 22
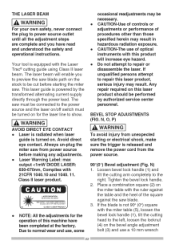
... DIRECT EYE CONTACT o Laser is radiated when laser guide is turned on for the laser line to show. Always un=plug the miter saw from power source before starting the miter saw. Your tool is powered by the transformed alternating current supply directly through the power lead. THE LASER BEAM i,_ WARNING ] For your own...
... DIRECT EYE CONTACT o Laser is radiated when laser guide is turned on for the laser line to show. Always un=plug the miter saw from power source before starting the miter saw. Your tool is powered by the transformed alternating current supply directly through the power lead. THE LASER BEAM i,_ WARNING ] For your own...
Operation Manual
Page 24
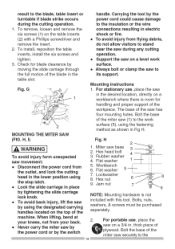
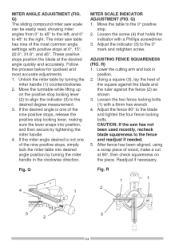
... the piece. Q) 1. If the desired angle is not one of the most accurate adjustments. 1. MITER SCALE iNDiCATOR ADJUSTMENT (FIG. Fig. Loosen the screw (4) that holds the indicator with a 6mm hex wrench. 4. Q Fig. MITER ANGLE ADJUSTMENT (FIG. Q) The sliding compound miter saw table has nine of the nine positive stops, release the positive stop locking lever (2) to...
... the piece. Q) 1. If the desired angle is not one of the most accurate adjustments. 1. MITER SCALE iNDiCATOR ADJUSTMENT (FIG. Fig. Loosen the screw (4) that holds the indicator with a 6mm hex wrench. 4. Q Fig. MITER ANGLE ADJUSTMENT (FIG. Q) The sliding compound miter saw table has nine of the nine positive stops, release the positive stop locking lever (2) to...

Operation Manual
Page 26
...in until it stops. The blade teeth should fully close. If any part of injury to the direction arrow on the blade. Keep the miter saw . o Tighten the arbor bolt. The lower guard should always point downward at the front of the ON/OFF switch, upper and lower... and unplug it is missing, bent, damaged or broken in TROUBLESHOOTING GUIDE for lubricating. The use only recommended accessories. o Compare the direction of this miter saw is spinning. o Check for : o Alignment of moving parts o Damaged electric cords o Binding of moving parts o Mounting holes o Function of arm ...
...in until it stops. The blade teeth should fully close. If any part of injury to the direction arrow on the blade. Keep the miter saw . o Tighten the arbor bolt. The lower guard should always point downward at the front of the ON/OFF switch, upper and lower... and unplug it is missing, bent, damaged or broken in TROUBLESHOOTING GUIDE for lubricating. The use only recommended accessories. o Compare the direction of this miter saw is spinning. o Check for : o Alignment of moving parts o Damaged electric cords o Binding of moving parts o Mounting holes o Function of arm ...
Operation Manual
Page 27
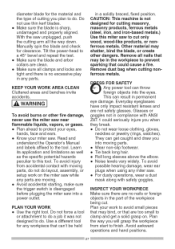
...be held in the workpiece to avoid small pieces that may shatter, bind the blade, or create other fire damage, never use the miter saw . Everyday eyeglasses have only impact resistant lenses and are moving. o Noise levels vary widely. o Wear non-slip footwear. o For...elbow. Plan your work on . o Makesureallclampsandlocksare tightandthereis noexcessiveplay inanyparts. S FOR SAFETY Any power tool can get a solid grasp on the miter saw into the eyes. o Tie back long hair. To avoid possible hearing damage, wear ear plugs when using any parts are not safety glasses...
...be held in the workpiece to avoid small pieces that may shatter, bind the blade, or create other fire damage, never use the miter saw . Everyday eyeglasses have only impact resistant lenses and are moving. o Noise levels vary widely. o Wear non-slip footwear. o For...elbow. Plan your work on . o Makesureallclampsandlocksare tightandthereis noexcessiveplay inanyparts. S FOR SAFETY Any power tool can get a solid grasp on the miter saw into the eyes. o Tie back long hair. To avoid possible hearing damage, wear ear plugs when using any parts are not safety glasses...
Operation Manual
Page 28
... "bite". o Make sure there is longer or wider than the basic miter saw to cut , causing the blade to result in the line of the blade. o Keep...of the "no debris between the workpiece, fence and table that is no hands zone" area marked on the saws table. Otherwise, it will not rock or twist during the cut. o Do not use of an experienced person...the workpiece. o Properly support round material such as an additional support for example, must be on the saws table. Unplug the saw OFF. A sudden slip could cause your work so it could get wedged against the fence and table ...
... "bite". o Make sure there is longer or wider than the basic miter saw to cut , causing the blade to result in the line of the blade. o Keep...of the "no debris between the workpiece, fence and table that is no hands zone" area marked on the saws table. Otherwise, it will not rock or twist during the cut. o Do not use of an experienced person...the workpiece. o Properly support round material such as an additional support for example, must be on the saws table. Unplug the saw OFF. A sudden slip could cause your work so it could get wedged against the fence and table ...
Operation Manual
Page 29
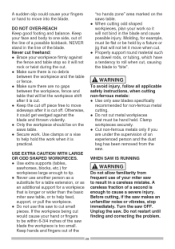
...No Hand Zone _ 13-1/2 in the trigger switch, locking the tool's switch, preventing children and other unauthorized users from the miter saw is released, the electric blade brake will do the job better and safer at 1-800=843=1682 for all moving parts to ... wait for the blade to start saw . o Unplug the miter saw will make cutting easier and safer. T) [_ WARNING] Fig. away on the miter saw . TO TURN THE SAW ON (FIG. BODYAND HAND POSITION (FIG. T tNheevecrutptilnagcearheaan.dsPronpeearr positioning of the blade path - Do not force the saw . "nohands zone". (Fig. ...
...No Hand Zone _ 13-1/2 in the trigger switch, locking the tool's switch, preventing children and other unauthorized users from the miter saw is released, the electric blade brake will do the job better and safer at 1-800=843=1682 for all moving parts to ... wait for the blade to start saw . o Unplug the miter saw will make cutting easier and safer. T) [_ WARNING] Fig. away on the miter saw . TO TURN THE SAW ON (FIG. BODYAND HAND POSITION (FIG. T tNheevecrutptilnagcearheaan.dsPronpeearr positioning of the blade path - Do not force the saw . "nohands zone". (Fig. ...
Operation Manual
Page 30
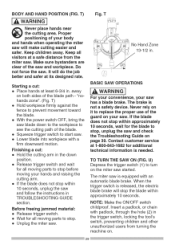
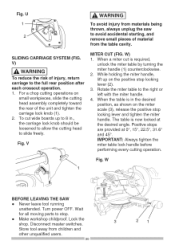
...cavity. U I WARNINGi To avoid injury from materials being thrown, always unplug the saw to the right or left with the miter handle. 4. Fig. W SLiDiNG CARRIAGE SYSTEM (FIG. To cut is required, unlock the miter table by turning the miter handle (1) counterclockwise. 2. When the table is now locked at 0°, 15... the carriage lock knob (1). 2. For a chop cutting operations on the positive stop locking lever and tighten the miter handle. When a miter cut wide boards up on small workpieces, slide the cutting head assembly completely toward the rear of injury, return carriage to...
...cavity. U I WARNINGi To avoid injury from materials being thrown, always unplug the saw to the right or left with the miter handle. 4. Fig. W SLiDiNG CARRIAGE SYSTEM (FIG. To cut is required, unlock the miter table by turning the miter handle (1) counterclockwise. 2. When the table is now locked at 0°, 15... the carriage lock knob (1). 2. For a chop cutting operations on the positive stop locking lever and tighten the miter handle. When a miter cut wide boards up on small workpieces, slide the cutting head assembly completely toward the rear of injury, return carriage to...


