

Operation Manual
Page 1
SLiDiNG COMPOUND MITER SAW WiTH LASER TRAC ® Model No. 137.211940 C US CAUTION: Before using this Miter Saw, read this manual and follow all its Safety Rules and Operating Instructions • Safety Instructions • Installation • Operation • Maintenance • Parts List Customer Help Line For Technical Support 1-800-843-1682 Sears Parts & Repair Center 1-800-488-1222 Sears, Roebuck and Co., Hoffman Estates, IL 60179 USA Visit our Craftsman website: www.sears.com/craftsman Part No. 137211940001 Printed in . Operator's Manual CRRFrSr4RH° 7-1/4 in China
SLiDiNG COMPOUND MITER SAW WiTH LASER TRAC ® Model No. 137.211940 C US CAUTION: Before using this Miter Saw, read this manual and follow all its Safety Rules and Operating Instructions • Safety Instructions • Installation • Operation • Maintenance • Parts List Customer Help Line For Technical Support 1-800-843-1682 Sears Parts & Repair Center 1-800-488-1222 Sears, Roebuck and Co., Hoffman Estates, IL 60179 USA Visit our Craftsman website: www.sears.com/craftsman Part No. 137211940001 Printed in . Operator's Manual CRRFrSr4RH° 7-1/4 in China
Operation Manual
Page 5
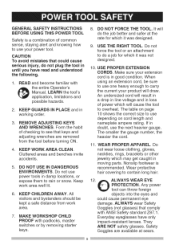
... better and safer at sears. KEEP GUARDS iN PLACE and in doubt, use the next heavier gauge. GENERALSAFETY iNSTRUCTiONS BEFORE USING THIS POWER TOOL Safety is a combination of common sense, staying alert and knowing how to use depending on page 10 shows the correct size to use your extension cord is recommended. Keep work area. . KEEP CHILDREN AWAY. The table on cord length and nameplate ampere...
... better and safer at sears. KEEP GUARDS iN PLACE and in doubt, use the next heavier gauge. GENERALSAFETY iNSTRUCTiONS BEFORE USING THIS POWER TOOL Safety is a combination of common sense, staying alert and knowing how to use depending on page 10 shows the correct size to use your extension cord is recommended. Keep work area. . KEEP CHILDREN AWAY. The table on cord length and nameplate ampere...
Operation Manual
Page 6
.... DISCONNECT TOOLS FROM POWER SOURCE before using your health. TURN THE POWER "OFF". Follow instructions for best and safest performance. The use of the tool, a guard or other part that it frees both hands to a complete stop and the tool is unintentionally contacted. 19. Serious injury could seriously injure you when they break. 13. Keep tools sharp and clean for lubricating and changing accessories. 23. Sawing operation produces dust. 14...
.... DISCONNECT TOOLS FROM POWER SOURCE before using your health. TURN THE POWER "OFF". Follow instructions for best and safest performance. The use of the tool, a guard or other part that it frees both hands to a complete stop and the tool is unintentionally contacted. 19. Serious injury could seriously injure you when they break. 13. Keep tools sharp and clean for lubricating and changing accessories. 23. Sawing operation produces dust. 14...
Operation Manual
Page 7
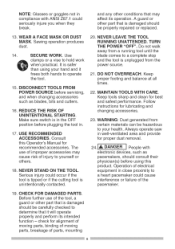
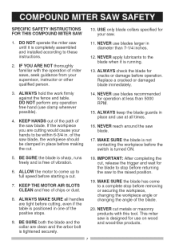
... starting a cut metals or masonry products with the operation of the saw until it is tightened securely. 10. iF YOU ARE NOT thoroughly familiar with this tool. This miter saw blade. 17. KEEP THE MOTOR AiR SLOTS CLEAN and free of vibration. 6. SPECiFiC SAFETY iNSTRUCTiONS FOR THiS COMPOUND MITER SAW . of the saw blade, the workpiece should be within 6-3/4 in place before making the cut , release the trigger and wait for your hands to stop...
... starting a cut metals or masonry products with the operation of the saw until it is tightened securely. 10. iF YOU ARE NOT thoroughly familiar with this tool. This miter saw blade. 17. KEEP THE MOTOR AiR SLOTS CLEAN and free of vibration. 6. SPECiFiC SAFETY iNSTRUCTiONS FOR THiS COMPOUND MITER SAW . of the saw blade, the workpiece should be within 6-3/4 in place before making the cut , release the trigger and wait for your hands to stop...
Operation Manual
Page 9
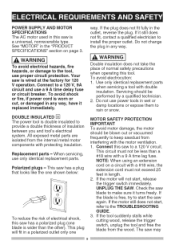
... tool's electrical system. If the tool suddenly stalls while cutting wood, release the trigger switch, unplug the tool and free the blade from interfering with the motor ventilation. 1. To avoid shock or fire, if power cord is double insulated to keep sawdust from the wood. Do not use only identical replacement parts. All exposed metal parts are isolated from the internal metal motor components with a #18 wire, the extension cord...
... tool's electrical system. If the tool suddenly stalls while cutting wood, release the trigger switch, unplug the tool and free the blade from interfering with the motor ventilation. 1. To avoid shock or fire, if power cord is double insulated to keep sawdust from the wood. Do not use only identical replacement parts. All exposed metal parts are isolated from the internal metal motor components with a #18 wire, the extension cord...
Operation Manual
Page 13
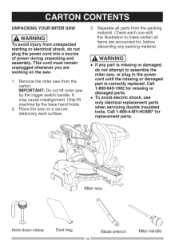
... trigger switch handle, it may cause misalignment. Check each one with the illustration to assemble the miter saw, or plug in the power cord until the missing or damaged part is correctly replaced. Place the saw on the saw by the base hand holds. 2. IMPORTANT: Do not lift miter saw . 1. Separate all items are working on a secure stationary work surface. 3. o To avoid electric shock, use only identical replacement parts when servicing double insulated tools. Miter saw...
... trigger switch handle, it may cause misalignment. Check each one with the illustration to assemble the miter saw, or plug in the power cord until the missing or damaged part is correctly replaced. Place the saw on the saw by the base hand holds. 2. IMPORTANT: Do not lift miter saw . 1. Separate all items are working on a secure stationary work surface. 3. o To avoid electric shock, use only identical replacement parts when servicing double insulated tools. Miter saw...
Operation Manual
Page 15
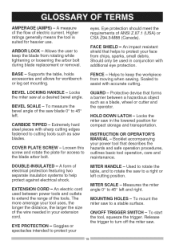
... amerage your tool uses, the longer the distance, the larger the size of the tools. MITER SCALE - Release the trigger to turn off the miter saw to protect your extension cord. FACESHIELD- assistwithaccuratecutting. Used to rotate the table, and to 45 ° left . AMPERAGE(AMPS-) A measure oftheflowofelectriccurrentH. BEVELLOCKINGHANDLE- Locks themitersawat a desiredbeveal ngle. To mount the miter saw to extend the range of the wire needed in your MITER HANDLE - ON/OFF TRIGGER SWITCH - eyes...
... amerage your tool uses, the longer the distance, the larger the size of the tools. MITER SCALE - Release the trigger to turn off the miter saw to protect your extension cord. FACESHIELD- assistwithaccuratecutting. Used to rotate the table, and to 45 ° left . AMPERAGE(AMPS-) A measure oftheflowofelectriccurrentH. BEVELLOCKINGHANDLE- Locks themitersawat a desiredbeveal ngle. To mount the miter saw to extend the range of the wire needed in your MITER HANDLE - ON/OFF TRIGGER SWITCH - eyes...
Operation Manual
Page 17
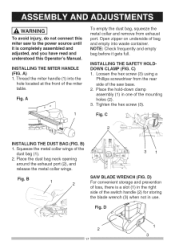
Thread the miter handle (1) into waste container. A To empty the dust bag, squeeze the metal collar and remove from the rear side of the dust bag (1). 2. Place the hold-down clamp assembly (1) in one of the miter table. Loosen the hex screw (3) using a Phillips screwdriver from exhaust port. FigC. A) 1. Squeeze the metal collar wings of the saw to the power source until it gets full...
Thread the miter handle (1) into waste container. A To empty the dust bag, squeeze the metal collar and remove from the rear side of the dust bag (1). 2. Place the hold-down clamp assembly (1) in one of the miter table. Loosen the hex screw (3) using a Phillips screwdriver from exhaust port. FigC. A) 1. Squeeze the metal collar wings of the saw to the power source until it gets full...
Operation Manual
Page 18
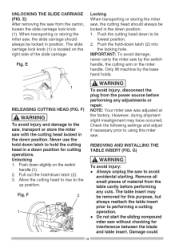
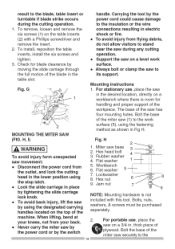
... the cutting head in the down position. 1. NOTE: Your miter saw by the base hand holds. REMOVING AND iNSTALLING THE TABLE iNSERT (FIG. G) I_ WARNING] To avoid injury: o Always unplug the saw without checking for interference between the blade and table insert. o Do not start the sliding compound miter saw to the saw, transport or store the miter saw from the carton, loosen the slide carriage lock knob (1). The slide carriage lock knob (1) is located on the switch handle (1). 2. E Locking When...
... the cutting head in the down position. 1. NOTE: Your miter saw by the base hand holds. REMOVING AND iNSTALLING THE TABLE iNSERT (FIG. G) I_ WARNING] To avoid injury: o Always unplug the saw without checking for interference between the blade and table insert. o Do not start the sliding compound miter saw to the saw, transport or store the miter saw from the carton, loosen the slide carriage lock knob (1). The slide carriage lock knob (1) is located on the switch handle (1). 2. E Locking When...
Operation Manual
Page 19
... room for blade clearance by the power cord could cause damage to the work surface. ® Always bolt or clamp the saw to its support. o Lock the slide carriage in the lower position using the stop latch. Mounting instructions 1. For stationary use , place the saw on a 3/4 in the desired location, directly on a workbench where there is not included with a Phillips screwdriver and remove the insert. 2. Rubber washer 4. Bolts, nuts, washers, & screws must be...
... room for blade clearance by the power cord could cause damage to the work surface. ® Always bolt or clamp the saw to its support. o Lock the slide carriage in the lower position using the stop latch. Mounting instructions 1. For stationary use , place the saw on a 3/4 in the desired location, directly on a workbench where there is not included with a Phillips screwdriver and remove the insert. 2. Rubber washer 4. Bolts, nuts, washers, & screws must be...
Operation Manual
Page 20
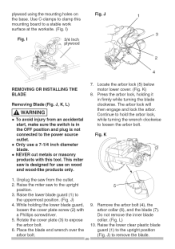
.... . Press the arbor lock, holding the lower blade guard, loosen the cover plate screw (2) with this tool. Fig. Rotate the cover plate (3) to the uppermost position. (Fig. J REMOVING OR INSTALLING THE BLADE Removing Blade (Fig. K) 8. Raise the miter saw from an accidental start, make sure the switch is in firmly while turning the blade clockwise. I ) Fig. o NEVER cut metals or masonry products with a Phillips screwdriver. 5. Place the blade end wrench over the arbor bolt...
.... . Press the arbor lock, holding the lower blade guard, loosen the cover plate screw (2) with this tool. Fig. Rotate the cover plate (3) to the uppermost position. (Fig. J REMOVING OR INSTALLING THE BLADE Removing Blade (Fig. K) 8. Raise the miter saw from an accidental start, make sure the switch is in firmly while turning the blade clockwise. I ) Fig. o NEVER cut metals or masonry products with a Phillips screwdriver. 5. Place the blade end wrench over the arbor bolt...
Operation Manual
Page 21
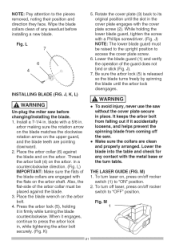
... plate engages with a Phillips screwdriver. (Fig. Thread the arbor bolt (4) on the arbor shaft. M) 1. Fig.L 7 \ 6 4 INSTALLING BLADE (FIG. J, K, L) i_ WARNING] Un-plug the miter saw . blade with the metal base or the turn off laser, press on the upper guard, and the blade teeth are clean and properly arranged. arbor making sure the rotation arrow on the blade matches the clockwise rotation arrow on /off rocker switch...
... plate engages with a Phillips screwdriver. (Fig. Thread the arbor bolt (4) on the arbor shaft. M) 1. Fig.L 7 \ 6 4 INSTALLING BLADE (FIG. J, K, L) i_ WARNING] Un-plug the miter saw . blade with the metal base or the turn off laser, press on the upper guard, and the blade teeth are clean and properly arranged. arbor making sure the rotation arrow on the blade matches the clockwise rotation arrow on /off rocker switch...
Operation Manual
Page 22
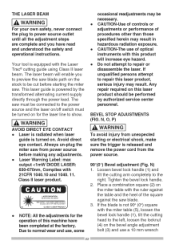
... DIRECT EYE CONTACT o Laser is radiated when laser guide is equipped with the Laser Trac ®cutting guide using Class II laser beam. The saw must be connected to show. o Laser Warning Label: max output Your tool is turned on. Always un=plug the miter saw from power source before starting the miter saw. The laser beam will enable you have read and understood the safety and operational instructions. Avoid direct eye contact. This laser guide...
... DIRECT EYE CONTACT o Laser is radiated when laser guide is equipped with the Laser Trac ®cutting guide using Class II laser beam. The saw must be connected to show. o Laser Warning Label: max output Your tool is turned on. Always un=plug the miter saw from power source before starting the miter saw. The laser beam will enable you have read and understood the safety and operational instructions. Avoid direct eye contact. This laser guide...
Operation Manual
Page 24
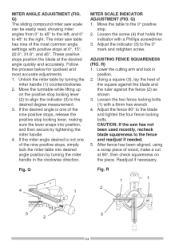
... right. Q) The sliding compound miter saw has not been used recently, recheck blade squareness to the desired degree measurement. 3. The miter saw table has nine of the most accurate adjustments. 1. If the miter angle desired is one of the nine positive stops, release the positive stop locking lever, making sure the lever snaps into desired angle position by turning the miter handle in position. 2. Q) 1. Using a square (3), lay the heel of wood, make a cut at 90 °...
... right. Q) The sliding compound miter saw has not been used recently, recheck blade squareness to the desired degree measurement. 3. The miter saw table has nine of the most accurate adjustments. 1. If the miter angle desired is one of the nine positive stops, release the positive stop locking lever, making sure the lever snaps into desired angle position by turning the miter handle in position. 2. Q) 1. Using a square (3), lay the heel of wood, make a cut at 90 °...

Operation Manual
Page 26
... plate screw. o Replace bent, damaged, missing or defective parts before any electrical parts do not touch the plug's metal prongs when plugging or unplugging your miter saw works. o Remove adjusting wrench from accidental starting, unplug the saw clean for best and safest performance. Follow the instructions that come with care. The use of this miter saw is spinning. o Compare the direction of this Operator's Manual. (SAFETY & OPERATIONS) o Review the MAINTENANCE and TROUBLESHOOTING GUIDE for recommended accessories. Follow instructions in working...
... plate screw. o Replace bent, damaged, missing or defective parts before any electrical parts do not touch the plug's metal prongs when plugging or unplugging your miter saw works. o Remove adjusting wrench from accidental starting, unplug the saw clean for best and safest performance. Follow the instructions that come with care. The use of this miter saw is spinning. o Compare the direction of this Operator's Manual. (SAFETY & OPERATIONS) o Review the MAINTENANCE and TROUBLESHOOTING GUIDE for recommended accessories. Follow instructions in working...
Operation Manual
Page 28
... dust bag has been removed from frequent use this saw makes an unfamiliar noise or vibrates, stop so it move sideways after it is enough to one side, out of the line of the saw OFF. Clamp workpieces securely. Turn the saw blade the workpiece is practical. If the workpiece being cut . l_, WARNING i To avoid injury, follow all applicable safety instructions, when cutting...
... dust bag has been removed from frequent use this saw makes an unfamiliar noise or vibrates, stop so it move sideways after it is enough to one side, out of the line of the saw OFF. Clamp workpieces securely. Turn the saw blade the workpiece is practical. If the workpiece being cut . l_, WARNING i To avoid injury, follow all applicable safety instructions, when cutting...
Operation Manual
Page 29
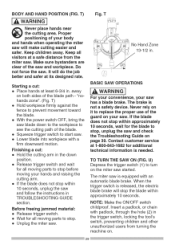
... stop . o Unplug the miter saw . Never rely on your hands and raising the cutting arm. U) Depress the trigger switch (1) to stop the blade within 10 seconds, unplug the saw . Insert a padlock, or chain with padlock, through the hole (2) in TROUBLESHOOTING GUIDE section. BODYAND HAND POSITION (FIG. Before freeing jammed material: o Release trigger switch. o Wait for the blade to turn on page 39. "nohands zone". (Fig. Keep children away. Starting a cut : e Hold the cutting...
... stop . o Unplug the miter saw . Never rely on your hands and raising the cutting arm. U) Depress the trigger switch (1) to stop the blade within 10 seconds, unplug the saw . Insert a padlock, or chain with padlock, through the hole (2) in TROUBLESHOOTING GUIDE section. BODYAND HAND POSITION (FIG. Before freeing jammed material: o Release trigger switch. o Wait for the blade to turn on page 39. "nohands zone". (Fig. Keep children away. Starting a cut : e Hold the cutting...
Operation Manual
Page 32
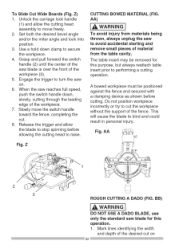
... table insert prior to avoid accidental starting and remove small pieces of the fence. Engage the trigger to turn the saw to performing a cutting operation. Release the trigger and allow the cutting head assembly to stop spinning before cutting. AA Fig. Use a hold down , slowly, cutting through the leading edge of the workpiece (3). 5. AA) i_ WARNING 1 To avoid injury from materials being thrown, always unplug the saw on 32 Unlock the carriage lock handle...
... table insert prior to avoid accidental starting and remove small pieces of the fence. Engage the trigger to turn the saw to performing a cutting operation. Release the trigger and allow the cutting head assembly to stop spinning before cutting. AA Fig. Use a hold down , slowly, cutting through the leading edge of the workpiece (3). 5. AA) i_ WARNING 1 To avoid injury from materials being thrown, always unplug the saw on 32 Unlock the carriage lock handle...
Operation Manual
Page 40
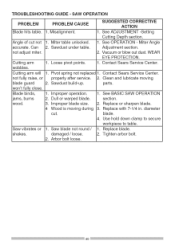
...OPERATION section. 2. Use hold down clamp to table. 1. Miter Angle Adjustment section. 2. Cutting arm wobbles. 1. not adjust miter. Arbor bolt loose. workpiece to secure Saw vibrates or 1. Contact Sears Service Center. Blade binds, ams, burns wood. 1. Improper operation. 2. Misalignment. 1. Cutting arm will 1. Clean and lubricate moving during cut not 1. Replace with 7-1/4 in. not fully raise, or properly after service. 2. TROUBLESHOOTING GUIDE =SAW OPERATION PROBLEM PROBLEM CAUSE SUGGESTED CORRECTIVE ACTION Blade hits table. 1. Pivot spring not replaced...
...OPERATION section. 2. Use hold down clamp to table. 1. Miter Angle Adjustment section. 2. Cutting arm wobbles. 1. not adjust miter. Arbor bolt loose. workpiece to secure Saw vibrates or 1. Contact Sears Service Center. Blade binds, ams, burns wood. 1. Improper operation. 2. Misalignment. 1. Cutting arm will 1. Clean and lubricate moving during cut not 1. Replace with 7-1/4 in. not fully raise, or properly after service. 2. TROUBLESHOOTING GUIDE =SAW OPERATION PROBLEM PROBLEM CAUSE SUGGESTED CORRECTIVE ACTION Blade hits table. 1. Pivot spring not replaced...
Operation Manual
Page 41
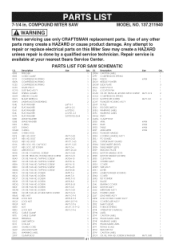
... SCREW & WASHER M6*] 0 80 74/4 in. COMPOUND MITER SAW MODEL NO. 137.211940 [_ WARNING] When servicing use only CRAFTSMAN replacement parts. Repair service is done by a qualified service technician. Any attempt to repair or replace electrical parts on this Miter Saw may create a HAZARD unless repair is available at your nearest Sears Service Center. Description 290M CAUTION LABEL Size Qty 083Z CORD CLAMP 27PF COMPRESSION SPRING 091S COMPRESSION SPRING 2BB6 FENCE #AW 0B5N COMPRESSION SPRING 2BGV NEEDLE POINTER 0CES COMPRESSION SPRING...
... SCREW & WASHER M6*] 0 80 74/4 in. COMPOUND MITER SAW MODEL NO. 137.211940 [_ WARNING] When servicing use only CRAFTSMAN replacement parts. Repair service is done by a qualified service technician. Any attempt to repair or replace electrical parts on this Miter Saw may create a HAZARD unless repair is available at your nearest Sears Service Center. Description 290M CAUTION LABEL Size Qty 083Z CORD CLAMP 27PF COMPRESSION SPRING 091S COMPRESSION SPRING 2BB6 FENCE #AW 0B5N COMPRESSION SPRING 2BGV NEEDLE POINTER 0CES COMPRESSION SPRING...


