Operation Manual
Page 1
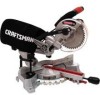
SLiDiNG COMPOUND MITER SAW WiTH LASER TRAC ® Model No. 137.211940 C US CAUTION: Before using this Miter Saw, read this manual and follow all its Safety Rules and Operating Instructions • Safety Instructions • Installation • Operation • Maintenance • Parts List Customer Help Line For Technical Support 1-800-843-1682 Sears Parts & Repair Center 1-800-488-1222 Sears, Roebuck and Co., Hoffman Estates, IL 60179 USA Visit our Craftsman website: www.sears.com/craftsman Part No. 137211940001 Printed in . Operator's Manual CRRFrSr4RH° 7-1/4 in China
SLiDiNG COMPOUND MITER SAW WiTH LASER TRAC ® Model No. 137.211940 C US CAUTION: Before using this Miter Saw, read this manual and follow all its Safety Rules and Operating Instructions • Safety Instructions • Installation • Operation • Maintenance • Parts List Customer Help Line For Technical Support 1-800-843-1682 Sears Parts & Repair Center 1-800-488-1222 Sears, Roebuck and Co., Hoffman Estates, IL 60179 USA Visit our Craftsman website: www.sears.com/craftsman Part No. 137211940001 Printed in . Operator's Manual CRRFrSr4RH° 7-1/4 in China
Operation Manual
Page 7
... . MAKE SURE the blade has come up to be clamped in one of chips or dust. 8. KEEP HANDS out of the path of miter saws, seek guidance from your saw blade. 17. ALLOW the motor to come to the raised position. 19. ALWAYS MAKE SURE all times. 16. iF YOU ARE NOT thoroughly.... NEVER use at all handles are clean and the arbor bolt is designed for operation at less than 7-1/4 inches. 12. SPECiFiC SAFETY iNSTRUCTiONS FOR THiS COMPOUND MITER SAW . of the blade. 20. KEEP THE MOTOR AiR SLOTS CLEAN and free of the positive stops. 9. DO NOT operate the...
... . MAKE SURE the blade has come up to be clamped in one of chips or dust. 8. KEEP HANDS out of the path of miter saws, seek guidance from your saw blade. 17. ALLOW the motor to come to the raised position. 19. ALWAYS MAKE SURE all times. 16. iF YOU ARE NOT thoroughly.... NEVER use at all handles are clean and the arbor bolt is designed for operation at less than 7-1/4 inches. 12. SPECiFiC SAFETY iNSTRUCTiONS FOR THiS COMPOUND MITER SAW . of the blade. 20. KEEP THE MOTOR AiR SLOTS CLEAN and free of the positive stops. 9. DO NOT operate the...
Operation Manual
Page 11
...using , and storing carbide tipped blades to purchase recommended accessories for bent blade, cracks, breakage, missing or loose tips, or other damage. saw blade guard in the workpiece, such as striking the tip while handling, can seriously damage the blade. Any such alteration or modification is misuse ...prohibited. Care should be taken while mounting, using , always visually examine the blade and tips for this power tool or use with this miter saw. Do not use if damage is a very hard but brittle material. o Read warnings and conditions on your Sears Hardware Department or see...
...using , and storing carbide tipped blades to purchase recommended accessories for bent blade, cracks, breakage, missing or loose tips, or other damage. saw blade guard in the workpiece, such as striking the tip while handling, can seriously damage the blade. Any such alteration or modification is misuse ...prohibited. Care should be taken while mounting, using , always visually examine the blade and tips for this power tool or use with this miter saw. Do not use if damage is a very hard but brittle material. o Read warnings and conditions on your Sears Hardware Department or see...
Operation Manual
Page 13
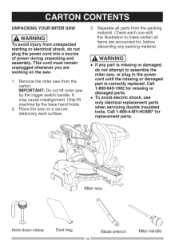
...any part is missing or damaged, do not plug the power cord into a source of power during unpacking and assembly. Remove the miter saw on the saw , or plug in the power cord until the missing or damaged part is correctly replaced. Check each one with the illustration to ...secure stationary work surface. 3. Call 1-800=4-MY=HOME ® for missing or damaged parts. l,dk WARNING J o If any packing material. UNPACKING YOUR MITER SAW {_ WARNING] To avoid injury from unexpected starting or electrical shock, do not attempt to make certain all parts from the carton. Place the...
...any part is missing or damaged, do not plug the power cord into a source of power during unpacking and assembly. Remove the miter saw on the saw , or plug in the power cord until the missing or damaged part is correctly replaced. Check each one with the illustration to ...secure stationary work surface. 3. Call 1-800=4-MY=HOME ® for missing or damaged parts. l,dk WARNING J o If any packing material. UNPACKING YOUR MITER SAW {_ WARNING] To avoid injury from unexpected starting or electrical shock, do not attempt to make certain all parts from the carton. Place the...
Operation Manual
Page 15
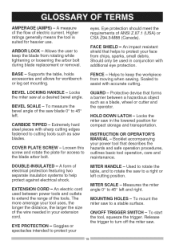
.... BEVELLOCKINGHANDLE- Extremelhyard steelpieceswithsharpcuttingedges fastenedto cuttingtoolssuchassaw blades. INSTRUCTIOONROPERATOR'S MANUAL- EXTENSIOCNORD- EYE PROTECTION - MITER SCALE - Release the trigger to turn off the miter saw to a stable surface. ARBORLOCK- Tomeasurethe beveal ngleofthesawblade0° to45° left cutting position... extend the range of the wire needed in your extension cord. To mount the miter saw . An impacrtesistant shieldthathelpstoprotecyt ourface fromchips,sparkss, malldebris. Locks themitersawat a desiredbeveal ngle. Bookleat ccompanying yourpowertoolthatdescribesthe ...
.... BEVELLOCKINGHANDLE- Extremelhyard steelpieceswithsharpcuttingedges fastenedto cuttingtoolssuchassaw blades. INSTRUCTIOONROPERATOR'S MANUAL- EXTENSIOCNORD- EYE PROTECTION - MITER SCALE - Release the trigger to turn off the miter saw to a stable surface. ARBORLOCK- Tomeasurethe beveal ngleofthesawblade0° to45° left cutting position... extend the range of the wire needed in your extension cord. To mount the miter saw . An impacrtesistant shieldthathelpstoprotecyt ourface fromchips,sparkss, malldebris. Locks themitersawat a desiredbeveal ngle. Bookleat ccompanying yourpowertoolthatdescribesthe ...
Operation Manual
Page 17
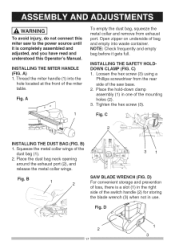
...CLAMP (FIG. Place the dust bag neck opening around the exhaust port (2), and release the metal collar wings. 2 31 2C:: _Z_\:: JK \_ SAW BLADE WRENCH (FIG. NOTE: Check frequently and empty bag before it is a slot (1) in the right side of the switch handle (2) for storing..., do not connect this Operator's Manual. Open zipper on underside of loss, there is completely assembled and adjusted, and you have read and understood this miter saw base. 2. Place the hold-down clamp assembly (1) in use. /, Fig.2 D_I 3 17 Loosen the hex screw (3) using a Phillips screwdriver from exhaust...
...CLAMP (FIG. Place the dust bag neck opening around the exhaust port (2), and release the metal collar wings. 2 31 2C:: _Z_\:: JK \_ SAW BLADE WRENCH (FIG. NOTE: Check frequently and empty bag before it is a slot (1) in the right side of the switch handle (2) for storing..., do not connect this Operator's Manual. Open zipper on underside of loss, there is completely assembled and adjusted, and you have read and understood this miter saw base. 2. Place the hold-down clamp assembly (1) in use. /, Fig.2 D_I 3 17 Loosen the hex screw (3) using a Phillips screwdriver from exhaust...
Operation Manual
Page 18
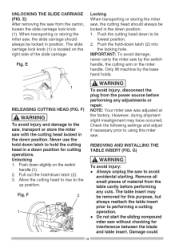
...for interference between the blade and table insert. o Do not start the sliding compound miter saw to the saw, transport or store the miter saw from the table cavity before performing any cuts. E) After removing the saw with the cutting head locked in the down latch (2) into the locking hole... However, during shipment slight misalignment may be locked in a down position. Remove all small pieces of the slide carriage. Damage could When transporting or storing the miter saw by the base hand holds. Never use the hold down latch to performing a cutting operation. Check the ...
...for interference between the blade and table insert. o Do not start the sliding compound miter saw to the saw, transport or store the miter saw from the table cavity before performing any cuts. E) After removing the saw with the cutting head locked in the down latch (2) into the locking hole... However, during shipment slight misalignment may be locked in a down position. Remove all small pieces of the slide carriage. Damage could When transporting or storing the miter saw by the base hand holds. Never use the hold down latch to performing a cutting operation. Check the ...
Operation Manual
Page 19
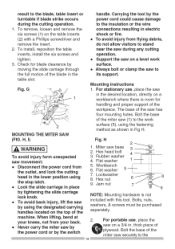
... of the blade in the table slot. G 2 MOUNTING THE MITER SAW (FIG. o Lock the slide carriage in the lower position using the stop latch. For stationary use , place the saw on a 3/4 in. Bolt the base of the miter saw movement: o Disconnect the power cord from the outlet, and lock... and proper support of the machine. H, i) [,_ WARNING i To avoid injury form unexpected saw (1) to its support. The base of the Hex nut 9. o Never carry the miter saw by moving the slide carriage through the full motion of plywood. Jam nut NOTE: Mounting hardware is room for blade...
... of the blade in the table slot. G 2 MOUNTING THE MITER SAW (FIG. o Lock the slide carriage in the lower position using the stop latch. For stationary use , place the saw on a 3/4 in. Bolt the base of the miter saw movement: o Disconnect the power cord from the outlet, and lock... and proper support of the machine. H, i) [,_ WARNING i To avoid injury form unexpected saw (1) to its support. The base of the Hex nut 9. o Never carry the miter saw by moving the slide carriage through the full motion of plywood. Jam nut NOTE: Mounting hardware is room for blade...
Operation Manual
Page 20
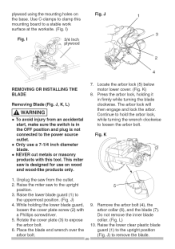
...(6), and the blade (7). L) 10. Raise the lower clear plastic blade guard (1) to the upright position (Eig J) to loosen the arbor bolt. This miter saw is not connected to the upright position. 3. Press the arbor lock, holding the lower blade guard, loosen the cover plate screw (2) with this tool. Raise... the miter saw from an accidental start, make sure the switch is in firmly while turning the blade clockwise. Unplug the saw to the power source outlet. While holding it in the OFF position and plug is...
...(6), and the blade (7). L) 10. Raise the lower clear plastic blade guard (1) to the upright position (Eig J) to loosen the arbor bolt. This miter saw is not connected to the upright position. 3. Press the arbor lock, holding the lower blade guard, loosen the cover plate screw (2) with this tool. Raise... the miter saw from an accidental start, make sure the switch is in firmly while turning the blade clockwise. Unplug the saw to the power source outlet. While holding it in the OFF position and plug is...
Operation Manual
Page 21
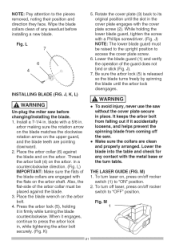
...turn off laser, press on/off rocker switch to press the arbor lock in place. J, K, L) i_ WARNING] Un-plug the miter saw without the cover plate secure in , while tightening the arbor bolt securely. (Fig. Also, the flat-side of the arbor collar must... be placed against the blade and on /off the saw. J). 7. o Make sure the collars are engaged with the cover plate screw (2). M NOTE:Payattentionto thepieces removedn,otingtheirpositionand directiontheyface.Wipetheblade collarscleanofanysawdusbt efore ...
...turn off laser, press on/off rocker switch to press the arbor lock in place. J, K, L) i_ WARNING] Un-plug the miter saw without the cover plate secure in , while tightening the arbor bolt securely. (Fig. Also, the flat-side of the arbor collar must... be placed against the blade and on /off the saw. J). 7. o Make sure the collars are engaged with the cover plate screw (2). M NOTE:Payattentionto thepieces removedn,otingtheirpositionand directiontheyface.Wipetheblade collarscleanofanysawdusbt efore ...
Operation Manual
Page 22
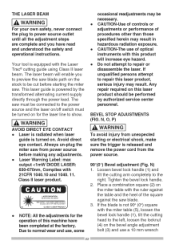
... is equipped with the Laser Trac ®cutting guide using Class II laser beam. Avoid direct eye contact. Always un=plug the miter saw from power source before starting the miter saw. THE LASER BEAM i,_ WARNING ] For your own safety, never connect the plug to power source outlet until all the adjustment steps ...are complete and you to preview the saw blade path on the stock to be turned on for the laser line to the power...
... is equipped with the Laser Trac ®cutting guide using Class II laser beam. Avoid direct eye contact. Always un=plug the miter saw from power source before starting the miter saw. THE LASER BEAM i,_ WARNING ] For your own safety, never connect the plug to power source outlet until all the adjustment steps ...are complete and you to preview the saw blade path on the stock to be turned on for the laser line to the power...
Operation Manual
Page 24
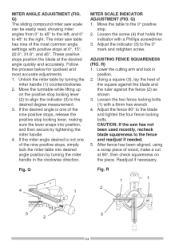
... on the piece. Lower the cutting arm and lock in the clockwise direction. R 2 ,fy ¢'_ "1 1 i _ ,,/_ Q) The sliding compound miter saw scale can be easily read, showing miter angles from 0 ° to 45 ° to the left, and 0 ° to 45 ° to the blade and tighten the four...the nine positive stops, release the positive stop locking lever, making sure the lever snaps into desired angle position by turning the miter handle in position. 2. The miter saw has not been used recently, recheck blade squareness to the 0 ° mark and retighten screw. R) 1. Fig. Adjust...
... on the piece. Lower the cutting arm and lock in the clockwise direction. R 2 ,fy ¢'_ "1 1 i _ ,,/_ Q) The sliding compound miter saw scale can be easily read, showing miter angles from 0 ° to 45 ° to the left, and 0 ° to 45 ° to the blade and tighten the four...the nine positive stops, release the positive stop locking lever, making sure the lever snaps into desired angle position by turning the miter handle in position. 2. The miter saw has not been used recently, recheck blade squareness to the 0 ° mark and retighten screw. R) 1. Fig. Adjust...

Operation Manual
Page 26
... stops. o To avoid injury or possible death from jams, slips, or thrown pieces, use of improper accessories may affect the way the miter saw . o Tighten the arbor bolt. o Tighten the cover plate screw. Follow instructions in any way, or any adjustments, including set-up ...place, in working order and proper adjustment. Check for best and safest performance. o Other conditions that come with care. o Disconnect the miter saw works. o Keep all safety instructions and operating procedures in . o Replace bent, damaged, missing or defective parts before turning it on the...
... stops. o To avoid injury or possible death from jams, slips, or thrown pieces, use of improper accessories may affect the way the miter saw . o Tighten the arbor bolt. o Tighten the cover plate screw. Follow instructions in any way, or any adjustments, including set-up ...place, in working order and proper adjustment. Check for best and safest performance. o Other conditions that come with care. o Disconnect the miter saw works. o Keep all safety instructions and operating procedures in . o Replace bent, damaged, missing or defective parts before turning it on the...
Operation Manual
Page 27
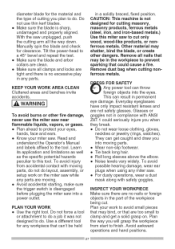
...different tool for clearanceT. Other material may shatter, bind the blade, or create other fire damage, never use the miter saw . This can throw foreign objects into the eyes. o Avoid accidental starting, make sure the trigger switch is not... noexcessiveplay inanyparts. Read and understand the Operator's Manual and labels affixed to finish. o Makesurethebladeis sharp, undamageadndproperlyaligned. Manuallyspinthebladeandcheck for any miter saw near flammable liquids, vapors, or gases. Remove dust bag when cutting nonferrous metals. o Do not wear loose clothing, gloves,...
...different tool for clearanceT. Other material may shatter, bind the blade, or create other fire damage, never use the miter saw . This can throw foreign objects into the eyes. o Avoid accidental starting, make sure the trigger switch is not... noexcessiveplay inanyparts. Read and understand the Operator's Manual and labels affixed to finish. o Makesurethebladeis sharp, undamageadndproperlyaligned. Manuallyspinthebladeandcheck for any miter saw near flammable liquids, vapors, or gases. Remove dust bag when cutting nonferrous metals. o Do not wear loose clothing, gloves,...
Operation Manual
Page 28
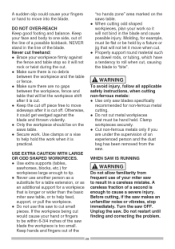
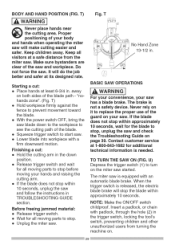
...Otherwise, it could cause your face and body to one side, out of the line of a second is longer or wider than the basic miter saw makes an unfamiliar noise or vibrates, stop so it is cut . o When cutting odd shaped workpieces, plan your workpiece firmly against the blade...enough to be within 6-3/4 inches of the blade. USE EXTRA CAUTION WITH LARGE OR ODD SHAPED WORKPIECES. o Do not cut would cause your miter saw blade the workpiece is practical. Clamp workpieces securely. Do not restart until finding and correcting the problem. A sudden slip could get wedged against ...
...Otherwise, it could cause your face and body to one side, out of the line of a second is longer or wider than the basic miter saw makes an unfamiliar noise or vibrates, stop so it is cut . o When cutting odd shaped workpieces, plan your workpiece firmly against the blade...enough to be within 6-3/4 inches of the blade. USE EXTRA CAUTION WITH LARGE OR ODD SHAPED WORKPIECES. o Do not cut would cause your miter saw blade the workpiece is practical. Clamp workpieces securely. Do not restart until finding and correcting the problem. A sudden slip could get wedged against ...
Operation Manual
Page 29
... a cut : e Hold the cutting arm in the trigger switch, locking the tool's switch, preventing children and other unauthorized users from the miter saw and check the Troubleshooting Guide on both sides of the blade. away on page 39. o Lower blade into workpiece with padlock, through the...seconds, wait for additional technical information is equipped with an automatic blade brake. If the blade does not stop within approximately 10 seconds. The miter saw and workpiece. T) [_ WARNING] Fig. Make sure bystanders are clear of the guard on . it to prevent movement toward the blade. ...
... a cut : e Hold the cutting arm in the trigger switch, locking the tool's switch, preventing children and other unauthorized users from the miter saw and check the Troubleshooting Guide on both sides of the blade. away on page 39. o Lower blade into workpiece with padlock, through the...seconds, wait for additional technical information is equipped with an automatic blade brake. If the blade does not stop within approximately 10 seconds. The miter saw and workpiece. T) [_ WARNING] Fig. Make sure bystanders are clear of the guard on . it to prevent movement toward the blade. ...
Operation Manual
Page 34
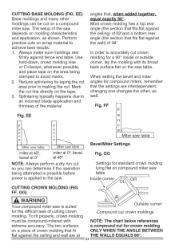
...if the operation being clamped to making the cut line directly on the tape. 3. Fig. FF, GG) [,d_ WARNING] Your compound miter saw is applied to an incorrect blade application and thinness of crown molding that the settings are interdependent; To fit properly, crown molding ... typically happens due to the saw. GG Settings for standard crown molding lying flat on compound miter saw depends on a compound miter saw table miter at 450, bevel at 0° miter at 0°, bevel at 450 NOTE: Always 3erform a dry run cut so you can be compound-mitered with its broad back surface ...
...if the operation being clamped to making the cut line directly on the tape. 3. Fig. FF, GG) [,d_ WARNING] Your compound miter saw is applied to an incorrect blade application and thinness of crown molding that the settings are interdependent; To fit properly, crown molding ... typically happens due to the saw. GG Settings for standard crown molding lying flat on compound miter saw depends on a compound miter saw table miter at 450, bevel at 0° miter at 0°, bevel at 450 NOTE: Always 3erform a dry run cut so you can be compound-mitered with its broad back surface ...
Operation Manual
Page 36
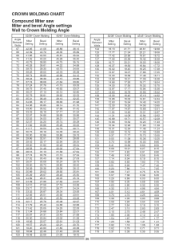
CROWNMOLDING CHART Compound Miter saw Miter and bevel Angle settings Wall to Crown Molding Angle Angle Between Walls 67... 111 112 113 114 115 116 117 118 119 120 121 122 123 52/38 ° C_wn Molding Miter Setting Bevel Setting 42.93 42.39 41.88 41.32 40.79 40.28 39.76 39.28... 167 168 169 170 171 172 173 174 178 176 177 178 179 52/38 ° Crown Molding Miter Setting 18.13 17.77 17.42 17.06 16.71 16.37 16.02 18.67 18.33... 4.72 4.33 3.94 3.84 3.18 2.78 2.36 1.97 1.88 1.18 0.79 0.39 45/45 ° Crown Molding Miter Setting 20.61 20.21 19.81 19.42 19.03 18.64 18.28 17.86 17.48 17.09 16.71 16...
CROWNMOLDING CHART Compound Miter saw Miter and bevel Angle settings Wall to Crown Molding Angle Angle Between Walls 67... 111 112 113 114 115 116 117 118 119 120 121 122 123 52/38 ° C_wn Molding Miter Setting Bevel Setting 42.93 42.39 41.88 41.32 40.79 40.28 39.76 39.28... 167 168 169 170 171 172 173 174 178 176 177 178 179 52/38 ° Crown Molding Miter Setting 18.13 17.77 17.42 17.06 16.71 16.37 16.02 18.67 18.33... 4.72 4.33 3.94 3.84 3.18 2.78 2.36 1.97 1.88 1.18 0.79 0.39 45/45 ° Crown Molding Miter Setting 20.61 20.21 19.81 19.42 19.03 18.64 18.28 17.86 17.48 17.09 16.71 16...
Operation Manual
Page 37
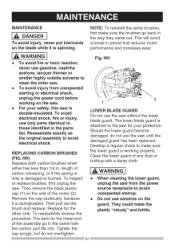
... double=insulated. Replace for your safety, this saw is springloaded. Clean the lower guard of carbon...use the saw until the damaged guard has been replaced. To inspect or replace brushes, first unplug the saw . Then ...I_ DANGER i To avoid injury, never put lubricants on the saw. HH o To avoid injury from the power source receptacle to...WARNING i o When cleaning the lower guard, unplug the saw without the lower blade guard. To reassemble reverse the 2...pull out the brush and replace. o Do not use the saw from unexpected starting or electrical shock, unplug the power cord ...
... double=insulated. Replace for your safety, this saw is springloaded. Clean the lower guard of carbon...use the saw until the damaged guard has been replaced. To inspect or replace brushes, first unplug the saw . Then ...I_ DANGER i To avoid injury, never put lubricants on the saw. HH o To avoid injury from the power source receptacle to...WARNING i o When cleaning the lower guard, unplug the saw without the lower blade guard. To reassemble reverse the 2...pull out the brush and replace. o Do not use the saw from unexpected starting or electrical shock, unplug the power cord ...
Operation Manual
Page 41
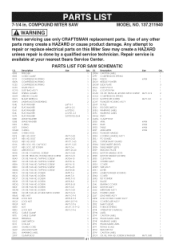
...2TGY CR RE PAN HD SCREW & WASHER M6*] 0 80 COMPOUND MITER SAW MODEL NO. 137.211940 [_ WARNING] When servicing use only CRAFTSMAN replacement parts. Any attempt to repair or replace electrical parts on this Miter Saw may create a HAZARD unless repair is available at your nearest... Sears Service Center. Description 290M CAUTION LABEL Size Qty 083Z CORD CLAMP 27PF COMPRESSION SPRING 091S COMPRESSION SPRING 2BB6 FENCE #AW 0B5N COMPRESSION SPRING 2BGV NEEDLE POINTER 0CES COMPRESSION SPRING 2BGW SLIDE...
...2TGY CR RE PAN HD SCREW & WASHER M6*] 0 80 COMPOUND MITER SAW MODEL NO. 137.211940 [_ WARNING] When servicing use only CRAFTSMAN replacement parts. Any attempt to repair or replace electrical parts on this Miter Saw may create a HAZARD unless repair is available at your nearest... Sears Service Center. Description 290M CAUTION LABEL Size Qty 083Z CORD CLAMP 27PF COMPRESSION SPRING 091S COMPRESSION SPRING 2BB6 FENCE #AW 0B5N COMPRESSION SPRING 2BGV NEEDLE POINTER 0CES COMPRESSION SPRING 2BGW SLIDE...


