Backup and Recovery - Windows XP
Page 7
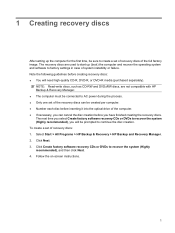
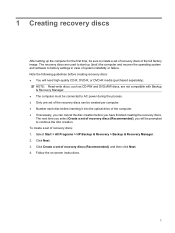
... have finished creating the recovery discs. The recovery discs are not compatible with HP Backup & Recovery Manager. ● The computer must be connected to AC power during the process. ● Only one set of the recovery discs can be created per computer. ● Number each disc before inserting it into the...
... have finished creating the recovery discs. The recovery discs are not compatible with HP Backup & Recovery Manager. ● The computer must be connected to AC power during the process. ● Only one set of the recovery discs can be created per computer. ● Number each disc before inserting it into the...
Backup and Recovery - Windows XP
Page 10
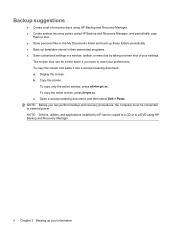
..., toolbar, or menu bar by taking a screen shot of your preferences. The screen shot can be a time saver if you can be connected to external power. Copy the screen. b. To copy only the active window, press alt+fn+prt sc. Open a word-processing document, and then select Edit > Paste. c. Display the...
..., toolbar, or menu bar by taking a screen shot of your preferences. The screen shot can be a time saver if you can be connected to external power. Copy the screen. b. To copy only the active window, press alt+fn+prt sc. Open a word-processing document, and then select Edit > Paste. c. Display the...
Backup and Recovery - Windows XP and Windows Vista
Page 7
The recovery discs are not compatible with Backup & Recovery Manager. ● The computer must be connected to AC power during the process. ● Only one set of recovery discs (Recommended), you have finished creating the recovery discs. To create a set of recovery discs (Recommended), ...
The recovery discs are not compatible with Backup & Recovery Manager. ● The computer must be connected to AC power during the process. ● Only one set of recovery discs (Recommended), you have finished creating the recovery discs. To create a set of recovery discs (Recommended), ...

Backup and Recovery - Windows XP and Windows Vista
Page 10
... shot of recovery discs using HP Backup & Recovery Manager. ● Create system recovery points using HP Backup & Recovery Manager, and periodically copy them to external power. The screen shot can be copied to a CD or to reset your preferences. NOTE: Drivers, utilities, and applications installed by HP can be connected to...
... shot of recovery discs using HP Backup & Recovery Manager. ● Create system recovery points using HP Backup & Recovery Manager, and periodically copy them to external power. The screen shot can be copied to a CD or to reset your preferences. NOTE: Drivers, utilities, and applications installed by HP can be connected to...

Drives
Page 2
Contents 1 Drive care 2 IDE drive light 3 Hard drive HP Mobile Data Protection with Digital Accelerometer 3-1 HP Mobile Data Protection status 3-2 HP Mobile Data Protection software 3-3 Replacing the hard drive 3-4 4 Optical drives Using optical discs 4-1 Inserting an optical disc 4-3 Removing an optical disc (with power 4-4 Removing an optical disc (without power 4-5 Avoiding standby or hibernation 4-6 Drives ii
Contents 1 Drive care 2 IDE drive light 3 Hard drive HP Mobile Data Protection with Digital Accelerometer 3-1 HP Mobile Data Protection status 3-2 HP Mobile Data Protection software 3-3 Replacing the hard drive 3-4 4 Optical drives Using optical discs 4-1 Inserting an optical disc 4-3 Removing an optical disc (with power 4-4 Removing an optical disc (without power 4-5 Avoiding standby or hibernation 4-6 Drives ii
Drives
Page 4
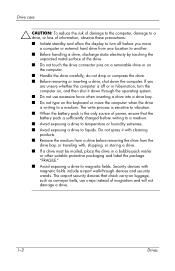
... from a drive before removing the drive from one location to another. ■ Before handling a drive, discharge static electricity by touching the unpainted metal surface of power, ensure that the battery pack is sufficiently charged before you are unsure whether the computer is off before writing to a medium. ■ Avoid exposing a drive...
... from a drive before removing the drive from one location to another. ■ Before handling a drive, discharge static electricity by touching the unpainted metal surface of power, ensure that the battery pack is sufficiently charged before you are unsure whether the computer is off before writing to a medium. ■ Avoid exposing a drive...
Drives
Page 6
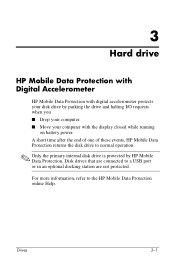
... HP Mobile Data Protection with Digital Accelerometer HP Mobile Data Protection with digital accelerometer protects your computer with the display closed while running on battery power. Drives 3-1 A short time after the end of one of these events, HP Mobile Data Protection returns the disk drive to a USB port or in an...
... HP Mobile Data Protection with Digital Accelerometer HP Mobile Data Protection with digital accelerometer protects your computer with the display closed while running on battery power. Drives 3-1 A short time after the end of one of these events, HP Mobile Data Protection returns the disk drive to a USB port or in an...
Drives
Page 7
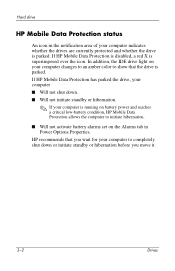
... changes to an amber color to show that you wait for your computer to initiate hibernation. ■ Will not activate battery alarms set on battery power and reaches a critical low-battery condition, HP Mobile Data Protection allows the computer to completely shut down . ■ Will not initiate standby or hibernation. ✎... before you move it. 3-2 Drives If HP Mobile Data Protection is disabled, a red X is parked. Hard drive HP Mobile Data Protection status An icon in Power Options Properties. HP recommends that the drive is superimposed over the icon.
... changes to an amber color to show that you wait for your computer to initiate hibernation. ■ Will not activate battery alarms set on battery power and reaches a critical low-battery condition, HP Mobile Data Protection allows the computer to completely shut down . ■ Will not initiate standby or hibernation. ✎... before you move it. 3-2 Drives If HP Mobile Data Protection is disabled, a red X is parked. Hard drive HP Mobile Data Protection status An icon in Power Options Properties. HP recommends that the drive is superimposed over the icon.
Drives
Page 9
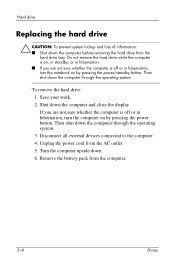
... from the hard drive bay. If you are not sure whether the computer is off or in hibernation, turn the computer on by pressing the power button. Remove the battery pack from the AC outlet. 5. Save your work. 2. Shut down the computer through the operating system. Then shut down the computer... the computer is on, in standby, or in hibernation. ■ If you are not sure whether the computer is off or in hibernation, turn the notebook on by pressing the power/standby button. Unplug the power cord from the computer. 3-4 Drives To remove the hard drive: 1.
... from the hard drive bay. If you are not sure whether the computer is off or in hibernation, turn the computer on by pressing the power button. Remove the battery pack from the AC outlet. 5. Save your work. 2. Shut down the computer through the operating system. Then shut down the computer... the computer is on, in standby, or in hibernation. ■ If you are not sure whether the computer is off or in hibernation, turn the notebook on by pressing the power/standby button. Unplug the power cord from the computer. 3-4 Drives To remove the hard drive: 1.
Drives
Page 17
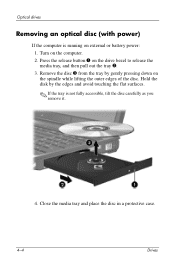
... surfaces. ✎ If the tray is running on the spindle while lifting the outer edges of the disc. Optical drives Removing an optical disc (with power) If the computer is not fully accessible, tilt the disc carefully as you remove it. 4. Hold the disk by gently pressing down on external or...
... surfaces. ✎ If the tray is running on the spindle while lifting the outer edges of the disc. Optical drives Removing an optical disc (with power) If the computer is not fully accessible, tilt the disc carefully as you remove it. 4. Hold the disk by gently pressing down on external or...
Drives
Page 18
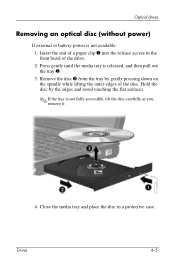
.... Close the media tray and place the disc in the front bezel of the disc. Drives 4-5 Optical drives Removing an optical disc (without power) If external or battery power is not fully accessible, tilt the disc carefully as you remove it. 4. Remove the disc 3 from the tray by the edges and avoid...
.... Close the media tray and place the disc in the front bezel of the disc. Drives 4-5 Optical drives Removing an optical disc (without power) If external or battery power is not fully accessible, tilt the disc carefully as you remove it. 4. Remove the disc 3 from the tray by the edges and avoid...

Drives - Windows Vista
Page 2
Contents 1 Drive care 2 IDE drive light 3 Hard drive HP Mobile Data Protection 3D with Digital Accelerometer 3-1 HP Mobile Data Protection 3D status 3-2 HP Mobile Data Protection 3D software 3-3 Replacing the hard drive 3-4 4 Optical drives Using optical discs 4-1 Inserting an optical disc 4-3 Removing an optical disc (with power 4-4 Removing an optical disc (without power 4-5 Avoiding the Sleep state or Hibernation 4-6 Index Drives ii
Contents 1 Drive care 2 IDE drive light 3 Hard drive HP Mobile Data Protection 3D with Digital Accelerometer 3-1 HP Mobile Data Protection 3D status 3-2 HP Mobile Data Protection 3D software 3-3 Replacing the hard drive 3-4 4 Optical drives Using optical discs 4-1 Inserting an optical disc 4-3 Removing an optical disc (with power 4-4 Removing an optical disc (without power 4-5 Avoiding the Sleep state or Hibernation 4-6 Index Drives ii
Drives - Windows Vista
Page 4
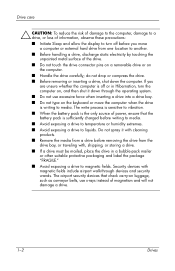
...; If a drive must be mailed, place the drive in Hibernation, turn off before you move the computer when the drive is the only source of power, ensure that check carry-on luggage, such as conveyor belts, use excessive force when inserting a drive into a drive bay. ■ Do not type on the...
...; If a drive must be mailed, place the drive in Hibernation, turn off before you move the computer when the drive is the only source of power, ensure that check carry-on luggage, such as conveyor belts, use excessive force when inserting a drive into a drive bay. ■ Do not type on the...
Drives - Windows Vista
Page 5
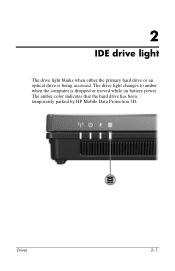
The drive light changes to amber when the computer is being accessed. The amber color indicates that the hard drive has been temporarily parked by HP Mobile Data Protection 3D. 2 IDE drive light The drive light blinks when either the primary hard drive or an optical drive is dropped or moved while on battery power. Drives 2-1
The drive light changes to amber when the computer is being accessed. The amber color indicates that the hard drive has been temporarily parked by HP Mobile Data Protection 3D. 2 IDE drive light The drive light blinks when either the primary hard drive or an optical drive is dropped or moved while on battery power. Drives 2-1
Drives - Windows Vista
Page 6
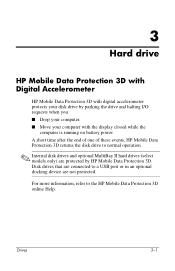
... drive and halting I/O requests when you ■ Drop your computer. ■ Move your computer with the display closed while the computer is running on battery power.
... drive and halting I/O requests when you ■ Drop your computer. ■ Move your computer with the display closed while the computer is running on battery power.

Drives - Windows Vista
Page 7
... battery level, HP Mobile Data Protection 3D allows the computer to initiate Hibernation. ■ Will not activate battery alarms set on the Alarms tab in Power Options Properties. You can use Mobility Center to show that the drive is superimposed over the hard drive icon. ■ If the drives are parked...
... battery level, HP Mobile Data Protection 3D allows the computer to initiate Hibernation. ■ Will not activate battery alarms set on the Alarms tab in Power Options Properties. You can use Mobility Center to show that the drive is superimposed over the hard drive icon. ■ If the drives are parked...
Drives - Windows Vista
Page 9
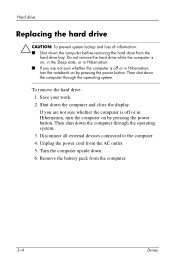
...Save your work. 2. If you are not sure whether the computer is off or in Hibernation, turn the computer on by pressing the power button. Unplug the power cord from the computer. 3-4 Drives Shut down . 6. Turn the computer upside down the computer and close the display. Then shut ... Sleep state, or in Hibernation. ■ If you are not sure whether the computer is off or in Hibernation, turn the notebook on by pressing the power button. Hard drive Replacing the hard drive Ä CAUTION: To prevent system lockup and loss of information: ■ Shut down the...
...Save your work. 2. If you are not sure whether the computer is off or in Hibernation, turn the computer on by pressing the power button. Unplug the power cord from the computer. 3-4 Drives Shut down . 6. Turn the computer upside down the computer and close the display. Then shut ... Sleep state, or in Hibernation. ■ If you are not sure whether the computer is off or in Hibernation, turn the notebook on by pressing the power button. Hard drive Replacing the hard drive Ä CAUTION: To prevent system lockup and loss of information: ■ Shut down the...

Drives - Windows Vista
Page 17
... gently pressing down on the drive bezel to release the media tray, and then pull out the tray 2. 3. Optical drives Removing an optical disc (with power) If the computer is not fully accessible, tilt the disc carefully as you remove it. 4. Turn on external or battery...
... gently pressing down on the drive bezel to release the media tray, and then pull out the tray 2. 3. Optical drives Removing an optical disc (with power) If the computer is not fully accessible, tilt the disc carefully as you remove it. 4. Turn on external or battery...

Drives - Windows Vista
Page 18
...; If the tray is not fully accessible, tilt the disc carefully as you remove it. 4. Drives 4-5 Optical drives Removing an optical disc (without power) If external or battery power is released, and then pull out the tray 2. 3. Hold the disc by gently pressing down on the spindle while lifting the outer edges...
...; If the tray is not fully accessible, tilt the disc carefully as you remove it. 4. Drives 4-5 Optical drives Removing an optical disc (without power) If external or battery power is released, and then pull out the tray 2. 3. Hold the disc by gently pressing down on the spindle while lifting the outer edges...
External Media Cards
Page 8
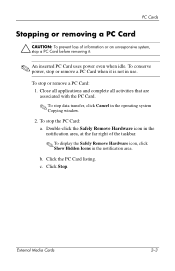
To conserve power, stop or remove a PC Card when it . ✎ An inserted PC Card uses power even when idle. External Media Cards 2-3 Close all applications and complete all activities that are associated with the PC Card. ✎ To stop or remove a PC Card: 1. Click the PC Card listing. To stop data transfer, click Cancel in the operating...
To conserve power, stop or remove a PC Card when it . ✎ An inserted PC Card uses power even when idle. External Media Cards 2-3 Close all applications and complete all activities that are associated with the PC Card. ✎ To stop or remove a PC Card: 1. Click the PC Card listing. To stop data transfer, click Cancel in the operating...


