
Hard Drive White Paper
Page 3
... routine which is operating on AC power or on all currently shipping notebooks, in conjunction with his or her notebook. The short test runs. HP recommends the latest system BIOS upgrade be undocked or removed from AC power before the display lid is closed. Refer to the...are displayed: • Display status • Enable HP Notebook LidSwitch Policy Note 1: The HP Notebook LidSwitch Policy utility will not invoke Standby on an AC-powered notebook having the display lid closed while the notebook is operating from the internal battery pack, e.g., on AC power. HP recommends use an ...
... routine which is operating on AC power or on all currently shipping notebooks, in conjunction with his or her notebook. The short test runs. HP recommends the latest system BIOS upgrade be undocked or removed from AC power before the display lid is closed. Refer to the...are displayed: • Display status • Enable HP Notebook LidSwitch Policy Note 1: The HP Notebook LidSwitch Policy utility will not invoke Standby on an AC-powered notebook having the display lid closed while the notebook is operating from the internal battery pack, e.g., on AC power. HP recommends use an ...
Lithium-ion battery technology: Getting the most from Smart Batteries
Page 6
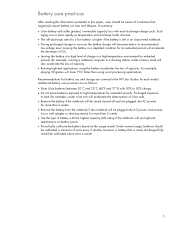
... will accelerate the decrease in FCC. • Leaving the battery at a high level of charge in a high-temperature environment for extended periods (for more than 2 weeks. • Remove the battery from the notebook if the notebook will be plugged into AC power) for more than 2 weeks.... • Use the type of battery with each model. Prolonged exposure to high temperatures for extended periods. In ...
... will accelerate the decrease in FCC. • Leaving the battery at a high level of charge in a high-temperature environment for extended periods (for more than 2 weeks. • Remove the battery from the notebook if the notebook will be plugged into AC power) for more than 2 weeks.... • Use the type of battery with each model. Prolonged exposure to high temperatures for extended periods. In ...
Hardware Guide
Page 4
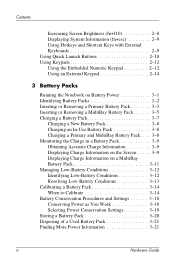
... Numeric Keypad 2-12 Using an External Keypad 2-14 3 Battery Packs Running the Notebook on Battery Power 3-1 Identifying Battery Packs 3-2 Inserting or Removing a Primary Battery Pack 3-3 Inserting or Removing a MultiBay Battery Pack 3-5 Charging a Battery Pack 3-7 Charging a New Battery Pack 3-8 Charging an In-Use Battery Pack 3-8 Charging a Primary and MultiBay Battery Pack . . . . 3-8 Monitoring the Charge in a Battery Pack 3-9 Obtaining Accurate Charge Information 3-9 Displaying Charge Information...
... Numeric Keypad 2-12 Using an External Keypad 2-14 3 Battery Packs Running the Notebook on Battery Power 3-1 Identifying Battery Packs 3-2 Inserting or Removing a Primary Battery Pack 3-3 Inserting or Removing a MultiBay Battery Pack 3-5 Charging a Battery Pack 3-7 Charging a New Battery Pack 3-8 Charging an In-Use Battery Pack 3-8 Charging a Primary and MultiBay Battery Pack . . . . 3-8 Monitoring the Charge in a Battery Pack 3-9 Obtaining Accurate Charge Information 3-9 Displaying Charge Information...
Hardware Guide
Page 20
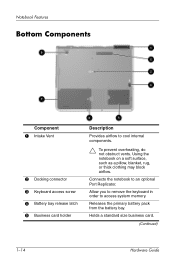
...remove the keyboard in order to an optional Port Replicator. Releases the primary battery pack from the battery bay. Connects the notebook to access system memory. Using the notebook on a soft surface, such as a pillow, blanket, rug, or thick clothing may block airflow. Holds a standard size business card. (Continued) 1-14 Hardware Guide Notebook... Features Bottom Components Component 1 Intake Vent 2 Docking connector 3 Keyboard access screw 4 Battery bay release latch 5 Business card holder Description Provides ...
...remove the keyboard in order to an optional Port Replicator. Releases the primary battery pack from the battery bay. Connects the notebook to access system memory. Using the notebook on a soft surface, such as a pillow, blanket, rug, or thick clothing may block airflow. Holds a standard size business card. (Continued) 1-14 Hardware Guide Notebook... Features Bottom Components Component 1 Intake Vent 2 Docking connector 3 Keyboard access screw 4 Battery bay release latch 5 Business card holder Description Provides ...
Hardware Guide
Page 40
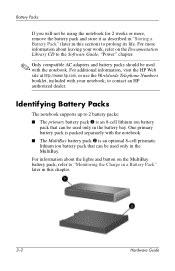
... chapter. 3-2 Hardware Guide For information about leaving your notebook, to "Monitoring the Charge in a Battery Pack" later in the MultiBay. For more , remove the battery pack and store it as described in "Storing a Battery Pack" (later in the battery bay. Battery Packs If you will not be using the notebook for 2 weeks or more information about the lights...
... chapter. 3-2 Hardware Guide For information about leaving your notebook, to "Monitoring the Charge in a Battery Pack" later in the MultiBay. For more , remove the battery pack and store it as described in "Storing a Battery Pack" (later in the battery bay. Battery Packs If you will not be using the notebook for 2 weeks or more information about the lights...

Hardware Guide
Page 41
Battery Packs Inserting or Removing a Primary Battery Pack Ä CAUTION: To prevent loss of work when removing a battery pack that is seated. Hardware Guide 3-3 To insert a battery pack, slide the battery pack into the battery bay until it is the sole power source, initiate Hibernation or turn off the notebook before removing the battery pack.
Battery Packs Inserting or Removing a Primary Battery Pack Ä CAUTION: To prevent loss of work when removing a battery pack that is seated. Hardware Guide 3-3 To insert a battery pack, slide the battery pack into the battery bay until it is the sole power source, initiate Hibernation or turn off the notebook before removing the battery pack.
Hardware Guide
Page 42
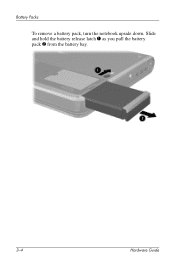
Slide and hold the battery release latch 1 as you pull the battery pack 2 from the battery bay. 3-4 Hardware Guide Battery Packs To remove a battery pack, turn the notebook upside down.
Slide and hold the battery release latch 1 as you pull the battery pack 2 from the battery bay. 3-4 Hardware Guide Battery Packs To remove a battery pack, turn the notebook upside down.
Hardware Guide
Page 43
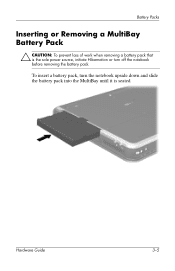
To insert a battery pack, turn the notebook upside down and slide the battery pack into the MultiBay until it is the sole power source, initiate Hibernation or turn off the notebook before removing the battery pack. Battery Packs Inserting or Removing a MultiBay Battery Pack Ä CAUTION: To prevent loss of work when removing a battery pack that is seated. Hardware Guide 3-5
To insert a battery pack, turn the notebook upside down and slide the battery pack into the MultiBay until it is the sole power source, initiate Hibernation or turn off the notebook before removing the battery pack. Battery Packs Inserting or Removing a MultiBay Battery Pack Ä CAUTION: To prevent loss of work when removing a battery pack that is seated. Hardware Guide 3-5
Hardware Guide
Page 44
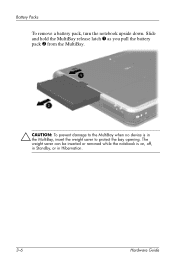
Battery Packs To remove a battery pack, turn the notebook upside down. Slide and hold the MultiBay release latch 1 as you pull the battery pack 2 from the MultiBay. Ä CAUTION: To prevent damage to protect the bay opening. The weight saver can be inserted or removed while the notebook is in the MultiBay, insert the weight saver to the MultiBay when no device is on, off, in Standby, or in Hibernation. 3-6 Hardware Guide
Battery Packs To remove a battery pack, turn the notebook upside down. Slide and hold the MultiBay release latch 1 as you pull the battery pack 2 from the MultiBay. Ä CAUTION: To prevent damage to protect the bay opening. The weight saver can be inserted or removed while the notebook is in the MultiBay, insert the weight saver to the MultiBay when no device is on, off, in Standby, or in Hibernation. 3-6 Hardware Guide
Hardware Guide
Page 56
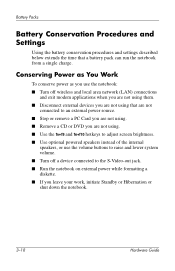
... connected to an external power source. ■ Stop or remove a PC Card you are not using. ■ Remove a CD or DVD you leave your work, initiate Standby or Hibernation or shut down the notebook. 3-18 Hardware Guide Battery Packs Battery Conservation Procedures and Settings Using the battery conservation procedures and settings described below extends the time that...
... connected to an external power source. ■ Stop or remove a PC Card you are not using. ■ Remove a CD or DVD you leave your work, initiate Standby or Hibernation or shut down the notebook. 3-18 Hardware Guide Battery Packs Battery Conservation Procedures and Settings Using the battery conservation procedures and settings described below extends the time that...
Hardware Guide
Page 58
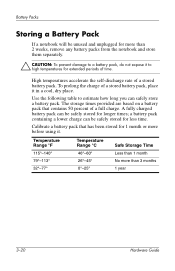
...than 1 month No more than 2 weeks, remove any battery packs from the notebook and store them separately. Ä CAUTION: To prevent damage to a battery pack, do not expose it to estimate how long you can safely store a battery pack. a battery pack containing a lower charge can be safely ...month or more before using it. Use the following table to high temperatures for extended periods of a full charge. Battery Packs Storing a Battery Pack If a notebook will be unused and unplugged for more than 3 months 1 year 3-20 Hardware Guide High temperatures accelerate the self-discharge...
...than 1 month No more than 2 weeks, remove any battery packs from the notebook and store them separately. Ä CAUTION: To prevent damage to a battery pack, do not expose it to estimate how long you can safely store a battery pack. a battery pack containing a lower charge can be safely ...month or more before using it. Use the following table to high temperatures for extended periods of a full charge. Battery Packs Storing a Battery Pack If a notebook will be unused and unplugged for more than 3 months 1 year 3-20 Hardware Guide High temperatures accelerate the self-discharge...
Hardware Guide
Page 62
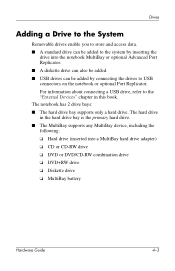
...book. For information about connecting a USB drive, refer to USB connectors on the notebook or optional Port Replicator. Drives Adding a Drive to the System Removable drives enable you to store and access data. ■ A standard drive can...drive. ■ The MultiBay supports any MultiBay device, including the following: ❏ Hard drive (inserted into the notebook MultiBay or optional Advanced Port Replicator. ■ A diskette drive can also be added. ■ USB drives can... drive ❏ DVD+RW drive ❏ Diskette drive ❏ MultiBay battery Hardware Guide 4-3
...book. For information about connecting a USB drive, refer to USB connectors on the notebook or optional Port Replicator. Drives Adding a Drive to the System Removable drives enable you to store and access data. ■ A standard drive can...drive. ■ The MultiBay supports any MultiBay device, including the following: ❏ Hard drive (inserted into the notebook MultiBay or optional Advanced Port Replicator. ■ A diskette drive can also be added. ■ USB drives can... drive ❏ DVD+RW drive ❏ Diskette drive ❏ MultiBay battery Hardware Guide 4-3
Hardware Guide
Page 100
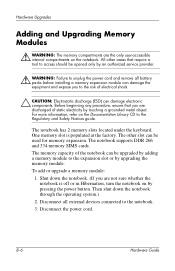
....) 2. The memory capacity of static electricity by an authorized service provider. Å WARNING: Failure to unplug the power cord and remove all external devices connected to the risk of electrical shock. Ä CAUTION: Electrostatic discharge (ESD) can damage electronic components. One memory... or by adding a memory module to the Regulatory and Safety Notices guide. The other areas that you to the notebook. 3. Disconnect all battery packs before installing a memory expansion module can damage the equipment and expose you are the only user-accessible internal compartments on...
....) 2. The memory capacity of static electricity by an authorized service provider. Å WARNING: Failure to unplug the power cord and remove all external devices connected to the risk of electrical shock. Ä CAUTION: Electrostatic discharge (ESD) can damage electronic components. One memory... or by adding a memory module to the Regulatory and Safety Notices guide. The other areas that you to the notebook. 3. Disconnect all battery packs before installing a memory expansion module can damage the equipment and expose you are the only user-accessible internal compartments on...
Hardware Guide
Page 101
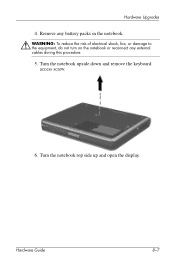
Remove any battery packs in the notebook. Å WARNING: To reduce the risk of electrical shock, fire, or damage to the equipment, do not turn on the notebook or reconnect any external cables during this procedure. 5. Hardware Guide 8-7 Turn the notebook upside down and remove the keyboard access screw. 6. Turn the notebook top side up and open the display. Hardware Upgrades 4.
Remove any battery packs in the notebook. Å WARNING: To reduce the risk of electrical shock, fire, or damage to the equipment, do not turn on the notebook or reconnect any external cables during this procedure. 5. Hardware Guide 8-7 Turn the notebook upside down and remove the keyboard access screw. 6. Turn the notebook top side up and open the display. Hardware Upgrades 4.
Hardware Guide
Page 110
... 6-3 Aircraft Power Adapter 1-12 connecting 3-13 tasks supported by 3-7 B battery bay device supported 3-2 inserting battery pack into 3-3 removing battery pack 3-3 battery bay, primary 1-8 battery charge information displays hotkey 2-6, 2-8 in Windows 3-9 increasing accuracy of 3-9 interpreting 3-10 battery light 1-6 battery packs calibrating 3-14 charging 3-7 discharge sequence 3-8 disposing of 3-21 inserting/removing primary 3-3 monitoring charge in MultiBay 4-18 Hardware Guide Index-1 digital...
... 6-3 Aircraft Power Adapter 1-12 connecting 3-13 tasks supported by 3-7 B battery bay device supported 3-2 inserting battery pack into 3-3 removing battery pack 3-3 battery bay, primary 1-8 battery charge information displays hotkey 2-6, 2-8 in Windows 3-9 increasing accuracy of 3-9 interpreting 3-10 battery light 1-6 battery packs calibrating 3-14 charging 3-7 discharge sequence 3-8 disposing of 3-21 inserting/removing primary 3-3 monitoring charge in MultiBay 4-18 Hardware Guide Index-1 digital...
Hardware Guide
Page 111
...PC Card eject 8-3 pointing stick 2-1 power 1-2 Presentation Mode 2-11 Quick Launch 1-2, 2-10 Quick Lock 2-10 TouchPad 1-1, 2-1 volume 1-11, 5-3 Wireless On/Off 2-11 C cable lock, connecting 7-5 cable(s) modem 6-1, 6-2 network 6-4 security 7-5 calibration, battery 3-14 camcorder 5-4 cap, replacing pointing stick 2-3 caps lock light 1-5 CD displaying contents of 4-12 inserting 4-9 removing... See battery bay; Index storing 3-1, 3-20 See also battery power battery power conserving 3-18 low-battery conditions 3-12, 3-13 running notebook on 3-1 switching to and from 3-1 See also battery packs ...
...PC Card eject 8-3 pointing stick 2-1 power 1-2 Presentation Mode 2-11 Quick Launch 1-2, 2-10 Quick Lock 2-10 TouchPad 1-1, 2-1 volume 1-11, 5-3 Wireless On/Off 2-11 C cable lock, connecting 7-5 cable(s) modem 6-1, 6-2 network 6-4 security 7-5 calibration, battery 3-14 camcorder 5-4 cap, replacing pointing stick 2-3 caps lock light 1-5 CD displaying contents of 4-12 inserting 4-9 removing... See battery bay; Index storing 3-1, 3-20 See also battery power battery power conserving 3-18 low-battery conditions 3-12, 3-13 running notebook on 3-1 switching to and from 3-1 See also battery packs ...
Hardware Guide
Page 112
... disk drive. See diskette drive fn key 1-3, 2-9 function keys 1-3 Hardware Guide Index-3 Index country-specific modem adapter 6-3 critical low-battery condition identifying 3-12 restoring from 2-6, 7-2 docking connector 1-14 drive(s) adding 4-3 affected by airport security 4-2 caring for 4-1 MultiBay 1-...10 optical disc 1-7 primary hard drive 1-15 replacing with weight saver 4-18 shipping 4-2 DVD displaying contents of 4-12 inserting 4-9 removing 4-10, 4-11 DVD drive inserting DVD 4-9 inserting into MultiBay 4-17 locations supported 4-3 See also drives display brightness 2-8 switching...
... disk drive. See diskette drive fn key 1-3, 2-9 function keys 1-3 Hardware Guide Index-3 Index country-specific modem adapter 6-3 critical low-battery condition identifying 3-12 restoring from 2-6, 7-2 docking connector 1-14 drive(s) adding 4-3 affected by airport security 4-2 caring for 4-1 MultiBay 1-...10 optical disc 1-7 primary hard drive 1-15 replacing with weight saver 4-18 shipping 4-2 DVD displaying contents of 4-12 inserting 4-9 removing 4-10, 4-11 DVD drive inserting DVD 4-9 inserting into MultiBay 4-17 locations supported 4-3 See also drives display brightness 2-8 switching...
Hardware Guide
Page 113
... screw 4-5 See also drives hard drive bay device 4-3 headphone jack 1-10 headphones, headset connecting 5-2 stereo speaker/headphone (line-out) jack 5-1 Hibernation and critical low-battery condition 3-12 and removing a hard drive 4-5 exiting 1-2, 3-13 file space requirements for 8-12 initiating 2-7 hotkeys defined 2-5 shortcut reference to commands 2-6 with external keyboards 2-9 hub, USB 7-3 I increasing RAM...
... screw 4-5 See also drives hard drive bay device 4-3 headphone jack 1-10 headphones, headset connecting 5-2 stereo speaker/headphone (line-out) jack 5-1 Hibernation and critical low-battery condition 3-12 and removing a hard drive 4-5 exiting 1-2, 3-13 file space requirements for 8-12 initiating 2-7 hotkeys defined 2-5 shortcut reference to commands 2-6 with external keyboards 2-9 hub, USB 7-3 I increasing RAM...

Hardware Guide
Page 114
...lock 1-5 hard drive activity 4-4 MultiBay 1-6 num lock 1-5 power/Standby 1-5 scroll lock 1-5 Wireless On/Off 1-5 location numbers in battery charge information displays 3-10 lock, security cable 7-5 low-battery conditions 3-12, 3-13 M memory adding memory expansion board 8-6 expansion compartment 8-6 primary slot 8-6 memory compartment, primary 1-4 microphone ... external connecting 7-1 using with other video devices 5-4 mouse, external 2-4 MultiBay 1-10 devices supported 3-2, 4-3 inserting battery pack 3-5 inserting drive 4-17 removing battery pack 3-5 MultiBay battery pack, defined 3-2 See also...
...lock 1-5 hard drive activity 4-4 MultiBay 1-6 num lock 1-5 power/Standby 1-5 scroll lock 1-5 Wireless On/Off 1-5 location numbers in battery charge information displays 3-10 lock, security cable 7-5 low-battery conditions 3-12, 3-13 M memory adding memory expansion board 8-6 expansion compartment 8-6 primary slot 8-6 memory compartment, primary 1-4 microphone ... external connecting 7-1 using with other video devices 5-4 mouse, external 2-4 MultiBay 1-10 devices supported 3-2, 4-3 inserting battery pack 3-5 inserting drive 4-17 removing battery pack 3-5 MultiBay battery pack, defined 3-2 See also...
HP Compaq nc8000 Business PC, HP Compaq nw8000 Mobile Workstation - Maintenance and Service Guide
Page 126
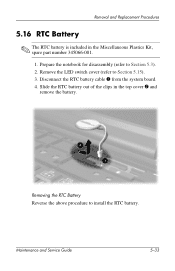
Remove the LED switch cover (refer to install the RTC battery. Maintenance and Service Guide 5-33 Slide the RTC battery out of the clips in the Miscellaneous Plastics Kit, spare part number 345066-001. 1. Disconnect the RTC battery cable 1 from the system board. 4. Removing the RTC Battery Reverse the above procedure to Section 5.15). 3. Removal and Replacement Procedures 5.16 RTC Battery ✎ The RTC battery is included in the top cover 2 and remove the battery. Prepare the notebook for disassembly (refer to Section 5.3). 2.
Remove the LED switch cover (refer to install the RTC battery. Maintenance and Service Guide 5-33 Slide the RTC battery out of the clips in the Miscellaneous Plastics Kit, spare part number 345066-001. 1. Disconnect the RTC battery cable 1 from the system board. 4. Removing the RTC Battery Reverse the above procedure to Section 5.15). 3. Removal and Replacement Procedures 5.16 RTC Battery ✎ The RTC battery is included in the top cover 2 and remove the battery. Prepare the notebook for disassembly (refer to Section 5.3). 2.


