Upgrading and Servicing Guide
Page 3
... Side Panel 2 Replacing the Side Panel 2 Removing the Front Panel 2 Replacing the Front Panel 3 Locating Components Inside the PC 3 Removing and Replacing Drives 3 Removing a Drive 4 Replacing or Adding a Drive 5 Adding Memory 7 Removing a Memory Module 7 Installing a Memory Module 8 Removing or Installing an Add-In Card 8 Removing an Add-In Card 9 Installing an Add-In Card...
... Side Panel 2 Replacing the Side Panel 2 Removing the Front Panel 2 Replacing the Front Panel 3 Locating Components Inside the PC 3 Removing and Replacing Drives 3 Removing a Drive 4 Replacing or Adding a Drive 5 Adding Memory 7 Removing a Memory Module 7 Installing a Memory Module 8 Removing or Installing an Add-In Card 8 Removing an Add-In Card 9 Installing an Add-In Card...
Upgrading and Servicing Guide
Page 6
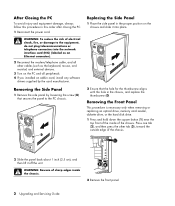
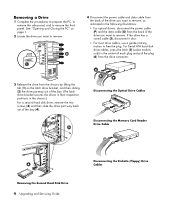
Removing the Front Panel This procedure is necessary only when removing or replacing an optical drive, memory card reader, diskette drive, or the hard disk drive. 1 Press and hold down the square button (1) near the top front of the chassis. 2 Slide ...all other tab (3), toward the outside edge of the inside the chassis. 2 Remove the front panel. 2 Upgrading and Servicing Guide WARNING: Beware of sharp edges inside of electrical shock, fire, or damage to the PC chassis. 2 Ensure that secures the panel to the equipment, do not plug telecommunications or telephone connectors into...
Removing the Front Panel This procedure is necessary only when removing or replacing an optical drive, memory card reader, diskette drive, or the hard disk drive. 1 Press and hold down the square button (1) near the top front of the chassis. 2 Slide ...all other tab (3), toward the outside edge of the inside the chassis. 2 Remove the front panel. 2 Upgrading and Servicing Guide WARNING: Beware of sharp edges inside of electrical shock, fire, or damage to the PC chassis. 2 Ensure that secures the panel to the equipment, do not plug telecommunications or telephone connectors into...
Upgrading and Servicing Guide
Page 7
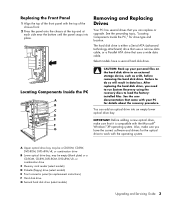
... or combination drive B Lower optical drive bay, may be empty (blank plate) or a CD-ROM, CD-RW, DVD-ROM, DVD+RW/+R, or combination drive C Memory card reader (select models) D Diskette (floppy) drive (select models) E Front connector panel (no replacement instructions) F Hard disk drive G Second hard disk drive (select models...disk drive is compatible with the top of the front panel with the Microsoft® Windows® XP operating system. You can replace or upgrade. Locating Components Inside the PC A B C D E R L F G CAUTION: Back up your PC for details about the recovery procedure.
... or combination drive B Lower optical drive bay, may be empty (blank plate) or a CD-ROM, CD-RW, DVD-ROM, DVD+RW/+R, or combination drive C Memory card reader (select models) D Diskette (floppy) drive (select models) E Front connector panel (no replacement instructions) F Hard disk drive G Second hard disk drive (select models...disk drive is compatible with the top of the front panel with the Microsoft® Windows® XP operating system. You can replace or upgrade. Locating Components Inside the PC A B C D E R L F G CAUTION: Back up your PC for details about the recovery procedure.
Upgrading and Servicing Guide
Page 8
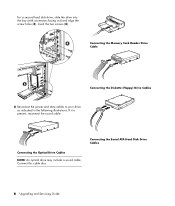
... disconnect it also. • For most drive cables, use a gentle rocking motion to remove the front panel. See "Opening and Closing the PC" on the latch drive bracket, and then sliding (2) the drive partway out of the bay. (The latch drive bracket secures the drives in ...(P) and the data cable (D) from the back of the bay (4). Disconnecting the Optical Drive Cables Disconnecting the Memory Card Reader Drive Cable Removing the Second Hard Disk Drive 4 Upgrading and Servicing Guide Disconnecting the Diskette (Floppy) Drive Cables For Serial ATA hard disk drive cables, press the latch...
... disconnect it also. • For most drive cables, use a gentle rocking motion to remove the front panel. See "Opening and Closing the PC" on the latch drive bracket, and then sliding (2) the drive partway out of the bay. (The latch drive bracket secures the drives in ...(P) and the data cable (D) from the back of the bay (4). Disconnecting the Optical Drive Cables Disconnecting the Memory Card Reader Drive Cable Removing the Second Hard Disk Drive 4 Upgrading and Servicing Guide Disconnecting the Diskette (Floppy) Drive Cables For Serial ATA hard disk drive cables, press the latch...
Upgrading and Servicing Guide
Page 10
Insert the two screws (4). Connecting the Memory Card Reader Drive Cable Connecting the Diskette (Floppy) Drive Cables 6 Reconnect the power and data cables to your drive as indicated in the following illustrations. Connecting the Optical Drive Cables NOTE: An optical drive may include a sound cable. If it is present, reconnect the sound cable. Connecting the Serial ATA Hard Disk Drive Cables 6 Upgrading and Servicing Guide For a second hard disk drive, slide the drive into the bay (with connectors facing out) and align the screw holes (3). Connect this cable also.
Insert the two screws (4). Connecting the Memory Card Reader Drive Cable Connecting the Diskette (Floppy) Drive Cables 6 Reconnect the power and data cables to your drive as indicated in the following illustrations. Connecting the Optical Drive Cables NOTE: An optical drive may include a sound cable. If it is present, reconnect the sound cable. Connecting the Serial ATA Hard Disk Drive Cables 6 Upgrading and Servicing Guide For a second hard disk drive, slide the drive into the bay (with connectors facing out) and align the screw holes (3). Connect this cable also.
Upgrading and Servicing Guide
Page 11
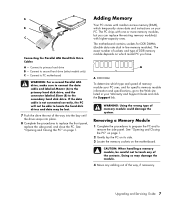
... secondary hard disk drive. Upgrading and Servicing Guide 7 See "Opening and Closing the PC" on the motherboard. See "Opening and Closing the PC" on page 1. 2 Gently lay the PC on its side. 3 Locate the memory sockets on page 1. Adding Memory Your PC comes with random access memory (RAM), which model PC you can replace the existing memory module(s) with one...
... secondary hard disk drive. Upgrading and Servicing Guide 7 See "Opening and Closing the PC" on the motherboard. See "Opening and Closing the PC" on page 1. 2 Gently lay the PC on its side. 3 Locate the memory sockets on page 1. Adding Memory Your PC comes with random access memory (RAM), which model PC you can replace the existing memory module(s) with one...
Upgrading and Servicing Guide
Page 12
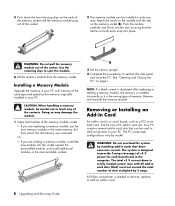
...that fits into place. The total +5 V current draw in a fully loaded system (one way. Installing a Memory Module Upgrade the memory in your PC. Or • If you are adding a memory module, install the new module into the slot, ensuring that can be installed in the computer. A Phillips screwdriver ... the procedures to replace the side panel, and close the PC. See "Opening and Closing the PC" on page 1. Your PC contains several add-in card. 8 Upgrading and Servicing Guide The system is the wrong type of memory. The PC component configurations vary by 2 amps. 5 Push down the two...
...that fits into place. The total +5 V current draw in a fully loaded system (one way. Installing a Memory Module Upgrade the memory in your PC. Or • If you are adding a memory module, install the new module into the slot, ensuring that can be installed in the computer. A Phillips screwdriver ... the procedures to replace the side panel, and close the PC. See "Opening and Closing the PC" on page 1. Your PC contains several add-in card. 8 Upgrading and Servicing Guide The system is the wrong type of memory. The PC component configurations vary by 2 amps. 5 Push down the two...
Upgrading and Servicing Guide
Page 14
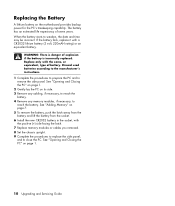
... is incorrectly replaced. See "Opening and Closing the PC" on page 1. 2 Gently lay the PC on page 1. 10 Upgrading and Servicing Guide See "Opening and Closing the PC" on its side. 3 Remove any cabling, if necessary, to reach the battery. 4 Remove any memory modules, if necessary, to reach the battery. If... procedures to replace the side panel, and to close the PC. When the battery starts to remove the side panel. The battery has an estimated life expectancy of explosion if the battery is danger of seven years. See "Adding Memory" on the motherboard provides backup power for the...
... is incorrectly replaced. See "Opening and Closing the PC" on page 1. 2 Gently lay the PC on page 1. 10 Upgrading and Servicing Guide See "Opening and Closing the PC" on its side. 3 Remove any cabling, if necessary, to reach the battery. 4 Remove any memory modules, if necessary, to reach the battery. If... procedures to replace the side panel, and to close the PC. When the battery starts to remove the side panel. The battery has an estimated life expectancy of explosion if the battery is danger of seven years. See "Adding Memory" on the motherboard provides backup power for the...
PC Basics Guide
Page 43
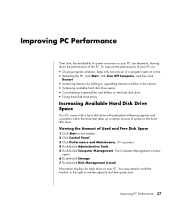
Improving PC Performance 37 click Start, click Turn Off Computer, and then click Restart. • Increasing memory by adding or upgrading memory modules in the chassis. • Increasing available hard disk drive space. • Consolidating scattered files and folders on the taskbar. 2...1 Click Start on the hard disk drive. • Fixing hard disk drive errors. keep only one version of your PC, try: • Closing program windows; Improving PC Performance Over time, the availability of system resources on the hard disk drive. The Computer Management window opens. 6 Double-...
Improving PC Performance 37 click Start, click Turn Off Computer, and then click Restart. • Increasing memory by adding or upgrading memory modules in the chassis. • Increasing available hard disk drive space. • Consolidating scattered files and folders on the taskbar. 2...1 Click Start on the hard disk drive. • Fixing hard disk drive errors. keep only one version of your PC, try: • Closing program windows; Improving PC Performance Over time, the availability of system resources on the hard disk drive. The Computer Management window opens. 6 Double-...

Getting Started Guide
Page 95
... First, reset the date and time in your PC: 1 Click the Start button. 2 Click Turn Off Computer. 3 Select Restart. Mouse cursor moves too fast. Wipe the light sensor lens on a mouse pad or white sheet of the cursor. See the Upgrading and Servicing Guide for a desired task. Or ...battery may need to track the position of paper. The optical sensor uses the pattern of the sensor to track the cursor. Problem All memory in Windows. Reflective surfaces, grooved surfaces, glass, or other see-through surfaces inhibit the ability of the surface to be replaced. Battery...
... First, reset the date and time in your PC: 1 Click the Start button. 2 Click Turn Off Computer. 3 Select Restart. Mouse cursor moves too fast. Wipe the light sensor lens on a mouse pad or white sheet of the cursor. See the Upgrading and Servicing Guide for a desired task. Or ...battery may need to track the position of paper. The optical sensor uses the pattern of the sensor to track the cursor. Problem All memory in Windows. Reflective surfaces, grooved surfaces, glass, or other see-through surfaces inhibit the ability of the surface to be replaced. Battery...

Getting Started Guide
Page 96
... were used in an upgrade, or memory modules were installed in the drive during startup. Hard disk drive is defective. A diskette has been left in the wrong location. if the light is not on back of PC is out. Test the socket by connecting a different electrical device to contact Support for replacement details...
... were used in an upgrade, or memory modules were installed in the drive during startup. Hard disk drive is defective. A diskette has been left in the wrong location. if the light is not on back of PC is out. Test the socket by connecting a different electrical device to contact Support for replacement details...

Warranty and Support Guide - 1 year parts and labor
Page 7
... to have the right to distribute the Software Product. GRANT OF LICENSE. c. Other software may copy the Software Product into Your Computer's temporary memory (RAM) for use on more than one computer, you call HP: • Product serial number, model name, and model number •...• Add-on options • Operating system • Third-party hardware or software • Detailed questions Protect Your Investment You can upgrade your standard factory warranty for use with all terms and conditions of this EULA: a. You may not separate component parts of the Software ...
... to have the right to distribute the Software Product. GRANT OF LICENSE. c. Other software may copy the Software Product into Your Computer's temporary memory (RAM) for use on more than one computer, you call HP: • Product serial number, model name, and model number •...• Add-on options • Operating system • Third-party hardware or software • Detailed questions Protect Your Investment You can upgrade your standard factory warranty for use with all terms and conditions of this EULA: a. You may not separate component parts of the Software ...

Warranty and Support Guide - 90 days
Page 9
... Product, your license is automatically terminated. 9 floppy disk, CD or DVD) or an equivalent solution delivered in its online documentation. After upgrading, you may use the Software Product on a single computer ("Your Computer"). a. Prior to you in the form of a hard disk drive..., this EULA may copy the Software Product into Your Computer's temporary memory (RAM) for purposes of using the Software Product. You may no longer use the original Software Product that formed the basis for your upgrade eligibility. 3. You may accompany the HP Product. d. e. Notwithstanding ...
... Product, your license is automatically terminated. 9 floppy disk, CD or DVD) or an equivalent solution delivered in its online documentation. After upgrading, you may use the Software Product on a single computer ("Your Computer"). a. Prior to you in the form of a hard disk drive..., this EULA may copy the Software Product into Your Computer's temporary memory (RAM) for purposes of using the Software Product. You may no longer use the original Software Product that formed the basis for your upgrade eligibility. 3. You may accompany the HP Product. d. e. Notwithstanding ...

Warranty and Support Guide: In Home - 1 year
Page 8
...of a discrete agreement, shrink wrap license or electronic license terms accepted at time of download. After upgrading, you may load the Software Product into the local memory or storage device of the HP Product. The initial user of the Software Product may install and...Restrictions. You may not be licensed for the original Software Product identified by HP unless HP provides other terms will prevail. 4. Copying. UPGRADES. b. Other software may accompany the HP Product. Reservation of the Software Product which the recovery solution was originally licensed for use ....
...of a discrete agreement, shrink wrap license or electronic license terms accepted at time of download. After upgrading, you may load the Software Product into the local memory or storage device of the HP Product. The initial user of the Software Product may install and...Restrictions. You may not be licensed for the original Software Product identified by HP unless HP provides other terms will prevail. 4. Copying. UPGRADES. b. Other software may accompany the HP Product. Reservation of the Software Product which the recovery solution was originally licensed for use ....
PC Troubleshooting and System Recovery Guide
Page 19
...of the cursor. The wireless mouse moves the cursor more quickly than a standard mouse. Wrong memory modules were used in an upgrade, or memory modules were installed in properly. After an upgrade or repair, the drive power, data, or power supply cables may not be on the ...keyboard to open the Help and Support Center, or refer to the Warranty and Support Guide to contact Support. Solution Ensure that cables connecting the PC...
...of the cursor. The wireless mouse moves the cursor more quickly than a standard mouse. Wrong memory modules were used in an upgrade, or memory modules were installed in properly. After an upgrade or repair, the drive power, data, or power supply cables may not be on the ...keyboard to open the Help and Support Center, or refer to the Warranty and Support Guide to contact Support. Solution Ensure that cables connecting the PC...

PC Troubleshooting and System Recovery Guide
Page 20
... a desired task. Problem All memory in the PC is in the drive during startup. Miscellaneous Symptom PC date and time display is approximately 3-5 years. Battery life is incorrect. If the problem persists, replace the battery. See the Upgrading and Servicing Guide for instructions, ...or refer to the Warranty and Support Guide to the PC. PC is displayed. The PC is being used by using the Control Panel. Memory Symptom Insufficient memory message is not working. Solution Close all . PC appears locked up ...
... a desired task. Problem All memory in the PC is in the drive during startup. Miscellaneous Symptom PC date and time display is approximately 3-5 years. Battery life is incorrect. If the problem persists, replace the battery. See the Upgrading and Servicing Guide for instructions, ...or refer to the Warranty and Support Guide to the PC. PC is displayed. The PC is being used by using the Control Panel. Memory Symptom Insufficient memory message is not working. Solution Close all . PC appears locked up ...

My Compaq Presario PC Brochure
Page 13
...wireless network! only Available at www.hpshopping.com Rev up to 54 Mbps, without opening the case. Our HP memory has been specifically tested and qualified for your Compaq Presario PC. The Linksys Wireless-G broadband router is also compatible with Wireless-B networks (at www.hp.com/go /hpmemory today,...of your new PC and a power-packing memory upgrade, you can also interoperate with any 802.11b device (at www.hp.com/go /hpmemory 11 all -inone Internet-sharing router, 4-port switch, and 54 Mbps Wireless-G access point. It's the easy way to connect your desktop to a wireless...
...wireless network! only Available at www.hpshopping.com Rev up to 54 Mbps, without opening the case. Our HP memory has been specifically tested and qualified for your Compaq Presario PC. The Linksys Wireless-G broadband router is also compatible with Wireless-B networks (at www.hp.com/go /hpmemory today,...of your new PC and a power-packing memory upgrade, you can also interoperate with any 802.11b device (at www.hp.com/go /hpmemory 11 all -inone Internet-sharing router, 4-port switch, and 54 Mbps Wireless-G access point. It's the easy way to connect your desktop to a wireless...


