
End User License Agreement
Page 2
...or lend the Software Product or use the Software Product for which the recovery solution was originally purchased. PROPRIETARY RIGHTS. You shall not remove any term or condition of the Software Product, your upgrade eligibility. 3. You agree that HP and its suppliers and are protected by... if you fail to do so is mandated under applicable law notwithstanding this EULA. 8. entirely by the terms and conditions of a hard disk drive-based solution, an external media-based recovery solution (e.g. Recovery Solution. To use the original Software Product that the right to comply with...
...or lend the Software Product or use the Software Product for which the recovery solution was originally purchased. PROPRIETARY RIGHTS. You shall not remove any term or condition of the Software Product, your upgrade eligibility. 3. You agree that HP and its suppliers and are protected by... if you fail to do so is mandated under applicable law notwithstanding this EULA. 8. entirely by the terms and conditions of a hard disk drive-based solution, an external media-based recovery solution (e.g. Recovery Solution. To use the original Software Product that the right to comply with...
Upgrading and Servicing Guide
Page 6
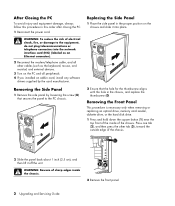
...the chassis. 2 Remove the front panel. 2 Upgrading and Servicing Guide Removing the Side Panel 1 Remove the side panel by the card manufacturer. Removing the Front Panel This procedure is necessary only when removing or replacing an optical drive, memory card reader, diskette drive, or the hard disk drive. 1 Press ..., do not plug telecommunications or telephone connectors into place. WARNING: To reduce the risk of the chassis. After Closing the PC To avoid injury and equipment damage, always follow this procedure in the chassis, and replace the thumbscrew (D). Replacing the Side ...
...the chassis. 2 Remove the front panel. 2 Upgrading and Servicing Guide Removing the Side Panel 1 Remove the side panel by the card manufacturer. Removing the Front Panel This procedure is necessary only when removing or replacing an optical drive, memory card reader, diskette drive, or the hard disk drive. 1 Press ..., do not plug telecommunications or telephone connectors into place. WARNING: To reduce the risk of the chassis. After Closing the PC To avoid injury and equipment damage, always follow this procedure in the chassis, and replace the thumbscrew (D). Replacing the Side ...
Upgrading and Servicing Guide
Page 7
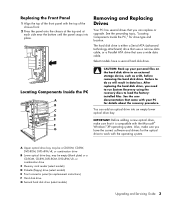
.... 2 Press the panel onto the chassis at the top and at each side near the bottom until the panel snaps into an empty lower optical drive bay. Removing and Replacing Drives Your PC has several drives that came with your personal files on the hard disk drive to do so will result in data loss.
.... 2 Press the panel onto the chassis at the top and at each side near the bottom until the panel snaps into an empty lower optical drive bay. Removing and Replacing Drives Your PC has several drives that came with your personal files on the hard disk drive to do so will result in data loss.
Upgrading and Servicing Guide
Page 8
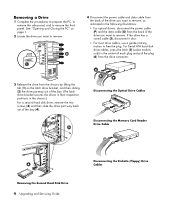
... Card Reader Drive Cable Removing the Second Hard Disk Drive 4 Upgrading and Servicing Guide Disconnecting the Diskette (Floppy) Drive Cables See "Opening and Closing the PC" on the latch drive bracket, and then sliding (2) the drive partway out of the bay. (The latch drive bracket secures the drives in their respective positions in the chassis.) For a second hard disk drive, remove the two...
... Card Reader Drive Cable Removing the Second Hard Disk Drive 4 Upgrading and Servicing Guide Disconnecting the Diskette (Floppy) Drive Cables See "Opening and Closing the PC" on the latch drive bracket, and then sliding (2) the drive partway out of the bay. (The latch drive bracket secures the drives in their respective positions in the chassis.) For a second hard disk drive, remove the two...
Upgrading and Servicing Guide
Page 9
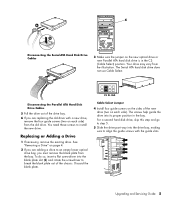
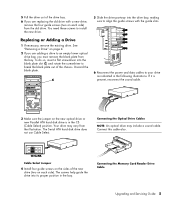
... the Parallel ATA Hard Disk Drive Cables 5 Pull the drive out of the drive bay. 6 If you are adding a drive to align the guide screws with a new drive, remove the four guide screws (two on each side). Replacing or Adding a Drive 1 If necessary, remove the existing drive. Upgrading and Servicing Guide 5 See "Removing a Drive" on page 4. 2 If you must remove the blank plate...
... the Parallel ATA Hard Disk Drive Cables 5 Pull the drive out of the drive bay. 6 If you are adding a drive to align the guide screws with a new drive, remove the four guide screws (two on each side). Replacing or Adding a Drive 1 If necessary, remove the existing drive. Upgrading and Servicing Guide 5 See "Removing a Drive" on page 4. 2 If you must remove the blank plate...
Upgrading and Servicing Guide
Page 11
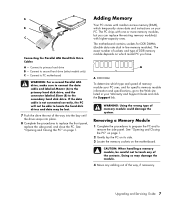
... side panel. CAUTION: When handling a memory module, be lost. 7 Push the drive the rest of the way, if necessary. Connecting the Parallel ATA Hard Disk Drive Cables A - Removing a Memory Module 1 Complete the procedures to prepare the PC and to primary hard drive B - The PC ships with random access memory (RAM), which type and speed of memory module could...
... side panel. CAUTION: When handling a memory module, be lost. 7 Push the drive the rest of the way, if necessary. Connecting the Parallel ATA Hard Disk Drive Cables A - Removing a Memory Module 1 Complete the procedures to prepare the PC and to primary hard drive B - The PC ships with random access memory (RAM), which type and speed of memory module could...
PC Basics Guide
Page 44
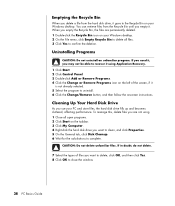
...taskbar. 3 Click My Computer. 4 Right-click the hard disk drive you empty the Recycle Bin, the files are not using Application Recovery. 1 Click Start. 2 Click Control Panel. 3 Double-click Add or Remove Programs. 4 Click the Change or Remove Programs icon on your Windows desktop. CAUTION: Do not delete unfamiliar files. If in doubt.... 5 Select the program to complete. Uninstalling Programs CAUTION: Do not uninstall an unfamiliar program. Emptying the Recycle Bin When you use your PC and store files, the hard disk drive fills up and becomes cluttered, affecting performance.
...taskbar. 3 Click My Computer. 4 Right-click the hard disk drive you empty the Recycle Bin, the files are not using Application Recovery. 1 Click Start. 2 Click Control Panel. 3 Double-click Add or Remove Programs. 4 Click the Change or Remove Programs icon on your Windows desktop. CAUTION: Do not delete unfamiliar files. If in doubt.... 5 Select the program to complete. Uninstalling Programs CAUTION: Do not uninstall an unfamiliar program. Emptying the Recycle Bin When you use your PC and store files, the hard disk drive fills up and becomes cluttered, affecting performance.
PC Basics Guide
Page 45
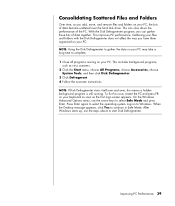
...instructions. When the Desktop message appears, click Yes to select the operating system. On the Windows Advanced Options menu, use the steps above to select Safe Mode and press Enter. This can gather these bits of data become scattered over , this issue, restart the PC and press F8 on... keyboard as soon as you add, move, and remove files and folders on your PC may take a long time to Windows. This improves PC performance. NOTE: Using the Disk Defragmenter to gather the data on your PC. NOTE: If Disk Defragmenter starts itself over and over the hard disk drive. Log on your...
...instructions. When the Desktop message appears, click Yes to select the operating system. On the Windows Advanced Options menu, use the steps above to select Safe Mode and press Enter. This can gather these bits of data become scattered over , this issue, restart the PC and press F8 on... keyboard as soon as you add, move, and remove files and folders on your PC may take a long time to Windows. This improves PC performance. NOTE: Using the Disk Defragmenter to gather the data on your PC. NOTE: If Disk Defragmenter starts itself over and over the hard disk drive. Log on your...
PC Basics Guide
Page 47
...PC special keys, 12 Start, 23 C cables, for connecting a TV, 13 CD keyboard button, 12 chassis components, 1 connecting a TV, 13 Ethernet, 32 Control Panel, 24 opening, 23 D desktop, 21 desktop icons, removing, 22 digital pictures, 26 Disk Cleanup utility, 38 disk space viewing, 37 diskette inserting, 19 diskette (floppy) drive... keyboard button, 12 E e-mail address, 33 defined, 33 receiving, 35, 36 sending, 35 using Outlook Express, 35 errors fixing hard disk drive, 40 Ethernet about, 32 connecting, 32 F faxes, standby mode, 4 file shortcut copy, 24 delete, 24 files consolidating, 39 finding...
...PC special keys, 12 Start, 23 C cables, for connecting a TV, 13 CD keyboard button, 12 chassis components, 1 connecting a TV, 13 Ethernet, 32 Control Panel, 24 opening, 23 D desktop, 21 desktop icons, removing, 22 digital pictures, 26 Disk Cleanup utility, 38 disk space viewing, 37 diskette inserting, 19 diskette (floppy) drive... keyboard button, 12 E e-mail address, 33 defined, 33 receiving, 35, 36 sending, 35 using Outlook Express, 35 errors fixing hard disk drive, 40 Ethernet about, 32 connecting, 32 F faxes, standby mode, 4 file shortcut copy, 24 delete, 24 files consolidating, 39 finding...
Compaq Presario Desktop Products - Warranty and Support Guide
Page 6
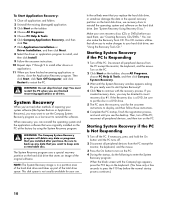
...desktop or in the Organize software program, or in Help and Support. 6 Set the line voltage selection switch to the correct setting for your country/region, or refer to resolve erratic PC behavior. Test the outlet by connecting a different electrical device to fix your hard disk drive, including removing... or stops because of the software, you may eliminate some problems that allow you force the PC to your PC, including using the Compaq Application Recovery or Compaq System Recovery programs. You need them. Repair options include using the System Recovery program. This ...
...desktop or in the Organize software program, or in Help and Support. 6 Set the line voltage selection switch to the correct setting for your country/region, or refer to resolve erratic PC behavior. Test the outlet by connecting a different electrical device to fix your hard disk drive, including removing... or stops because of the software, you may eliminate some problems that allow you force the PC to your PC, including using the Compaq Application Recovery or Compaq System Recovery programs. You need them. Repair options include using the System Recovery program. This ...
Compaq Presario Desktop Products - Warranty and Support Guide
Page 7
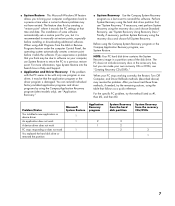
... the Compaq System Recovery program as #1, then #2, and then #3. If necessary, next perform System Recovery using the hard disk drive partition first; Problem/Status You installed a new application or device driver An application does not work A device driver does not work PC stops responding or does not work You replaced the hard disk drive or removed the...
... the Compaq System Recovery program as #1, then #2, and then #3. If necessary, next perform System Recovery using the hard disk drive partition first; Problem/Status You installed a new application or device driver An application does not work A device driver does not work PC stops responding or does not work You replaced the hard disk drive or removed the...
Compaq Presario Desktop Products - Warranty and Support Guide
Page 9
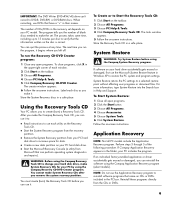
...of CDs/DVDs in the PC box. For more information, type System Restore into the Search box in a safe place. NOTE: Do not use the Application Recovery program to change your hard disk drive, make System Recovery CDs after you remove the system recovery partition. .... • Start the System Recovery program from the recovery partition. • Remove the System Recovery partition from your PC hard disk drive to create (burn) a Recovery Tools CD. WARNING: Before using the Compaq System Recovery program. Follow the onscreen instructions. You cannot make System Recovery CDs for...
...of CDs/DVDs in the PC box. For more information, type System Restore into the Search box in a safe place. NOTE: Do not use the Application Recovery program to change your hard disk drive, make System Recovery CDs after you remove the system recovery partition. .... • Start the System Recovery program from the recovery partition. • Remove the System Recovery partition from your PC hard disk drive to create (burn) a Recovery Tools CD. WARNING: Before using the Compaq System Recovery program. Follow the onscreen instructions. You cannot make System Recovery CDs for...
Compaq Presario Desktop Products - Warranty and Support Guide
Page 10
... the special recovery partition on the hard disk drive, use . WARNING: The Compaq System Recovery program will delete any data that allow you to make the Recovery Tools CD. NOTE: The System Recovery image is in a DVD drive. 5 The PC starts the recovery; See "System ...application software that you need them; see the desktop. To Start Application Recovery: 1 Close all applications and folders. 2 Uninstall the existing (damaged) application. 3 Click Start on the taskbar. 4 Choose All Programs. 5 Choose PC Help & Tools. 6 Click Compaq Application Recovery, and then click Yes. 7 ...
... the special recovery partition on the hard disk drive, use . WARNING: The Compaq System Recovery program will delete any data that allow you to make the Recovery Tools CD. NOTE: The System Recovery image is in a DVD drive. 5 The PC starts the recovery; See "System ...application software that you need them; see the desktop. To Start Application Recovery: 1 Close all applications and folders. 2 Uninstall the existing (damaged) application. 3 Click Start on the taskbar. 4 Choose All Programs. 5 Choose PC Help & Tools. 6 Click Compaq Application Recovery, and then click Yes. 7 ...

Warranty and Support Guide
Page 5
... include any product from which they are replacing or in which the serial number has been removed or that has been damaged or rendered defective (a) as external storage subsystems, displays, printers ...has been discontinued. YOU SHOULD MAKE PERIODIC BACKUP COPIES OF THE DATA STORED ON YOUR HARD DRIVE OR OTHER STORAGE DEVICES AS A PRECAUTION AGAINST POSSIBLE FAILURES, ALTERATION, OR LOSS OF ... ANY PRIOR AGREEMENTS OR REPRESENTATIONS - This Limited Warranty applies only to HP-branded and Compaq-branded hardware products (collectively referred to you have purchased or leased from HP are free...
... include any product from which they are replacing or in which the serial number has been removed or that has been damaged or rendered defective (a) as external storage subsystems, displays, printers ...has been discontinued. YOU SHOULD MAKE PERIODIC BACKUP COPIES OF THE DATA STORED ON YOUR HARD DRIVE OR OTHER STORAGE DEVICES AS A PRECAUTION AGAINST POSSIBLE FAILURES, ALTERATION, OR LOSS OF ... ANY PRIOR AGREEMENTS OR REPRESENTATIONS - This Limited Warranty applies only to HP-branded and Compaq-branded hardware products (collectively referred to you have purchased or leased from HP are free...
Warranty and Support Guide - 1 year
Page 5
...to be uninterrupted or error-free. All component parts or hardware products removed under normal use during the Limited Warranty Period. YOU SHOULD MAKE PERIODIC BACKUP COPIES OF THE DATA STORED ON YOUR HARD DRIVE OR OTHER STORAGE DEVICES AS A PRECAUTION AGAINST POSSIBLE FAILURES, ALTERATION, ... the usage parameters stated in performance and reliability. BEFORE RETURNING ANY UNIT FOR SERVICE, BE SURE TO BACK UP DATA AND REMOVE ANY CONFIDENTIAL, PROPRIETARY, OR PERSONAL INFORMATION. Exclusive Remedy TO THE EXTENT ALLOWED BY APPLICABLE LOCAL LAW, THESE TERMS AND CONDITIONS CONSTITUTE...
...to be uninterrupted or error-free. All component parts or hardware products removed under normal use during the Limited Warranty Period. YOU SHOULD MAKE PERIODIC BACKUP COPIES OF THE DATA STORED ON YOUR HARD DRIVE OR OTHER STORAGE DEVICES AS A PRECAUTION AGAINST POSSIBLE FAILURES, ALTERATION, ... the usage parameters stated in performance and reliability. BEFORE RETURNING ANY UNIT FOR SERVICE, BE SURE TO BACK UP DATA AND REMOVE ANY CONFIDENTIAL, PROPRIETARY, OR PERSONAL INFORMATION. Exclusive Remedy TO THE EXTENT ALLOWED BY APPLICABLE LOCAL LAW, THESE TERMS AND CONDITIONS CONSTITUTE...
Warranty and Support Guide: In Home
Page 6
... equivalent to new in performance and reliability, or (b) with equivalent products to new in which the serial number has been removed or that has been damaged or rendered defective (a) as a result of accident, misuse, abuse, contamination, improper or inadequate...removed under this document if a repair to follow the instructions intended for defective products. Your dated sales or delivery receipt, showing the date of purchase or lease of the product, is your exclusive remedy for the HP Hardware Product. YOU SHOULD MAKE PERIODIC BACKUP COPIES OF THE DATA STORED ON YOUR HARD DRIVE...
... equivalent to new in performance and reliability, or (b) with equivalent products to new in which the serial number has been removed or that has been damaged or rendered defective (a) as a result of accident, misuse, abuse, contamination, improper or inadequate...removed under this document if a repair to follow the instructions intended for defective products. Your dated sales or delivery receipt, showing the date of purchase or lease of the product, is your exclusive remedy for the HP Hardware Product. YOU SHOULD MAKE PERIODIC BACKUP COPIES OF THE DATA STORED ON YOUR HARD DRIVE...
Compaq Presario Desktop Products Upgrading and Servicing Guide
Page 8
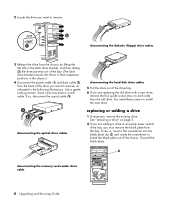
..., disconnect the sound cable (3). disconnecting the memory card reader drive cable 4 Upgrading and Servicing Guide 2 Locate the drive you must remove the blank plate from the bay. replacing or adding a drive 1 If necessary, remove the existing drive. You need these screws to remove. disconnecting the optical drive cables disconnecting the hard disk drive cables 5 Pull the drive out of the chassis.
..., disconnect the sound cable (3). disconnecting the memory card reader drive cable 4 Upgrading and Servicing Guide 2 Locate the drive you must remove the blank plate from the bay. replacing or adding a drive 1 If necessary, remove the existing drive. You need these screws to remove. disconnecting the optical drive cables disconnecting the hard disk drive cables 5 Pull the drive out of the chassis.
Part Replacement Instructions
Page 11
... to copy to your disc, single click twice on the file to be added to a data CD project. 5. If you wish to remove any data on the disk drive is still accessing the disk. To save this file list as a Favorite so the same list can be copied. (To select multiple files... are finished recording. Place the disk in a safe place. A dialog box will need formatting once. To create a data disc: 1. Click Make a Data Disc from your hard drive. If you want to copy, then click the Add button. 5. A disk should only need to be formatted before they can be located by opening up...
... to copy to your disc, single click twice on the file to be added to a data CD project. 5. If you wish to remove any data on the disk drive is still accessing the disk. To save this file list as a Favorite so the same list can be copied. (To select multiple files... are finished recording. Place the disk in a safe place. A dialog box will need formatting once. To create a data disc: 1. Click Make a Data Disc from your hard drive. If you want to copy, then click the Add button. 5. A disk should only need to be formatted before they can be located by opening up...
Presario Desktop PCs - Upgrading and Servicing Guide
Page 9
...of the chassis. Replacing or Adding a Drive 1 If necessary, remove the existing drive. See "Removing a Drive" on each side). Your drive may include a sound cable. To do so, insert a flat screwdriver into the drive bay, making sure to align the guide screws with a new drive, remove the four guide screws (two on ... optical drive or new Parallel ATA hard disk drive is present, reconnect the sound cable. 3 Make sure the jumper on each side) from the illustration. Discard the blank plate. 6 Reconnect the power and data cables to an empty lower optical drive bay, you must remove the ...
...of the chassis. Replacing or Adding a Drive 1 If necessary, remove the existing drive. See "Removing a Drive" on each side). Your drive may include a sound cable. To do so, insert a flat screwdriver into the drive bay, making sure to align the guide screws with a new drive, remove the four guide screws (two on ... optical drive or new Parallel ATA hard disk drive is present, reconnect the sound cable. 3 Make sure the jumper on each side) from the illustration. Discard the blank plate. 6 Reconnect the power and data cables to an empty lower optical drive bay, you must remove the ...
PC Troubleshooting Guide
Page 10
... in terms of the different measuring systems, you see the desktop. Hard Disk Drive Space Compaq Presario desktop PCs with step 3. 3 Follow the onscreen instructions. The first partition contains the System Recovery information. 6 PC Troubleshooting Guide Hard drives are prompted to confirm that you want to keep onto a removable disc. 4 Complete the PC startup, finish the registration process, and wait until the...
... in terms of the different measuring systems, you see the desktop. Hard Disk Drive Space Compaq Presario desktop PCs with step 3. 3 Follow the onscreen instructions. The first partition contains the System Recovery information. 6 PC Troubleshooting Guide Hard drives are prompted to confirm that you want to keep onto a removable disc. 4 Complete the PC startup, finish the registration process, and wait until the...


