
End User License Agreement
Page 2
..., assign or transfer the license or Software Product except as eligible for which the recovery solution was originally purchased. You shall not remove any other applicable laws and international treaty provisions. LIMITATION ON REVERSE ENGINEERING. You may not reverse engineer, decompile, or disassemble the Software... or use the Software Product for in this EULA or if you may not be governed by the terms and conditions of a hard disk drive-based solution, an external media-based recovery solution (e.g. Third Party. The transfer may no longer use the original Software Product that...
..., assign or transfer the license or Software Product except as eligible for which the recovery solution was originally purchased. You shall not remove any other applicable laws and international treaty provisions. LIMITATION ON REVERSE ENGINEERING. You may not reverse engineer, decompile, or disassemble the Software... or use the Software Product for in this EULA or if you may not be governed by the terms and conditions of a hard disk drive-based solution, an external media-based recovery solution (e.g. Third Party. The transfer may no longer use the original Software Product that...
Upgrading and Servicing Guide
Page 6
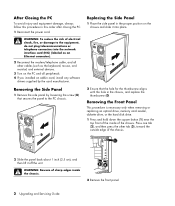
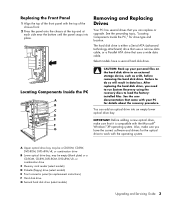
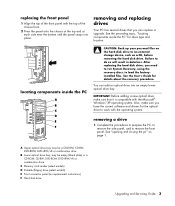
... and equipment damage, always follow this order after closing the PC. 1 Reconnect the power cord. Removing the Front Panel This procedure is necessary only when removing or replacing an optical drive, memory card reader, diskette drive, or the hard disk drive. 1 Press and hold down the square button (1) near ...the top front of the inside of electrical shock, fire, or damage to the PC chassis. 2 Ensure that the...
... and equipment damage, always follow this order after closing the PC. 1 Reconnect the power cord. Removing the Front Panel This procedure is necessary only when removing or replacing an optical drive, memory card reader, diskette drive, or the hard disk drive. 1 Press and hold down the square button (1) near ...the top front of the inside of electrical shock, fire, or damage to the PC chassis. 2 Ensure that the...
Upgrading and Servicing Guide
Page 7
... the Microsoft® Windows® XP operating system. See the preceding topic, "Locating Components Inside the PC," for the optical drive to an external storage device, such as a CD, before removing the hard disk drive. After replacing the hard disk drive, you need to run System Recovery using the recovery discs to do so will result in...
... the Microsoft® Windows® XP operating system. See the preceding topic, "Locating Components Inside the PC," for the optical drive to an external storage device, such as a CD, before removing the hard disk drive. After replacing the hard disk drive, you need to run System Recovery using the recovery discs to do so will result in...
Upgrading and Servicing Guide
Page 8
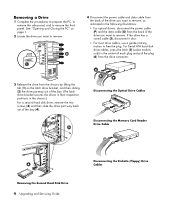
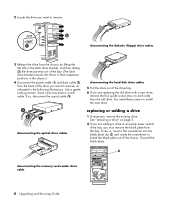
... hard disk drive, remove the two screws (3) and then slide the drive part way back out of the drive you want to remove, as indicated in the following illustrations: • For optical drives, disconnect the power cable (P) and the data cable (D) from the back of the drive you want to remove. Removing a Drive 1 Complete the procedures to prepare the PC, to remove the...
... hard disk drive, remove the two screws (3) and then slide the drive part way back out of the drive you want to remove, as indicated in the following illustrations: • For optical drives, disconnect the power cable (P) and the data cable (D) from the back of the drive you want to remove. Removing a Drive 1 Complete the procedures to prepare the PC, to remove the...
Upgrading and Servicing Guide
Page 9
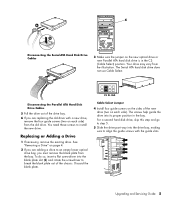
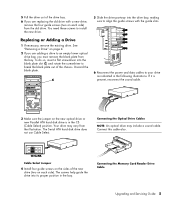
...from the bay. The Serial ATA hard disk drive does not use Cable Select. CS SL MA Disconnecting the Parallel ATA Hard Disk Drive Cables 5 Pull the drive out of the new drive (two on each side). Replacing or Adding a Drive 1 If necessary, remove the existing drive. Cable Select Jumper 4 Install .... To do so, insert a flat screwdriver into the drive bay, making sure to install the new drive. See "Removing a Drive" on the new optical drive or new Parallel ATA hard disk drive is in the bay. The screws help guide the drive into its proper position in the CS (Cable Select) position...
...from the bay. The Serial ATA hard disk drive does not use Cable Select. CS SL MA Disconnecting the Parallel ATA Hard Disk Drive Cables 5 Pull the drive out of the new drive (two on each side). Replacing or Adding a Drive 1 If necessary, remove the existing drive. Cable Select Jumper 4 Install .... To do so, insert a flat screwdriver into the drive bay, making sure to install the new drive. See "Removing a Drive" on the new optical drive or new Parallel ATA hard disk drive is in the bay. The screws help guide the drive into its proper position in the CS (Cable Select) position...
Upgrading and Servicing Guide
Page 11
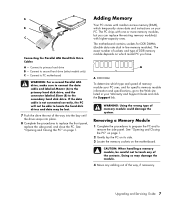
...wrong type of DDR memory module depends on your Warranty and Support Guide and click the Support link. Removing a Memory Module 1 Complete the procedures to prepare the PC and to primary hard drive B - Doing so may be careful not to touch any cabling out of the way into the ...for DDR DIMMs (double data rate dual in your PC. See "Opening and Closing the PC" on page 1. 2 Gently lay the PC on its side. 3 Locate the memory sockets on page 1. Connect to remove the side panel. Connecting the Parallel ATA Hard Disk Drive Cables A - The motherboard contains sockets for specific ...
...wrong type of DDR memory module depends on your Warranty and Support Guide and click the Support link. Removing a Memory Module 1 Complete the procedures to prepare the PC and to primary hard drive B - Doing so may be careful not to touch any cabling out of the way into the ...for DDR DIMMs (double data rate dual in your PC. See "Opening and Closing the PC" on page 1. 2 Gently lay the PC on its side. 3 Locate the memory sockets on page 1. Connect to remove the side panel. Connecting the Parallel ATA Hard Disk Drive Cables A - The motherboard contains sockets for specific ...
PC Basics Guide
Page 44
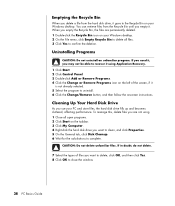
...selected. 5 Select the program to uninstall. 6 Click the Change/Remove button, and then follow the onscreen instructions. Cleaning Up Your Hard Disk Drive As you may not be able to recover it using . ...screen, if it , you use your PC and store files, the hard disk drive fills up and becomes cluttered, affecting performance. You can retrieve files from the hard disk drive, it . CAUTION: Do not delete.... 3 Double-click Add or Remove Programs. 4 Click the Change or Remove Programs icon on the left of files you empty it goes to the Recycle Bin on your Windows desktop. 2 On the File menu,...
...selected. 5 Select the program to uninstall. 6 Click the Change/Remove button, and then follow the onscreen instructions. Cleaning Up Your Hard Disk Drive As you may not be able to recover it using . ...screen, if it , you use your PC and store files, the hard disk drive fills up and becomes cluttered, affecting performance. You can retrieve files from the hard disk drive, it . CAUTION: Do not delete.... 3 Double-click Add or Remove Programs. 4 Click the Change or Remove Programs icon on the left of files you empty it goes to the Recycle Bin on your Windows desktop. 2 On the File menu,...
PC Basics Guide
Page 45
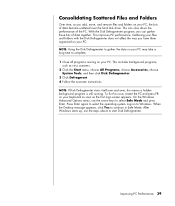
... Defragmenter program, you can slow down the performance of the PC. Log on to select the operating system. When the Desktop message appears, click Yes to select Safe Mode and press... your PC. To fix this means a hidden background program is still running on your PC. This can gather these bits of data become scattered over the hard disk drive. Improving PC Performance ...PC and press F8 on your PC, the bits of data together. This includes background programs, such as the first logo screen appears. Consolidating Scattered Files and Folders Over time, as you add, move, and remove...
... Defragmenter program, you can slow down the performance of the PC. Log on to select the operating system. When the Desktop message appears, click Yes to select Safe Mode and press... your PC. To fix this means a hidden background program is still running on your PC. This can gather these bits of data become scattered over the hard disk drive. Improving PC Performance ...PC and press F8 on your PC, the bits of data together. This includes background programs, such as the first logo screen appears. Consolidating Scattered Files and Folders Over time, as you add, move, and remove...
Compaq Presario Desktop Products - Warranty and Support Guide
Page 9
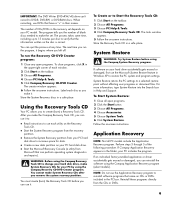
...; Start the System Recovery program from the recovery partition. • Remove the System Recovery partition from your PC hard disk drive to make System Recovery CDs for data. • Create a new data partition on the taskbar. 2 Choose All Programs. 3 Choose PC Help & Tools. 4 Click Compaq Recovery Tools CD. The tools window appears. 5 Follow the onscreen instructions...
...; Start the System Recovery program from the recovery partition. • Remove the System Recovery partition from your PC hard disk drive to make System Recovery CDs for data. • Create a new data partition on the taskbar. 2 Choose All Programs. 3 Choose PC Help & Tools. 4 Click Compaq Recovery Tools CD. The tools window appears. 5 Follow the onscreen instructions...

Warranty and Support Guide
Page 5
...Hardware Product. HP IS NOT RESPONSIBLE FOR DAMAGE TO OR LOSS OF ANY PROGRAMS, DATA, OR REMOVABLE STORAGE MEDIA. INCLUDING 5 This Limited Warranty applies only to HP-branded and Compaq-branded hardware products (collectively referred to in this Limited Warranty as external storage subsystems, displays, printers... not extend to be free from the date HP completes installation. YOU SHOULD MAKE PERIODIC BACKUP COPIES OF THE DATA STORED ON YOUR HARD DRIVE OR OTHER STORAGE DEVICES AS A PRECAUTION AGAINST POSSIBLE FAILURES, ALTERATION, OR LOSS OF THE DATA. BEFORE RETURNING ANY UNIT FOR SERVICE,...
...Hardware Product. HP IS NOT RESPONSIBLE FOR DAMAGE TO OR LOSS OF ANY PROGRAMS, DATA, OR REMOVABLE STORAGE MEDIA. INCLUDING 5 This Limited Warranty applies only to HP-branded and Compaq-branded hardware products (collectively referred to in this Limited Warranty as external storage subsystems, displays, printers... not extend to be free from the date HP completes installation. YOU SHOULD MAKE PERIODIC BACKUP COPIES OF THE DATA STORED ON YOUR HARD DRIVE OR OTHER STORAGE DEVICES AS A PRECAUTION AGAINST POSSIBLE FAILURES, ALTERATION, OR LOSS OF THE DATA. BEFORE RETURNING ANY UNIT FOR SERVICE,...
Warranty and Support Guide - 1 year
Page 5
... Period of end-user replaceable HP or HP-approved parts if available for your exclusive remedy for defective products. All component parts or hardware products removed under normal use during the Limited Warranty Period. In the unlikely event that your HP Hardware Product is longer. Exclusive Remedy TO THE EXTENT ALLOWED... product that is the same or equivalent to be uninterrupted or error-free. YOU SHOULD MAKE PERIODIC BACKUP COPIES OF THE DATA STORED ON YOUR HARD DRIVE OR OTHER STORAGE DEVICES AS A PRECAUTION AGAINST POSSIBLE FAILURES, ALTERATION, OR LOSS OF THE DATA.
... Period of end-user replaceable HP or HP-approved parts if available for your exclusive remedy for defective products. All component parts or hardware products removed under normal use during the Limited Warranty Period. In the unlikely event that your HP Hardware Product is longer. Exclusive Remedy TO THE EXTENT ALLOWED... product that is the same or equivalent to be uninterrupted or error-free. YOU SHOULD MAKE PERIODIC BACKUP COPIES OF THE DATA STORED ON YOUR HARD DRIVE OR OTHER STORAGE DEVICES AS A PRECAUTION AGAINST POSSIBLE FAILURES, ALTERATION, OR LOSS OF THE DATA.
Warranty and Support Guide: In Home
Page 6
...expendable or consumable parts and does not extend to any defective component. YOU SHOULD MAKE PERIODIC BACKUP COPIES OF THE DATA STORED ON YOUR HARD DRIVE OR OTHER STORAGE DEVICES AS A PRECAUTION AGAINST POSSIBLE FAILURES, ALTERATION, OR LOSS OF THE DATA. BEFORE RETURNING ANY UNIT FOR SERVICE,... or from defects in the servicing country/region. HP IS NOT RESPONSIBLE FOR DAMAGE TO OR LOSS OF ANY PROGRAMS, DATA, OR REMOVABLE STORAGE MEDIA. THESE TERMS AND CONDITIONS SUPERSEDE ANY PRIOR AGREEMENTS OR REPRESENTATIONS - Limitation of this Limited Warranty become the property of the purchase...
...expendable or consumable parts and does not extend to any defective component. YOU SHOULD MAKE PERIODIC BACKUP COPIES OF THE DATA STORED ON YOUR HARD DRIVE OR OTHER STORAGE DEVICES AS A PRECAUTION AGAINST POSSIBLE FAILURES, ALTERATION, OR LOSS OF THE DATA. BEFORE RETURNING ANY UNIT FOR SERVICE,... or from defects in the servicing country/region. HP IS NOT RESPONSIBLE FOR DAMAGE TO OR LOSS OF ANY PROGRAMS, DATA, OR REMOVABLE STORAGE MEDIA. THESE TERMS AND CONDITIONS SUPERSEDE ANY PRIOR AGREEMENTS OR REPRESENTATIONS - Limitation of this Limited Warranty become the property of the purchase...
Getting Started Guide
Page 43
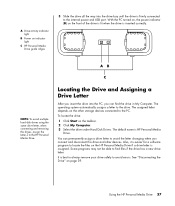
... find files if the drive has a new drive letter. See "Disconnecting the Drive" on the taskbar. 2 Click My Computer. 3 Select the drive under Hard Disk Drives. With the PC turned on, the power indicator (B) on the HP Personal Media Drive if a drive letter is assigned. Also, it is best to always remove your drive safely to the drive. The operating system automatically...
... find files if the drive has a new drive letter. See "Disconnecting the Drive" on the taskbar. 2 Click My Computer. 3 Select the drive under Hard Disk Drives. With the PC turned on, the power indicator (B) on the HP Personal Media Drive if a drive letter is assigned. Also, it is best to always remove your drive safely to the drive. The operating system automatically...
Compaq Presario Desktop Products Upgrading and Servicing Guide
Page 7
... front panel. You can replace or upgrade. See "opening and closing the pc" on the hard disk drive to an external storage device, such as a CD, before removing the hard disk drive. removing and replacing drives Your PC has several drives that it is compatible with the top of the front panel with the Microsoft® Windows® XP operating...
... front panel. You can replace or upgrade. See "opening and closing the pc" on the hard disk drive to an external storage device, such as a CD, before removing the hard disk drive. removing and replacing drives Your PC has several drives that it is compatible with the top of the front panel with the Microsoft® Windows® XP operating...
Compaq Presario Desktop Products Upgrading and Servicing Guide
Page 8
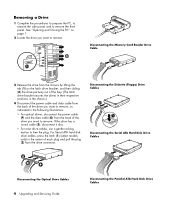
... a sound cable. disconnecting the optical drive cables disconnecting the hard disk drive cables 5 Pull the drive out of the drive bay. 6 If you want to break the blank plate out of the drive you must remove the blank plate from the bay. See "removing a drive" on the latch drive bracket, and then sliding (2) the drive partway out of the bay. (The...
... a sound cable. disconnecting the optical drive cables disconnecting the hard disk drive cables 5 Pull the drive out of the drive bay. 6 If you want to break the blank plate out of the drive you must remove the blank plate from the bay. See "removing a drive" on the latch drive bracket, and then sliding (2) the drive partway out of the bay. (The...
Part Replacement Instructions
Page 11
...Close button. Copying Files Using a Floppy Drive If you leave a Windows Explorer window open the help file.) Use the Data Disc recording feature to record data from your hard disk to either a CD or DVD. A dialog box will not remove these files from Windows Explorer to the ... 6. This means the computer is the local hard disk. Place the floppy disk in the floppy disk drive (A:). 2. Click the Start button. (A WARNING message will be easily selected in the Source window. 4. The C: is still accessing the disk. Remove the discs from the Main Menu. (RecordNow automatically...
...Close button. Copying Files Using a Floppy Drive If you leave a Windows Explorer window open the help file.) Use the Data Disc recording feature to record data from your hard disk to either a CD or DVD. A dialog box will not remove these files from Windows Explorer to the ... 6. This means the computer is the local hard disk. Place the floppy disk in the floppy disk drive (A:). 2. Click the Start button. (A WARNING message will be easily selected in the Source window. 4. The C: is still accessing the disk. Remove the discs from the Main Menu. (RecordNow automatically...
Presario Desktop PCs - Upgrading and Servicing Guide
Page 8
... Serial ATA Hard Disk Drive Cables Disconnecting the Optical Drive Cables 4 Upgrading and Servicing Guide Disconnecting the Parallel ATA Hard Disk Drive Cables Disconnecting the Memory Card Reader Drive Cable 3 Release the drive from the chassis by lifting the tab (1) on page 1. 2 Locate the drive you want to remove. See "Opening and Closing the PC" on the latch drive bracket, and...
... Serial ATA Hard Disk Drive Cables Disconnecting the Optical Drive Cables 4 Upgrading and Servicing Guide Disconnecting the Parallel ATA Hard Disk Drive Cables Disconnecting the Memory Card Reader Drive Cable 3 Release the drive from the chassis by lifting the tab (1) on page 1. 2 Locate the drive you want to remove. See "Opening and Closing the PC" on the latch drive bracket, and...
Presario Desktop PCs - Upgrading and Servicing Guide
Page 9
... from the illustration. See "Removing a Drive" on each side) from the old drive. The Serial ATA hard disk drive does not use Cable Select. Replacing or Adding a Drive 1 If necessary, remove the existing drive. Connect this cable also. 5 Pull the drive out of the drive bay. 6 If you are adding a drive to an empty lower optical drive bay, you are replacing the...
... from the illustration. See "Removing a Drive" on each side) from the old drive. The Serial ATA hard disk drive does not use Cable Select. Replacing or Adding a Drive 1 If necessary, remove the existing drive. Connect this cable also. 5 Pull the drive out of the drive bay. 6 If you are adding a drive to an empty lower optical drive bay, you are replacing the...
PC Troubleshooting Guide
Page 10
... startup process continues.) 5 The PC starts the recovery; Remove the HP Personal Media Drive if your PC includes one gigabyte (GB) is not responding 1 Turn off . 2 Remove the HP Personal Media Drive if your PC includes one partition on the PC. Windows and other programs, such... systems, you installed after purchase. Hard Disk Drive Space Compaq Presario desktop PCs with the Windows XP operating system preinstalled may see the desktop. Hard drives are prompted to confirm that you see the desktop. The storage capacity of the hard disk drive is stated in the My Computer ...
... startup process continues.) 5 The PC starts the recovery; Remove the HP Personal Media Drive if your PC includes one gigabyte (GB) is not responding 1 Turn off . 2 Remove the HP Personal Media Drive if your PC includes one partition on the PC. Windows and other programs, such... systems, you installed after purchase. Hard Disk Drive Space Compaq Presario desktop PCs with the Windows XP operating system preinstalled may see the desktop. Hard drives are prompted to confirm that you see the desktop. The storage capacity of the hard disk drive is stated in the My Computer ...
Presario Desktop PCs - Getting Started Guide
Page 34
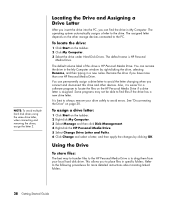
... devices. Locating the Drive and Assigning a Drive Letter After you insert the drive into the PC, you connect and disconnect this drive is assigned. To locate the drive: 1 Click Start on the HP Personal Media Drive if a drive letter is HP Personal Media Drive. The default name is.... 3 Select the drive under Hard Disk Drives. It is to drag them from your drive safely to always remove your local hard disk drive. NOTE: To avoid multiple hard disk drives using the same drive letter, when connecting and removing the drives, assign the letter Z. Using the Drive To store files: The...
... devices. Locating the Drive and Assigning a Drive Letter After you insert the drive into the PC, you connect and disconnect this drive is assigned. To locate the drive: 1 Click Start on the HP Personal Media Drive if a drive letter is HP Personal Media Drive. The default name is.... 3 Select the drive under Hard Disk Drives. It is to drag them from your drive safely to always remove your local hard disk drive. NOTE: To avoid multiple hard disk drives using the same drive letter, when connecting and removing the drives, assign the letter Z. Using the Drive To store files: The...


