

Maintenance and Service Guide
Page 25
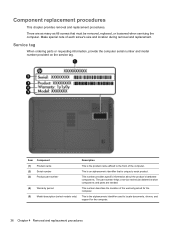
Item Description (4) Warranty period (5) Model description (select models only) Function This number describes the duration of the warranty period for the computer. This is the alphanumeric identifier used to locate documents, drivers, and support for the computer. Service tag 17
Item Description (4) Warranty period (5) Model description (select models only) Function This number describes the duration of the warranty period for the computer. This is the alphanumeric identifier used to locate documents, drivers, and support for the computer. Service tag 17
Maintenance and Service Guide
Page 44
... and replacement. The part number helps a service technician determine what components and parts are as many as 66 screws that is unique to locate documents, drivers, and support for the computer. Component replacement procedures This chapter provides removal and replacement procedures. There are needed.
... and replacement. The part number helps a service technician determine what components and parts are as many as 66 screws that is unique to locate documents, drivers, and support for the computer. Component replacement procedures This chapter provides removal and replacement procedures. There are needed.
Maintenance and Service Guide
Page 102
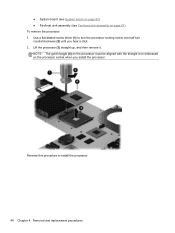
NOTE: The gold triangle (4) on the processor must be aligned with the triangle icon embossed on page 87) To remove the processor: 1. Reverse this procedure to turn the processor locking screw one-half turn counterclockwise (2) until you install the processor. Use a flat-bladed screw driver (1) to install the processor. 94 Chapter 4 Removal and replacement procedures Lift the processor (3) straight up, and then remove it. ● System board (see System board on page 82) ● Fan/heat sink assembly (see Fan/heat sink assembly on the processor socket when you hear a click. 2.
NOTE: The gold triangle (4) on the processor must be aligned with the triangle icon embossed on page 87) To remove the processor: 1. Reverse this procedure to turn the processor locking screw one-half turn counterclockwise (2) until you install the processor. Use a flat-bladed screw driver (1) to install the processor. 94 Chapter 4 Removal and replacement procedures Lift the processor (3) straight up, and then remove it. ● System board (see System board on page 82) ● Fan/heat sink assembly (see Fan/heat sink assembly on the processor socket when you hear a click. 2.
Maintenance and Service Guide
Page 114
... Recovery Manager in either of the screen. Click System Recovery in the search field. See Changing the computer boot order on the screen. 2. All hardwarerelated drivers and software are re-installed, but other software applications are not. If the recovery partition is present, a Recovery drive is displayed at system bootup. 4. or...
... Recovery Manager in either of the screen. Click System Recovery in the search field. See Changing the computer boot order on the screen. 2. All hardwarerelated drivers and software are re-installed, but other software applications are not. If the recovery partition is present, a Recovery drive is displayed at system bootup. 4. or...


