
End User License Agreement
Page 2
... the license or Software Product except as other terms along with any term or condition of this EULA. 5. You may not reverse engineer, decompile, or disassemble the Software Product, except and only to the extent that the right to United States copyright, trade secret, and trademark law, as well as expressly...
... the license or Software Product except as other terms along with any term or condition of this EULA. 5. You may not reverse engineer, decompile, or disassemble the Software Product, except and only to the extent that the right to United States copyright, trade secret, and trademark law, as well as expressly...

Hardware Guide, Compaq Notebook Series
Page 62
... text of or recycle battery packs by using other regions, refer to the Worldwide Telephone Numbers booklet, included with the notebook, to contact a Compaq authorized dealer, reseller, or service provider and request information about battery pack disposal. Finding More Power Information For more information...9632; In North America, you with the computer. ■ In Europe, dispose of governmental agency notices, refer on a battery pack. Do not disassemble, crush, or puncture a battery pack or short the contacts on this CD to temperatures higher than 60° C (140° F), or...
... text of or recycle battery packs by using other regions, refer to the Worldwide Telephone Numbers booklet, included with the notebook, to contact a Compaq authorized dealer, reseller, or service provider and request information about battery pack disposal. Finding More Power Information For more information...9632; In North America, you with the computer. ■ In Europe, dispose of governmental agency notices, refer on a battery pack. Do not disassemble, crush, or puncture a battery pack or short the contacts on this CD to temperatures higher than 60° C (140° F), or...

Regulatory and Safety Notices Compaq Notebook Series
Page 9
... metals are recycled. Dispose of or recycle them by taking advantage of batteries with a postage-paid battery pack mailer preaddressed to recharge, disassemble, immerse in Worldwide Telephone Numbers booklet included with the Compaq battery pack for this notebook. This program provides you with general household waste. In Europe, do not dispose of the...
... metals are recycled. Dispose of or recycle them by taking advantage of batteries with a postage-paid battery pack mailer preaddressed to recharge, disassemble, immerse in Worldwide Telephone Numbers booklet included with the Compaq battery pack for this notebook. This program provides you with general household waste. In Europe, do not dispose of the...

Regulatory and Safety Notices Compaq Notebook Series
Page 10
... Regulatory and Safety Notices Reverse engineering or disassembly is intended for continuous use in conjunction with the U.S. As an Energy Star Partner, Compaq Computer Corporation has determined that bear the "GS" approval mark. Compaq portable notebooks in a stand-alone mode are not ...unless otherwise authorized by Macrovision Corporation. Environmental Protection Agency (EPA) Energy Star Computers Program 3.0. German Ergonomics Notice Compaq notebooks bearing the "GS" approval mark meet the requirements of ZH 1/618 (German Safety Regulations for energy efficiency. Regulatory ...
... Regulatory and Safety Notices Reverse engineering or disassembly is intended for continuous use in conjunction with the U.S. As an Energy Star Partner, Compaq Computer Corporation has determined that bear the "GS" approval mark. Compaq portable notebooks in a stand-alone mode are not ...unless otherwise authorized by Macrovision Corporation. Environmental Protection Agency (EPA) Energy Star Computers Program 3.0. German Ergonomics Notice Compaq notebooks bearing the "GS" approval mark meet the requirements of ZH 1/618 (German Safety Regulations for energy efficiency. Regulatory ...
Maintenance and Service Guide
Page 1
It provides comprehensive information on identifying computer features, components, and spare parts, troubleshooting computer problems, and performing computer disassembly procedures. b Maintenance and Service Guide Evo Notebook N800c, Evo Notebook N800v, Evo Notebook N800w, and Presario 2800 Mobile PC Series Document Part Number: 268135-003 January 2003 This guide is a troubleshooting reference used for maintaining and servicing the notebook.
It provides comprehensive information on identifying computer features, components, and spare parts, troubleshooting computer problems, and performing computer disassembly procedures. b Maintenance and Service Guide Evo Notebook N800c, Evo Notebook N800v, Evo Notebook N800w, and Presario 2800 Mobile PC Series Document Part Number: 268135-003 January 2003 This guide is a troubleshooting reference used for maintaining and servicing the notebook.

Maintenance and Service Guide
Page 4
... to Removable Drives 4-3 4.4 Preventing Electrostatic Damage 4-4 4.5 Packaging and Transporting Precautions 4-4 4.6 Workstation Precautions 4-5 4.7 Grounding Equipment and Methods 4-6 5 Removal and Replacement Procedures 5.1 Serial Number 5-2 5.2 Disassembly Sequence Chart 5-2 5.3 Preparing the Computer for Disassembly 5-4 5.4 Computer Feet 5-9 5.5 Memory Expansion Board 5-9 5.6 Mini PCI Communications Board 5-12 5.7 Connector Cover 5-15 5.8 LED Cover 5-16 5.9 Keyboard 5-18 5.10 Display 5-22 5.11...
... to Removable Drives 4-3 4.4 Preventing Electrostatic Damage 4-4 4.5 Packaging and Transporting Precautions 4-4 4.6 Workstation Precautions 4-5 4.7 Grounding Equipment and Methods 4-6 5 Removal and Replacement Procedures 5.1 Serial Number 5-2 5.2 Disassembly Sequence Chart 5-2 5.3 Preparing the Computer for Disassembly 5-4 5.4 Computer Feet 5-9 5.5 Memory Expansion Board 5-9 5.6 Mini PCI Communications Board 5-12 5.7 Connector Cover 5-15 5.8 LED Cover 5-16 5.9 Keyboard 5-18 5.10 Display 5-22 5.11...

Maintenance and Service Guide
Page 48
Product Description 1.3 Clearing a Password If the notebook you are servicing has an unknown password, follow these steps to Section 5.3, "Preparing the Computer for Disassembly," for disassembly (refer to clear the password. These steps also clear CMOS: 1. Turn on the computer. Wait approximately five minutes. 4. Maintenance and Service Guide 1-43 Do not ...
Product Description 1.3 Clearing a Password If the notebook you are servicing has an unknown password, follow these steps to Section 5.3, "Preparing the Computer for Disassembly," for disassembly (refer to clear the password. These steps also clear CMOS: 1. Turn on the computer. Wait approximately five minutes. 4. Maintenance and Service Guide 1-43 Do not ...
Maintenance and Service Guide
Page 60
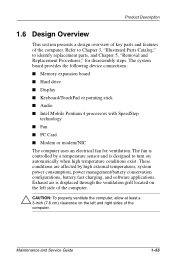
... ■ Keyboard/TouchPad or pointing stick ■ Audio ■ Intel Mobile Pentium 4 processors with SpeedStep technology ■ Fan ■ PC Card ■ Modem or modem/NIC The computer uses an electrical fan for disassembly steps. Product Description 1.6 Design Overview This section presents a design overview of key parts and features of the computer.
... ■ Keyboard/TouchPad or pointing stick ■ Audio ■ Intel Mobile Pentium 4 processors with SpeedStep technology ■ Fan ■ PC Card ■ Modem or modem/NIC The computer uses an electrical fan for disassembly steps. Product Description 1.6 Design Overview This section presents a design overview of key parts and features of the computer.

Maintenance and Service Guide
Page 113
Plastic Parts Using excessive force during removal and insertion. Apply only the tension required to unseat or seat the cables during disassembly and reassembly can damage the computer. 4-2 Maintenance and Service Guide Handle cables by parts being removed or replaced. these cables ... ensure that cables are routed in mind during the reassembly process. Apply pressure only at the points designated in their proper locations during disassembly and assembly procedures. ✎ As you should keep in such a way that they cannot be handled with extreme care; Improper cable...
Plastic Parts Using excessive force during removal and insertion. Apply only the tension required to unseat or seat the cables during disassembly and reassembly can damage the computer. 4-2 Maintenance and Service Guide Handle cables by parts being removed or replaced. these cables ... ensure that cables are routed in mind during the reassembly process. Apply pressure only at the points designated in their proper locations during disassembly and assembly procedures. ✎ As you should keep in such a way that they cannot be handled with extreme care; Improper cable...

Maintenance and Service Guide
Page 120
5 Removal and Replacement Procedures This chapter provides removal and replacement procedures. Maintenance and Service Guide 5-1 There are removed during removal and replacement. Make special note of each screw size and location during disassembly. Phillips P1 screws are 48 screws, in nine different sizes, that must be removed, replaced, and loosened when servicing the computer. Refer to Appendix C, "Screw Listing," for detailed information on screw sizes, locations, and usage.
5 Removal and Replacement Procedures This chapter provides removal and replacement procedures. Maintenance and Service Guide 5-1 There are removed during removal and replacement. Make special note of each screw size and location during disassembly. Phillips P1 screws are 48 screws, in nine different sizes, that must be removed, replaced, and loosened when servicing the computer. Refer to Appendix C, "Screw Listing," for detailed information on screw sizes, locations, and usage.

Maintenance and Service Guide
Page 121
Serial Number Location 5.2 Disassembly Sequence Chart Use the chart below to determine the section number to Compaq when requesting information or ordering spare parts. Section 5.3 Table 5-1 Disassembly Sequence Chart Description Preparing the computer for disassembly Battery pack # of the computer (Figure 5-1). Figure 5-1. Removal and Replacement Procedures 5.1 Serial Number Report the computer serial number to be referenced when removing computer components. The serial number is located on the bottom of Screws Removed 0 5-2 Maintenance and Service Guide
Serial Number Location 5.2 Disassembly Sequence Chart Use the chart below to determine the section number to Compaq when requesting information or ordering spare parts. Section 5.3 Table 5-1 Disassembly Sequence Chart Description Preparing the computer for disassembly Battery pack # of the computer (Figure 5-1). Figure 5-1. Removal and Replacement Procedures 5.1 Serial Number Report the computer serial number to be referenced when removing computer components. The serial number is located on the bottom of Screws Removed 0 5-2 Maintenance and Service Guide
Maintenance and Service Guide
Page 122
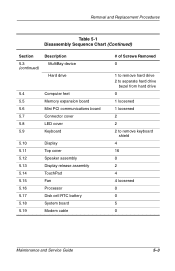
Removal and Replacement Procedures Table 5-1 Disassembly Sequence Chart (Continued) Section 5.3 (continued) Description MultiBay device Hard drive 5.4 Computer feet 5.5 Memory expansion board 5.6 Mini PCI communications board 5.7 Connector cover 5.8 LED cover 5.9 Keyboard 5.10 ...
Removal and Replacement Procedures Table 5-1 Disassembly Sequence Chart (Continued) Section 5.3 (continued) Description MultiBay device Hard drive 5.4 Computer feet 5.5 Memory expansion board 5.6 Mini PCI communications board 5.7 Connector cover 5.8 LED cover 5.9 Keyboard 5.10 ...

Maintenance and Service Guide
Page 123
... the Battery Pack Reverse the above procedures to slide the battery pack out of the computer (Figure 5-2). Remove the battery pack by following steps before disassembling the computer: 1. Use the notch in the battery bay to install the battery pack. 5-4 Maintenance and Service Guide c. Removal and Replacement Procedures 5.3 Preparing the Computer...
... the Battery Pack Reverse the above procedures to slide the battery pack out of the computer (Figure 5-2). Remove the battery pack by following steps before disassembling the computer: 1. Use the notch in the battery bay to install the battery pack. 5-4 Maintenance and Service Guide c. Removal and Replacement Procedures 5.3 Preparing the Computer...

Maintenance and Service Guide
Page 129
...-001 for Presario 2800 models, and spare part number 286868-001 for Evo Notebook N800c, N800v, and N800w models. 5-10 Maintenance and Service Guide Turn the computer bottom side up with silver finish for Presario 2800 models and carbon finish for disassembly (Section 5.3). 2. Lift the front edge of the cover and swing it back...
...-001 for Presario 2800 models, and spare part number 286868-001 for Evo Notebook N800c, N800v, and N800w models. 5-10 Maintenance and Service Guide Turn the computer bottom side up with silver finish for Presario 2800 models and carbon finish for disassembly (Section 5.3). 2. Lift the front edge of the cover and swing it back...

Maintenance and Service Guide
Page 131
Turn the computer bottom side up with the rear panel facing forward. 5-12 Maintenance and Service Guide Removal and Replacement Procedures 5.6 Mini PCI Communications Board Mini PCI Communication Boards Spare Part Number Information U.S. modem International modem 285286-001 285287-001 1. Prepare the computer for disassembly (Section 5.3). 2.
Turn the computer bottom side up with the rear panel facing forward. 5-12 Maintenance and Service Guide Removal and Replacement Procedures 5.6 Mini PCI Communications Board Mini PCI Communication Boards Spare Part Number Information U.S. modem International modem 285286-001 285287-001 1. Prepare the computer for disassembly (Section 5.3). 2.

Maintenance and Service Guide
Page 134
... Cover Reverse the above procedure to the base enclosure (Figure 5-12). 4. Prepare the computer for Evo Notebook N800c, N800v, and N800w models. Turn the computer bottom side up with silver finish for Presario 2800 models and carbon finish for disassembly (Section 5.3). 2. Removal and Replacement Procedures 5.7 Connector Cover ✎ The connector cover is included in...
... Cover Reverse the above procedure to the base enclosure (Figure 5-12). 4. Prepare the computer for Evo Notebook N800c, N800v, and N800w models. Turn the computer bottom side up with silver finish for Presario 2800 models and carbon finish for disassembly (Section 5.3). 2. Removal and Replacement Procedures 5.7 Connector Cover ✎ The connector cover is included in...

Maintenance and Service Guide
Page 135
Remove the two black PM2.0 × 10.0 screws that secure the LED cover to the base enclosure (Figure 5-13). Removing the LED Cover Screws 4. Open the computer. 5-16 Maintenance and Service Guide Figure 5-13. Turn the computer top side up with the front facing forward. 5. Prepare the computer for disassembly (Section 5.3). 2. Removal and Replacement Procedures 5.8 LED Cover LED Cover Spare Part Number Information LED cover 288503-001 1. Turn the computer bottom side up with the rear panel facing forward. 3.
Remove the two black PM2.0 × 10.0 screws that secure the LED cover to the base enclosure (Figure 5-13). Removing the LED Cover Screws 4. Open the computer. 5-16 Maintenance and Service Guide Figure 5-13. Turn the computer top side up with the front facing forward. 5. Prepare the computer for disassembly (Section 5.3). 2. Removal and Replacement Procedures 5.8 LED Cover LED Cover Spare Part Number Information LED cover 288503-001 1. Turn the computer bottom side up with the rear panel facing forward. 3.
Maintenance and Service Guide
Page 138
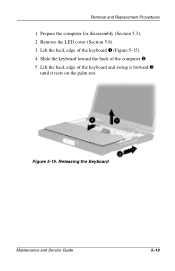
Prepare the computer for disassembly (Section 5.3). 2. Slide the keyboard toward the back of the keyboard 1 (Figure 5-15). 4. Lift the back edge of the computer 2. 5. Remove the LED cover (Section 5.8). 3. Figure 5-15. Releasing the Keyboard Maintenance and Service Guide 5-19 Removal and Replacement Procedures 1. Lift the back edge of the keyboard and swing it forward 3 until it rests on the palm rest.
Prepare the computer for disassembly (Section 5.3). 2. Slide the keyboard toward the back of the keyboard 1 (Figure 5-15). 4. Lift the back edge of the computer 2. 5. Remove the LED cover (Section 5.8). 3. Figure 5-15. Releasing the Keyboard Maintenance and Service Guide 5-19 Removal and Replacement Procedures 1. Lift the back edge of the keyboard and swing it forward 3 until it rests on the palm rest.

Maintenance and Service Guide
Page 141
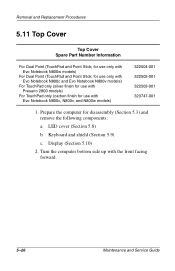
Prepare the computer for use with Evo Notebook N800c, N800v, and N800w models 15-inch, UXGA WVA 15-inch, UXGA 15-inch, SXGA+ 15-inch, XGA 14-inch, XGA 322511-001 286872-001 286871-001 ... LED cover (Section 5.8). 3. Removal and Replacement Procedures 5.10 Display Displays Spare Part Number Information Contain parts with carbon finish for use with silver finish for disassembly (Section 5.3). 2.
Prepare the computer for use with Evo Notebook N800c, N800v, and N800w models 15-inch, UXGA WVA 15-inch, UXGA 15-inch, SXGA+ 15-inch, XGA 14-inch, XGA 322511-001 286872-001 286871-001 ... LED cover (Section 5.8). 3. Removal and Replacement Procedures 5.10 Display Displays Spare Part Number Information Contain parts with carbon finish for use with silver finish for disassembly (Section 5.3). 2.
Maintenance and Service Guide
Page 145
... Point Stick; Prepare the computer for use with Evo Notebook N800c, N800v, and N800w models) 322504-001 322502-001 322503-001 323747-001 1. Keyboard and shield (Section 5.9) c. for use only with Evo Notebook N800c and Evo Notebook N800v models) For TouchPad only (silver finish for use... with Presario 2800 models) For TouchPad only (carbon finish for use only with the front facing forward. 5-26 Maintenance and Service Guide for disassembly (Section 5.3) and remove the...
... Point Stick; Prepare the computer for use with Evo Notebook N800c, N800v, and N800w models) 322504-001 322502-001 322503-001 323747-001 1. Keyboard and shield (Section 5.9) c. for use only with Evo Notebook N800c and Evo Notebook N800v models) For TouchPad only (silver finish for use... with Presario 2800 models) For TouchPad only (carbon finish for use only with the front facing forward. 5-26 Maintenance and Service Guide for disassembly (Section 5.3) and remove the...


