Wireless Security
Page 9
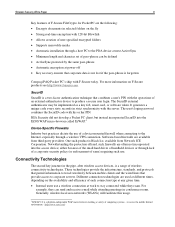
... on the availability and efficiency of wireless connectivity technologies. either because of the small hard drives of handheld devices or through a wireless VPN connection. Wireless Security White Paper 9 ...; Allows creation of user-specified encrypted folders • Supports removable media • Automatic installation through a host PC to the PDA device at next ActiveSync • Minimum length... Security did not develop a Pocket PC client, but instead incorporated SecurID into the access device; One such product is forgotten Compaq iPAQ Pocket PC's ship with the server. Different...
... on the availability and efficiency of wireless connectivity technologies. either because of the small hard drives of handheld devices or through a wireless VPN connection. Wireless Security White Paper 9 ...; Allows creation of user-specified encrypted folders • Supports removable media • Automatic installation through a host PC to the PDA device at next ActiveSync • Minimum length... Security did not develop a Pocket PC client, but instead incorporated SecurID into the access device; One such product is forgotten Compaq iPAQ Pocket PC's ship with the server. Different...
Evo Notebook N600c Software Overview
Page 12
... customers with DriveLock remain protected even if removed from the notebook. Compaq Support Windows 2000 Software CD ! Hard drives protected with a means to unlock a protected drive for the Armada, 2nd ed., February 1998. 15KR-0901A-WWEN For more information about DriveLock, refer to be cached. Compaq Web Site QuickRestore CD Evo N400c computers feature the ATI Mobility-M video chipset...
... customers with DriveLock remain protected even if removed from the notebook. Compaq Support Windows 2000 Software CD ! Hard drives protected with a means to unlock a protected drive for the Armada, 2nd ed., February 1998. 15KR-0901A-WWEN For more information about DriveLock, refer to be cached. Compaq Web Site QuickRestore CD Evo N400c computers feature the ATI Mobility-M video chipset...

Hard Drive White Paper
Page 3
...option. The new routine of the hard drive self-test have been combined as a commercial notebook system BIOS upgrade. If no errors occur, SMART attribute checking automatically runs. 3. HP recommends the latest system BIOS upgrade be undocked or removed from a docking device or external power... allow the user to connect to the Evo N400 and Evo N600 series. Initiating the enhanced hard drive self-test includes the following options are displayed: • Display status • Enable HP Notebook LidSwitch Policy Note 1: The HP Notebook LidSwitch Policy utility will not invoke Standby ...
...option. The new routine of the hard drive self-test have been combined as a commercial notebook system BIOS upgrade. If no errors occur, SMART attribute checking automatically runs. 3. HP recommends the latest system BIOS upgrade be undocked or removed from a docking device or external power... allow the user to connect to the Evo N400 and Evo N600 series. Initiating the enhanced hard drive self-test includes the following options are displayed: • Display status • Enable HP Notebook LidSwitch Policy Note 1: The HP Notebook LidSwitch Policy utility will not invoke Standby ...
Hard Drive White Paper
Page 4
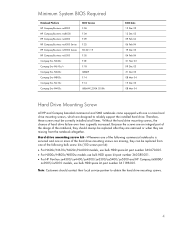
... serviced and one or more hard drive mounting screws, which are designed to obtain the hard drive mounting screws. 4 Minimum System BIOS Required Notebook Platform HP Compaq Business nc8000 HP Compaq Business nw8000 HP Compaq Business nc6000 HP Compaq Business nc4000 Series HP Compaq Business nx9000 Series HP Compaq Business nx5000 Compaq Evo N620c Compaq Evo N610c/v Compaq Evo N600c Compaq Evo N800c Compaq Evo N410c Compaq Evo N400c BIOS Version F.0A F.0A F.09...
... serviced and one or more hard drive mounting screws, which are designed to obtain the hard drive mounting screws. 4 Minimum System BIOS Required Notebook Platform HP Compaq Business nc8000 HP Compaq Business nw8000 HP Compaq Business nc6000 HP Compaq Business nc4000 Series HP Compaq Business nx9000 Series HP Compaq Business nx5000 Compaq Evo N620c Compaq Evo N610c/v Compaq Evo N600c Compaq Evo N800c Compaq Evo N410c Compaq Evo N400c BIOS Version F.0A F.0A F.09...
Hard Drive White Paper
Page 5
...documents to removable media. • Regularly check the HP Web site for any errors, bad sectors and/or recovery of readable information. Windows XP: http://support.microsoft.com/default.aspx?scid=kb;EN-US;314848 - As a result, movement of data to the hard drive. Windows ...: - HP Recommendations for Notebook Users • Install HP Notebook LidSwitch Policy, or as an alternative, place the notebook into Standby mode before transporting it from one location to another. • Upgrade to the latest system BIOS, as given in the "F10 Setup Hard Drive Self-Test" section. &#...
...documents to removable media. • Regularly check the HP Web site for any errors, bad sectors and/or recovery of readable information. Windows XP: http://support.microsoft.com/default.aspx?scid=kb;EN-US;314848 - As a result, movement of data to the hard drive. Windows ...: - HP Recommendations for Notebook Users • Install HP Notebook LidSwitch Policy, or as an alternative, place the notebook into Standby mode before transporting it from one location to another. • Upgrade to the latest system BIOS, as given in the "F10 Setup Hard Drive Self-Test" section. &#...
Compaq Evo Notebook N400c Hardware Guide
Page 4
...Battery Pack 4-3 Replacing an Optional External Battery Pack 4-6 Storing a Battery Pack 4-10 Recycling a Used Battery Pack 4-10 5 Drives Caring for Drives 5-1 Removing a Hard Drive 5-1 Inserting a Hard Drive 5-6 Changing the Startup Sequence with MultiBoot 5-6 Enabling Bootable Media and Devices for MultiBoot 5-7 Using the Default Search Sequence 5-8 ...Prompt 5-12 Responding to the Express Boot Menu 5-12 Changing the Startup Sequence in Compaq Computer Security 5-13 6 Audio and Video Using Audio Features 6-1 Connecting a Stereo Speaker/Headphone 6-2 Connecting a Microphone 6-3 iv...
...Battery Pack 4-3 Replacing an Optional External Battery Pack 4-6 Storing a Battery Pack 4-10 Recycling a Used Battery Pack 4-10 5 Drives Caring for Drives 5-1 Removing a Hard Drive 5-1 Inserting a Hard Drive 5-6 Changing the Startup Sequence with MultiBoot 5-6 Enabling Bootable Media and Devices for MultiBoot 5-7 Using the Default Search Sequence 5-8 ...Prompt 5-12 Responding to the Express Boot Menu 5-12 Changing the Startup Sequence in Compaq Computer Security 5-13 6 Audio and Video Using Audio Features 6-1 Connecting a Stereo Speaker/Headphone 6-2 Connecting a Microphone 6-3 iv...
Compaq Evo Notebook N400c Hardware Guide
Page 53
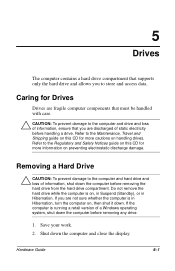
Removing a Hard Drive Ä CAUTION: To prevent damage to the computer and hard drive and loss of information, shut down the computer before removing the hard drive from the hard drive compartment. If the computer is running a retail version of a Windows operating system, shut down the computer before removing any drive. 1. Save your work. 2. Caring for more information on this CD for Drives Drives are...
Removing a Hard Drive Ä CAUTION: To prevent damage to the computer and hard drive and loss of information, shut down the computer before removing the hard drive from the hard drive compartment. If the computer is running a retail version of a Windows operating system, shut down the computer before removing any drive. 1. Save your work. 2. Caring for more information on this CD for Drives Drives are...
Compaq Evo Notebook N400c Hardware Guide
Page 57
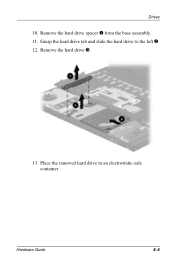
Grasp the hard drive tab and slide the hard drive to the left 2. 12. Place the removed hard drive in an electrostatic-safe container. Remove the hard drive spacer 1 from the base assembly. 11. Remove the hard drive 3. 13. Hardware Guide 5-5 Drives 10.
Grasp the hard drive tab and slide the hard drive to the left 2. 12. Place the removed hard drive in an electrostatic-safe container. Remove the hard drive spacer 1 from the base assembly. 11. Remove the hard drive 3. 13. Hardware Guide 5-5 Drives 10.
Compaq Evo Notebook N400c Hardware Guide
Page 82
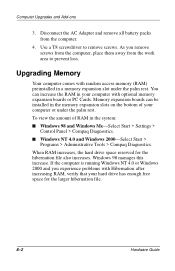
...hard drive has enough free space for the hibernation file also increases. To view the amount of your computer with random access memory (RAM) preinstalled in the system: s Windows 98 and Windows Me-Select Start > Settings > Control Panel > Compaq Diagnostics. Disconnect the AC Adapter and remove... all battery packs from the work area to remove screws. Use a T8 screwdriver to prevent loss. When RAM increases, the hard drive... running Windows NT 4.0 or Windows 2000 and you remove screws from the computer, place them away from the...
...hard drive has enough free space for the hibernation file also increases. To view the amount of your computer with random access memory (RAM) preinstalled in the system: s Windows 98 and Windows Me-Select Start > Settings > Control Panel > Compaq Diagnostics. Disconnect the AC Adapter and remove... all battery packs from the work area to remove screws. Use a T8 screwdriver to prevent loss. When RAM increases, the hard drive... running Windows NT 4.0 or Windows 2000 and you remove screws from the computer, place them away from the...
Compaq Evo Notebook N400c Hardware Guide
Page 83
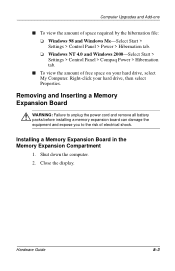
...-ons s To view the amount of electrical shock. Shut down the computer. 2. Removing and Inserting a Memory Expansion Board Å WARNING: Failure to unplug the power cord and remove all battery packs before installing a memory expansion board can damage the equipment and expose ... > Power > Hibernation tab. ❏ Windows NT 4.0 and Windows 2000-Select Start > Settings > Control Panel > Compaq Power > Hibernation tab. s To view the amount of free space on your hard drive, then select Properties. Installing a Memory Expansion Board in the Memory Expansion Compartment 1. Right-click your...
...-ons s To view the amount of electrical shock. Shut down the computer. 2. Removing and Inserting a Memory Expansion Board Å WARNING: Failure to unplug the power cord and remove all battery packs before installing a memory expansion board can damage the equipment and expose ... > Power > Hibernation tab. ❏ Windows NT 4.0 and Windows 2000-Select Start > Settings > Control Panel > Compaq Power > Hibernation tab. s To view the amount of free space on your hard drive, then select Properties. Installing a Memory Expansion Board in the Memory Expansion Compartment 1. Right-click your...
Compaq Evo Notebook N400c Hardware Guide
Page 102
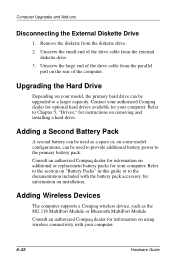
Upgrading the Hard Drive Depending on your computer. Remove the diskette from the external diskette drive. 3. Contact your authorized Compaq dealer for optional hard drives available for instructions on "Battery Packs" in this guide or to Chapter 5, "Drives," for your model, the primary hard drive can be upgraded to a larger capacity. Refer to the documentation included with your computer. Refer to...
Upgrading the Hard Drive Depending on your computer. Remove the diskette from the external diskette drive. 3. Contact your authorized Compaq dealer for optional hard drives available for instructions on "Battery Packs" in this guide or to Chapter 5, "Drives," for your model, the primary hard drive can be upgraded to a larger capacity. Refer to the documentation included with your computer. Refer to...
Compaq Evo Notebook N400c Hardware Guide
Page 107
... pack 1-7 caps lock light 2-5 cautions battery pack safety 4-10 computer damage 7-1 electrostatic discharge 8-1 external device damage 6-3 file corruption 1-6 hard drive damage 5-1, 5-6 initiate Hibernation 4-3 loss of information 5-6 memory troubleshooting 8-11 PC Card connector damage 8-17 removal 8-18 software 8-16 Certificate of Authenticity label 1-1, 2-11 COM port settings 9-3 components 2-1 composite video-out jack connecting a device 6-5 location...
... pack 1-7 caps lock light 2-5 cautions battery pack safety 4-10 computer damage 7-1 electrostatic discharge 8-1 external device damage 6-3 file corruption 1-6 hard drive damage 5-1, 5-6 initiate Hibernation 4-3 loss of information 5-6 memory troubleshooting 8-11 PC Card connector damage 8-17 removal 8-18 software 8-16 Certificate of Authenticity label 1-1, 2-11 COM port settings 9-3 components 2-1 composite video-out jack connecting a device 6-5 location...
Compaq Evo Notebook N400c Hardware Guide
Page 108
...PC Card 8-16 connectors docking 2-10 parallel 2-12 power 2-8 serial 2-12 USB 2-7, 2-9 D default search sequence, MultiBoot 5-8 diskette drive connecting 8-21 disconnecting 8-22 display brightness adjustment 3-3 connecting 7-1 release latch 2-1 switch 2-3 docking base, connecting 7-6 docking connector 2-10 drivers, installing 8-20 drives...7-1 external diskette drive connecting 8-21 disconnecting 8-22 external monitor connector 2-8 F fan 2-11 Fn key 3-3 front panel components 2-1 function key 3-3 H hard drive inserting 5-6 installing 8-22 light 2-4 removing 5-1 spacer, removing 5-5 hardware setup...
...PC Card 8-16 connectors docking 2-10 parallel 2-12 power 2-8 serial 2-12 USB 2-7, 2-9 D default search sequence, MultiBoot 5-8 diskette drive connecting 8-21 disconnecting 8-22 display brightness adjustment 3-3 connecting 7-1 release latch 2-1 switch 2-3 docking base, connecting 7-6 docking connector 2-10 drivers, installing 8-20 drives...7-1 external diskette drive connecting 8-21 disconnecting 8-22 external monitor connector 2-8 F fan 2-11 Fn key 3-3 front panel components 2-1 function key 3-3 H hard drive inserting 5-6 installing 8-22 light 2-4 removing 5-1 spacer, removing 5-5 hardware setup...
Compaq Mobile Expansion Unit
Page 21
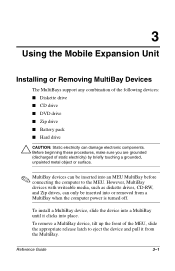
... can be inserted into place. However, MultiBay devices with writeable media, such as diskette drives, CD-RW, and Zip drives, can damage electronic components. Reference Guide 3-1 To remove a MultiBay device, tilt up the front of the MEU, slide the appropriate release latch...and pull it clicks into or removed from the MultiBay. 3 Using the Mobile Expansion Unit Installing or Removing MultiBay Devices The MultiBays support any combination of the following devices: I Diskette drive I CD drive I DVD drive I Zip drive I Battery pack I Hard drive Ä CAUTION: Static electricity can...
... can be inserted into place. However, MultiBay devices with writeable media, such as diskette drives, CD-RW, and Zip drives, can damage electronic components. Reference Guide 3-1 To remove a MultiBay device, tilt up the front of the MEU, slide the appropriate release latch...and pull it clicks into or removed from the MultiBay. 3 Using the Mobile Expansion Unit Installing or Removing MultiBay Devices The MultiBays support any combination of the following devices: I Diskette drive I CD drive I DVD drive I Zip drive I Battery pack I Hard drive Ä CAUTION: Static electricity can...

Compaq Mobile Expansion Unit
Page 22
... MultiBay while the system is turned on. ❏ Turn off the system before inserting or removing a hard drive to and from a MultiBay. ❏ A SuperDisk LS-120 drive that has been inserted into a MultiBay while the system is turned on the Notebook Products Reference Library CD included with your computer. Å WARNING: To reduce the risk...
... MultiBay while the system is turned on. ❏ Turn off the system before inserting or removing a hard drive to and from a MultiBay. ❏ A SuperDisk LS-120 drive that has been inserted into a MultiBay while the system is turned on the Notebook Products Reference Library CD included with your computer. Å WARNING: To reduce the risk...
Evo N400c Software Overview
Page 14
... by a display utility that offers advanced protection against unauthorized access to the Compaq white paper, DriveLock Hard Drive Protection for which provide customers with DriveLock remain protected even if removed from the notebook. Multimedia ! This PCI audio chipset accelerates Microsoft DirectSound applications. Security ! Evo N400c Software Overview-Second Edition 14 Video ! Windows 98 & Windows 95 ! Windows NT...
... by a display utility that offers advanced protection against unauthorized access to the Compaq white paper, DriveLock Hard Drive Protection for which provide customers with DriveLock remain protected even if removed from the notebook. Multimedia ! This PCI audio chipset accelerates Microsoft DirectSound applications. Security ! Evo N400c Software Overview-Second Edition 14 Video ! Windows 98 & Windows 95 ! Windows NT...
Compaq Evo N400c and N410c Notebook PCs - Maintenance and Service Guide
Page 4
... 4-2 Plastic Parts 4-2 Cables and Connectors 4-2 4.3 Preventing Damage to Removable Drives 4-3 4.4 Preventing Electrostatic Damage 4-4 4.5 Packaging and Transporting Precautions 4-4 4.6 Workstation Precautions 4-5 4.7 Grounding Equipment and Methods 4-6 5 Removal and Replacement Procedures 5.1 Serial Number 5-1 5.2 Disassembly Sequence Chart 5-2 5.3 Preparing the Notebook for Disassembly 5-3 5.4 Computer Feet 5-5 5.5 Palm Rest 5-6 5.6 Memory Expansion Board 5-13 5.7 Hard Drive 5-17 5.8 Mini PCI Communications Board 5-19 5.9 Keyboard 5-21 5.10...
... 4-2 Plastic Parts 4-2 Cables and Connectors 4-2 4.3 Preventing Damage to Removable Drives 4-3 4.4 Preventing Electrostatic Damage 4-4 4.5 Packaging and Transporting Precautions 4-4 4.6 Workstation Precautions 4-5 4.7 Grounding Equipment and Methods 4-6 5 Removal and Replacement Procedures 5.1 Serial Number 5-1 5.2 Disassembly Sequence Chart 5-2 5.3 Preparing the Notebook for Disassembly 5-3 5.4 Computer Feet 5-5 5.5 Palm Rest 5-6 5.6 Memory Expansion Board 5-13 5.7 Hard Drive 5-17 5.8 Mini PCI Communications Board 5-19 5.9 Keyboard 5-21 5.10...
Compaq Evo N400c and N410c Notebook PCs - Maintenance and Service Guide
Page 32
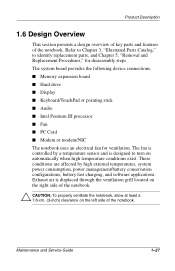
...5, "Removal and Replacement Procedures," for ventilation. Product Description 1.6 Design Overview This section presents a design overview of key parts and features of the notebook. The system board provides the following device connections: ■ Memory expansion board ■ Hard drive ■...; Display ■ Keyboard/TouchPad or pointing stick ■ Audio ■ Intel Pentium III processor ■ Fan ■ PC Card ■ Modem or modem/NIC The notebook...
...5, "Removal and Replacement Procedures," for ventilation. Product Description 1.6 Design Overview This section presents a design overview of key parts and features of the notebook. The system board provides the following device connections: ■ Memory expansion board ■ Hard drive ■...; Display ■ Keyboard/TouchPad or pointing stick ■ Audio ■ Intel Pentium III processor ■ Fan ■ PC Card ■ Modem or modem/NIC The notebook...
Compaq Evo N400c and N410c Notebook PCs - Maintenance and Service Guide
Page 53
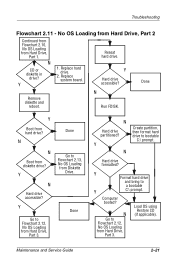
Done Remove diskette and reboot. Y Go to Flowchart 2.13, No OS Loading from Hard Drive, Part 3. Y Go to Flowchart 2.12, No OS Loading from Hard Drive, Part 1. Computer booted? Load OS using Restore CD (if applicable). N Done N Boot from hard drive? Y Boot from diskette drive? Y N Create partition, then format hard drive to a bootable Y C:\ prompt. N Go to Flowchart 2.12, No OS Loading...
Done Remove diskette and reboot. Y Go to Flowchart 2.13, No OS Loading from Hard Drive, Part 3. Y Go to Flowchart 2.12, No OS Loading from Hard Drive, Part 1. Computer booted? Load OS using Restore CD (if applicable). N Done N Boot from hard drive? Y Boot from diskette drive? Y N Create partition, then format hard drive to a bootable Y C:\ prompt. N Go to Flowchart 2.12, No OS Loading...
Compaq Evo N400c and N410c Notebook PCs - Maintenance and Service Guide
Page 81
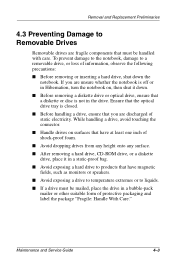
... are unsure whether the notebook is not in the drive. Maintenance and Service Guide 4-3 Removal and Replacement Preliminaries 4.3 Preventing Damage to Removable Drives Removable drives are fragile components that have at least one inch of shock-proof foam. ■ Avoid dropping drives from any height onto any surface. ■ After removing a hard drive, CD-ROM drive, or a diskette drive, place it down the...
... are unsure whether the notebook is not in the drive. Maintenance and Service Guide 4-3 Removal and Replacement Preliminaries 4.3 Preventing Damage to Removable Drives Removable drives are fragile components that have at least one inch of shock-proof foam. ■ Avoid dropping drives from any height onto any surface. ■ After removing a hard drive, CD-ROM drive, or a diskette drive, place it down the...


