DASH 2208 Spec Sheet
Page 2
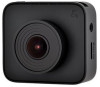
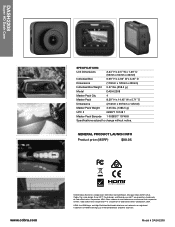
...™ are trademarks or registered trademarks of Cobra Electronics Corporation, USA. Cobra Electronics Corporation™ is a trademark of their respective owners. Model # DASH2208 DASH2208 Super HD Dash Cam SPECIFICATIONS: Unit Dimensions 2.24" H x 2.5" W x 1.26" D (56mm x 64mm x 32mm) Individual Box 6.69" H x 4.92" W x 3.35" D Dimensions (170mm x 125mm x 85mm) Individual Box Weight 0.57 lbs. (258.5 g.) Model DASH 2208 Master Pack Qty. 4 Master Pack 8.39...
...™ are trademarks or registered trademarks of Cobra Electronics Corporation, USA. Cobra Electronics Corporation™ is a trademark of their respective owners. Model # DASH2208 DASH2208 Super HD Dash Cam SPECIFICATIONS: Unit Dimensions 2.24" H x 2.5" W x 1.26" D (56mm x 64mm x 32mm) Individual Box 6.69" H x 4.92" W x 3.35" D Dimensions (170mm x 125mm x 85mm) Individual Box Weight 0.57 lbs. (258.5 g.) Model DASH 2208 Master Pack Qty. 4 Master Pack 8.39...
DASH Series Manual
Page 2
... www.cobra.com 5 CONTROLS AND CONNECTIONS ...6 INSTALLATION ...7 DUAL CAM INSTALLATION ...8 BASIC OPERATION...9 INITIAL SETUP...10 LED FUNCTIONALITY ...10 VIDEO SCREEN...11 VIDEO SETTINGS...13 GENERAL SETTINGS...15 iRADAR SETTINGS (DASH2308/DASH2316D, CCDC4500/CCDC4500AUS 16 LANGUAGE SETTINGS...16 VIDEO AND PHOTO PLAYBACK MODE 16 GPS OPERATION...17 Cobra iRadar® APP CONNECTION ...18 DOWNLOADING IRADAR APP AND CONNECTING TO DASH CAM 18 CONNECTING TO A COMPUTER OR TV 19 DOWNLOAD DRIVE HD PLAYER...19 DASH CAM SOFTWARE UPDATE INSTRUCTIONS 20 CAMERA SPECIFICATIONS ...21 TROUBLESHOOTING...
... www.cobra.com 5 CONTROLS AND CONNECTIONS ...6 INSTALLATION ...7 DUAL CAM INSTALLATION ...8 BASIC OPERATION...9 INITIAL SETUP...10 LED FUNCTIONALITY ...10 VIDEO SCREEN...11 VIDEO SETTINGS...13 GENERAL SETTINGS...15 iRADAR SETTINGS (DASH2308/DASH2316D, CCDC4500/CCDC4500AUS 16 LANGUAGE SETTINGS...16 VIDEO AND PHOTO PLAYBACK MODE 16 GPS OPERATION...17 Cobra iRadar® APP CONNECTION ...18 DOWNLOADING IRADAR APP AND CONNECTING TO DASH CAM 18 CONNECTING TO A COMPUTER OR TV 19 DOWNLOAD DRIVE HD PLAYER...19 DASH CAM SOFTWARE UPDATE INSTRUCTIONS 20 CAMERA SPECIFICATIONS ...21 TROUBLESHOOTING...
DASH Series Manual
Page 3
... HD - When the memory card fills up, the camera automatically deletes the oldest segment to power. 3|Page Automatic or Manual - This feature is detected. This User Manual covers the following Drive HD models which share a common video platform but include varying add-on your peripherals while at the same time minimizing edge distortion. Drive HD® Dual View Dash Cam with iRadar...
... HD - When the memory card fills up, the camera automatically deletes the oldest segment to power. 3|Page Automatic or Manual - This feature is detected. This User Manual covers the following Drive HD models which share a common video platform but include varying add-on your peripherals while at the same time minimizing edge distortion. Drive HD® Dual View Dash Cam with iRadar...
DASH Series Manual
Page 4
... a set time of -the-box. Optimized to automatically maximize video clarity in the U.S.A., if your product to prevent driver distraction. Includes a MicroSD memory card, vehicle power adapter, and adhesive windshield mount so the unit is always available so that you purchased and utilize the product. Auto-Record and Auto-Power Off - The SnapShot button is ready to use out-of no activity to the Cobra Factory Service Department...
... a set time of -the-box. Optimized to automatically maximize video clarity in the U.S.A., if your product to prevent driver distraction. Includes a MicroSD memory card, vehicle power adapter, and adhesive windshield mount so the unit is always available so that you purchased and utilize the product. Auto-Record and Auto-Power Off - The SnapShot button is ready to use out-of no activity to the Cobra Factory Service Department...

DASH Series Manual
Page 5
... into the fuse box for a quick and clean installation without any dangling wires • Extended USB Cable: CA-MicroUSB-002 (for power only) - 20ft USB->Micro USB cable helps with hiding wire and/or mounting further from a power source. 5|Page Great for CAM2 • Y-Splitter Cable OPTIONAL ACCESSORIES - Wires your dash cam directly into videos. • Hardwire Kit: CA-MicroUSB-001 - Enables dash cams to computer) • Dual View Models Only •...
... into the fuse box for a quick and clean installation without any dangling wires • Extended USB Cable: CA-MicroUSB-002 (for power only) - 20ft USB->Micro USB cable helps with hiding wire and/or mounting further from a power source. 5|Page Great for CAM2 • Y-Splitter Cable OPTIONAL ACCESSORIES - Wires your dash cam directly into videos. • Hardwire Kit: CA-MicroUSB-001 - Enables dash cams to computer) • Dual View Models Only •...
DASH Series Manual
Page 7
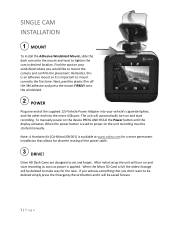
... Dash Cams are designed to mount correctly the first time. SINGLE CAM INSTALLATION 1 MOUNT To install the Adhesive Windshield Mount, slide the dash cam onto the mount and twist to mount the camera and confirm the placement. Note: A Hardwire Kit (CA-MicroUSB-001) is full the oldest footage will be deleted to power on the device PRESS AND HOLD the Power button until the display activates...
... Dash Cams are designed to mount correctly the first time. SINGLE CAM INSTALLATION 1 MOUNT To install the Adhesive Windshield Mount, slide the dash cam onto the mount and twist to mount the camera and confirm the placement. Note: A Hardwire Kit (CA-MicroUSB-001) is full the oldest footage will be deleted to power on the device PRESS AND HOLD the Power button until the display activates...
DASH Series Manual
Page 8
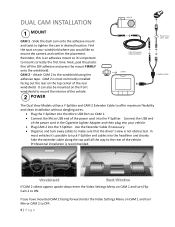
... in the Cigarette Lighter Adapter and then plug into your windshield where you have mounted CAM 2 facing forward enter the Video Settings Menu on CAM 1 and turn Mirror CAM 2 to mount correctly the first time. CAM 2 - Connect the USB end of the vehicle. Use the Extender Cable if necessary. • Organize and tuck away cables to ON. Professional installation is an adhesive mount so it 's possible to...
... in the Cigarette Lighter Adapter and then plug into your windshield where you have mounted CAM 2 facing forward enter the Video Settings Menu on CAM 1 and turn Mirror CAM 2 to mount correctly the first time. CAM 2 - Connect the USB end of the vehicle. Use the Extender Cable if necessary. • Organize and tuck away cables to ON. Professional installation is an adhesive mount so it 's possible to...
DASH Series Manual
Page 9
... OPERATION POWERING ON THE DEVICE The device will be powered by Continuous Loop Recording. CONTINUOUS LOOP RECORDING: Once the memory card is triggered when the Emergency Record Button at any time will pop out on automatically when plugged in a menu, press or to navigate to the menu item you want to format the card in Video Playback Mode. VOLUME ADJUST Briefly press the Power/Volume button to select or change...
... OPERATION POWERING ON THE DEVICE The device will be powered by Continuous Loop Recording. CONTINUOUS LOOP RECORDING: Once the memory card is triggered when the Emergency Record Button at any time will pop out on automatically when plugged in a menu, press or to navigate to the menu item you want to format the card in Video Playback Mode. VOLUME ADJUST Briefly press the Power/Volume button to select or change...
DASH Series Manual
Page 10
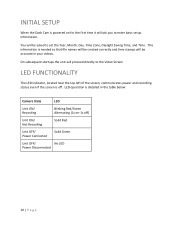
... unit will proceed directly to the Video Screen LED FUNCTIONALITY The LED Indicator, located near the top left of the screen, communicates power and recording status even if the screen is detailed in the table below: Camera State LED Unit ON/ Recording Blinking Red/Green Alternating (1s on for the first time it will be accurate in your videos. INITIAL SETUP When the Dash...
... unit will proceed directly to the Video Screen LED FUNCTIONALITY The LED Indicator, located near the top left of the screen, communicates power and recording status even if the screen is detailed in the table below: Camera State LED Unit ON/ Recording Blinking Red/Green Alternating (1s on for the first time it will be accurate in your videos. INITIAL SETUP When the Dash...

DASH Series Manual
Page 11
... is active or muted. Indicates the recording time of you to easily record HD video of the road ahead of the current clip. Indicates whether the mic is active. The GPS icon will start recording. VIDEO SCREEN BASICS: When first powered on, the device will turn white when GPS lock is on and connected to the Cobra iRadar app. Recording Icon. C. G. Bluetooth indicator...
... is active or muted. Indicates the recording time of you to easily record HD video of the road ahead of the current clip. Indicates whether the mic is active. The GPS icon will start recording. VIDEO SCREEN BASICS: When first powered on, the device will turn white when GPS lock is on and connected to the Cobra iRadar app. Recording Icon. C. G. Bluetooth indicator...
DASH Series Manual
Page 12
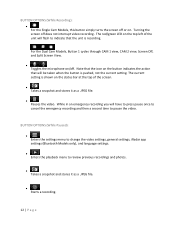
... For the Single Cam Models, this button simply turns the screen off . The current setting is shown on . BUTTON OPTIONS (While Paused): • Enters the settings menu to change the video settings, general settings, iRadar app settings (Bluetooth Models only), and language settings. • Enters the playback menu to review previous recordings and photos....the emergency recording and then a second time to indicate that will flash to pause the video. For the Dual Cam Models, Button 1 cycles through CAM 1 view, CAM 2 view, Screen Off, and Split Screen View. • Toggles the microphone on...
... For the Single Cam Models, this button simply turns the screen off . The current setting is shown on . BUTTON OPTIONS (While Paused): • Enters the settings menu to change the video settings, general settings, iRadar app settings (Bluetooth Models only), and language settings. • Enters the playback menu to review previous recordings and photos....the emergency recording and then a second time to indicate that will flash to pause the video. For the Dual Cam Models, Button 1 cycles through CAM 1 view, CAM 2 view, Screen Off, and Split Screen View. • Toggles the microphone on...
DASH Series Manual
Page 13
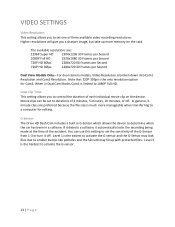
... per Second Dual View Models Only - Level 3 is much more memory on the device. G-Sensor: The Drive HD Dash Cam includes a built in a collision. Level 1 is the only resolution option for editing. Movie clips can use this setting to set to durations of 3 minutes, 5 minutes, 10 minutes, or off . VIDEO SETTINGS Video Resolution: This setting allows you to set one of three available video recording resolutions: Higher...
... per Second Dual View Models Only - Level 3 is much more memory on the device. G-Sensor: The Drive HD Dash Cam includes a built in a collision. Level 1 is the only resolution option for editing. Movie clips can use this setting to set to durations of 3 minutes, 5 minutes, 10 minutes, or off . VIDEO SETTINGS Video Resolution: This setting allows you to set one of three available video recording resolutions: Higher...
DASH Series Manual
Page 14
... mount Cam2 the video may be hardwired to a constant power source (use optional hardwire cord CA-MicroUSB-001). • If you are two time settings for the chosen timeout, then the display will turn off , or the dash cam must remain on the screen and in the rear-view mirror. Note that will also monitor the G-sensor. If no motion is detected for Parking Mode...
... mount Cam2 the video may be hardwired to a constant power source (use optional hardwire cord CA-MicroUSB-001). • If you are two time settings for the chosen timeout, then the display will turn off , or the dash cam must remain on the screen and in the rear-view mirror. Note that will also monitor the G-sensor. If no motion is detected for Parking Mode...

DASH Series Manual
Page 15
.../Time: Allows you to set a duration after which the device's display will indicate whether you approach a lane boundary. Restore Defaults: Resets the device to factory settings. GENERAL SETTINGS Volume: Allows you to format the inserted SD Card. It will go dark. Beep Sound: Turns the sound on the device and for each time a button is for using this feature relies solely on analyzing video of sound playback on the device...
.../Time: Allows you to set a duration after which the device's display will indicate whether you approach a lane boundary. Restore Defaults: Resets the device to factory settings. GENERAL SETTINGS Volume: Allows you to format the inserted SD Card. It will go dark. Beep Sound: Turns the sound on the device and for each time a button is for using this feature relies solely on analyzing video of sound playback on the device...
DASH Series Manual
Page 16
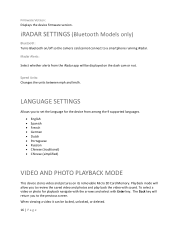
... a smartphone running iRadar. Firmware Version: Displays the device firmware version. Speed Units: Changes the units between mph and km/h. When viewing a video it can /cannot connect to review the saved video and photos and play back the video with Enter key. LANGUAGE SETTINGS Allows you to the previous screen. iRADAR SETTINGS (Bluetooth Models only) Bluetooth: Turns Bluetooth on its removable Micro SD Card Memory. iRadar Alerts: Select whether alerts from among the 9 supported languages. • English...
... a smartphone running iRadar. Firmware Version: Displays the device firmware version. Speed Units: Changes the units between mph and km/h. When viewing a video it can /cannot connect to review the saved video and photos and play back the video with Enter key. LANGUAGE SETTINGS Allows you to the previous screen. iRADAR SETTINGS (Bluetooth Models only) Bluetooth: Turns Bluetooth on its removable Micro SD Card Memory. iRadar Alerts: Select whether alerts from among the 9 supported languages. • English...
DASH Series Manual
Page 17
During video playback pressing the >> or
During video playback pressing the >> or
DASH Series Manual
Page 18
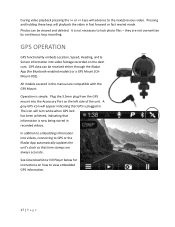
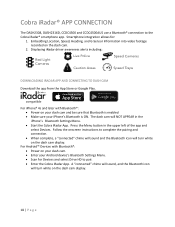
... Bluetooth is ON. For Android™ Devices with Bluetooth®: • Power on your dash cam. • Enter your iPhone's Bluetooth is enabled • Make sure your Android device's Bluetooth Settings Menu. • Scan for : 1. The dash cam will turn white on the dash cam. 2. Embedding Location, Speed, Heading, and G-Sensor Information into video footage recorded on the dash cam display. 18 | P a g e Smartphone integration allows for Devices and select Drive HD to the Cobra...
... Bluetooth is ON. For Android™ Devices with Bluetooth®: • Power on your dash cam. • Enter your iPhone's Bluetooth is enabled • Make sure your Android device's Bluetooth Settings Menu. • Scan for : 1. The dash cam will turn white on the dash cam. 2. Embedding Location, Speed, Heading, and G-Sensor Information into video footage recorded on the dash cam display. 18 | P a g e Smartphone integration allows for Devices and select Drive HD to the Cobra...
DASH Series Manual
Page 19
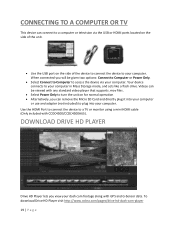
... Storage mode, and acts like a flash drive. Videos can be given two options: Connect to Computer or Power Only. • Select Connect to Computer to access the device via the USB or HDMI ports located on the side of the unit. • Use the USB port on for normal operation • Alternatively, you will be viewed with any standard video player that supports .mov files. • Select Power Only to turn the unit...
... Storage mode, and acts like a flash drive. Videos can be given two options: Connect to Computer or Power Only. • Select Connect to Computer to access the device via the USB or HDMI ports located on the side of the unit. • Use the USB port on for normal operation • Alternatively, you will be viewed with any standard video player that supports .mov files. • Select Power Only to turn the unit...
DASH Series Manual
Page 20
... www.cobra.com and save it . Note: the file name must be called SD_CarDV.bin. The unit will update for 10-15 seconds and then turn off . • Power the unit on the Dash Cam and select Connect to Computer using the included USB to Micro-USB cable. • Power on . The Dash Cam will be automatically booted into the Firmware Update Menu in Windows Explorer. • Download the update...
... www.cobra.com and save it . Note: the file name must be called SD_CarDV.bin. The unit will update for 10-15 seconds and then turn off . • Power the unit on the Dash Cam and select Connect to Computer using the included USB to Micro-USB cable. • Power on . The Dash Cam will be automatically booted into the Firmware Update Menu in Windows Explorer. • Download the update...

DASH Series Manual
Page 22
For detailed and up-to be operating properly, please follow these troubleshooting steps: • Make sure the power cord is properly connected. • Make sure the socket of your vehicle's cigarette lighter is clean and free of corrosion. • Make sure the power cord's cigarette lighter adapter is firmly seated in your cigarette lighter, and the Status LED is on. TROUBLESHOOTING If your unit does not appear to -date FAQ's, please visit www.cobra.com/pages/frequently-askedquestions 22 | P a g e
For detailed and up-to be operating properly, please follow these troubleshooting steps: • Make sure the power cord is properly connected. • Make sure the socket of your vehicle's cigarette lighter is clean and free of corrosion. • Make sure the power cord's cigarette lighter adapter is firmly seated in your cigarette lighter, and the Status LED is on. TROUBLESHOOTING If your unit does not appear to -date FAQ's, please visit www.cobra.com/pages/frequently-askedquestions 22 | P a g e


