

Administration Guide
Page 2
... this manual generates and may result in accordance with radio and television reception. All rights reserved. Copyright © 1981, Regents of the University of Cisco Systems, Inc.; and/or its peripheral devices. All other trademarks mentioned in the United States and certain other company. (0406R) Cisco IP Phone Administration Guide for Cisco CallManager 3.3, Cisco IP Phones 7902G, 7905G, and 7912G...
... this manual generates and may result in accordance with radio and television reception. All rights reserved. Copyright © 1981, Regents of the University of Cisco Systems, Inc.; and/or its peripheral devices. All other trademarks mentioned in the United States and certain other company. (0406R) Cisco IP Phone Administration Guide for Cisco CallManager 3.3, Cisco IP Phones 7902G, 7905G, and 7912G...
Administration Guide
Page 5
... Database 2-12 Using Auto-Registration 2-12 Adding Phones Manually 2-14 Adding Phones Manually Using DHCP 2-14 Assigning Static IP Addresses 2-15 Using the Bulk Administration Tool 2-17 Installing the Cisco IP Phone 3-1 Before You Begin 3-1 Network Requirements 3-2 Cisco CallManager Configuration 3-2 Safety 3-3 Connecting the Cisco IP Phone to the Network 3-4 Mounting the Phone to the Wall 3-8 Verifying the Phone Startup Process 3-9 Configuring Startup Network Settings...
... Database 2-12 Using Auto-Registration 2-12 Adding Phones Manually 2-14 Adding Phones Manually Using DHCP 2-14 Assigning Static IP Addresses 2-15 Using the Bulk Administration Tool 2-17 Installing the Cisco IP Phone 3-1 Before You Begin 3-1 Network Requirements 3-2 Cisco CallManager Configuration 3-2 Safety 3-3 Connecting the Cisco IP Phone to the Network 3-4 Mounting the Phone to the Wall 3-8 Verifying the Phone Startup Process 3-9 Configuring Startup Network Settings...
Administration Guide
Page 6
... Up Services 5-8 Providing Information to Users Via a Web Site 5-9 How Users Obtain Support for the Cisco IP Phone 5-9 How Users Get Copies of Cisco IP Phone Manuals 5-9 How Users Subscribe to Services and Configure Phone Features 5-10 How Users Configure Phone Features 5-11 How Users Access Voice Messages 5-11 Cisco IP Phone Administration Guide for Cisco CallManager 3.3, Cisco IP Phones 7902G/7905G/7912G vi OL-6313-01
... Up Services 5-8 Providing Information to Users Via a Web Site 5-9 How Users Obtain Support for the Cisco IP Phone 5-9 How Users Get Copies of Cisco IP Phone Manuals 5-9 How Users Subscribe to Services and Configure Phone Features 5-10 How Users Configure Phone Features 5-11 How Users Access Voice Messages 5-11 Cisco IP Phone Administration Guide for Cisco CallManager 3.3, Cisco IP Phones 7902G/7905G/7912G vi OL-6313-01
Administration Guide
Page 31
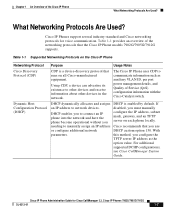
... Protocol (DHCP) Purpose Usage Notes CDP is enabled by default. DHCP enables you to manually assign an IP address or configure additional network parameters. Cisco recommends that the Cisco IP Phone models 7902G/7905G/7912G supports. If disabled, you configure the TFTP server IP address as auxiliary VLAN ID, per port power management details, and Quality of the...
... Protocol (DHCP) Purpose Usage Notes CDP is enabled by default. DHCP enables you to manually assign an IP address or configure additional network parameters. Cisco recommends that the Cisco IP Phone models 7902G/7905G/7912G supports. If disabled, you configure the TFTP server IP address as auxiliary VLAN ID, per port power management details, and Quality of the...
Administration Guide
Page 32
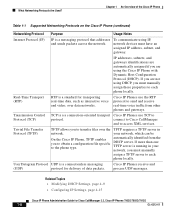
... obtain a configuration file specific to transfer files over data networks. On the Cisco IP Phone, TFTP enables you to the phone type. If you must manually assign a TFTP server to protocol. User Datagram Protocol UDP is a messaging protocol... Chapter 1 An Overview of the Cisco IP Phone Table 1-1 Supported Networking Protocols on the Cisco IP Phone (continued) Networking Protocol Purpose Usage Notes Internet Protocol (IP) IP is a connectionless messaging (UDP) protocol for Cisco CallManager 3.3, Cisco IP Phones 7902G/7905G/7912G 1-8 OL-6313-01 Real-Time Transport...
... obtain a configuration file specific to transfer files over data networks. On the Cisco IP Phone, TFTP enables you to the phone type. If you must manually assign a TFTP server to protocol. User Datagram Protocol UDP is a messaging protocol... Chapter 1 An Overview of the Cisco IP Phone Table 1-1 Supported Networking Protocols on the Cisco IP Phone (continued) Networking Protocol Purpose Usage Notes Internet Protocol (IP) IP is a connectionless messaging (UDP) protocol for Cisco CallManager 3.3, Cisco IP Phones 7902G/7905G/7912G 1-8 OL-6313-01 Real-Time Transport...
Administration Guide
Page 38
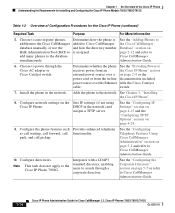
... Configuration Procedures for Cisco CallManager 3.3, Cisco IP Phones 7902G/7905G/7912G OL-6313-01 Administration Guide. 6. Configure network settings on page 4-28. 9. See the "Configuring Telephony Features Using Cisco CallManager Administration" section on Bulk Administration Tool (BAT) to is See the "Adding Phones to add them to the Cisco CallManager added to Cisco CallManager the Cisco CallManager database manually, or use...
... Configuration Procedures for Cisco CallManager 3.3, Cisco IP Phones 7902G/7905G/7912G OL-6313-01 Administration Guide. 6. Configure network settings on page 4-28. 9. See the "Configuring Telephony Features Using Cisco CallManager Administration" section on Bulk Administration Tool (BAT) to is See the "Adding Phones to add them to the Cisco CallManager added to Cisco CallManager the Cisco CallManager database manually, or use...
Administration Guide
Page 47
... The configuration file defines how the Cisco IP Phone communicates with its startup process. If the phone was manually added to the database, Cisco CallManager identifies the phone. Related Topics • Understanding the Phone Startup Process, page 2-4 • Resolving Startup Problems, page 6-12 Cisco IP Phone Administration Guide for the Cisco IP Phone 7912G. Chapter 2 Preparing to Install the Cisco IP Phone on the list. Devices using .cnf...
... The configuration file defines how the Cisco IP Phone communicates with its startup process. If the phone was manually added to the database, Cisco CallManager identifies the phone. Related Topics • Understanding the Phone Startup Process, page 2-4 • Resolving Startup Problems, page 6-12 Cisco IP Phone Administration Guide for the Cisco IP Phone 7912G. Chapter 2 Preparing to Install the Cisco IP Phone on the list. Devices using .cnf...
Administration Guide
Page 52
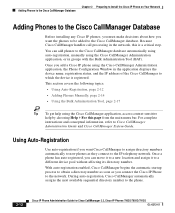
... Cisco IP Phone Administration Guide for Cisco CallManager 3.3, Cisco IP Phones 7902G/7905G/7912G OL-6313-01 During auto-registration, Cisco CallManager automatically assigns the next available sequential directory number to Cisco CallManager Administration Guide and Cisco CallManager System Guide. Adding Phones to the Cisco CallManager Database Chapter 2 Preparing to Install the Cisco IP Phone on Your Network Adding Phones to the Cisco CallManager Database Before installing any Cisco IP phones...
... Cisco IP Phone Administration Guide for Cisco CallManager 3.3, Cisco IP Phones 7902G/7905G/7912G OL-6313-01 During auto-registration, Cisco CallManager automatically assigns the next available sequential directory number to Cisco CallManager Administration Guide and Cisco CallManager System Guide. Adding Phones to the Cisco CallManager Database Chapter 2 Preparing to Install the Cisco IP Phone on Your Network Adding Phones to the Cisco CallManager Database Before installing any Cisco IP phones...

Administration Guide
Page 53
... use auto-registration, you must manually add phones to the Cisco CallManager database or use the Bulk Administration Tool (BAT). Related Topics • Adding Phones Manually, page 2-14 • Using the Bulk Administration Tool, page 2-17 • Configuring Telephony Features Using Cisco CallManager Administration, page 5-2 Cisco IP Phone Administration Guide for Cisco CallManager 3.3, Cisco IP Phones 7902G/7905G/7912G OL-6313-01 2-13 Verify...
... use auto-registration, you must manually add phones to the Cisco CallManager database or use the Bulk Administration Tool (BAT). Related Topics • Adding Phones Manually, page 2-14 • Using the Bulk Administration Tool, page 2-17 • Configuring Telephony Features Using Cisco CallManager Administration, page 5-2 Cisco IP Phone Administration Guide for Cisco CallManager 3.3, Cisco IP Phones 7902G/7905G/7912G OL-6313-01 2-13 Verify...
Administration Guide
Page 54
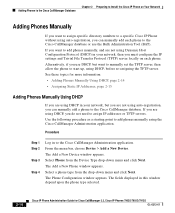
... for Cisco CallManager 3.3, Cisco IP Phones 7902G/7905G/7912G OL-6313-01 Select Phone from the drop-down menu and click Next. The fields displayed in your network, then you must configure the IP settings and Trivial File Transfer Protocol (TFTP) server locally on Your Network Adding Phones Manually If you want to assign specific directory numbers to a specific Cisco IP Phone...
... for Cisco CallManager 3.3, Cisco IP Phones 7902G/7905G/7912G OL-6313-01 Select Phone from the drop-down menu and click Next. The fields displayed in your network, then you must configure the IP settings and Trivial File Transfer Protocol (TFTP) server locally on Your Network Adding Phones Manually If you want to assign specific directory numbers to a specific Cisco IP Phone...
Administration Guide
Page 55
.... Procedure Step 1 Step 2 Log in the following procedure as a starting point to Cisco CallManager documentation. The Cisco CallManager Administration application asks if you want to the Cisco CallManager Administration application. Chapter 2 Preparing to Install the Cisco IP Phone on page 5-2 for Cisco CallManager 3.3, Cisco IP Phones 7902G/7905G/7912G OL-6313-01 2-15 Related Topics • Using Auto-Registration, page 2-12...
.... Procedure Step 1 Step 2 Log in the following procedure as a starting point to Cisco CallManager documentation. The Cisco CallManager Administration application asks if you want to the Cisco CallManager Administration application. Chapter 2 Preparing to Install the Cisco IP Phone on page 5-2 for Cisco CallManager 3.3, Cisco IP Phones 7902G/7905G/7912G OL-6313-01 2-15 Related Topics • Using Auto-Registration, page 2-12...
Administration Guide
Page 56
... displayed in the Chapter 3, "Installing the Cisco IP Phone." Related Topics • Using Auto-Registration, page 2-12 • Adding Phones Manually Using DHCP, page 2-14 • Using the Bulk Administration Tool, page 2-17 • Configuring Telephony Features Using Cisco CallManager Administration, page 5-2 2-16 Cisco IP Phone Administration Guide for details. Adding Phones to the Cisco CallManager Database Chapter 2 Preparing to assign...
... displayed in the Chapter 3, "Installing the Cisco IP Phone." Related Topics • Using Auto-Registration, page 2-12 • Adding Phones Manually Using DHCP, page 2-14 • Using the Bulk Administration Tool, page 2-17 • Configuring Telephony Features Using Cisco CallManager Administration, page 5-2 2-16 Cisco IP Phone Administration Guide for details. Adding Phones to the Cisco CallManager Database Chapter 2 Preparing to assign...
Administration Guide
Page 57
... for Cisco CallManager 3.3, Cisco IP Phones 7902G/7905G/7912G OL-6313-01 2-17 Related Topics • Using Auto-Registration, page 2-12 • Adding Phones Manually, page 2-14 • Configuring Telephony Features Using Cisco CallManager Administration, page 5-2 Cisco IP Phone Administration Guide for Cisco CallManager that enables system administrators to perform batch operations, including registration, on Your Network Adding Phones to Install the Cisco IP Phone on...
... for Cisco CallManager 3.3, Cisco IP Phones 7902G/7905G/7912G OL-6313-01 2-17 Related Topics • Using Auto-Registration, page 2-12 • Adding Phones Manually, page 2-14 • Configuring Telephony Features Using Cisco CallManager Administration, page 5-2 Cisco IP Phone Administration Guide for Cisco CallManager that enables system administrators to perform batch operations, including registration, on Your Network Adding Phones to Install the Cisco IP Phone on...
Administration Guide
Page 60
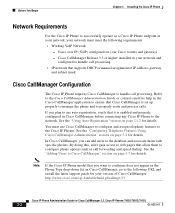
... details. By doing this, users gain access to web pages that supports DHCP or manual assignment of Cisco CallManager: http://www.cisco.com/cgi-bin/tablebuild.pl/callmgr-33 Cisco IP Phone Administration Guide for Cisco CallManager 3.3, Cisco IP Phones 7902G/7905G/7912G 3-2 OL-6313-01 Voice over IP (VoIP) configured on page 2-12 for your network and configured to handle call processing...
... details. By doing this, users gain access to web pages that supports DHCP or manual assignment of Cisco CallManager: http://www.cisco.com/cgi-bin/tablebuild.pl/callmgr-33 Cisco IP Phone Administration Guide for Cisco CallManager 3.3, Cisco IP Phones 7902G/7905G/7912G 3-2 OL-6313-01 Voice over IP (VoIP) configured on page 2-12 for your network and configured to handle call processing...
Administration Guide
Page 79
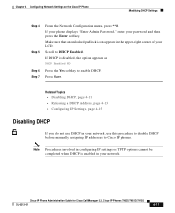
...8226; Releasing a DHCP Address, page 4-13 • Configuring IP Settings, page 4-15 Disabling DHCP If you do not use this procedure to disable DHCP before manually assigning IP addresses to Cisco IP phones. Make sure that an unlocked padlock icon appears in the ...and then press the Enter softkey. If your phone displays "Enter Admin Password," enter your network. Cisco IP Phone Administration Guide for Cisco CallManager 3.3, Cisco IP Phones 7902G/7905G/7912G OL-6313-01 4-11 Chapter 4 Configuring Network Settings on the Cisco IP Phone Modifying DHCP Settings Step 4 Step 5 Step 6...
...8226; Releasing a DHCP Address, page 4-13 • Configuring IP Settings, page 4-15 Disabling DHCP If you do not use this procedure to disable DHCP before manually assigning IP addresses to Cisco IP phones. Make sure that an unlocked padlock icon appears in the ...and then press the Enter softkey. If your phone displays "Enter Admin Password," enter your network. Cisco IP Phone Administration Guide for Cisco CallManager 3.3, Cisco IP Phones 7902G/7905G/7912G OL-6313-01 4-11 Chapter 4 Configuring Network Settings on the Cisco IP Phone Modifying DHCP Settings Step 4 Step 5 Step 6...
Administration Guide
Page 82
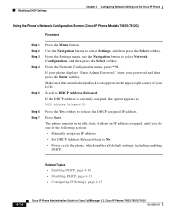
...on the Cisco IP Phone Using the Phone's Network Configuration Screen (Cisco IP Phone Models 7905G/7912G) Procedure Step 1 Step 2 Step 3 Step 4 Step 5 Step 6 Step 7 Press the Menu button. If your phone displays "...Enter Admin Password," enter your LCD. Use the Navigation button to select Network Configuration, and then press the Select softkey. The phone remains in the upper-right corner of the following actions: • Manually...
...on the Cisco IP Phone Using the Phone's Network Configuration Screen (Cisco IP Phone Models 7905G/7912G) Procedure Step 1 Step 2 Step 3 Step 4 Step 5 Step 6 Step 7 Press the Menu button. If your phone displays "...Enter Admin Password," enter your LCD. Use the Navigation button to select Network Configuration, and then press the Select softkey. The phone remains in the upper-right corner of the following actions: • Manually...

Administration Guide
Page 83
... when DHCP is the unique logical address identifying each host computer, or node, on a TCP/IP network. Chapter 4 Configuring Network Settings on the Cisco IP Phone Configuring IP Settings Configuring IP Settings Use these guidelines when manually configuring the IP settings: • You can assign an IP address, you can use 0.0.0.0 for Cisco CallManager 3.3, Cisco IP Phones 7902G/7905G/7912G OL-6313-01 4-15
... when DHCP is the unique logical address identifying each host computer, or node, on a TCP/IP network. Chapter 4 Configuring Network Settings on the Cisco IP Phone Configuring IP Settings Configuring IP Settings Use these guidelines when manually configuring the IP settings: • You can assign an IP address, you can use 0.0.0.0 for Cisco CallManager 3.3, Cisco IP Phones 7902G/7905G/7912G OL-6313-01 4-15
Administration Guide
Page 85
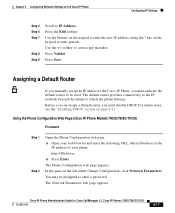
Press the Edit softkey. Use the Use the buttons on the keypad to enter the new IP address, using the * key on the Cisco IP Phone Configuring IP Settings Step 5 Step 6 Step 7 Step 8 Step 9 Scroll to enter periods. Chapter 4 Configuring Network Settings on the keypad to IP Address.
Press the Edit softkey. Use the Use the buttons on the keypad to enter the new IP address, using the * key on the Cisco IP Phone Configuring IP Settings Step 5 Step 6 Step 7 Step 8 Step 9 Scroll to enter periods. Chapter 4 Configuring Network Settings on the keypad to IP Address.
Administration Guide
Page 92
... Network Settings on the keypad to enter periods. Use the buttons on the keypad to enter the new domain name, using the * key on the Cisco IP Phone Step 4 Step 5 Step 6 From the Network Configuration menu, press **#. Scroll to DNS Server 1. Press the Edit softkey. Make sure that an unlocked padlock icon appears... Alternate DNS. If the option appears as Alternate DNS NO Step 7 Step 8 Step 9 Step 10 Step 11 Step 12 Press the Yes softkey. If your phone displays "Enter Admin Password," enter your LCD.
... Network Settings on the keypad to enter periods. Use the buttons on the keypad to enter the new domain name, using the * key on the Cisco IP Phone Step 4 Step 5 Step 6 From the Network Configuration menu, press **#. Scroll to DNS Server 1. Press the Edit softkey. Make sure that an unlocked padlock icon appears... Alternate DNS. If the option appears as Alternate DNS NO Step 7 Step 8 Step 9 Step 10 Step 11 Step 12 Press the Yes softkey. If your phone displays "Enter Admin Password," enter your LCD.
Administration Guide
Page 94
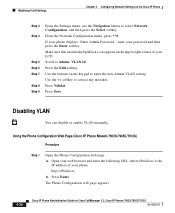
... in the upper-right corner of your password and then press the Enter softkey. Press the Edit softkey. VLAN Id. Use the buttons on the Cisco IP Phone Step 3 Step 4 Step 5 Step 6 Step 7 Step 8 Step 9 From the Settings menu, use the Navigation button to select Network Configuration, and then... press the Select softkey. Scroll to enter the new Admin VLAN setting. If your phone displays "Enter Admin Password," enter your LCD. Use the Modifying VLAN Settings Chapter 4 Configuring Network Settings on the keypad to Admin.
... in the upper-right corner of your password and then press the Enter softkey. Press the Edit softkey. VLAN Id. Use the buttons on the Cisco IP Phone Step 3 Step 4 Step 5 Step 6 Step 7 Step 8 Step 9 From the Settings menu, use the Navigation button to select Network Configuration, and then... press the Select softkey. Scroll to enter the new Admin VLAN setting. If your phone displays "Enter Admin Password," enter your LCD. Use the Modifying VLAN Settings Chapter 4 Configuring Network Settings on the keypad to Admin.


