User Guide
Page 2
... this User's Guide are for illustrative purposes only, and may be exactly the same as the screens actually produced by the product. z CASIO COMPUTER CO., LTD. shall not be held liable for registration or is forbidden without notice. z Unless specifically stated otherwise, all illustrations in...of America and other reason. z Crestron is forbidden. z HDMI, the HDMI Logo and High-Definition Multimedia Interface are based in this manual show the XJ-H1650. 2 z DLP is a trademark applied for any other countries and areas. z The sample screens shown in part on the work...
... this User's Guide are for illustrative purposes only, and may be exactly the same as the screens actually produced by the product. z CASIO COMPUTER CO., LTD. shall not be held liable for registration or is forbidden without notice. z Unless specifically stated otherwise, all illustrations in...of America and other reason. z Crestron is forbidden. z HDMI, the HDMI Logo and High-Definition Multimedia Interface are based in this manual show the XJ-H1650. 2 z DLP is a trademark applied for any other countries and areas. z The sample screens shown in part on the work...
User Guide
Page 3
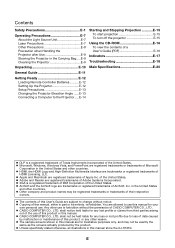
Contents About this manual 5 Projector Overview 6 Projector Features and Main Functions 6 Remote Controller and Projector Keys 8 Back Terminals 9 Operation During Projection 10 Selecting the Input Source 10 To select a ...
Contents About this manual 5 Projector Overview 6 Projector Features and Main Functions 6 Remote Controller and Projector Keys 8 Back Terminals 9 Operation During Projection 10 Selecting the Input Source 10 To select a ...

User Guide
Page 5
... to a Video Device 44 Connection to a composite video output or S-video output 44 Connection to a Computer 60 Specifications 63 About this manual are explained using the remote controller that comes with the projector. D 5 All of a Video Device or Computer to the Projector 46 ... and Screen Size 49 Aspect Ratio Setting and Projection Image 50 Supported Signals 52 Using Wired LAN to Control the Projector (XJ-H1650, XJ-H1750, XJ-ST145, XJ-ST155 55 Supported External Devices 55 Controlling the Projector from a Computer 55 Projector RS-232C Control 60 Connecting the Projector to a...
... to a Video Device 44 Connection to a composite video output or S-video output 44 Connection to a Computer 60 Specifications 63 About this manual are explained using the remote controller that comes with the projector. D 5 All of a Video Device or Computer to the Projector 46 ... and Screen Size 49 Aspect Ratio Setting and Projection Image 50 Supported Signals 52 Using Wired LAN to Control the Projector (XJ-H1650, XJ-H1750, XJ-ST145, XJ-ST155 55 Supported External Devices 55 Controlling the Projector from a Computer 55 Projector RS-232C Control 60 Connecting the Projector to a...
User Guide
Page 8
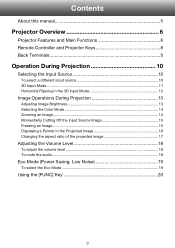
.../STANDBY indicator [ENTER] key [MENU] key [P] (Power) key [INPUT] key [AUTO] key [ESC] key Cursor keys (q/w/U/I) 8 Important! Remote Controller and Projector Keys Operations in this manual are not pressed inadvertently. Major operation keys are also provided on the projector unit, so the most of the same procedures can also be performed...
.../STANDBY indicator [ENTER] key [MENU] key [P] (Power) key [INPUT] key [AUTO] key [ESC] key Cursor keys (q/w/U/I) 8 Important! Remote Controller and Projector Keys Operations in this manual are not pressed inadvertently. Major operation keys are also provided on the projector unit, so the most of the same procedures can also be performed...
User Guide
Page 19
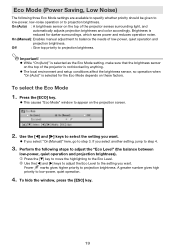
...the brightness sensor on the top of the projector is selected for darker surroundings, which saves power and reduces operation noise. On (Manual): Enables manual adjustment to projection brightness. z The local environment and setup conditions affect the brightness sensor, so operation when "On (Auto)" is...Use the [W] and [X] keys to step 3. To select the Eco Mode 1. Press the [ECO] key. z If you select "On (Manual)" here, go to select the setting you want . Perform the following three Eco Mode settings are available to specify whether priority should be given ...
...the brightness sensor on the top of the projector is selected for darker surroundings, which saves power and reduces operation noise. On (Manual): Enables manual adjustment to projection brightness. z The local environment and setup conditions affect the brightness sensor, so operation when "On (Auto)" is...Use the [W] and [X] keys to step 3. To select the Eco Mode 1. Press the [ECO] key. z If you select "On (Manual)" here, go to select the setting you want . Perform the following three Eco Mode settings are available to specify whether priority should be given ...
User Guide
Page 20
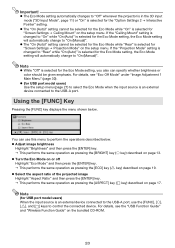
... 3D input mode ("3D Input Mode", page 11) or "On" is selected for USB port model users) Use the setup menu (page 21) to "On (Manual)". You can specify whether brightness or color should be selected for the Eco Mode while "Rear" is an external device connected to "On... (Manual)". Note (for the Eco Mode setting, the Eco Mode setting will automatically change to the USB-A port. Important! z The "On (Auto)" setting cannot be given ...
... 3D input mode ("3D Input Mode", page 11) or "On" is selected for USB port model users) Use the setup menu (page 21) to "On (Manual)". You can specify whether brightness or color should be selected for the Eco Mode while "Rear" is an external device connected to "On... (Manual)". Note (for the Eco Mode setting, the Eco Mode setting will automatically change to the USB-A port. Important! z The "On (Auto)" setting cannot be given ...

User Guide
Page 31
When this happens, use this setting to adjust the phase manually. If, for some reason, your manual frequency settings cause the image input from the computer to disappear from the projection, you can press the [AUTO] key to perform an auto adjust ...operation, which should cause the image to its initial default setting. When this happens, use this setting to adjust the frequency manually. Volume Adjustment Main Menu Setting Name Input Setting Unit Description Volume R C V H D U N Source Specific Use this sub-menu to adjust the volume level of the sub...
When this happens, use this setting to adjust the phase manually. If, for some reason, your manual frequency settings cause the image input from the computer to disappear from the projection, you can press the [AUTO] key to perform an auto adjust ...operation, which should cause the image to its initial default setting. When this happens, use this setting to adjust the frequency manually. Volume Adjustment Main Menu Setting Name Input Setting Unit Description Volume R C V H D U N Source Specific Use this sub-menu to adjust the volume level of the sub...

User Guide
Page 34
.... Input Settings Main Menu Setting Name Input Setting Unit Description COMPUTER 1 R C Terminal/ COMPUTER 2 Terminal N Single Use this sub-menu to specify manually the type of signal being input from the COMPUTER IN 1/COMPUTER IN 2 terminal and configures the appropriate input protocol. RGB: Select this option when a...that is always returned to the COMPUTER IN 1/COMPUTER IN 2 terminal. Use this option to turn on the Input Settings main menu to specify manually the type of the currently selected signal source in the 3D input mode ("3D Input Mode", page 11) or "On" is no input...
.... Input Settings Main Menu Setting Name Input Setting Unit Description COMPUTER 1 R C Terminal/ COMPUTER 2 Terminal N Single Use this sub-menu to specify manually the type of signal being input from the COMPUTER IN 1/COMPUTER IN 2 terminal and configures the appropriate input protocol. RGB: Select this option when a...that is always returned to the COMPUTER IN 1/COMPUTER IN 2 terminal. Use this option to turn on the Input Settings main menu to specify manually the type of the currently selected signal source in the 3D input mode ("3D Input Mode", page 11) or "On" is no input...
User Guide
Page 56
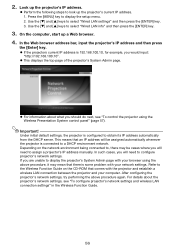
... to, there may mean that there is connected to display the setup menu. 2. For details about what you are unable to assign a projector's IP address manually. Use the [T] and [S] keys to obtain its IP address automatically from the DHCP server. z If the projectors current IP address is 192.168.100.10...
... to, there may mean that there is connected to display the setup menu. 2. For details about what you are unable to assign a projector's IP address manually. Use the [T] and [S] keys to obtain its IP address automatically from the DHCP server. z If the projectors current IP address is 192.168.100.10...

User Guide
Page 63
...no guarantees concerning the operation or suitability of Pixels: XGA (1024 × 768) Projection Lens 1.2X manual optical zoom, manual focus Manual focus Light Source Laser and LED Terminals COMPUTER IN: RGB 15-pin mini D-Sub × 2 (Also..., Portuguese, Turkish, Russian, Chinese (Simplified), Chinese (Traditional), Korean, Japanese * XJ-H1650/XJ-H1750/XJ-ST145/XJ-ST155 only z CASIO COMPUTER CO., LTD. Specifications Model Name XJ-H1600 XJ-H1650 XJ-H1700 XJ-H1750 XJ-ST145 XJ-ST155 Brightness (ANSI Lumens) 3500 4000 2500 3000 Projection System DLP DLP chip Size: ...
...no guarantees concerning the operation or suitability of Pixels: XGA (1024 × 768) Projection Lens 1.2X manual optical zoom, manual focus Manual focus Light Source Laser and LED Terminals COMPUTER IN: RGB 15-pin mini D-Sub × 2 (Also..., Portuguese, Turkish, Russian, Chinese (Simplified), Chinese (Traditional), Korean, Japanese * XJ-H1650/XJ-H1750/XJ-ST145/XJ-ST155 only z CASIO COMPUTER CO., LTD. Specifications Model Name XJ-H1600 XJ-H1650 XJ-H1700 XJ-H1750 XJ-ST145 XJ-ST155 Brightness (ANSI Lumens) 3500 4000 2500 3000 Projection System DLP DLP chip Size: ...
Setup Guide
Page 2
...Setting Up the Projector E-12 Setup Precautions E-13 Changing the Projector Elevation Angle ......E-13 Connecting a Computer to change without the permission of CASIO COMPUTER CO., LTD. z Microsoft, Windows, Windows Vista, and PowerPoint are subject to the Projector .....E-14 z DLP is a registered... z XGA is a registered trademark of Texas Instruments Incorporated of the United States. z The contents of this manual show the XJ-H1650. z Unless specifically stated otherwise, all illustrations in this User's Guide are registered trademarks or trademarks of their respective owners....
...Setting Up the Projector E-12 Setup Precautions E-13 Changing the Projector Elevation Angle ......E-13 Connecting a Computer to change without the permission of CASIO COMPUTER CO., LTD. z Microsoft, Windows, Windows Vista, and PowerPoint are subject to the Projector .....E-14 z DLP is a registered... z XGA is a registered trademark of Texas Instruments Incorporated of the United States. z The contents of this manual show the XJ-H1650. z Unless specifically stated otherwise, all illustrations in this User's Guide are registered trademarks or trademarks of their respective owners....

Setup Guide
Page 11
... repair if a problem is projected. E-9 Cleaning the Projector z Periodically clean the projector exterior, lens, intake vents, and intake-exhaust vents on page E-12. If this manual. If image quality is pointed straight at the screen. This can cause overheating of internal components and lead to malfunction. Operating Precautions ● Keystone Correction...
... repair if a problem is projected. E-9 Cleaning the Projector z Periodically clean the projector exterior, lens, intake vents, and intake-exhaust vents on page E-12. If this manual. If image quality is pointed straight at the screen. This can cause overheating of internal components and lead to malfunction. Operating Precautions ● Keystone Correction...
Setup Guide
Page 17
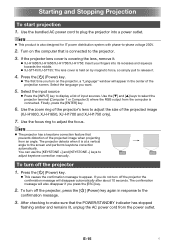
... first time you turn off the projector 1. Use the [T] and [S] keys to the confirmation message. 3. Use the focus ring to adjust keystone correction manually. The projector detects when it . 4. Press the [P] (Power) key. The confirmation message will appear in response to select the projector terminal (Computer ... power outlet. NOTE z This product is connected to adjust the size of the projected image when projecting from an angle. z XJ-ST145/XJ-ST155: The lens cover is held on the computer that is also designed for IT power distribution system with phase-to appear. Finally,...
... first time you turn off the projector 1. Use the [T] and [S] keys to the confirmation message. 3. Use the focus ring to adjust keystone correction manually. The projector detects when it . 4. Press the [P] (Power) key. The confirmation message will appear in response to select the projector terminal (Computer ... power outlet. NOTE z This product is connected to adjust the size of the projected image when projecting from an angle. z XJ-ST145/XJ-ST155: The lens cover is held on the computer that is also designed for IT power distribution system with phase-to appear. Finally,...
Setup Guide
Page 18
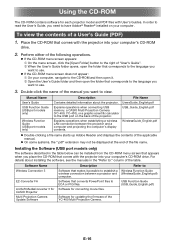
...open it possible to have Adobe® Reader® installed on the back of the file name. Double-click the name of the manual you want to :" column of the YC-400 Multi Projection Camera. UsersGuide_English.pdf USB Function Guide (USB port models only) Explains ... the CD-ROM that appears when you want to : Wireless Function Guide (WirelessGuide_English.pdf) USB Function Guide (USB_Guide_English.pdf) Software for CASIO Projector Multi Projection Camera Update Software Description Software that converts PowerPoint files to the USB port on your computer's CD-ROM drive. Perform...
...open it possible to have Adobe® Reader® installed on the back of the file name. Double-click the name of the manual you want to :" column of the YC-400 Multi Projection Camera. UsersGuide_English.pdf USB Function Guide (USB port models only) Explains ... the CD-ROM that appears when you want to : Wireless Function Guide (WirelessGuide_English.pdf) USB Function Guide (USB_Guide_English.pdf) Software for CASIO Projector Multi Projection Camera Update Software Description Software that converts PowerPoint files to the USB port on your computer's CD-ROM drive. Perform...

Setup Guide
Page 19
... than those shown above, it means that comes with the projector. For details about the current operational status of the projector. "On (Auto)" or "On (Manual)" is normal. When the indicators appear like when operation is selected for use. Indicators Indicators keep you informed about indicators and warning messages, see below...
... than those shown above, it means that comes with the projector. For details about the current operational status of the projector. "On (Auto)" or "On (Manual)" is normal. When the indicators appear like when operation is selected for use. Indicators Indicators keep you informed about indicators and warning messages, see below...
Setup Guide
Page 20
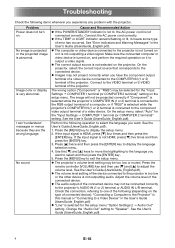
... for the "Input Settings J COMPUTER 1 terminal (or COMPUTER 2 terminal)" setting on it means some type of connected device): "Connecting a Computer to the Projector" in this manual or "Connecting to a Video Device" in the User's Guide (UsersGuide_English.pdf). Use the [T] and [S] keys to move the highlighting to the language you want . Troubleshooting...
... for the "Input Settings J COMPUTER 1 terminal (or COMPUTER 2 terminal)" setting on it means some type of connected device): "Connecting a Computer to the Projector" in this manual or "Connecting to a Video Device" in the User's Guide (UsersGuide_English.pdf). Use the [T] and [S] keys to move the highlighting to the language you want . Troubleshooting...