
Function Guide
Page 1
.... z The sample screens shown in the separate Setup Guide. z CASIO COMPUTER CO., LTD. DATA PROJECTOR E XJ-M145/XJ-M155/ XJ-M245/XJ-M255 Data Projector USB Function Guide z Be sure to keep all user documentation handy for future reference. z Be sure to read the precautions in this manual are trademarks or registered trademarks of this product, the...
.... z The sample screens shown in the separate Setup Guide. z CASIO COMPUTER CO., LTD. DATA PROJECTOR E XJ-M145/XJ-M155/ XJ-M245/XJ-M255 Data Projector USB Function Guide z Be sure to keep all user documentation handy for future reference. z Be sure to read the precautions in this manual are trademarks or registered trademarks of this product, the...
Function Guide
Page 2
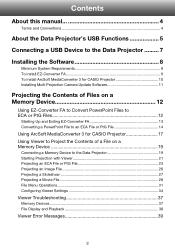
Contents About this manual 4 Terms and Conventions 4 About the Data Projector's USB Functions 5 Connecting a USB Device to the Data Projector ......... 7 Installing the Software 8 Minimum System Requirements 8 To install EZ-Converter FA 9 To install ArcSoft MediaConverter 3 for CASIO Projector 10 Installing Multi Projection Camera Update ...and Exiting EZ-Converter FA 13 Converting a PowerPoint File to an ECA File or PtG File 14 Using ArcSoft MediaConverter 3 for CASIO Projector 17 Using Viewer to Project the Contents of a File on a Memory Device 19 Connecting a Memory Device to the ...
Contents About this manual 4 Terms and Conventions 4 About the Data Projector's USB Functions 5 Connecting a USB Device to the Data Projector ......... 7 Installing the Software 8 Minimum System Requirements 8 To install EZ-Converter FA 9 To install ArcSoft MediaConverter 3 for CASIO Projector 10 Installing Multi Projection Camera Update ...and Exiting EZ-Converter FA 13 Converting a PowerPoint File to an ECA File or PtG File 14 Using ArcSoft MediaConverter 3 for CASIO Projector 17 Using Viewer to Project the Contents of a File on a Memory Device 19 Connecting a Memory Device to the ...
Function Guide
Page 4
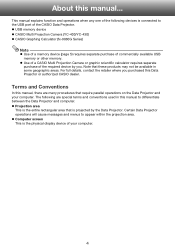
... require parallel operations on the Data Projector and your computer. 4 z Use of a CASIO Multi Projection Camera or graphic scientific calculator requires separate purchase of the CASIO Data Projector. z Computer screen This is connected to appear within the projection area. This manual explains function and operations when any one of the following are many...
... require parallel operations on the Data Projector and your computer. 4 z Use of a CASIO Multi Projection Camera or graphic scientific calculator requires separate purchase of the CASIO Data Projector. z Computer screen This is connected to appear within the projection area. This manual explains function and operations when any one of the following are many...

Function Guide
Page 5
... and 320 × 240 • Audio Format: ADPCM ECA/ PtG AVI JPEG USB memory device Refer to about this: Refer to this section of this manual: Converting PowerPoint files to files that can be "Using EZ-Converter FA to Convert PowerPoint Files to ECA or played back with the Data Projector...
... and 320 × 240 • Audio Format: ADPCM ECA/ PtG AVI JPEG USB memory device Refer to about this: Refer to this section of this manual: Converting PowerPoint files to files that can be "Using EZ-Converter FA to Convert PowerPoint Files to ECA or played back with the Data Projector...
Function Guide
Page 15
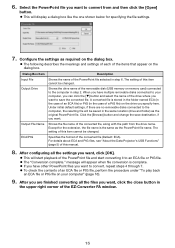
... or PtG file on the dialog box. z If you have multiple removable disks connected to your computer" (page 16). 9. z To check the contents of this manual. 8.
... or PtG file on the dialog box. z If you have multiple removable disks connected to your computer" (page 16). 9. z To check the contents of this manual. 8.
Function Guide
Page 27
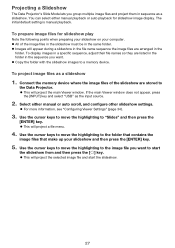
... window does not appear, press the [INPUT] key and select "USB" as a slideshow. To project image files as a slideshow 1. Select either manual playback or auto playback for slideshow play Note the following points when preparing your slideshow on your slideshow and then press the [ENTER] key. 5. ...the slideshow must be in the folder. To prepare image files for slideshow image display. The initial default setting is manual playback. You can select either manual or auto scroll, and configure other slideshow settings. z Copy the folder with the slideshow images to the Data Projector....
... window does not appear, press the [INPUT] key and select "USB" as a slideshow. To project image files as a slideshow 1. Select either manual playback or auto playback for slideshow play Note the following points when preparing your slideshow on your slideshow and then press the [ENTER] key. 5. ...the slideshow must be in the folder. To prepare image files for slideshow image display. The initial default setting is manual playback. You can select either manual or auto scroll, and configure other slideshow settings. z Copy the folder with the slideshow images to the Data Projector....
Function Guide
Page 34
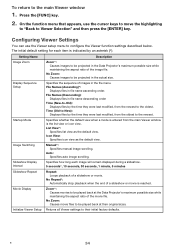
..., 30 seconds, 1 minute, 5 minutes Slideshow Repeat Repeat: Loops playback of the image file. Icon View: Specifies icon view as the default view. Image Switching Manual*: Specifies manual image scrolling. No Zoom: Causes movie files to Viewer Selection" and then press the [ENTER] key. Configuring Viewer Settings You can use the cursor keys...
..., 30 seconds, 1 minute, 5 minutes Slideshow Repeat Repeat: Loops playback of the image file. Icon View: Specifies icon view as the default view. Image Switching Manual*: Specifies manual image scrolling. No Zoom: Causes movie files to Viewer Selection" and then press the [ENTER] key. Configuring Viewer Settings You can use the cursor keys...

Function Guide
Page 42
.... Place the document whose image you can replace the document currently on the stage with its image and switch from the fuzzy monitor image to "Manual Capture". z When the document camera senses that the document on page 49. 42 Note Step 5 above is what happens while the Data Projector's YC Camera...
.... Place the document whose image you can replace the document currently on the stage with its image and switch from the fuzzy monitor image to "Manual Capture". z When the document camera senses that the document on page 49. 42 Note Step 5 above is what happens while the Data Projector's YC Camera...

Function Guide
Page 43
...image recorded with the YC Camera application and how to configure YC Camera application settings. Important! To release the document camera shutter manually 1. The procedures in this section assume that the Data Projector's YC Camera application is running . Press the [FUNC] key to release ... Data Projector as explained under "Connecting the Document Camera to the Data Projector" (page 40), and that you can release the shutter manually by default. 2. Press the [ENTER] key to display the YC Camera application function menu. YC Camera Application Operations This section explains...
...image recorded with the YC Camera application and how to configure YC Camera application settings. Important! To release the document camera shutter manually 1. The procedures in this section assume that the Data Projector's YC Camera application is running . Press the [FUNC] key to release ... Data Projector as explained under "Connecting the Document Camera to the Data Projector" (page 40), and that you can release the shutter manually by default. 2. Press the [ENTER] key to display the YC Camera application function menu. YC Camera Application Operations This section explains...

Function Guide
Page 44
... [T] key to move the highlighting to appear in the projection area. Use the [X] and [W] keys to appear in the projection area. 3. To adjust document focus manually 1. Press the [FUNC] key to adjust the document camera's focus. 5. Use the [X] and [W] keys to display the YC Camera application function menu. 2. z This will close...
... [T] key to move the highlighting to appear in the projection area. Use the [X] and [W] keys to appear in the projection area. 3. To adjust document focus manually 1. Press the [FUNC] key to adjust the document camera's focus. 5. Use the [X] and [W] keys to display the YC Camera application function menu. 2. z This will close...

Function Guide
Page 46
... projected image Note z Skew correction automatically straightens the image of the document camera. For more information, see the note under "To perform manual skew correction on a document easier to read. Use the [T] key to move the highlighting to "Skew Correction" and then press the ...). 1. z Instead of steps 1 and 2 above , you release the shutter will affect only the image that is configured to adjust image alignment manually. You can also perform skew correction of steps 1 and 2 above , you can perform white enhancement only on a projected image that is currently ...
... projected image Note z Skew correction automatically straightens the image of the document camera. For more information, see the note under "To perform manual skew correction on a document easier to read. Use the [T] key to move the highlighting to "Skew Correction" and then press the ...). 1. z Instead of steps 1 and 2 above , you release the shutter will affect only the image that is configured to adjust image alignment manually. You can also perform skew correction of steps 1 and 2 above , you can perform white enhancement only on a projected image that is currently ...

Function Guide
Page 49
...placed on the document stage. Auto Capture*: Automatically records the image of the items included on the projected image. Manual Capture: Requires manual release of the document camera should be performed while the "Skew Correction" setting is placed on the document stage ... Horizontal*: Records the document on white enhancement. White Enhancement Specifies whether or not white enhancement should be performed automatically or manually. On: Turns on the document stage horizontally. Off*: Turns off white enhancement. Important! White enhancement cannot be performed ...
...placed on the document stage. Auto Capture*: Automatically records the image of the items included on the projected image. Manual Capture: Requires manual release of the document camera should be performed while the "Skew Correction" setting is placed on the document stage ... Horizontal*: Records the document on white enhancement. White Enhancement Specifies whether or not white enhancement should be performed automatically or manually. On: Turns on the document stage horizontally. Off*: Turns off white enhancement. Important! White enhancement cannot be performed ...