User Manual
Page 5
...Projection Distance and Screen Size 47 Aspect Ratio Setting and Projection Image 48 Supported Signals 52 Using Wired LAN to Control the Projector (XJ-M145, XJ-M155, XJ-M245, XJ-M255 55 Supported External Devices 55 Controlling the Projector from a Computer 55 Projector RS-232C Control 60 Connecting the Projector to a ... this manual... Appendix 43 Connecting to a Video Device 43 Connection to a composite video output or S-video output 43 Connection to a Computer 60 Specifications 62 About this manual are explained using the remote controller that comes with the projector. 5
...Projection Distance and Screen Size 47 Aspect Ratio Setting and Projection Image 48 Supported Signals 52 Using Wired LAN to Control the Projector (XJ-M145, XJ-M155, XJ-M245, XJ-M255 55 Supported External Devices 55 Controlling the Projector from a Computer 55 Projector RS-232C Control 60 Connecting the Projector to a ... this manual... Appendix 43 Connecting to a Video Device 43 Connection to a composite video output or S-video output 43 Connection to a Computer 60 Specifications 62 About this manual are explained using the remote controller that comes with the projector. 5
User Manual
Page 15
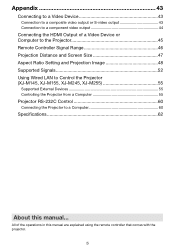
... may not display properly when you want is displayed. Displaying a Pointer in the Projected Image You can be used during a presentation to indicate or highlight a specific part of the [POINTER] key cycles through the available pointer types. z This will change the keystone correction value to zero. For this happens, use the...
... may not display properly when you want is displayed. Displaying a Pointer in the Projected Image You can be used during a presentation to indicate or highlight a specific part of the [POINTER] key cycles through the available pointer types. z This will change the keystone correction value to zero. For this happens, use the...
User Manual
Page 28
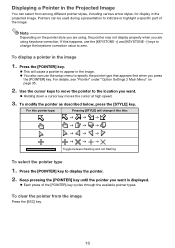
... Adjustment 1 Main Menu Setting Name Input Brightness RCV HDU Contrast RCV HDU Sharpness V Saturation V Tint V Setting Unit Description Source Specific Use this sub-menu to select it softer. A larger value produces a stronger contrast. The following describes the type of information that... appears in this sub-menu to adjust the contrast of the projected image. "Source Specific" in each individual input source. Description: This column provides details about the setting item and how to adjust the brightness ...
... Adjustment 1 Main Menu Setting Name Input Brightness RCV HDU Contrast RCV HDU Sharpness V Saturation V Tint V Setting Unit Description Source Specific Use this sub-menu to select it softer. A larger value produces a stronger contrast. The following describes the type of information that... appears in this sub-menu to adjust the contrast of the projected image. "Source Specific" in each individual input source. Description: This column provides details about the setting item and how to adjust the brightness ...
User Manual
Page 29
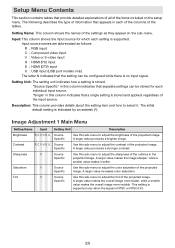
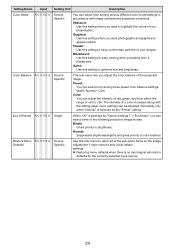
...Mode", you want photographs and graphics to return all of your presentation. Game: Use this sub-menu to appear natural. Source Specific Use this setting to brightness. The intensity of your images. Color settings can select either of the projected image. Setting Name Input...V H D U Color Balance R C V H D U Eco Off Mode R C V H D U Restore Menu R C V H D U Defaults Setting Unit Description Source Specific You can select from among various different color mode settings in accordance with the setting value. Standard: Use this setting when you adjust the color...
...Mode", you want photographs and graphics to return all of your presentation. Game: Use this sub-menu to appear natural. Source Specific Use this setting to brightness. The intensity of your images. Color settings can select either of the projected image. Setting Name Input...V H D U Color Balance R C V H D U Eco Off Mode R C V H D U Restore Menu R C V H D U Defaults Setting Unit Description Source Specific You can select from among various different color mode settings in accordance with the setting value. Standard: Use this setting when you adjust the color...
User Manual
Page 30
...horizontal position of signal (XGA/60Hz, SXGA/60Hz, etc.) that the frequency setting is no input signal will restore defaults for a specific input source. When this happens, use this setting to adjust the phase manually. When this happens, use this setting to adjust the ...frequency manually. Volume Adjustment Main Menu Setting Name Input Setting Unit Description Volume R C V H D U N Source Specific Use this sub-menu to their initial default settings. z Restoring menu defaults when there is performed, and not for the current signal type (XGA/...
...horizontal position of signal (XGA/60Hz, SXGA/60Hz, etc.) that the frequency setting is no input signal will restore defaults for a specific input source. When this happens, use this setting to adjust the phase manually. When this happens, use this setting to adjust the ...frequency manually. Volume Adjustment Main Menu Setting Name Input Setting Unit Description Volume R C V H D U N Source Specific Use this sub-menu to their initial default settings. z Restoring menu defaults when there is performed, and not for the current signal type (XGA/...
User Manual
Page 31
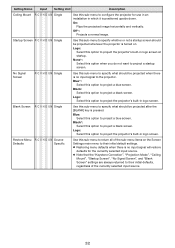
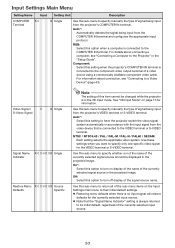
... to correct vertical keystoning of the projected image. Full: Projects at 16:9. Letter Box (XJ-M240/XJ-M245/XJ-M250/XJ-M255 only): This will be displayed with an aspect ratio of the original material. Projection ...Mode R C V H D U N Single Important! Screen Settings Main Menu Setting Name Input Setting Unit Description Keystone Correction R C V H D U N Single Use this option to project from the front of the screen. Aspect Ratio R C V H D Source Specific...
... to correct vertical keystoning of the projected image. Full: Projects at 16:9. Letter Box (XJ-M240/XJ-M245/XJ-M250/XJ-M255 only): This will be displayed with an aspect ratio of the original material. Projection ...Mode R C V H D U N Single Important! Screen Settings Main Menu Setting Name Input Setting Unit Description Keystone Correction R C V H D U N Single Use this option to project from the front of the screen. Aspect Ratio R C V H D Source Specific...
User Manual
Page 32
... settings. No Signal Screen R C V H D U N Single Use this sub-menu to specify what should be projected when there is positioned upside down. Restore Menu R C V H D U N Source Defaults Specific Use this sub-menu to return all of the currently selected input source. 32 Startup Screen R C V H D U N Single Use this sub-menu to specify whether or...
... settings. No Signal Screen R C V H D U N Single Use this sub-menu to specify what should be projected when there is positioned upside down. Restore Menu R C V H D U N Source Defaults Specific Use this sub-menu to return all of the currently selected input source. 32 Startup Screen R C V H D U N Single Use this sub-menu to specify whether or...
User Manual
Page 33
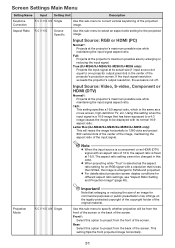
... system automatically in the "Setup Guide". Video Signal / V S-Video Signal N Single Signal Name R C V H D U N Single Indicator Restore Menu R C V H D U N Source Defaults Specific Note The setting of signal being input from the projector's COMPUTER IN terminal. See "3D Input Mode" on the Input Settings main menu to return... IN terminal and configures the appropriate input protocol. For information about connecting a computer, see "Connecting to specify only one specific video signal for information. Use these settings when you want to a Video Device" (page 43).
... system automatically in the "Setup Guide". Video Signal / V S-Video Signal N Single Signal Name R C V H D U N Single Indicator Restore Menu R C V H D U N Source Defaults Specific Note The setting of signal being input from the projector's COMPUTER IN terminal. See "3D Input Mode" on the Input Settings main menu to return... IN terminal and configures the appropriate input protocol. For information about connecting a computer, see "Connecting to specify only one specific video signal for information. Use these settings when you want to a Video Device" (page 43).
User Manual
Page 34
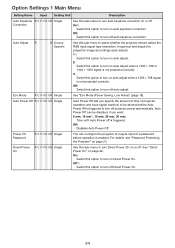
... off . Eco Mode R C V H D U N Single See "Eco Mode (Power Saving, Low Noise)" (page 18). On: Select this option to turn on page 23. Auto Adjust R N Source Specific Use this sub-menu to select whether the projector should detect the RGB input signal type (resolution, frequency) and adjust the projection image accordingly (auto...
... off . Eco Mode R C V H D U N Single See "Eco Mode (Power Saving, Low Noise)" (page 18). On: Select this option to turn on page 23. Auto Adjust R N Source Specific Use this sub-menu to select whether the projector should detect the RGB input signal type (resolution, frequency) and adjust the projection image accordingly (auto...
User Manual
Page 38
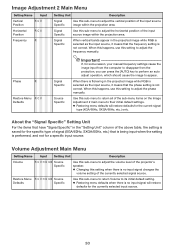
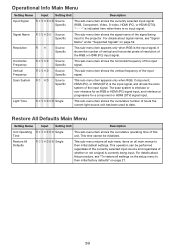
... (DTV) is currently being input to their initial factory defaults" on all main menus to the projector. Vertical Frequency RCVHD Source Specific This sub-menu item shows the vertical frequency of the RGB or HDMI (PC) input signal. This time cannot be performed regardless... The scan system is the input signal. Operational Info Main Menu Setting Name Input Setting Unit Description Input Signal R C V H D U N Source Specific This sub-menu item shows the currently selected input signal (RGB, Component, Video, S-video, HDMI (PC), or HDMI (DTV is indicated here when ...
... (DTV) is currently being input to their initial factory defaults" on all main menus to the projector. Vertical Frequency RCVHD Source Specific This sub-menu item shows the vertical frequency of the RGB or HDMI (PC) input signal. This time cannot be performed regardless... The scan system is the input signal. Operational Info Main Menu Setting Name Input Setting Unit Description Input Signal R C V H D U N Source Specific This sub-menu item shows the currently selected input signal (RGB, Component, Video, S-video, HDMI (PC), or HDMI (DTV is indicated here when ...
User Manual
Page 62
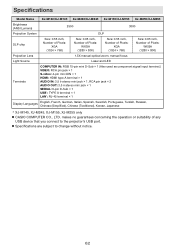
...English, French, German, Italian, Spanish, Swedish, Portuguese, Turkish, Russian, Chinese (Simplified), Chinese (Traditional), Korean, Japanese * XJ-M145, XJ-M245, XJ-M155, XJ-M255 only z CASIO COMPUTER CO., LTD. Specifications Model Name XJ-M140/XJ-M145 XJ-M240/XJ-M245 XJ-M150/XJ-M155 XJ-M250/XJ-M255 Brightness (ANSI Lumens) 2500 3000 Projection System DLP DLP chip Size: 0.55 inch, Number of Pixels... of Pixels: XGA (1024 × 768) Size: 0.65 inch, Number of any USB device that you connect to change without notice. 62 z Specifications are subject to the projector's USB port.
...English, French, German, Italian, Spanish, Swedish, Portuguese, Turkish, Russian, Chinese (Simplified), Chinese (Traditional), Korean, Japanese * XJ-M145, XJ-M245, XJ-M155, XJ-M255 only z CASIO COMPUTER CO., LTD. Specifications Model Name XJ-M140/XJ-M145 XJ-M240/XJ-M245 XJ-M150/XJ-M155 XJ-M250/XJ-M255 Brightness (ANSI Lumens) 2500 3000 Projection System DLP DLP chip Size: 0.55 inch, Number of Pixels... of Pixels: XGA (1024 × 768) Size: 0.65 inch, Number of any USB device that you connect to change without notice. 62 z Specifications are subject to the projector's USB port.
Setup Guide
Page 2
... CD-ROM E-16 To view the contents of a User's Guide (PDF E-16 Indicators E-17 Troubleshooting E-18 Unpacking E-10 Main Specifications E-20 General Guide E-10 Getting Ready E-11 Loading Remote Controller Batteries...........E-11 Setting Up the Projector E-11 Setup Precautions E-12 Changing ...the Projector Elevation Angle ......E-12 Connecting a Computer to change without the permission of CASIO COMPUTER CO., LTD. z Apple and Macintosh are trademarks or registered trademarks of ArcSoft, Inc. z Adobe and Reader are trademarks...
... CD-ROM E-16 To view the contents of a User's Guide (PDF E-16 Indicators E-17 Troubleshooting E-18 Unpacking E-10 Main Specifications E-20 General Guide E-10 Getting Ready E-11 Loading Remote Controller Batteries...........E-11 Setting Up the Projector E-11 Setup Precautions E-12 Changing ...the Projector Elevation Angle ......E-12 Connecting a Computer to change without the permission of CASIO COMPUTER CO., LTD. z Apple and Macintosh are trademarks or registered trademarks of ArcSoft, Inc. z Adobe and Reader are trademarks...
Setup Guide
Page 3
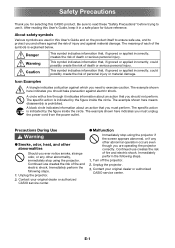
...Immediately perform the following steps. 1. Contact your original dealer or authorized CASIO service center. ● Malfunction - The example shown here indicates you should take precaution against material damage. The specific action is explained below. *Danger *Warning *Caution This symbol indicates information...or serious personal injury. The meaning of each of fire and electric shock. A circle with a line through it . The specific action is prohibited. $ A black circle indicates information about an action that you are used in a safe place for selecting ...
...Immediately perform the following steps. 1. Contact your original dealer or authorized CASIO service center. ● Malfunction - The example shown here indicates you should take precaution against material damage. The specific action is explained below. *Danger *Warning *Caution This symbol indicates information...or serious personal injury. The meaning of each of fire and electric shock. A circle with a line through it . The specific action is prohibited. $ A black circle indicates information about an action that you are used in a safe place for selecting ...
Setup Guide
Page 9
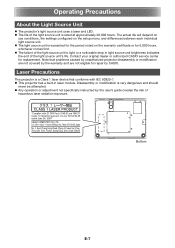
Contact your original dealer or authorized CASIO service center for repair by CASIO. Operating Precautions About the Light Source Unit z The projector's light source unit uses a laser and LED. z The failure of the light source unit's life. z Any operation or adjustment not specifically instructed by the warranty and are not eligible for replacement. Laser...
Contact your original dealer or authorized CASIO service center for repair by CASIO. Operating Precautions About the Light Source Unit z The projector's light source unit uses a laser and LED. z The failure of the light source unit's life. z Any operation or adjustment not specifically instructed by the warranty and are not eligible for replacement. Laser...

Setup Guide
Page 22
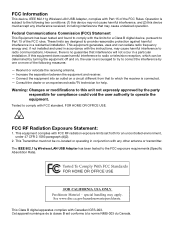
Main Specifications Model Name XJ-M140/XJ-M145/ XJ-M240/XJ-M245 XJ-M150/XJ-M155/ XJ-M250/XJ-M255 Brightness (ANSI Lumens) 2500 3000 Environment Operating Temperature: 5 to 35°C (41 to 95°F) Operating Humidity: 20 to 80% (non-condensation) Operating Altitude: 0 to 3,000 meters (0 to 10,000 feet) above sea level Power Requirements 100-240V AC, 50/60Hz, 2.3A-1.0A Approximate Dimensions 311 (W) × 244 (D) × 84 (H) mm (12.2" × 9.6" × 3.3") Weight Approximately 3.9kg (8.6Ibs) Specifications are subject to change without notice. E-20
Main Specifications Model Name XJ-M140/XJ-M145/ XJ-M240/XJ-M245 XJ-M150/XJ-M155/ XJ-M250/XJ-M255 Brightness (ANSI Lumens) 2500 3000 Environment Operating Temperature: 5 to 35°C (41 to 95°F) Operating Humidity: 20 to 80% (non-condensation) Operating Altitude: 0 to 3,000 meters (0 to 10,000 feet) above sea level Power Requirements 100-240V AC, 50/60Hz, 2.3A-1.0A Approximate Dimensions 311 (W) × 244 (D) × 84 (H) mm (12.2" × 9.6" × 3.3") Weight Approximately 3.9kg (8.6Ibs) Specifications are subject to change without notice. E-20
Setup Guide
Page 24
... Canadian ICES-003. Reorient or relocate the receiving antenna. - Connect the equipment into an outlet on , the user is subject to the FCC exposure requirements (Specific Absorbtion Rate). Tested To Comply With FCC Standards FOR HOME OR OFFICE USE FOR CALIFORNIA USA ONLY Perchlorate Material - This Class B digital apparatus complies with...
... Canadian ICES-003. Reorient or relocate the receiving antenna. - Connect the equipment into an outlet on , the user is subject to the FCC exposure requirements (Specific Absorbtion Rate). Tested To Comply With FCC Standards FOR HOME OR OFFICE USE FOR CALIFORNIA USA ONLY Perchlorate Material - This Class B digital apparatus complies with...