

User Guide
Page 2
... comes with the XJ-A135V, XJ-A145V, XJ-A155V, XJ-A235V, XJ-A245V, XJ-A255V E-10 General Guide E-11 Preparing the Remote Controller E-12 Getting Ready E-14 Setting Up the Projector E-14 Setup Precautions E-15 Adjusting the Projector Elevation Angle.......E-16 Connecting a Computer to the Projector .....E-17 Connecting to change without the permission of this manual. CASIO COMPUTER CO., LTD...
... comes with the XJ-A135V, XJ-A145V, XJ-A155V, XJ-A235V, XJ-A245V, XJ-A255V E-10 General Guide E-11 Preparing the Remote Controller E-12 Getting Ready E-14 Setting Up the Projector E-14 Setup Precautions E-15 Adjusting the Projector Elevation Angle.......E-16 Connecting a Computer to the Projector .....E-17 Connecting to change without the permission of this manual. CASIO COMPUTER CO., LTD...
User Guide
Page 3
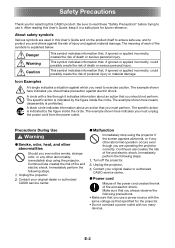
... injury. Should you ever notice smoke, strange odor, or any other abnormality, immediately stop using the projector. Unplug the projector. 2. Continued use creates the risk of fire and electric shock. Contact your original dealer or authorized CASIO service center. ● Malfunction - This symbol indicates information that , if ignored or applied incorrectly, creates the...an action that , if ignored or applied incorrectly, could possibly create the risk of fire and electric shock. A circle with a line through it in this CASIO product. Turn off the projector. 2.
... injury. Should you ever notice smoke, strange odor, or any other abnormality, immediately stop using the projector. Unplug the projector. 2. Continued use creates the risk of fire and electric shock. Contact your original dealer or authorized CASIO service center. ● Malfunction - This symbol indicates information that , if ignored or applied incorrectly, creates the...an action that , if ignored or applied incorrectly, could possibly create the risk of fire and electric shock. A circle with a line through it in this CASIO product. Turn off the projector. 2.

User Guide
Page 4
..." Never touch the power cord or plug while your original dealer or authorized CASIO service center. ● Disposal by the projector creates the risk of that you are wet. Whenever using this projector in any other container of water on top of fire and electric shock. ...to purchase and use . English Safety Precautions - Make sure that country. Contact your original dealer or authorized CASIO service center. ● Dropping and impact - Touching the projector while it has been damaged by the warranty and are not covered by dropping or other liquid, or foreign...
..." Never touch the power cord or plug while your original dealer or authorized CASIO service center. ● Disposal by the projector creates the risk of that you are wet. Whenever using this projector in any other container of water on top of fire and electric shock. ...to purchase and use . English Safety Precautions - Make sure that country. Contact your original dealer or authorized CASIO service center. ● Dropping and impact - Touching the projector while it has been damaged by the warranty and are not covered by dropping or other liquid, or foreign...

User Guide
Page 5
...vibration • An area subject to large amounts of electric shock. ● Cleaning $ Before cleaning the projector, be sure to consult your original dealer or authorized CASIO service center. + Never allow the remote controller to your physician or device manufacturer before turning on a high... shelf. The areas near or under the projector. Be sure to leave all internal inspection, adjustment, and ...
...vibration • An area subject to large amounts of electric shock. ● Cleaning $ Before cleaning the projector, be sure to consult your original dealer or authorized CASIO service center. + Never allow the remote controller to your physician or device manufacturer before turning on a high... shelf. The areas near or under the projector. Be sure to leave all internal inspection, adjustment, and ...

User Guide
Page 6
...for a long time. ● Lens Never touch the lens with your hand. ● Wireless adapter (provided with the rules and regulations in projector memory. Memory data can interfere with proper breathing and create a life-threatening situation. ● Disposing of batteries Make sure that produces a lens ... -• Use only the type of small children. Make sure that is on the power cord. • Insert the plug into some projector models) - Keep the wireless adapter out of the reach of batteries that you always observe the following precautions. • Do not locate ...
...for a long time. ● Lens Never touch the lens with your hand. ● Wireless adapter (provided with the rules and regulations in projector memory. Memory data can interfere with proper breathing and create a life-threatening situation. ● Disposing of batteries Make sure that produces a lens ... -• Use only the type of small children. Make sure that is on the power cord. • Insert the plug into some projector models) - Keep the wireless adapter out of the reach of batteries that you always observe the following precautions. • Do not locate ...

User Guide
Page 7
...a magnetic attachment. The lens cover can corrupt data recorded on magnetic media. Other *Caution Allowing dust to build up inside the projector for cleaning. Note that uses magnetic recording. E-6 Keep the lens cover away from the person experiencing the problem and consult a ... magnetic tapes, prepaid cards, checks, and any other media that you will be used in the vicinity of the projector cleaned. Contact your original dealer or authorized CASIO service center once a year about having the interior of anyone wearing a pacemaker or any other electric medical device.
...a magnetic attachment. The lens cover can corrupt data recorded on magnetic media. Other *Caution Allowing dust to build up inside the projector for cleaning. Note that uses magnetic recording. E-6 Keep the lens cover away from the person experiencing the problem and consult a ... magnetic tapes, prepaid cards, checks, and any other media that you will be used in the vicinity of the projector cleaned. Contact your original dealer or authorized CASIO service center once a year about having the interior of anyone wearing a pacemaker or any other electric medical device.

User Guide
Page 8
... conditions. This is made of precision components. Other Precautions This projector is normal, and does not indicate malfunction. Contact your original dealer or authorized CASIO service center for a long time. Doing so creates the risk of malfunction of and damage to the projector. Locations subjected to electrostatic charge Locations subjected to...
... conditions. This is made of precision components. Other Precautions This projector is normal, and does not indicate malfunction. Contact your original dealer or authorized CASIO service center for a long time. Doing so creates the risk of malfunction of and damage to the projector. Locations subjected to electrostatic charge Locations subjected to...

User Guide
Page 9
... after some time, but it may be the wrong color or it is the highest priority, turn projector power off and then back on page E-14. E-8 This can result distortion of the image or ...does not return the projected image to its proper color, use the procedure under "To turn off the projector" on page E-20 to be charged for repair if a problem is due to the illustration under ... "Setup Precautions" on the CD-ROM that comes with the indicator explanations under "Setting Up the Projector" on again. If this , you will be compressed before stowing it is the wrong color,...
... after some time, but it may be the wrong color or it is the highest priority, turn projector power off and then back on page E-14. E-8 This can result distortion of the image or ...does not return the projected image to its proper color, use the procedure under "To turn off the projector" on page E-20 to be charged for repair if a problem is due to the illustration under ... "Setup Precautions" on the CD-ROM that comes with the indicator explanations under "Setting Up the Projector" on again. If this , you will be compressed before stowing it is the wrong color,...

User Guide
Page 10
...to do to use the CD-ROM that comes with the projector depends on your computer. Using the CD-ROM that comes with the XJ-A130V, XJ-A140V, XJ-A150V, XJ-A230V, XJ-A240V, XJ-A250V The CD-ROM that comes with the projector has a PDF file "User's Guide" that contains detailed ...explanations about projector operations. Double-click "UsersGuide_English.pdf". This starts up Adobe ...
...to do to use the CD-ROM that comes with the projector depends on your computer. Using the CD-ROM that comes with the XJ-A130V, XJ-A140V, XJ-A150V, XJ-A230V, XJ-A240V, XJ-A250V The CD-ROM that comes with the projector has a PDF file "User's Guide" that contains detailed ...explanations about projector operations. Double-click "UsersGuide_English.pdf". This starts up Adobe ...

User Guide
Page 11
...connecting USB memory, a CASIO Multi Projection Camera (YC-400, YC-430), or a graphic scientific calculator to ECA files. Using the CD-ROM Using the CD-ROM that comes with the XJ-A135V, XJ-A145V, XJ-A155V, XJ-A235V, XJ-A245V, XJ-A255V The CD-ROM contains software for each projector model and PDF files... with the projector into your computer's CD-ROM drive. Place the CD-ROM that makes it ...
...connecting USB memory, a CASIO Multi Projection Camera (YC-400, YC-430), or a graphic scientific calculator to ECA files. Using the CD-ROM Using the CD-ROM that comes with the XJ-A135V, XJ-A145V, XJ-A155V, XJ-A235V, XJ-A245V, XJ-A255V The CD-ROM contains software for each projector model and PDF files... with the projector into your computer's CD-ROM drive. Place the CD-ROM that makes it ...

User Guide
Page 12
... Guide [Front/Top/Left Side] CLASS 1 LASER PRODUCT [P] (Power) key Key and Indicator Panel Wireless adapter cover* (XJ-A135V/XJ-A145V/XJ-A155V/ XJ-A235V/XJ-A245V/XJ-A255V only) Intake vents Intake vents Lens cover (Magnetic attachment to projector) Projection lens Exhaust vents Remote control signal receiver * A special-purpose port is located inside the wireless adapter cover...
... Guide [Front/Top/Left Side] CLASS 1 LASER PRODUCT [P] (Power) key Key and Indicator Panel Wireless adapter cover* (XJ-A135V/XJ-A145V/XJ-A155V/ XJ-A235V/XJ-A245V/XJ-A255V only) Intake vents Intake vents Lens cover (Magnetic attachment to projector) Projection lens Exhaust vents Remote control signal receiver * A special-purpose port is located inside the wireless adapter cover...

User Guide
Page 13
... controller does not come with batteries loaded. You need to control the projector from a computer. General Guide [Back, Terminals] COMPUTER terminal AV terminal Remote control signal receiver Serial port* Speaker HDMI port USB port (XJ-A135V/XJ-A145V/XJ-A155V/ XJ-A235V/XJ-A245V/XJ-A255V only) Anti-theft lock hole Intake vents Power connector * This serial port...
... controller does not come with batteries loaded. You need to control the projector from a computer. General Guide [Back, Terminals] COMPUTER terminal AV terminal Remote control signal receiver Serial port* Speaker HDMI port USB port (XJ-A135V/XJ-A145V/XJ-A155V/ XJ-A235V/XJ-A245V/XJ-A255V only) Anti-theft lock hole Intake vents Power connector * This serial port...

User Guide
Page 15
... Above Viewed from the Side (XJ-A230V/XJ-A235V/XJ-A240V/ XJ-A245V/XJ-A250V/XJ-A255V) Screen Position the projector so the lens side is at an angle so its lens is firm and level. Note that is pointing up to the screen. Viewed from the Side (XJ-A130V/XJ-A135V/XJ-A140V/ XJ-A145V/XJ-A150V/XJ-A155V) Screen Screen Make sure...
... Above Viewed from the Side (XJ-A230V/XJ-A235V/XJ-A240V/ XJ-A245V/XJ-A250V/XJ-A255V) Screen Position the projector so the lens side is at an angle so its lens is firm and level. Note that is pointing up to the screen. Viewed from the Side (XJ-A130V/XJ-A135V/XJ-A140V/ XJ-A145V/XJ-A150V/XJ-A155V) Screen Screen Make sure...

User Guide
Page 16
... it will be exposed to direct sunlight. Avoid locations where there are large amounts of dust and moisture. Keep the projector away from speakers, TVs, radios, and other devices that is unstable or prone to malfunction of a carpet, blanket, towel, or other ... dashed line in the illustration below . Use a conveniently located power outlet that you can reach easily when you only operate the projector in a way that operating conditions greatly affects the performance of environment described below . Exhaust vents Intake vents Intake vents Intake vents 30cm (11...
... it will be exposed to direct sunlight. Avoid locations where there are large amounts of dust and moisture. Keep the projector away from speakers, TVs, radios, and other devices that is unstable or prone to malfunction of a carpet, blanket, towel, or other ... dashed line in the illustration below . Use a conveniently located power outlet that you can reach easily when you only operate the projector in a way that operating conditions greatly affects the performance of environment described below . Exhaust vents Intake vents Intake vents Intake vents 30cm (11...
User Guide
Page 17
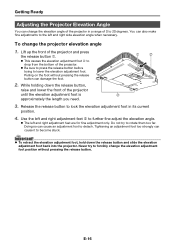
... too far. Important! To retract the elevation adjustment foot, hold down the release button, raise and lower the front of the projector until the elevation adjustment foot is approximately the length you need. 1 2 3 3. E-16 Use the left and right side elevation angle... when necessary. Do not try to lock the elevation adjustment foot in a range of the projector. Be sure to press the release button before trying to lower the elevation adjustment foot. Tightening an adjustment foot too strongly can...
... too far. Important! To retract the elevation adjustment foot, hold down the release button, raise and lower the front of the projector until the elevation adjustment foot is approximately the length you need. 1 2 3 3. E-16 Use the left and right side elevation angle... when necessary. Do not try to lock the elevation adjustment foot in a range of the projector. Be sure to press the release button before trying to lower the elevation adjustment foot. Tightening an adjustment foot too strongly can...
User Guide
Page 18
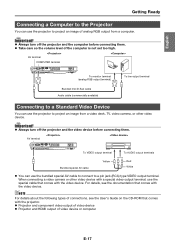
...terminal) Bundled mini D-Sub cable Audio cable (commercially available) To line output terminal Connecting to a Standard Video Device You can use the projector to a pin jack (RCA) type VIDEO output terminal. AV terminal To VIDEO output terminal To AUDIO output terminals Bundled special AV cable Yellow...61548; You can use the bundled special AV cable to connect to project an image from a computer. Important! Always turn off the projector and the computer before connecting them . Take care so the volume level of analog RGB output from a video deck, TV, video ...
...terminal) Bundled mini D-Sub cable Audio cable (commercially available) To line output terminal Connecting to a Standard Video Device You can use the projector to a pin jack (RCA) type VIDEO output terminal. AV terminal To VIDEO output terminal To AUDIO output terminals Bundled special AV cable Yellow...61548; You can use the bundled special AV cable to connect to project an image from a computer. Important! Always turn off the projector and the computer before connecting them . Take care so the volume level of analog RGB output from a video deck, TV, video ...

User Guide
Page 19
... top of the power cord and do not step on it. Never pull on the top of the projector to light amber. To turn on your original dealer or authorized CASIO service center. Power supply connector Bundled AC power cord The shape of the plug depends on the... projector 1. Wait until the projector is in this projector. Never use a power source with phase-to-phase voltage 230V. 2. NOTE If...
... top of the power cord and do not step on it. Never pull on the top of the projector to light amber. To turn on your original dealer or authorized CASIO service center. Power supply connector Bundled AC power cord The shape of the plug depends on the... projector 1. Wait until the projector is in this projector. Never use a power source with phase-to-phase voltage 230V. 2. NOTE If...
User Guide
Page 20
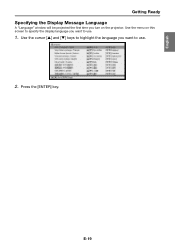
Press the [ENTER] key. E-19 Use the cursor [] and [] keys to highlight the language you want to use . 2. English Getting Ready Specifying the Display Message Language A "Language" window will be projected the first time you want to use . 1. Use the menu on this screen to specify the display language you turn on the projector.
Press the [ENTER] key. E-19 Use the cursor [] and [] keys to highlight the language you want to use . 2. English Getting Ready Specifying the Display Message Language A "Language" window will be projected the first time you want to use . 1. Use the menu on this screen to specify the display language you turn on the projector.
User Guide
Page 21
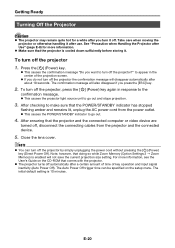
...Do you want to appear in response to the confirmation message. This causes the projector light source unit to go out and stops projection. 3. to turn off the projector the confirmation message will not save the current projection size setting. NOTE You can ...cooled down sufficiently before storing it. The Auto Power Off trigger time can turn off the projector 1. To turn off the projector?" Note, however, that comes with the projector. The projector turns off the projector, press the [P] (Power) key again in the center of key operation and input ...
...Do you want to appear in response to the confirmation message. This causes the projector light source unit to go out and stops projection. 3. to turn off the projector the confirmation message will not save the current projection size setting. NOTE You can ...cooled down sufficiently before storing it. The Auto Power Off trigger time can turn off the projector 1. To turn off the projector?" Note, however, that comes with the projector. The projector turns off the projector, press the [P] (Power) key again in the center of key operation and input ...
User Guide
Page 22
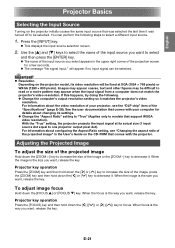
... will appear if no input signal can perform the following . Change the computer's output resolution setting so it matches the projector's video resolution. When focus is the size you select appears in the User's Guide on the CD-ROM that support WXGA video resolution... information about changing its settings. Change the "Aspect Ratio" setting to "True" (Applies only to models that comes with the projector. For information about configuring the Aspect Ratio setting, see the "DLP chip" item of the projection screen for details about the video resolution ...
... will appear if no input signal can perform the following . Change the computer's output resolution setting so it matches the projector's video resolution. When focus is the size you select appears in the User's Guide on the CD-ROM that support WXGA video resolution... information about changing its settings. Change the "Aspect Ratio" setting to "True" (Applies only to models that comes with the projector. For information about configuring the Aspect Ratio setting, see the "DLP chip" item of the projection screen for details about the video resolution ...

