User Guide
Page 2
...registered product names or trademarks of HDMI Licensing, LLC. z Copying of this manual, either in part or its entirety is forbidden without notice. z Portions of this manual are trademarks or registered trademarks of their respective owners. z CASIO COMPUTER CO., LTD. z The sample screens shown in this product are ...loss or lost profits or claims from third parties arising out of the use of this product or this manual for any other use is forbidden. Any other reason. z CASIO COMPUTER CO., LTD. shall not be held liable for any lost profits due to loss of data due ...
...registered product names or trademarks of HDMI Licensing, LLC. z Copying of this manual, either in part or its entirety is forbidden without notice. z Portions of this manual are trademarks or registered trademarks of their respective owners. z CASIO COMPUTER CO., LTD. z The sample screens shown in this product are ...loss or lost profits or claims from third parties arising out of the use of this product or this manual for any other use is forbidden. Any other reason. z CASIO COMPUTER CO., LTD. shall not be held liable for any lost profits due to loss of data due ...
User Guide
Page 3
Contents About this manual 5 Projector Overview 6 Projector Features and Main Functions 6 Remote Controller and Projector Keys 8 Back Terminals 9 Loading Remote Controller Batteries 9 Setting Up the Projector 10 Setup Precautions ... 14 Selecting the Input Source 14 To select a different input source 14 Resolution ...14 Image Operations During Projection 15 Adjusting Image Brightness 15 To use manual keystone correction 15 Selecting the Color Mode 16 Zooming an Image ...16 Momentarily Blanking the Image and Muting the Audio 17 Freezing an Image...17...
Contents About this manual 5 Projector Overview 6 Projector Features and Main Functions 6 Remote Controller and Projector Keys 8 Back Terminals 9 Loading Remote Controller Batteries 9 Setting Up the Projector 10 Setup Precautions ... 14 Selecting the Input Source 14 To select a different input source 14 Resolution ...14 Image Operations During Projection 15 Adjusting Image Brightness 15 To use manual keystone correction 15 Selecting the Color Mode 16 Zooming an Image ...16 Momentarily Blanking the Image and Muting the Audio 17 Freezing an Image...17...
User Guide
Page 5
Projector Troubleshooting 47 Appendix 49 Remote Controller Signal Range 49 Projection Distance and Screen Size 50 Aspect Ratio Setting and Projection Image 51 Supported Signals 53 Specifications 55 About this manual are explained using the remote controller that comes with the projector. 5 All of the operations in this manual...
Projector Troubleshooting 47 Appendix 49 Remote Controller Signal Range 49 Projection Distance and Screen Size 50 Aspect Ratio Setting and Projection Image 51 Supported Signals 53 Specifications 55 About this manual are explained using the remote controller that comes with the projector. 5 All of the operations in this manual...
User Guide
Page 8
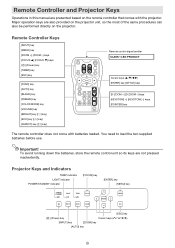
...] key [ENTER] key [MENU] key [ESC] key [P] (Power) key Cursor keys (q/w/U/I) [INPUT] key [ZOOM] key [AUTO] key 8 Remote Controller and Projector Keys Operations in this manual are presented based on the projector. To avoid running down the batteries, store the remote control unit so its keys are not pressed inadvertently.
...] key [ENTER] key [MENU] key [ESC] key [P] (Power) key Cursor keys (q/w/U/I) [INPUT] key [ZOOM] key [AUTO] key 8 Remote Controller and Projector Keys Operations in this manual are presented based on the projector. To avoid running down the batteries, store the remote control unit so its keys are not pressed inadvertently.
User Guide
Page 15
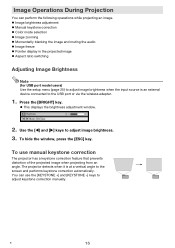
...+] and [KEYSTONE -] keys to the USB port or via the wireless adapter. 1. B 15 Image Operations During Projection You can use manual keystone correction The projector has a keystone correction feature that prevents distortion of the projected image when projecting from an angle. To hide the ... the [ESC] key. Press the [BRIGHT] key. The projector detects when it is an external device connected to adjust keystone correction manually. Use the [W] and [X] keys to the screen and performs keystone correction automatically. You can perform the following operations while projecting an ...
...+] and [KEYSTONE -] keys to the USB port or via the wireless adapter. 1. B 15 Image Operations During Projection You can use manual keystone correction The projector has a keystone correction feature that prevents distortion of the projected image when projecting from an angle. To hide the ... the [ESC] key. Press the [BRIGHT] key. The projector detects when it is an external device connected to adjust keystone correction manually. Use the [W] and [X] keys to the screen and performs keystone correction automatically. You can perform the following operations while projecting an ...
User Guide
Page 23
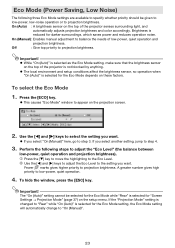
...selected for the Eco Mode setting, the Eco Mode setting will automatically change to "On (Manual)". 23 Press the [ECO] key. Use the [W] and [X] keys to select the setting you select "On (Manual)" here, go to step 3. Perform the following three Eco Mode settings are available to ... the Eco Mode setting, make sure that the brightness sensor on the top of low-power, quiet operation and projection brightness. On (Manual): Enables manual adjustment to balance the needs of the projector is selected for darker surroundings, which saves power and reduces operation noise. Off : Give...
...selected for the Eco Mode setting, the Eco Mode setting will automatically change to "On (Manual)". 23 Press the [ECO] key. Use the [W] and [X] keys to select the setting you select "On (Manual)" here, go to step 3. Perform the following three Eco Mode settings are available to ... the Eco Mode setting, make sure that the brightness sensor on the top of low-power, quiet operation and projection brightness. On (Manual): Enables manual adjustment to balance the needs of the projector is selected for darker surroundings, which saves power and reduces operation noise. Off : Give...
User Guide
Page 35
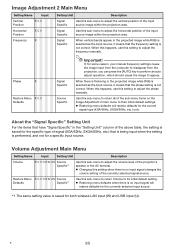
... projection area. z Changing this sub-menu to appear. When this happens, use this sub-menu to adjust the frequency manually. z Restoring menu defaults when there is saved for some reason, your manual frequency settings cause the image input from the computer to disappear from the projection, you can press the [AUTO] key... setting value is no input signal changes the volume setting of the sub-menu items on the Image Adjustment 2 main menu to adjust the phase manually.
... projection area. z Changing this sub-menu to appear. When this happens, use this sub-menu to adjust the frequency manually. z Restoring menu defaults when there is saved for some reason, your manual frequency settings cause the image input from the computer to disappear from the projection, you can press the [AUTO] key... setting value is no input signal changes the volume setting of the sub-menu items on the Image Adjustment 2 main menu to adjust the phase manually.
User Guide
Page 38
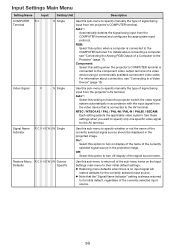
Input Settings Main Menu Setting Name Input Setting Unit Description COMPUTER R C Terminal N Single Use this sub-menu to specify manually the type of the signal source name. NTSC / NTSC4.43 / PAL / PAL-M / PAL-N / PAL60 / SECAM: Each setting ...selects the applicable video system. Off: Select this sub-menu to their initial default settings. For information about connecting a computer, see "Connecting to specify manually the type of a video device using a commercially available component video cable. Restore Menu R C V H D W U N Source Defaults Specific Use this ...
Input Settings Main Menu Setting Name Input Setting Unit Description COMPUTER R C Terminal N Single Use this sub-menu to specify manually the type of the signal source name. NTSC / NTSC4.43 / PAL / PAL-M / PAL-N / PAL60 / SECAM: Each setting ...selects the applicable video system. Off: Select this sub-menu to their initial default settings. For information about connecting a computer, see "Connecting to specify manually the type of a video device using a commercially available component video cable. Restore Menu R C V H D W U N Source Defaults Specific Use this ...
User Guide
Page 44
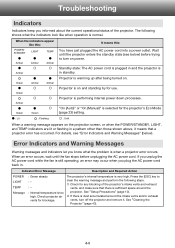
... and indicators let you unplug the AC power cord while the fan is in a pattern other than those shown above, it . "On (Auto)" or "On (Manual)" is warming up after being turned on power. Check projector air vents for any blocking of the projector. Projector is selected for use. Indicator/Error...
... and indicators let you unplug the AC power cord while the fan is in a pattern other than those shown above, it . "On (Auto)" or "On (Manual)" is warming up after being turned on power. Check projector air vents for any blocking of the projector. Projector is selected for use. Indicator/Error...