
User Guide
Page 1
z Be sure to read the precautions in the separate Setup Guide. E DATA PROJECTOR XJ-A141/XJ-A146* XJ-A241/XJ-A246* XJ-A251/XJ-A256* * USB Port Models User's Guide z Be sure to keep all user documentation handy for future reference.
z Be sure to read the precautions in the separate Setup Guide. E DATA PROJECTOR XJ-A141/XJ-A146* XJ-A241/XJ-A246* XJ-A251/XJ-A256* * USB Port Models User's Guide z Be sure to keep all user documentation handy for future reference.
User Guide
Page 3
... Setup Precautions 10 Connecting to an Image Output Device 11 Connecting the Analog RGB Output of a Computer to the Projector 11 Connecting the HDMI Output of a Video Device or Computer to the Projector 12 Connecting to a Video Device 13 Connection to a composite video output 13 Connection to a component video output 13 Operation...
... Setup Precautions 10 Connecting to an Image Output Device 11 Connecting the Analog RGB Output of a Computer to the Projector 11 Connecting the HDMI Output of a Video Device or Computer to the Projector 12 Connecting to a Video Device 13 Connection to a composite video output 13 Connection to a component video output 13 Operation...

User Guide
Page 4
...Timer 21 Eco Mode (Power Saving, Low Noise 23 To select the Eco Mode 23 Using the [FUNC] Key 24 Configuring Advanced Projector Settings 25 Basic Setup Menu Operations 25 Displaying the Setup Menu 25 Configuring Setup Menu Settings 25 Basic Setup Menu Example 26 Direct ...Only 42 Wireless Main Menu (USB Port Models Only 42 Operational Info Main Menu 42 Restore All Defaults Main Menu 42 Cleaning the Projector 43 Cleaning the Projector Exterior 43 Cleaning the Lens 43 Cleaning Intake and Exhaust Vents 43 Troubleshooting 44 Indicators 44 Error Indicators and Warning Messages 44 4
...Timer 21 Eco Mode (Power Saving, Low Noise 23 To select the Eco Mode 23 Using the [FUNC] Key 24 Configuring Advanced Projector Settings 25 Basic Setup Menu Operations 25 Displaying the Setup Menu 25 Configuring Setup Menu Settings 25 Basic Setup Menu Example 26 Direct ...Only 42 Wireless Main Menu (USB Port Models Only 42 Operational Info Main Menu 42 Restore All Defaults Main Menu 42 Cleaning the Projector 43 Cleaning the Projector Exterior 43 Cleaning the Lens 43 Cleaning Intake and Exhaust Vents 43 Troubleshooting 44 Indicators 44 Error Indicators and Warning Messages 44 4
User Guide
Page 5
Projector Troubleshooting 47 Appendix 49 Remote Controller Signal Range 49 Projection Distance and Screen Size 50 Aspect Ratio Setting and Projection Image 51 Supported Signals 53 Specifications 55 About this manual are explained using the remote controller that comes with the projector. 5 All of the operations in this manual...
Projector Troubleshooting 47 Appendix 49 Remote Controller Signal Range 49 Projection Distance and Screen Size 50 Aspect Ratio Setting and Projection Image 51 Supported Signals 53 Specifications 55 About this manual are explained using the remote controller that comes with the projector. 5 All of the operations in this manual...
User Guide
Page 6
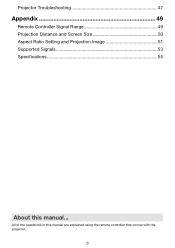
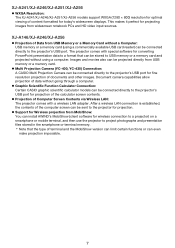
... controller can be used to -screen distance is plugged into a power outlet. 6 z A wide selection of the projector and remote controller keys. Projector Features and Main Functions XJ-A141/XJ-A146/XJ-A241/XJ-A246/XJ-A251/XJ-A256 z Mercury-free Hybrid Light Source: A CASIO-original laser and LED hybrid light source delivers high luminance from 2,500 to install or use...
... controller can be used to -screen distance is plugged into a power outlet. 6 z A wide selection of the projector and remote controller keys. Projector Features and Main Functions XJ-A141/XJ-A146/XJ-A241/XJ-A246/XJ-A251/XJ-A256 z Mercury-free Hybrid Light Source: A CASIO-original laser and LED hybrid light source delivers high luminance from 2,500 to install or use...
User Guide
Page 7
...CASIO graphic scientific calculator models can even make projection impossible. 7 Images and movies also can be stored to project photographs and presentation files stored in the smartphone or terminal memory. * Note that can be sent to the projector's USB port for projection of content formatted for today's widescreen displays. XJ-A241/XJ-A246/XJ-A251/XJ...-A256 z WXGA Resolution: The XJ-A241/XJ-A246/XJ-A251/XJ-A256 models support WXGA (1280...
...CASIO graphic scientific calculator models can even make projection impossible. 7 Images and movies also can be stored to project photographs and presentation files stored in the smartphone or terminal memory. * Note that can be sent to the projector's USB port for projection of content formatted for today's widescreen displays. XJ-A241/XJ-A246/XJ-A251/XJ...-A256 z WXGA Resolution: The XJ-A241/XJ-A246/XJ-A251/XJ-A256 models support WXGA (1280...
User Guide
Page 8
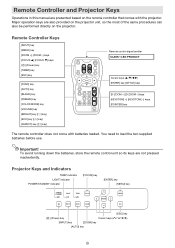
... remote controller that comes with batteries loaded. To avoid running down the batteries, store the remote control unit so its keys are not pressed inadvertently. Projector Keys and Indicators TEMP indicator LIGHT indicator POWER/STANDBY indicator [FOCUS] key [ENTER] key [MENU] key [ESC] key [P] (Power) key Cursor keys ... keys (S/T/W/X) [ENTER] key ([STYLE] key) [D-ZOOM +] [D-ZOOM -] keys [KEYSTONE +] [KEYSTONE -] keys [POINTER] key The remote controller does not come with the projector. Remote Controller and Projector Keys Operations in this manual are presented based on the...
... remote controller that comes with batteries loaded. To avoid running down the batteries, store the remote control unit so its keys are not pressed inadvertently. Projector Keys and Indicators TEMP indicator LIGHT indicator POWER/STANDBY indicator [FOCUS] key [ENTER] key [MENU] key [ESC] key [P] (Power) key Cursor keys ... keys (S/T/W/X) [ENTER] key ([STYLE] key) [D-ZOOM +] [D-ZOOM -] keys [KEYSTONE +] [KEYSTONE -] keys [POINTER] key The remote controller does not come with the projector. Remote Controller and Projector Keys Operations in this manual are presented based on the...

User Guide
Page 9
Back Terminals COMPUTER terminal AV terminal Remote control signal receiver Serial port* Speaker HDMI port USB port (XJ-A146/XJ-A246/XJ-A256 only) Anti-theft lock hole Intake vents Power connector * This serial port is for connecting a separately available special cable (YK-5) to use alkaline batteries ... on the back of the remote controller, replace the old batteries with new ones, and then close the battery cover. 9 Be sure to control the projector from a computer.
Back Terminals COMPUTER terminal AV terminal Remote control signal receiver Serial port* Speaker HDMI port USB port (XJ-A146/XJ-A246/XJ-A256 only) Anti-theft lock hole Intake vents Power connector * This serial port is for connecting a separately available special cable (YK-5) to use alkaline batteries ... on the back of the remote controller, replace the old batteries with new ones, and then close the battery cover. 9 Be sure to control the projector from a computer.

User Guide
Page 10
... back of the table, etc. Exhaust vents Intake vents 30cm (11.8 inches) Intake vents Intake vents 10 XJ-A141/XJ-A146 XJ-A241/XJ-A246/XJ-A251/XJ-A256 Screen Screen Make sure the projector is firm and level. z The projector can reach easily when you allow any objects to be oriented for optimum projection relative to appear in...
... back of the table, etc. Exhaust vents Intake vents 30cm (11.8 inches) Intake vents Intake vents 10 XJ-A141/XJ-A146 XJ-A241/XJ-A246/XJ-A251/XJ-A256 Screen Screen Make sure the projector is firm and level. z The projector can reach easily when you allow any objects to be oriented for optimum projection relative to appear in...
User Guide
Page 11
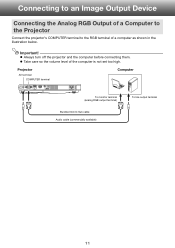
Projector AV terminal COMPUTER terminal Computer To monitor terminal (analog RGB output terminal) Bundled mini D-Sub cable Audio cable (commercially available) To line output terminal 11 z Take care so the volume level of a computer as shown in the illustration below. Connecting to an Image Output Device Connecting the Analog RGB Output of a Computer to the Projector Connect the projector's COMPUTER terminal to the RGB terminal of the computer is not set too high. Important! z Always turn off the projector and the computer before connecting them.
Projector AV terminal COMPUTER terminal Computer To monitor terminal (analog RGB output terminal) Bundled mini D-Sub cable Audio cable (commercially available) To line output terminal 11 z Take care so the volume level of a computer as shown in the illustration below. Connecting to an Image Output Device Connecting the Analog RGB Output of a Computer to the Projector Connect the projector's COMPUTER terminal to the RGB terminal of the computer is not set too high. Important! z Always turn off the projector and the computer before connecting them.
User Guide
Page 12
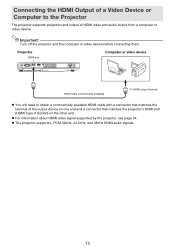
... device before connecting them. z For information about HDMI video signal supported by the projector, see page 54. z The projector supports L-PCM 32kHz, 44.1kHz, and 48kHz HDMI audio signals. 12 Projector HDMI port Computer or video device HDMI cable (commercially available) To HDMI output terminal... z You will need to the Projector The projector supports projection and output of the output device on one end and a connector that matches the projector's HDMI port (HDMI Type A Socket) on the other end. Connecting the HDMI...
... device before connecting them. z For information about HDMI video signal supported by the projector, see page 54. z The projector supports L-PCM 32kHz, 44.1kHz, and 48kHz HDMI audio signals. 12 Projector HDMI port Computer or video device HDMI cable (commercially available) To HDMI output terminal... z You will need to the Projector The projector supports projection and output of the output device on one end and a connector that matches the projector's HDMI port (HDMI Type A Socket) on the other end. Connecting the HDMI...
User Guide
Page 13
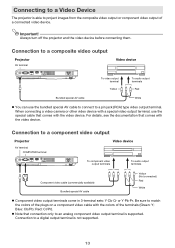
...colors of the plugs on a component video cable with the colors of a connected video device. Important! Connection to a composite video output Projector AV terminal Video device To video output terminal Yellow To audio output terminals Red Bundled special AV cable White z You can use the ...special cable that comes with the video device. z Note that comes with the video device. Connecting to a Video Device The projector is able to project images from the composite video output or component video output of the terminals (Green: Y; When connecting a video camera ...
...colors of the plugs on a component video cable with the colors of a connected video device. Important! Connection to a composite video output Projector AV terminal Video device To video output terminal Yellow To audio output terminals Red Bundled special AV cable White z You can use the ...special cable that comes with the video device. z Note that comes with the video device. Connecting to a Video Device The projector is able to project images from the composite video output or component video output of the terminals (Green: Y; When connecting a video camera ...

User Guide
Page 14
...selected. Images may appear coarse, text and other figures may appear when the input signal from a computer does not match the projector's video resolution. z The message "No signal input." For information about changing its actual size (1 input source dot equal to one... projector output pixel dot). Operation During Projection Selecting the Input Source Turning on the projector model, its video resolution will appear if no input signal can be difficult to read or a moire ...
...selected. Images may appear coarse, text and other figures may appear when the input signal from a computer does not match the projector's video resolution. z The message "No signal input." For information about changing its actual size (1 input source dot equal to one... projector output pixel dot). Operation During Projection Selecting the Input Source Turning on the projector model, its video resolution will appear if no input signal can be difficult to read or a moire ...
User Guide
Page 15
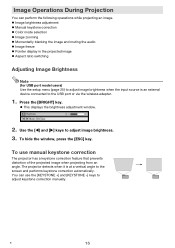
Use the [W] and [X] keys to the screen and performs keystone correction automatically. The projector detects when it is an external device connected to adjust keystone correction manually. z Image brightness adjustment z Manual keystone correction z Color mode selection z Image zooming z Momentarily ... to the USB port or via the wireless adapter. 1. B 15 Press the [BRIGHT] key. Image Operations During Projection You can use manual keystone correction The projector has a keystone correction feature that prevents distortion of the projected image when projecting from an angle.
Use the [W] and [X] keys to the screen and performs keystone correction automatically. The projector detects when it is an external device connected to adjust keystone correction manually. z Image brightness adjustment z Manual keystone correction z Color mode selection z Image zooming z Momentarily ... to the USB port or via the wireless adapter. 1. B 15 Press the [BRIGHT] key. Image Operations During Projection You can use manual keystone correction The projector has a keystone correction feature that prevents distortion of the projected image when projecting from an angle.
User Guide
Page 17
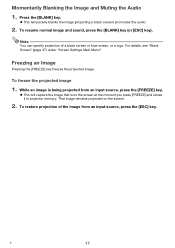
... of a black screen or blue screen, or a logo. That image remains projected on the screen at the moment you press [FREEZE] and stores it in projector memory. To freeze the projected image 1. While an image is on the screen. 2. Note You can specify projection of the image from an input source...
... of a black screen or blue screen, or a logo. That image remains projected on the screen at the moment you press [FREEZE] and stores it in projector memory. To freeze the projected image 1. While an image is on the screen. 2. Note You can specify projection of the image from an input source...
User Guide
Page 19
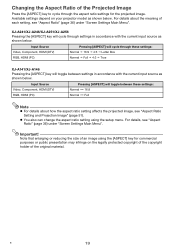
...) RGB, HDMI (PC) Pressing [ASPECT] will cycle through the aspect ratio settings for commercial purposes or public presentation may infringe on your projector model as shown below. Note that enlarging or reducing the size of an image using the setup menu. Available settings depend on the legally ... with the current input source as shown below. For details, see "Aspect Ratio" (page 36) under "Screen Settings Main Menu". XJ-A241/XJ-A246/XJ-A251/XJ-A256 Pressing the [ASPECT] key will toggle between settings in accordance with the current input source as shown below.
...) RGB, HDMI (PC) Pressing [ASPECT] will cycle through the aspect ratio settings for commercial purposes or public presentation may infringe on your projector model as shown below. Note that enlarging or reducing the size of an image using the setup menu. Available settings depend on the legally ... with the current input source as shown below. For details, see "Aspect Ratio" (page 36) under "Screen Settings Main Menu". XJ-A241/XJ-A246/XJ-A251/XJ-A256 Pressing the [ASPECT] key will toggle between settings in accordance with the current input source as shown below.
User Guide
Page 20
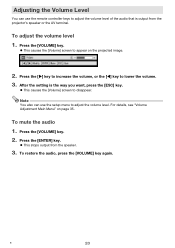
z This causes the [Volume] screen to appear on page 35. z This stops output from the projector's speaker or the AV terminal. Press the [VOLUME] key. Note You also can use the setup menu to adjust the volume level. To restore the ...
z This causes the [Volume] screen to appear on page 35. z This stops output from the projector's speaker or the AV terminal. Press the [VOLUME] key. Note You also can use the setup menu to adjust the volume level. To restore the ...
User Guide
Page 22
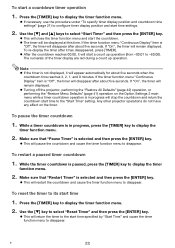
...press the [ENTER] key. Note z If the timer is in progress, press the [TIMER] key to the start time settings. 2. z Turning off the projector, performing the "Restore All Defaults" (page 42) operation, or performing the "Restore Menu Defaults" (page 41) operation on the timer. To pause the ...it has disappeared, press [TIMER]. If the timer function menu "Continuous Display" item is selected and then press the [ENTER] key. Any other projector operations do not have any affect on the Option Settings 2 main menu while a timer countdown operation is not displayed, it will stop the countdown...
...press the [ENTER] key. Note z If the timer is in progress, press the [TIMER] key to the start time settings. 2. z Turning off the projector, performing the "Restore All Defaults" (page 42) operation, or performing the "Restore Menu Defaults" (page 41) operation on the timer. To pause the ...it has disappeared, press [TIMER]. If the timer function menu "Continuous Display" item is selected and then press the [ENTER] key. Any other projector operations do not have any affect on the Option Settings 2 main menu while a timer countdown operation is not displayed, it will stop the countdown...
User Guide
Page 23
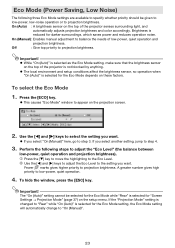
z While "On (Auto)" is selected as the Eco Mode setting, make sure that the brightness sensor on the top of the projector senses surrounding light, and automatically adjusts projection brightness and color accordingly. If you select "On (Manual)" here, go to step 3. On... (Manual): Enables manual adjustment to balance the needs of the projector is selected for "Screen Settings J Projection Mode" (page 37) on the projection screen. 2. Important! Press the [ECO] key. If the "Projection Mode...
z While "On (Auto)" is selected as the Eco Mode setting, make sure that the brightness sensor on the top of the projector senses surrounding light, and automatically adjusts projection brightness and color accordingly. If you select "On (Manual)" here, go to step 3. On... (Manual): Enables manual adjustment to balance the needs of the projector is selected for "Screen Settings J Projection Mode" (page 37) on the projection screen. 2. Important! Press the [ECO] key. If the "Projection Mode...
User Guide
Page 25
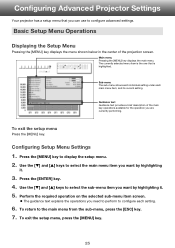
.... Use the [T] and [S] keys to select the sub-menu item you want by highlighting it . 5. To return to display the setup menu. 2. Configuring Advanced Projector Settings Your projector has a setup menu that is the one that you are currently performing. Guidance text Guidance text provides a brief description of the projection screen. Press...
.... Use the [T] and [S] keys to select the sub-menu item you want by highlighting it . 5. To return to display the setup menu. 2. Configuring Advanced Projector Settings Your projector has a setup menu that is the one that you are currently performing. Guidance text Guidance text provides a brief description of the projection screen. Press...


