
User Guide
Page 2
...CASIO COMPUTER CO., LTD. CASIO COMPUTER CO., LTD. Contents Safety Precautions E-2 Operating Precautions E-7 About the Lamp E-7 Other Precautions E-7 Unpacking E-9 Using the CD-ROM E-9 Using the CD-ROM that comes with the XJ-A130, XJ-A140, XJ-A230, and XJ-A240 E-9 Using the CD-ROM that comes with the XJ-A135, XJ-A145, XJ-A235, and XJ...24 Cleaning the Projector E-24 About the Lamp E-24 Troubleshooting E-24 Indicators E-24 Projector Troubleshooting E-25 Specifications E-28 DLP is forbidden. E-1 shall not be held liable for any other reason. ...
...CASIO COMPUTER CO., LTD. CASIO COMPUTER CO., LTD. Contents Safety Precautions E-2 Operating Precautions E-7 About the Lamp E-7 Other Precautions E-7 Unpacking E-9 Using the CD-ROM E-9 Using the CD-ROM that comes with the XJ-A130, XJ-A140, XJ-A230, and XJ-A240 E-9 Using the CD-ROM that comes with the XJ-A135, XJ-A145, XJ-A235, and XJ...24 Cleaning the Projector E-24 About the Lamp E-24 Troubleshooting E-24 Indicators E-24 Projector Troubleshooting E-25 Specifications E-28 DLP is forbidden. E-1 shall not be held liable for any other reason. ...
User Guide
Page 3
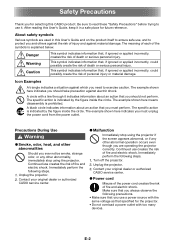
...against electric shock. ! A circle with too many devices. The specific action is indicated by the figure inside the circle. The specific action is indicated by the figure inside the circle. Contact your original dealer or authorized CASIO service center. ● Power cord + Misuse of the power... other abnormality, immediately stop using the projector. Contact your original dealer or authorized CASIO service center. ● Malfunction - After reading this User's Guide, keep it in this CASIO product. The example shown here indicates you must unplug the power cord from the...
...against electric shock. ! A circle with too many devices. The specific action is indicated by the figure inside the circle. The specific action is indicated by the figure inside the circle. Contact your original dealer or authorized CASIO service center. ● Power cord + Misuse of the power... other abnormality, immediately stop using the projector. Contact your original dealer or authorized CASIO service center. ● Malfunction - After reading this User's Guide, keep it in this CASIO product. The example shown here indicates you must unplug the power cord from the...
User Guide
Page 22
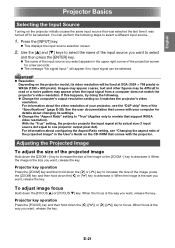
... details about configuring the Aspect Ratio setting, see the "DLP chip" item of the image or the [ZOOM -] key to increase the size of the "Specifications" (page E-28). Adjusting the Projected Image To adjust the size of the input source you want , release the key. Projector key operation Press the [ZOOM...
... details about configuring the Aspect Ratio setting, see the "DLP chip" item of the image or the [ZOOM -] key to increase the size of the "Specifications" (page E-28). Adjusting the Projected Image To adjust the size of the input source you want , release the key. Projector key operation Press the [ZOOM...
User Guide
Page 29
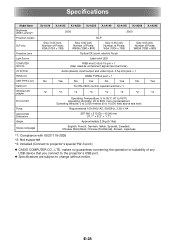
...change without notice. Specifications Model Name Brightness (ANSI Lumens)*1 Projection System DLP chip Projection Lens Light Source COMPUTER terminal AV terminal HDMI port USB TYPE A port Serial port Wireless LAN adapter Environment Power Approximate Dimensions Weight Display Languages XJ-A130 XJ-A135 XJ-A230 XJ-A235 XJ-A140 XJ-A145 XJ-A240 XJ-A245 2000 2500 DLP...: XGA (1024 × 768) Size: 0.65 inch, Number of any USB device that you connect to the projector's USB port. Specifications are subject to projector's special YW-3 port.) CASIO COMPUTER CO., LTD. E-28
...change without notice. Specifications Model Name Brightness (ANSI Lumens)*1 Projection System DLP chip Projection Lens Light Source COMPUTER terminal AV terminal HDMI port USB TYPE A port Serial port Wireless LAN adapter Environment Power Approximate Dimensions Weight Display Languages XJ-A130 XJ-A135 XJ-A230 XJ-A235 XJ-A140 XJ-A145 XJ-A240 XJ-A245 2000 2500 DLP...: XGA (1024 × 768) Size: 0.65 inch, Number of any USB device that you connect to the projector's USB port. Specifications are subject to projector's special YW-3 port.) CASIO COMPUTER CO., LTD. E-28
User Guide
Page 35
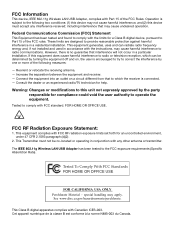
... This device, IEEE 802.11g Wireless LAN USB Adapter, complies with Canadian ICES-003. However, there is encouraged to try to the FCC exposure requirements (Specific Absorbtion Rate). Increase the separation between the equipment and receiver. - This Transmitter must accept any other antenna or transmitter.
... This device, IEEE 802.11g Wireless LAN USB Adapter, complies with Canadian ICES-003. However, there is encouraged to try to the FCC exposure requirements (Specific Absorbtion Rate). Increase the separation between the equipment and receiver. - This Transmitter must accept any other antenna or transmitter.
User Manual
Page 12
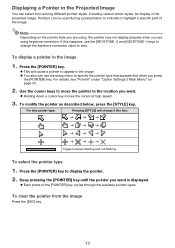
... want is displayed. Each press of the image. Press the [POINTER] key to zero. Pointers can be used during a presentation to indicate or highlight a specific part of the [POINTER] key cycles through the available pointer types. Use the cursor keys to move the pointer to specify the pointer type that...
... want is displayed. Each press of the image. Press the [POINTER] key to zero. Pointers can be used during a presentation to indicate or highlight a specific part of the [POINTER] key cycles through the available pointer types. Use the cursor keys to move the pointer to specify the pointer type that...
User Manual
Page 26
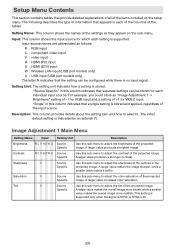
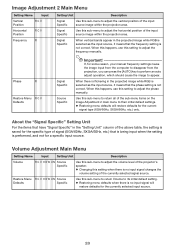
... 1 Main Menu Setting Name Input Brightness R C V H DWU Contrast R C V H DWU Sharpness V Saturation V Tint V Setting Unit Description Source Specific Use this sub-menu to adjust the sharpness of the outlines in this sub-menu to adjust the brightness of the projected image. "Single" in...in this column indicates that a single setting is no input signal. Setting Unit: The setting unit indicates how a setting is supported. "Source Specific" in each setting is stored. For example, you could store an "Image Adjustment 1 Brightness" setting of -1 for RGB input...
... 1 Main Menu Setting Name Input Brightness R C V H DWU Contrast R C V H DWU Sharpness V Saturation V Tint V Setting Unit Description Source Specific Use this sub-menu to adjust the sharpness of the outlines in this sub-menu to adjust the brightness of the projected image. "Single" in...in this column indicates that a single setting is no input signal. Setting Unit: The setting unit indicates how a setting is supported. "Source Specific" in each setting is stored. For example, you could store an "Image Adjustment 1 Brightness" setting of -1 for RGB input...
User Manual
Page 27
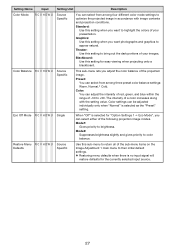
... the sub-menu items on the Image Adjustment 1 main menu to +50. Source Specific Use this setting for the currently selected input source. 27 Source Specific This sub-menu lets you want photographs and graphics to bring out the dark portions ...Input Color Mode R C V H D W U Color Balance R C V H D W U Eco Off Mode R C V H D W U Restore Menu R C V H D W U Defaults Setting Unit Description Source Specific You can select from among four different color mode settings to highlight the colors of your presentation. Mode2: Suppresses brightness slightly and gives priority to...
... the sub-menu items on the Image Adjustment 1 main menu to +50. Source Specific Use this setting for the currently selected input source. 27 Source Specific This sub-menu lets you want photographs and graphics to bring out the dark portions ...Input Color Mode R C V H D W U Color Balance R C V H D W U Eco Off Mode R C V H D W U Restore Menu R C V H D W U Defaults Setting Unit Description Source Specific You can select from among four different color mode settings to highlight the colors of your presentation. Mode2: Suppresses brightness slightly and gives priority to...
User Manual
Page 28
...image while RGB is selected as the input source, it means that is being input when the setting is not correct. Signal Specific Use this setting when there is no input signal will restore defaults for the currently selected input source. 28 Volume Adjustment Main ...Menu Setting Name Input Setting Unit Description Volume R C V H D W U N Source Specific Use this sub-menu to adjust the volume level of the projector's speaker. Changing this sub-menu to adjust the horizontal position of the...
...image while RGB is selected as the input source, it means that is being input when the setting is not correct. Signal Specific Use this setting when there is no input signal will restore defaults for the currently selected input source. 28 Volume Adjustment Main ...Menu Setting Name Input Setting Unit Description Volume R C V H D W U N Source Specific Use this sub-menu to adjust the volume level of the projector's speaker. Changing this sub-menu to adjust the horizontal position of the...

User Manual
Page 29
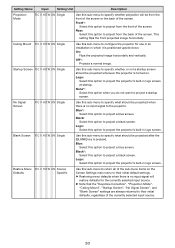
...signal. Letter Box (XJ-A230/XJ-A235/XJ-A240/XJ-A245 only): This will resize the image horizontally to 1280 dots and project 800 vertical dots of the center of the image, maintaining the aspect ratio of the original material. 29 Aspect Ratio R C V H D Source Specific Use this sub-menu...maintaining the input signal aspect ratio. 16:9 : This setting specifies a 16:9 aspect ratio, which is cut off. Important! True (XJ-A230/XJ-A235/XJ-A240/XJ-A245 only): Projects the input signal at 16:9. If the input signal resolution exceeds the projector's output resolution, the excess is the ...
...signal. Letter Box (XJ-A230/XJ-A235/XJ-A240/XJ-A245 only): This will resize the image horizontally to 1280 dots and project 800 vertical dots of the center of the image, maintaining the aspect ratio of the original material. 29 Aspect Ratio R C V H D Source Specific Use this sub-menu...maintaining the input signal aspect ratio. 16:9 : This setting specifies a 16:9 aspect ratio, which is cut off. Important! True (XJ-A230/XJ-A235/XJ-A240/XJ-A245 only): Projects the input signal at 16:9. If the input signal resolution exceeds the projector's output resolution, the excess is the ...
User Manual
Page 30
... be projected whenever the projector is turned on the Screen Settings main menu to their initial defaults, regardless of the screen. Restore Menu R C V H D W U N Source Defaults Specific Use this sub-menu to return all of the sub-menu items on . Setting Name Input Setting Unit Description Projection Mode R C V H D W U N Single Use this sub...
... be projected whenever the projector is turned on the Screen Settings main menu to their initial defaults, regardless of the screen. Restore Menu R C V H D W U N Source Defaults Specific Use this sub-menu to return all of the sub-menu items on . Setting Name Input Setting Unit Description Projection Mode R C V H D W U N Single Use this sub...
User Manual
Page 31
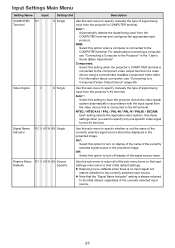
... input protocol. NTSC / NTSC4.43 / PAL / PAL-M / PAL-N / PAL60 / SECAM: Each setting selects the applicable video system. Restore Menu R C V H D W U N Source Defaults Specific Use this option to specify only one specific video signal for the currently selected input source. Note that is connected to the component video output terminal of a video device...
... input protocol. NTSC / NTSC4.43 / PAL / PAL-M / PAL-N / PAL60 / SECAM: Each setting selects the applicable video system. Restore Menu R C V H D W U N Source Defaults Specific Use this option to specify only one specific video signal for the currently selected input source. Note that is connected to the component video output terminal of a video device...
User Manual
Page 32
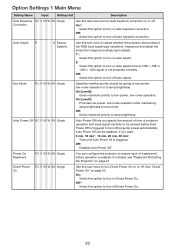
... correction. Auto Power Off can configure the projector to turn off Direct Power On. 32 Off: Select this option to turn off . Auto Adjust R N Source Specific Use this sub-menu to select whether the projector should be allowed before operation is triggered to turn on auto adjust when a 1360 × 768...
... correction. Auto Power Off can configure the projector to turn off Direct Power On. 32 Off: Select this option to turn off . Auto Adjust R N Source Specific Use this sub-menu to select whether the projector should be allowed before operation is triggered to turn on auto adjust when a 1360 × 768...

User Manual
Page 35
.... It shows the number of vertical and horizontal pixels of resolution of the input signal. For details about this unit. Horizontal Frequency RCVHD Source Specific This sub-menu item shows the horizontal frequency of this procedure, see "Signal Name" under "Supported Signals" on page 25. 35 Restore All... of the input signal. Operational Info Main Menu Setting Name Input Setting Unit Description Input Signal R C V H D W U N Source Specific This sub-menu item shows the currently selected input signal (RGB, Component, VIDEO, HDMI (PC), or HDMI (DTV is indicated here when...
.... It shows the number of vertical and horizontal pixels of resolution of the input signal. For details about this unit. Horizontal Frequency RCVHD Source Specific This sub-menu item shows the horizontal frequency of this procedure, see "Signal Name" under "Supported Signals" on page 25. 35 Restore All... of the input signal. Operational Info Main Menu Setting Name Input Setting Unit Description Input Signal R C V H D W U N Source Specific This sub-menu item shows the currently selected input signal (RGB, Component, VIDEO, HDMI (PC), or HDMI (DTV is indicated here when...