
User Guide
Page 2
...comes with the XJ-A130, XJ-A140, XJ-A230, and XJ-A240 E-9 Using the CD-ROM that comes with the XJ-A135, XJ-A145, XJ-A235, and XJ-A245 E-10 General Guide E-11 Preparing the Remote Controller E-12 Getting Ready E-14 Setting Up the Projector E-14 Setup Precautions E-15 Adjusting the Projector Elevation Angle.......E-...Inc. in the United States and other use this manual, either in this manual are trademarks or registered trademarks of CASIO COMPUTER CO., LTD. CASIO COMPUTER CO., LTD. Any other countries. Other company and product names may not be exactly the same ...
...comes with the XJ-A130, XJ-A140, XJ-A230, and XJ-A240 E-9 Using the CD-ROM that comes with the XJ-A135, XJ-A145, XJ-A235, and XJ-A245 E-10 General Guide E-11 Preparing the Remote Controller E-12 Getting Ready E-14 Setting Up the Projector E-14 Setup Precautions E-15 Adjusting the Projector Elevation Angle.......E-...Inc. in the United States and other use this manual, either in this manual are trademarks or registered trademarks of CASIO COMPUTER CO., LTD. CASIO COMPUTER CO., LTD. Any other countries. Other company and product names may not be exactly the same ...
User Guide
Page 3
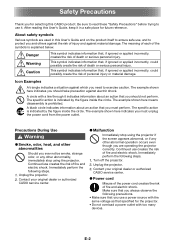
... applied incorrectly, creates the risk of death or serious personal injury. The example shown here indicates you should not perform. Unplug the projector. 2. Contact your original dealer or authorized CASIO service center. ● Power cord + Misuse of the power cord creates the risk of fire and electric shock. Make sure that you...
... applied incorrectly, creates the risk of death or serious personal injury. The example shown here indicates you should not perform. Unplug the projector. 2. Contact your original dealer or authorized CASIO service center. ● Power cord + Misuse of the power cord creates the risk of fire and electric shock. Make sure that you...
User Guide
Page 4
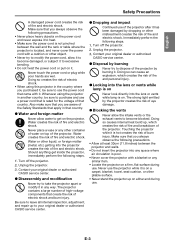
...sure that apply in any similar item. • Locate the projector on the power cord and never expose it is on the projector. Never use of eye damage. ● Blocking the vents - Contact your original dealer or authorized CASIO service center. ● Dropping and impact - Never try ...it to become blocked. " Never touch the power cord or plug while your original dealer or authorized CASIO service center. ● Disposal by the projector creates the risk of the projector after it has been damaged by burning it in that country. Should anything get on a carpet, blanket...
...sure that apply in any similar item. • Locate the projector on the power cord and never expose it is on the projector. Never use of eye damage. ● Blocking the vents - Contact your original dealer or authorized CASIO service center. ● Dropping and impact - Never try ...it to become blocked. " Never touch the power cord or plug while your original dealer or authorized CASIO service center. ● Disposal by the projector creates the risk of the projector after it has been damaged by burning it in that country. Should anything get on a carpet, blanket...
User Guide
Page 5
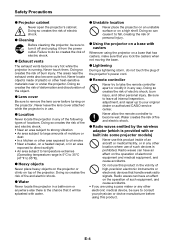
... the risk of electric shock. ● Cleaning $ Before cleaning the projector, be sure to consult your original dealer or authorized CASIO service center. + Never allow the remote controller to large amounts of the projector. Doing so creates the risk of such devices is the chance that handle...adapter (which is in use this product in any other location where use this product. Never leave the lens cover attached while the projector is provided with water. ● Unstable location - Water creates the risk of electric shock, burn injury, and other area exposed to...
... the risk of electric shock. ● Cleaning $ Before cleaning the projector, be sure to consult your original dealer or authorized CASIO service center. + Never allow the remote controller to large amounts of the projector. Doing so creates the risk of such devices is the chance that handle...adapter (which is in use this product in any other location where use this product. Never leave the lens cover attached while the projector is provided with water. ● Unstable location - Water creates the risk of electric shock, burn injury, and other area exposed to...
User Guide
Page 6
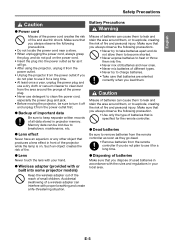
...area. Make sure that you always observe the following precaution. -• Use only the type of batteries that produces a lens effect in front of the projector while the lamp is specified for a long time. • At least once a year, unplug the power plug and use it for the remote ...Never expose batteries to heat or throw them , or to keep separate written records of used batteries in accordance with the rules and regulations in projector memory. Such an object creates the risk of the power plug. • Never use detergent to clean the power cord, especially the power...
...area. Make sure that you always observe the following precaution. -• Use only the type of batteries that produces a lens effect in front of the projector while the lamp is specified for a long time. • At least once a year, unplug the power plug and use it for the remote ...Never expose batteries to heat or throw them , or to keep separate written records of used batteries in accordance with the rules and regulations in projector memory. Such an object creates the risk of the power plug. • Never use detergent to clean the power cord, especially the power...

User Guide
Page 7
... a magnetic attachment. E-6 Safety Precautions Lens Cover *Warning + The lens cover of the projector cleaned. Contact your original dealer or authorized CASIO service center once a year about having the interior of this , it should not be charged for long periods without cleaning creates the risk of anyone ...
... a magnetic attachment. E-6 Safety Precautions Lens Cover *Warning + The lens cover of the projector cleaned. Contact your original dealer or authorized CASIO service center once a year about having the interior of this , it should not be charged for long periods without cleaning creates the risk of anyone ...
User Guide
Page 8
... volatile agent to clean the projector. A dead battery can remove its markings and cause staining of the case. ● Missing Screen Dots Though this projector is normal, and does not indicate malfunction. Contact your original dealer or authorized CASIO service center for a long time.... Doing so creates the risk of malfunction of and damage to the projector. Locations subjected to electrostatic ...
... volatile agent to clean the projector. A dead battery can remove its markings and cause staining of the case. ● Missing Screen Dots Though this projector is normal, and does not indicate malfunction. Contact your original dealer or authorized CASIO service center for a long time.... Doing so creates the risk of malfunction of and damage to the projector. Locations subjected to electrostatic ...
User Guide
Page 9
... the area around the vents become very hot during operation, and will still be charged for very long periods (like 24 hours) or if the projector was set up and used without following the "Setup Precautions" on again. This can result distortion of the image or a loss of this does not... return the projected image to its proper color, use the procedure under "Setting Up the Projector" on the CD-ROM that comes with the projector. ● Keystone Correction and Image Quality Performing keystone correction causes the image to turn off and then back on page E-15...
... the area around the vents become very hot during operation, and will still be charged for very long periods (like 24 hours) or if the projector was set up and used without following the "Setup Precautions" on again. This can result distortion of the image or a loss of this does not... return the projected image to its proper color, use the procedure under "Setting Up the Projector" on the CD-ROM that comes with the projector. ● Keystone Correction and Image Quality Performing keystone correction causes the image to turn off and then back on page E-15...

User Guide
Page 10
...that comes with the XJ-A130, XJ-A140, XJ-A230, and XJ-A240 The CD-ROM that comes with the projector depends on your ...computer. In order to read the User's Guide contents 1. To read the User's Guide, you need to do to the CD-ROM, and open the "User's Guide" folder. 3. English Unpacking As you unpack the projector...first" Sheet • Warranty • Wireless adapter (Provided with or built into your projector model. Place the bundled CD-ROM into models equipped with USB ports only.) Mini D-...
...that comes with the XJ-A130, XJ-A140, XJ-A230, and XJ-A240 The CD-ROM that comes with the projector depends on your ...computer. In order to read the User's Guide contents 1. To read the User's Guide, you need to do to the CD-ROM, and open the "User's Guide" folder. 3. English Unpacking As you unpack the projector...first" Sheet • Warranty • Wireless adapter (Provided with or built into your projector model. Place the bundled CD-ROM into models equipped with USB ports only.) Mini D-...

User Guide
Page 11
... computer and projecting the computer's display contents. Place the CD-ROM that comes with the XJ-A135, XJ-A145, XJ-A235, and XJ-A245 The CD-ROM contains software for CASIO Projector Multi Projection Camera Update Software Description Software that converts PowerPoint files to the USB port on ...for updating the firmware of the manuals. Explains operations when connecting USB memory, a CASIO Multi Projection Camera (YC-400, YC-430), or a graphic scientific calculator to ECA files. For details about the projector. In the "User's Guide" folder, open the "User's Guide" folder. ...
... computer and projecting the computer's display contents. Place the CD-ROM that comes with the XJ-A135, XJ-A145, XJ-A235, and XJ-A245 The CD-ROM contains software for CASIO Projector Multi Projection Camera Update Software Description Software that converts PowerPoint files to the USB port on ...for updating the firmware of the manuals. Explains operations when connecting USB memory, a CASIO Multi Projection Camera (YC-400, YC-430), or a graphic scientific calculator to ECA files. For details about the projector. In the "User's Guide" folder, open the "User's Guide" folder. ...
User Guide
Page 12
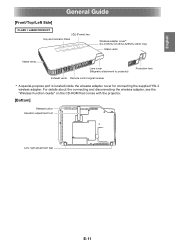
... [Front/Top/Left Side] CLASS 1 LASER PRODUCT [P] (Power) key Key and Indicator Panel Wireless adapter cover* (XJ-A135/XJ-A145/XJ-A235/XJ-A245 only) Intake vents Intake vents Lens cover (Magnetic attachment to projector) Projection lens Exhaust vents Remote control signal receiver * A special-purpose port is located inside the wireless adapter cover.... For details about the connecting and disconnecting the wireless adapter, see the "Wireless Function Guide" on the CD-ROM that comes with the projector. [Bottom] Release button Elevation adjustment foot Left, right adjustment feet E-11
... [Front/Top/Left Side] CLASS 1 LASER PRODUCT [P] (Power) key Key and Indicator Panel Wireless adapter cover* (XJ-A135/XJ-A145/XJ-A235/XJ-A245 only) Intake vents Intake vents Lens cover (Magnetic attachment to projector) Projection lens Exhaust vents Remote control signal receiver * A special-purpose port is located inside the wireless adapter cover.... For details about the connecting and disconnecting the wireless adapter, see the "Wireless Function Guide" on the CD-ROM that comes with the projector. [Bottom] Release button Elevation adjustment foot Left, right adjustment feet E-11
User Guide
Page 13
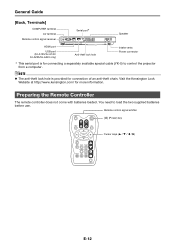
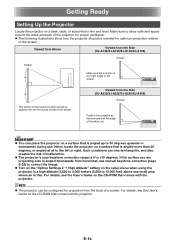
... Terminals] COMPUTER terminal AV terminal Remote control signal receiver Serial port* Speaker HDMI port USB port (XJ-A135/XJ-A145/ XJ-A235/XJ-A245 only) Anti-theft lock hole Intake vents Power connector * This serial port is provided for ...connection of an anti-theft chain. Preparing the Remote Controller The remote controller does not come with batteries loaded. Remote control signal emitter [P] (Power) key Cursor keys E-12 You need to control the projector...
... Terminals] COMPUTER terminal AV terminal Remote control signal receiver Serial port* Speaker HDMI port USB port (XJ-A135/XJ-A145/ XJ-A235/XJ-A245 only) Anti-theft lock hole Intake vents Power connector * This serial port is provided for ...connection of an anti-theft chain. Preparing the Remote Controller The remote controller does not come with batteries loaded. Remote control signal emitter [P] (Power) key Cursor keys E-12 You need to control the projector...
User Guide
Page 15
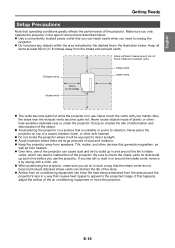
...Above Viewed from the Side (XJ-A230/XJ-A235/XJ-A240/XJ-A245) Screen Position the projector so the lens side is 0 to the screen. Viewed from the Side (XJ-A130/XJ-A135/XJ-A140/XJ-A145) Screen Screen Make sure the projector is at the edge of malfunction. The projector's auto keystone correction range is...the "Option Settings 2 High Altitude" setting on the CD-ROM that is thin. The center of the projector's lens should be aligned with the projector. E-14 If the surface you are projecting onto is angled up to 30 degrees upwards or downwards during use manual ...
...Above Viewed from the Side (XJ-A230/XJ-A235/XJ-A240/XJ-A245) Screen Position the projector so the lens side is 0 to the screen. Viewed from the Side (XJ-A130/XJ-A135/XJ-A140/XJ-A145) Screen Screen Make sure the projector is at the edge of malfunction. The projector's auto keystone correction range is...the "Option Settings 2 High Altitude" setting on the CD-ROM that is thin. The center of the projector's lens should be aligned with the projector. E-14 If the surface you are projecting onto is angled up to 30 degrees upwards or downwards during use manual ...
User Guide
Page 16
... remove it will be exposed to direct sunlight. Avoid locations where there are large amounts of dust and moisture. Keep the projector away from speakers, TVs, radios, and other devices that operating conditions greatly affects the performance of a carpet, blanket, towel, or other heat-...block intake and exhaust vents. If this happens, adjust the airflow of plastic or other soft material. Do not locate the projector where it by the dashed line in the projected image. English Getting Ready Setup Precautions Note that generate magnetism, as well as from ...
... remove it will be exposed to direct sunlight. Avoid locations where there are large amounts of dust and moisture. Keep the projector away from speakers, TVs, radios, and other devices that operating conditions greatly affects the performance of a carpet, blanket, towel, or other heat-...block intake and exhaust vents. If this happens, adjust the airflow of plastic or other soft material. Do not locate the projector where it by the dashed line in the projected image. English Getting Ready Setup Precautions Note that generate magnetism, as well as from ...
User Guide
Page 17
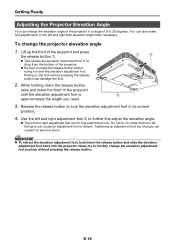
Pulling on the foot without pressing the release button. While holding down the release button and slide the elevation adjustment foot back into the projector. Release the release button to become stuck. Do not try to forcibly change the elevation adjustment foot position without pressing the release button ... press the release button . This causes the elevation adjustment foot to drop from the bottom of the projector. Be sure to press the release button before trying to detach. Doing so can cause an adjustment foot to lower the elevation ...
Pulling on the foot without pressing the release button. While holding down the release button and slide the elevation adjustment foot back into the projector. Release the release button to become stuck. Do not try to forcibly change the elevation adjustment foot position without pressing the release button ... press the release button . This causes the elevation adjustment foot to drop from the bottom of the projector. Be sure to press the release button before trying to detach. Doing so can cause an adjustment foot to lower the elevation ...
User Guide
Page 18
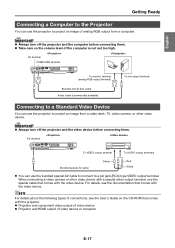
... computer is not set too high. When connecting a video camera or other video device. Important! Always turn off the projector and the video device before connecting them . AV terminal COMPUTER terminal To monitor terminal (analog RGB output terminal) Bundled mini D-Sub ...cable Audio cable (commercially available) To line output terminal Connecting to a Standard Video Device You can use the projector to project an image from a computer. AV terminal To VIDEO output terminal To AUDIO output terminals Bundled special AV cable Yellow Red ...
... computer is not set too high. When connecting a video camera or other video device. Important! Always turn off the projector and the video device before connecting them . AV terminal COMPUTER terminal To monitor terminal (analog RGB output terminal) Bundled mini D-Sub ...cable Audio cable (commercially available) To line output terminal Connecting to a Standard Video Device You can use the projector to project an image from a computer. AV terminal To VIDEO output terminal To AUDIO output terminals Bundled special AV cable Yellow Red ...
User Guide
Page 19
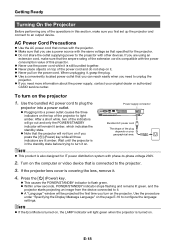
...that comes with the projector. Make sure that is covering the lens, remove it. 4. To turn on the projector 1. Power supply connector Bundled AC power cord The shape of the plug depends on your original dealer or authorized CASIO service center. If the projector lens cover is ...connected to the projector. 3. E-18 If you are lit amber. Press the [P] (Power) key. This causes the POWER/STANDBY indicator to...
...that comes with the projector. Make sure that is covering the lens, remove it. 4. To turn on the projector 1. Power supply connector Bundled AC power cord The shape of the plug depends on your original dealer or authorized CASIO service center. If the projector lens cover is ...connected to the projector. 3. E-18 If you are lit amber. Press the [P] (Power) key. This causes the POWER/STANDBY indicator to...
User Guide
Page 20
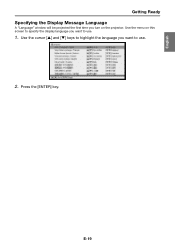
Use the cursor [] and [] keys to highlight the language you want to use . 2. E-19 Use the menu on the projector. Press the [ENTER] key. English Getting Ready Specifying the Display Message Language A "Language" window will be projected the first time you turn on this screen to specify the display language you want to use . 1.
Use the cursor [] and [] keys to highlight the language you want to use . 2. E-19 Use the menu on the projector. Press the [ENTER] key. English Getting Ready Specifying the Display Message Language A "Language" window will be projected the first time you turn on this screen to specify the display language you want to use . 1.
User Guide
Page 21
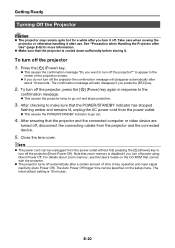
...from the power outlet. This causes the POWER/STANDBY indicator to turn off . E-20 After checking to make sure that the projector and the connected computer or video device are turned off, disconnect the connecting cables from the power outlet without first pressing the [P] (Power)... key to go out. 4. Close the lens cover. To turn off the projector?" Press the [P] (Power) key. This causes the confirmation message "Do you turn off power using Direct Power Off. The Auto Power ...
...from the power outlet. This causes the POWER/STANDBY indicator to turn off . E-20 After checking to make sure that the projector and the connected computer or video device are turned off, disconnect the connecting cables from the power outlet without first pressing the [P] (Power)... key to go out. 4. Close the lens cover. To turn off the projector?" Press the [P] (Power) key. This causes the confirmation message "Do you turn off power using Direct Power Off. The Auto Power ...
User Guide
Page 22
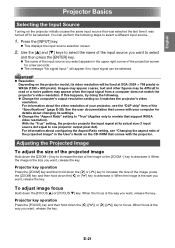
... hold down the [ZOOM +] key to increase the size of the input source you want , release the key. E-21 With the "True" setting, the projector projects the input signal at XGA (1024 × 768 pixels) or WXGA (1280 × 800 pixels). For information about changing its settings. Change... it. Press the [INPUT] key. This displays the input source selection screen. 2. If this happens, try doing the following steps to one projector output pixel dot). Use the [] and [] keys to select the name of the input source you want , release the key. When the ...
... hold down the [ZOOM +] key to increase the size of the input source you want , release the key. E-21 With the "True" setting, the projector projects the input signal at XGA (1024 × 768 pixels) or WXGA (1280 × 800 pixels). For information about changing its settings. Change... it. Press the [INPUT] key. This displays the input source selection screen. 2. If this happens, try doing the following steps to one projector output pixel dot). Use the [] and [] keys to select the name of the input source you want , release the key. When the ...


