

Owners Manual
Page 1
E DATA PROJECTOR XJ-450 User's Guide Keep this manual in a safe place for future reference.
E DATA PROJECTOR XJ-450 User's Guide Keep this manual in a safe place for future reference.

Owners Manual
Page 4
...4 GPower cord Never touch the power cord or plug while your original dealer or authorized CASIO service center. Doing so creates the risk of fire and electric shock. Turn off the projector. 2. Make sure that you always observe the following precautions. • Make sure that ...the risk of fire and electric shock. Contact your original dealer or authorized CASIO service center. Continued use creates the risk of fire and electric shock. Unplug the projector. 2. Make sure that specified for the projector. • Do not overload a power outlet with a cushion or other ...
...4 GPower cord Never touch the power cord or plug while your original dealer or authorized CASIO service center. Doing so creates the risk of fire and electric shock. Turn off the projector. 2. Make sure that you always observe the following precautions. • Make sure that ...the risk of fire and electric shock. Contact your original dealer or authorized CASIO service center. Continued use creates the risk of fire and electric shock. Unplug the projector. 2. Make sure that specified for the projector. • Do not overload a power outlet with a cushion or other ...

Owners Manual
Page 5
...other mistreatment creates the risk of burn injury. Turn off the projector. 2. Contact your original dealer or authorized CASIO service center. Unplug the projector. 3. GDisassembly and modification Never try to dispose of the projector by dropping or other liquid, or foreign matter (metal, etc...Should anything get on . Be sure to take the projector apart or modify it . Immediately perform the following steps. 1. Contact your original dealer or authorized CASIO service center. GDisposal by the projector creates the risk of fire and electric shock. GLooking into...
...other mistreatment creates the risk of burn injury. Turn off the projector. 2. Contact your original dealer or authorized CASIO service center. Unplug the projector. 3. GDisassembly and modification Never try to dispose of the projector by dropping or other liquid, or foreign matter (metal, etc...Should anything get on . Be sure to take the projector apart or modify it . Immediately perform the following steps. 1. Contact your original dealer or authorized CASIO service center. GDisposal by the projector creates the risk of fire and electric shock. GLooking into...

Owners Manual
Page 6
...take the remote controller apart or modify it to turn it off and unplug it will be splashed with casters Whenever using the projector on a base that has casters, make sure that it from the power outlet. Never allow the remote controller to your original ...dealer or authorized CASIO Service Center. Never touch them. GUsing the projector on a high shelf. Doing so creates the risk of the object. G Cleaning Before cleaning the projector, be sure to fall, creating the risk of electric shock, burn ...
...take the remote controller apart or modify it to turn it off and unplug it will be splashed with casters Whenever using the projector on a base that has casters, make sure that it from the power outlet. Never allow the remote controller to your original ...dealer or authorized CASIO Service Center. Never touch them. GUsing the projector on a high shelf. Doing so creates the risk of the object. G Cleaning Before cleaning the projector, be sure to fall, creating the risk of electric shock, burn ...
Owners Manual
Page 7
... to use it for a long time. • To avoid the built up of dust between the prongs at least once a year. • Before moving the projector, be lost due to cool down. G Lens Never touch the lens with your hand. 7 Safety Precautions Caution GPower cord Misuse of the power cord creates... fire and electric shock. GLens effect Never have an aquarium or any other object that produces a lens effect in projector memory. GPower cord Misuse of the power cord creates the risk of the projector while the lamp is on the power cord. Next, unplug it from the power outlet. • Unplug the...
... to use it for a long time. • To avoid the built up of dust between the prongs at least once a year. • Before moving the projector, be lost due to cool down. G Lens Never touch the lens with your hand. 7 Safety Precautions Caution GPower cord Misuse of the power cord creates... fire and electric shock. GLens effect Never have an aquarium or any other object that produces a lens effect in projector memory. GPower cord Misuse of the power cord creates the risk of the projector while the lamp is on the power cord. Next, unplug it from the power outlet. • Unplug the...

Owners Manual
Page 9
... get into your original dealer or authorized CASIO service center to be sure to turn off the projector. GBroken lamp Never attempt to replace a broken lamp on your own. Attempting to steady (not flashing) amber, unplug the projector from the power outlet. After the POWER...minutes before removing the lamp. Glass inside the lamp housing. Safety Precautions Lamp Precautions Warning GLamp removal Never remove the lamp from the projector's vent exhaust ports. Should the lamp break, be sure to contact your eyes, immediately contact a physician. The lamp becomes very...
... get into your original dealer or authorized CASIO service center to be sure to turn off the projector. GBroken lamp Never attempt to replace a broken lamp on your own. Attempting to steady (not flashing) amber, unplug the projector from the power outlet. After the POWER...minutes before removing the lamp. Glass inside the lamp housing. Safety Precautions Lamp Precautions Warning GLamp removal Never remove the lamp from the projector's vent exhaust ports. Should the lamp break, be sure to contact your eyes, immediately contact a physician. The lamp becomes very...

Owners Manual
Page 10
... the lamp as soon as possible after the replacement message appears. G The replacement message appears and the LAMP indicator flashes red after 100 hours the projector will not turn on the display for 90 days from the power outlet. Replace the lamp as soon as possible." G Turn off the... projector. Note that the lamp cartridge becomes very hot during normal use of a lamp that the performance of its lamp life increases the risk of the ...
... the lamp as soon as possible after the replacement message appears. G The replacement message appears and the LAMP indicator flashes red after 100 hours the projector will not turn on the display for 90 days from the power outlet. Replace the lamp as soon as possible." G Turn off the... projector. Note that the lamp cartridge becomes very hot during normal use of a lamp that the performance of its lamp life increases the risk of the ...

Owners Manual
Page 11
...the special screwdriver that comes with the YL-40 replacement lamp. Doing so creates the risk of malfunction of and damage to the projector. • Locations subjected to electrostatic charge • Locations subjected to temperature extremes • Locations where there is extreme moisture &#... foreign objects to correctly save data and malfunction. Other Precautions This projector is made of the projector. 11 Operating Precautions G When replacing the lamp, use or store the projector in inability to drop into the projector. • Never place a vase or any other container of ...
...the special screwdriver that comes with the YL-40 replacement lamp. Doing so creates the risk of malfunction of and damage to the projector. • Locations subjected to electrostatic charge • Locations subjected to temperature extremes • Locations where there is extreme moisture &#... foreign objects to correctly save data and malfunction. Other Precautions This projector is made of the projector. 11 Operating Precautions G When replacing the lamp, use or store the projector in inability to drop into the projector. • Never place a vase or any other container of ...

Owners Manual
Page 12
... purposes only, and appear differently from the screens actually produced by malfunction or maintenance of this product, or any other volatile agent to clean the projector. Doing so can leak, which leads to malfunction of the dots on the screen may be held liable for any loss or lost profits or... data caused by the product. 12 Wring all excess water from third parties arising out of the use of this product or this manual. • CASIO COMPUTER CO., LTD. Any other use thinner, benzene, or any other reason. • The sample screens shown in part or its markings and cause ...
... purposes only, and appear differently from the screens actually produced by malfunction or maintenance of this product, or any other volatile agent to clean the projector. Doing so can leak, which leads to malfunction of the dots on the screen may be held liable for any loss or lost profits or... data caused by the product. 12 Wring all excess water from third parties arising out of the use of this product or this manual. • CASIO COMPUTER CO., LTD. Any other use thinner, benzene, or any other reason. • The sample screens shown in part or its markings and cause ...

Owners Manual
Page 13
...Batteries 27 Using the Laser Pointer 28 Remote Controller Signal Range 29 Getting Ready 30 Setting Up the Projector 30 Setup Precautions 33 Projector Angle to the Screen 34 Adjusting the Projector Elevation Angle 35 Rear Projection (From the Back of the Screen 37 Connecting a Computer to the... Port 38 Connecting to a Standard Video Device 39 Connecting to a Component Video Output Device 40 Turning On the Projector 41 Turning Off the Projector 44 Projection Operations 46 Projecting onto a Screen 46 Keystone Correction (KEYSTONE 53 Adjusting the Volume Level (VOL 56 Enlarging the...
...Batteries 27 Using the Laser Pointer 28 Remote Controller Signal Range 29 Getting Ready 30 Setting Up the Projector 30 Setup Precautions 33 Projector Angle to the Screen 34 Adjusting the Projector Elevation Angle 35 Rear Projection (From the Back of the Screen 37 Connecting a Computer to the... Port 38 Connecting to a Standard Video Device 39 Connecting to a Component Video Output Device 40 Turning On the Projector 41 Turning Off the Projector 44 Projection Operations 46 Projecting onto a Screen 46 Keystone Correction (KEYSTONE 53 Adjusting the Volume Level (VOL 56 Enlarging the...

Owners Manual
Page 14
Contents Using the Setup Menu 64 Setup Menu Overview 64 Before Configuring Menu Settings 67 Setup Menu Screen Operations 68 Setup Menu Reference 77 Image Adjustment 77 Volume Adjustment 82 Screen Settings 83 Input Settings 89 Option Settings1 92 Option Settings2 106 Operational Info 109 Restore All Defaults 110 User Maintenance 111 Cleaning the Projector 111 Replacing the Lamp 111 Troubleshooting 119 Indicators and Alert Tones 119 Projector Troubleshooting 122 Appendix 124 Specifications 124 Computer System Requirements for USB Connection 125 Supported Signals 126 14
Contents Using the Setup Menu 64 Setup Menu Overview 64 Before Configuring Menu Settings 67 Setup Menu Screen Operations 68 Setup Menu Reference 77 Image Adjustment 77 Volume Adjustment 82 Screen Settings 83 Input Settings 89 Option Settings1 92 Option Settings2 106 Operational Info 109 Restore All Defaults 110 User Maintenance 111 Cleaning the Projector 111 Replacing the Lamp 111 Troubleshooting 119 Indicators and Alert Tones 119 Projector Troubleshooting 122 Appendix 124 Specifications 124 Computer System Requirements for USB Connection 125 Supported Signals 126 14

Owners Manual
Page 15
... effective. 15 ILaser pointer built into a projected computer image, and much more . The remote controller helps to perform page up the projector anywhere from the screen. IA selection of this product. To project onto a 60-inch screen, for a perfect projected image. Features and...laser pointer. I278 × 64 × 197 mm (10.9 × 2.5 × 7.8 inch), 2.4 kg (5.3 lbs) lightweight and compact data projector Though it possible to indicate items within the projected image. IAuto Focus, auto vertical and horizontal keystone correction The press of the projected image can...
... effective. 15 ILaser pointer built into a projected computer image, and much more . The remote controller helps to perform page up the projector anywhere from the screen. IA selection of this product. To project onto a 60-inch screen, for a perfect projected image. Features and...laser pointer. I278 × 64 × 197 mm (10.9 × 2.5 × 7.8 inch), 2.4 kg (5.3 lbs) lightweight and compact data projector Though it possible to indicate items within the projected image. IAuto Focus, auto vertical and horizontal keystone correction The press of the projected image can...

Owners Manual
Page 16
... Exhaust vents : Exhaust air for cooling. ) Setup Precautions (page 33) Warning z Never allow the exhaust vents to extend the lens before turning on the projector. 5 Remote control signal receiver : Receives the remote control signal. ) Remote Controller Signal Range (page 29) 16 Blocked vents can become blocked, and make ... the exhaust vents. General Guide This General Guide section defines the names and explains the main functions of each part of the projector. [Front/Top/Left side] 1 2 (4Cover open to become very hot, and create the risk of fire and malfunction.
... Exhaust vents : Exhaust air for cooling. ) Setup Precautions (page 33) Warning z Never allow the exhaust vents to extend the lens before turning on the projector. 5 Remote control signal receiver : Receives the remote control signal. ) Remote Controller Signal Range (page 29) 16 Blocked vents can become blocked, and make ... the exhaust vents. General Guide This General Guide section defines the names and explains the main functions of each part of the projector. [Front/Top/Left side] 1 2 (4Cover open to become very hot, and create the risk of fire and malfunction.

Owners Manual
Page 17
Warning Never look into the lens while the projector is turned on the sensors can cause keystone correction problems. Should the sensors ever become soiled, wipe them clean using a commercially available lens cloth or optical lens paper, like those for eyeglasses or camera lenses. 17 General Guide 6 Lens : Projects the image from the projector. z Finger smudges or dirt on . 7 Sensors Caution : Measures the distance between the projector and screen.
Warning Never look into the lens while the projector is turned on the sensors can cause keystone correction problems. Should the sensors ever become soiled, wipe them clean using a commercially available lens cloth or optical lens paper, like those for eyeglasses or camera lenses. 17 General Guide 6 Lens : Projects the image from the projector. z Finger smudges or dirt on . 7 Sensors Caution : Measures the distance between the projector and screen.

Owners Manual
Page 18
... lamp (page 114) 18 General Guide [Bottom] 21 3 5 4 3 1 Elevation adjustment foot : Rotate to change the angle of the projector. ) To change the projector elevation angle (page 35) 2 Release button : Press to release the elevation adjustment foot. 3 Left, right adjustment feet (2) : Rotate for fine... adjustment of the left and right angle of the projector. ) To change the projector elevation angle (page 35) 4 Intake vents : Intake air for cooling. ) Setup Precautions (page 33) Never allow the intake...
... lamp (page 114) 18 General Guide [Bottom] 21 3 5 4 3 1 Elevation adjustment foot : Rotate to change the angle of the projector. ) To change the projector elevation angle (page 35) 2 Release button : Press to release the elevation adjustment foot. 3 Left, right adjustment feet (2) : Rotate for fine... adjustment of the left and right angle of the projector. ) To change the projector elevation angle (page 35) 4 Intake vents : Intake air for cooling. ) Setup Precautions (page 33) Never allow the intake...

Owners Manual
Page 19
...Website at http://www.kensington.com/ for cooling. ) Setup Precautions (page 33) Never allow the intake vents on the back or the bottom of the projector Warning to become blocked. General Guide [Back, Terminals] 1 2 3 4 5 6 7 89 bk 1 RGB input terminal : For connection to ... Device (page 40) 2 USB port : For connection to a USB port of a computer using the bundled USB cable. ) Connecting a Computer to the Projector's USB Port (page 38) 3 Remote control signal receiver : Receives the remote control signal. ) Remote Controller Signal Range (page 29) 4 Projection key panel...
...Website at http://www.kensington.com/ for cooling. ) Setup Precautions (page 33) Never allow the intake vents on the back or the bottom of the projector Warning to become blocked. General Guide [Back, Terminals] 1 2 3 4 5 6 7 89 bk 1 RGB input terminal : For connection to ... Device (page 40) 2 USB port : For connection to a USB port of a computer using the bundled USB cable. ) Connecting a Computer to the Projector's USB Port (page 38) 3 Remote control signal receiver : Receives the remote control signal. ) Remote Controller Signal Range (page 29) 4 Projection key panel...

Owners Manual
Page 20
General Guide 9 AUDIO input terminal : For connection to the audio output terminal of a computer or video device using a commercially available audio cable (∅.3.5mm stereo). ) Connecting a Computer to the Projector (Video and Audio) (page 37) ) Connecting to a Standard Video Device (page 39) bk Power connector : For connection of the bundled AC power cord. ) Turning On the Projector(page 41) 20
General Guide 9 AUDIO input terminal : For connection to the audio output terminal of a computer or video device using a commercially available audio cable (∅.3.5mm stereo). ) Connecting a Computer to the Projector (Video and Audio) (page 37) ) Connecting to a Standard Video Device (page 39) bk Power connector : For connection of the bundled AC power cord. ) Turning On the Projector(page 41) 20

Owners Manual
Page 21
...Key and Indicator Panel] 12 3 ZOOM TEMP LAMP POWER/STANDBY AF/AK AUTO INPUT 4 5678 1 TEMP indicator : Indicates the error status of the projector. ) Indicators and Alert Tones (page 119) 2 LAMP indicator : Indicates the current lamp status. ) Indicators and Alert Tones (page 119) ) ...Replacing the Lamp (page 111) 3 POWER/STANDBY indicator : Indicates the current projector status. ) Turning On the Projector(page 41) ) Indicators and Alert Tones (page 119) 4 [ZOOM] keys : Press to control the projector when the remote controller is not available for some reason.
...Key and Indicator Panel] 12 3 ZOOM TEMP LAMP POWER/STANDBY AF/AK AUTO INPUT 4 5678 1 TEMP indicator : Indicates the error status of the projector. ) Indicators and Alert Tones (page 119) 2 LAMP indicator : Indicates the current lamp status. ) Indicators and Alert Tones (page 119) ) ...Replacing the Lamp (page 111) 3 POWER/STANDBY indicator : Indicates the current projector status. ) Turning On the Projector(page 41) ) Indicators and Alert Tones (page 119) 4 [ZOOM] keys : Press to control the projector when the remote controller is not available for some reason.
Owners Manual
Page 22
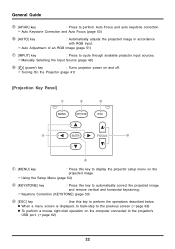
...) Auto Adjustment of an RGB Image (page 51) 7 [INPUT] key : Press to cycle through available projector input sources. ) Manually Selecting the Input Source (page 48) 8 [ ] (power) key : Turns projector power on and off. ) Turning On the Projector (page 41) [Projection Key Panel] 1 2 3 MENU KEYSTONE ESC 4 ENTER FOCUS 6 5 1 [...MENU] key : Press this key to display the projector setup menu on the computer connected to perform the operations described below. z When a menu screen is displayed, to back-step to ...
...) Auto Adjustment of an RGB Image (page 51) 7 [INPUT] key : Press to cycle through available projector input sources. ) Manually Selecting the Input Source (page 48) 8 [ ] (power) key : Turns projector power on and off. ) Turning On the Projector (page 41) [Projection Key Panel] 1 2 3 MENU KEYSTONE ESC 4 ENTER FOCUS 6 5 1 [...MENU] key : Press this key to display the projector setup menu on the computer connected to perform the operations described below. z When a menu screen is displayed, to back-step to ...

Owners Manual
Page 23
z To move the highlighting (selection cursor) on the menu screen ()page 68) z To perform mouse operations on the computer connected to the projector's USB por ()page 62) *In this manual, cursor key operations are indicated as [S], [T], [X], [W]. 5 [ENTER] key : Use this key to perform... 4 Cursor keys : Use these keys to perform the operations described below . For details, see "Option Settings1 J Key Lock" on the computer connected to the projector's USB port. ()page 62) 6 [FOCUS] keys : Press to adjust focus. ) Zoom and Focus (page 50) z You can disable certain key operations,...
z To move the highlighting (selection cursor) on the menu screen ()page 68) z To perform mouse operations on the computer connected to the projector's USB por ()page 62) *In this manual, cursor key operations are indicated as [S], [T], [X], [W]. 5 [ENTER] key : Use this key to perform... 4 Cursor keys : Use these keys to perform the operations described below . For details, see "Option Settings1 J Key Lock" on the computer connected to the projector's USB port. ()page 62) 6 [FOCUS] keys : Press to adjust focus. ) Zoom and Focus (page 50) z You can disable certain key operations,...

