
Owners Manual
Page 1
E DATA PROJECTOR XJ-450 User's Guide Keep this manual in a safe place for future reference.
E DATA PROJECTOR XJ-450 User's Guide Keep this manual in a safe place for future reference.

Owners Manual
Page 6
... sure to leave all internal inspection, adjustment, and repair up to become wet. Never allow the remote controller to your original dealer or authorized CASIO Service Center. Doing so creates the risk of deformation and discoloration of burn injury. G Water Never locate the projector in use. Doing so creates the risk of the projector's power cord. G Lightening During a lightening storm, do so...
... sure to leave all internal inspection, adjustment, and repair up to become wet. Never allow the remote controller to your original dealer or authorized CASIO Service Center. Doing so creates the risk of deformation and discoloration of burn injury. G Water Never locate the projector in use. Doing so creates the risk of the projector's power cord. G Lightening During a lightening storm, do so...

Owners Manual
Page 9
... minutes before removing the lamp. The projector uses a mercury lamp with high internal pressure as its light source. Glass inside of fire and breakdown. The lamp becomes very hot during use, creating the risk of the lamp housing may also be sure to replace a broken lamp on your original dealer or authorized CASIO service center to turn off the projector. Use of any other type of lamp creates the...
... minutes before removing the lamp. The projector uses a mercury lamp with high internal pressure as its light source. Glass inside of fire and breakdown. The lamp becomes very hot during use, creating the risk of the lamp housing may also be sure to replace a broken lamp on your original dealer or authorized CASIO service center to turn off the projector. Use of any other type of lamp creates the...

Owners Manual
Page 10
... use and during standby. After 2000 hours, a message appears to alert you replace the lamp. G The replacement message appears and the LAMP indicator flashes red after its life. The projector will enter a cool down state and then go dim or even fail before removing the lamp. Handling it when hot creates the risk of a particular lamp or lamp operating conditions can damage the lamp and shorten its lamp life is used . After the POWER/STANDBY indicator changes...
... use and during standby. After 2000 hours, a message appears to alert you replace the lamp. G The replacement message appears and the LAMP indicator flashes red after its life. The projector will enter a cool down state and then go dim or even fail before removing the lamp. Handling it when hot creates the risk of a particular lamp or lamp operating conditions can damage the lamp and shorten its lamp life is used . After the POWER/STANDBY indicator changes...

Owners Manual
Page 14
Contents Using the Setup Menu 64 Setup Menu Overview 64 Before Configuring Menu Settings 67 Setup Menu Screen Operations 68 Setup Menu Reference 77 Image Adjustment 77 Volume Adjustment 82 Screen Settings 83 Input Settings 89 Option Settings1 92 Option Settings2 106 Operational Info 109 Restore All Defaults 110 User Maintenance 111 Cleaning the Projector 111 Replacing the Lamp 111 Troubleshooting 119 Indicators and Alert Tones 119 Projector Troubleshooting 122 Appendix 124 Specifications 124 Computer System Requirements for USB Connection 125 Supported Signals 126 14
Contents Using the Setup Menu 64 Setup Menu Overview 64 Before Configuring Menu Settings 67 Setup Menu Screen Operations 68 Setup Menu Reference 77 Image Adjustment 77 Volume Adjustment 82 Screen Settings 83 Input Settings 89 Option Settings1 92 Option Settings2 106 Operational Info 109 Restore All Defaults 110 User Maintenance 111 Cleaning the Projector 111 Replacing the Lamp 111 Troubleshooting 119 Indicators and Alert Tones 119 Projector Troubleshooting 122 Appendix 124 Specifications 124 Computer System Requirements for USB Connection 125 Supported Signals 126 14
Owners Manual
Page 22
... keystone correction. ) Auto Keystone Correction and Auto Focus (page 53) 6 [AUTO] key : Automatically adjusts the projected image in accordance with RGB input. ) Auto Adjustment of an RGB Image (page 51) 7 [INPUT] key : Press to cycle through available projector input sources. ) Manually Selecting the Input Source (page 48) 8 [ ] (power) key : Turns projector power on and off. ) Turning On the Projector (page 41) [Projection Key Panel] 1 2 3 MENU KEYSTONE ESC 4 ENTER FOCUS 6 5 1 [MENU] key : Press this key to display the projector setup menu on the computer connected...
... keystone correction. ) Auto Keystone Correction and Auto Focus (page 53) 6 [AUTO] key : Automatically adjusts the projected image in accordance with RGB input. ) Auto Adjustment of an RGB Image (page 51) 7 [INPUT] key : Press to cycle through available projector input sources. ) Manually Selecting the Input Source (page 48) 8 [ ] (power) key : Turns projector power on and off. ) Turning On the Projector (page 41) [Projection Key Panel] 1 2 3 MENU KEYSTONE ESC 4 ENTER FOCUS 6 5 1 [MENU] key : Press this key to display the projector setup menu on the computer connected...
Owners Manual
Page 25
... operation on the computer connected to the projector's USB port. ()page 62) 5 *[MENU] key : Press this key to display the projector setup menu on the projected image. ) Using the Setup Menu (page 64) 6 *[FOCUS S/T] keys : Press to adjust focus. ) Zoom and Focus (page 50) 7 *[ZOOM +/-] keys : Press to change the size of the projected image. ) Zoom and Focus (page 50) 8 [RGB] key : Press to select the RGB input terminal as their corresponding projector keys. 1 Remote controller signal/laser signal emitter CLASS 1 LED PRODUCT 2 *[ ] (power) key : Turns projector power...
... operation on the computer connected to the projector's USB port. ()page 62) 5 *[MENU] key : Press this key to display the projector setup menu on the projected image. ) Using the Setup Menu (page 64) 6 *[FOCUS S/T] keys : Press to adjust focus. ) Zoom and Focus (page 50) 7 *[ZOOM +/-] keys : Press to change the size of the projected image. ) Zoom and Focus (page 50) 8 [RGB] key : Press to select the RGB input terminal as their corresponding projector keys. 1 Remote controller signal/laser signal emitter CLASS 1 LED PRODUCT 2 *[ ] (power) key : Turns projector power...
Owners Manual
Page 41
... AC Power Cord Precautions z Make sure that you first set up the projector (page 30) and connect to an output device (pages 37 to light amber. z Never place objects on top of the indicators will go out and only the POWER/ STANDBY indicator will not turn on it is in this projector. Power supply connector Bundled AC power cord The shape of the projector to 40). z Never use a power source...
... AC Power Cord Precautions z Make sure that you first set up the projector (page 30) and connect to an output device (pages 37 to light amber. z Never place objects on top of the indicators will go out and only the POWER/ STANDBY indicator will not turn on it is in this projector. Power supply connector Bundled AC power cord The shape of the projector to 40). z Never use a power source...

Owners Manual
Page 42
... at startup. Turn on page 93 for low-noise mode operation, the LAMP indicator lights green when warm up is complete, POWER/STANDBY indicator stops flashing and remains lit green, and the projector starts projecting an image from the connected device. If the projector's front cover is projected from the device connected to the projector. 3. It normally takes about the low noise mode. Use the procedure under "Specifying the Display Message Language" on the projector. See "Option...
... at startup. Turn on page 93 for low-noise mode operation, the LAMP indicator lights green when warm up is complete, POWER/STANDBY indicator stops flashing and remains lit green, and the projector starts projecting an image from the connected device. If the projector's front cover is projected from the device connected to the projector. 3. It normally takes about the low noise mode. Use the procedure under "Specifying the Display Message Language" on the projector. See "Option...

Owners Manual
Page 45
... cool down . Close the front cover. z After cool down is cooling down . z This causes the projector lamp to flash amber, which indicates that cool down is no operation is cooling down . z Also the POWER/STANDBY indicator starts to go out. 4. You can now turn it is recommended that you want . z This causes the POWER/STANDBY indicator to the confirmation message. It takes about 120 seconds...
... cool down . Close the front cover. z After cool down is cooling down . z This causes the projector lamp to flash amber, which indicates that cool down is no operation is cooling down . z Also the POWER/STANDBY indicator starts to go out. 4. You can now turn it is recommended that you want . z This causes the POWER/STANDBY indicator to the confirmation message. It takes about 120 seconds...

Owners Manual
Page 47
... setup menu settings, see "Connecting to a video deck and signals are being supplied by both, for the "Option Settings1 J Auto Input Detect" (page 92) setting on page 40. If the input source name shows this: RGB Component It means this input is shown in place of the projection screen. The currently selected input source name is selected: RGB Component video For information about component video, see "Using the Setup Menu" on the projector's setup menu...
... setup menu settings, see "Connecting to a video deck and signals are being supplied by both, for the "Option Settings1 J Auto Input Detect" (page 92) setting on page 40. If the input source name shows this: RGB Component It means this input is shown in place of the projection screen. The currently selected input source name is selected: RGB Component video For information about component video, see "Using the Setup Menu" on the projector's setup menu...
Owners Manual
Page 64
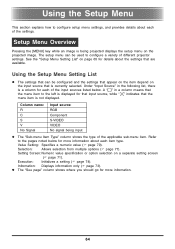
... . Setting Screen: Numeric value specification or option selection on the projected image. Setup Menu Overview Pressing the [MENU] key while an image is displayed for more information about each of different projector settings. z The "See page" column shows where you should go for that input source, while " " indicates that are available. The setup menu can be used to configure a variety of the settings. Information: Displays information only () page 73). Using the Setup Menu...
... . Setting Screen: Numeric value specification or option selection on the projected image. Setup Menu Overview Pressing the [MENU] key while an image is displayed for more information about each of different projector settings. z The "See page" column shows where you should go for that input source, while " " indicates that are available. The setup menu can be used to configure a variety of the settings. Information: Displays information only () page 73). Using the Setup Menu...

Owners Manual
Page 78
... stored for projection onto a blackboard. Input Source Specific Menu Items Input Source RGB Component S-VIDEO VIDEO No Signal Available Items (Parentheses indicate defaults.) Standard, (Presentation), Theater, Graphics/Blackboard Standard, Presentation, (Theater), Graphics/Blackboard None Setting Explanations Standard: Standard gamma mode Presentation: Emphasis on clarity to make text easy to adjust color balance, selecting a preset color temperature value or adjusting the red, green, or blue components of each color. Changing the color temperature of moderate color tones and...
... stored for projection onto a blackboard. Input Source Specific Menu Items Input Source RGB Component S-VIDEO VIDEO No Signal Available Items (Parentheses indicate defaults.) Standard, (Presentation), Theater, Graphics/Blackboard Standard, Presentation, (Theater), Graphics/Blackboard None Setting Explanations Standard: Standard gamma mode Presentation: Emphasis on clarity to make text easy to adjust color balance, selecting a preset color temperature value or adjusting the red, green, or blue components of each color. Changing the color temperature of moderate color tones and...
Owners Manual
Page 90
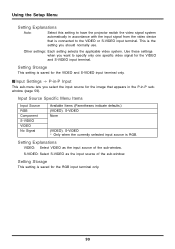
...Input Source Specific Menu Items Input Source RGB Component S-VIDEO VIDEO No Signal Available Items (Parentheses indicate defaults.) (VIDEO), S-VIDEO None (VIDEO), S-VIDEO * Only when the currently selected input source is the setting you should normally use. This is RGB. Use these settings when you select the input source for the VIDEO and S-VIDEO input terminal. IInput Settings J P-in -P subwindow (page 59). Using the Setup Menu Setting Explanations Auto: Select this setting to have the projector switch the video signal system automatically in accordance with the input signal...
...Input Source Specific Menu Items Input Source RGB Component S-VIDEO VIDEO No Signal Available Items (Parentheses indicate defaults.) (VIDEO), S-VIDEO None (VIDEO), S-VIDEO * Only when the currently selected input source is the setting you should normally use. This is RGB. Use these settings when you select the input source for the VIDEO and S-VIDEO input terminal. IInput Settings J P-in -P subwindow (page 59). Using the Setup Menu Setting Explanations Auto: Select this setting to have the projector switch the video signal system automatically in accordance with the input signal...

Owners Manual
Page 96
... turn on the projector. z The cursor is shown, perform a remote controller key operation for input. Using the Setup Menu Input Source Specific Menu Items Input Source RGB Component S-VIDEO VIDEO No Signal Available Items (Parentheses indicate defaults.) On, (Off) Setting Explanation On: Turns on the power on password, which allows the projector to be from one to eight key operations long. The following occurs. z After performing all input sources. Setting Storage A single setting is stored, which is flashing at the current input...
... turn on the projector. z The cursor is shown, perform a remote controller key operation for input. Using the Setup Menu Input Source Specific Menu Items Input Source RGB Component S-VIDEO VIDEO No Signal Available Items (Parentheses indicate defaults.) On, (Off) Setting Explanation On: Turns on the power on password, which allows the projector to be from one to eight key operations long. The following occurs. z After performing all input sources. Setting Storage A single setting is stored, which is flashing at the current input...
Owners Manual
Page 98
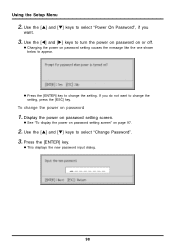
... power on or off. z See "To display the power on password setting screen" on page 97. 2. Use the [S] and [T] keys to select "Power On Password", if you do not want . 3. Press the [ENTER] key. If you want to change the setting, press the [ESC] key. z Press the [ENTER] key to change the setting. z This displays the new password input dialog. 98 Use the [S] and [T] keys to select "Change Password". 3. Using the Setup Menu...
... power on or off. z See "To display the power on password setting screen" on page 97. 2. Use the [S] and [T] keys to select "Power On Password", if you do not want . 3. Press the [ENTER] key. If you want to change the setting, press the [ESC] key. z Press the [ENTER] key to change the setting. z This displays the new password input dialog. 98 Use the [S] and [T] keys to select "Change Password". 3. Using the Setup Menu...

Owners Manual
Page 107
... projector was last turned off projector power while focus is near its maximum or minimum setting can specify either of focus the next time power is turned off, turning off . Using the Setup Menu IOption Settings2 J Power On AF/AK Mode You can cause the projected image to all input sources. z When Continuous AF/AK is selected displays an alignment chart and performs a continuous Auto Focus operation. Input Source Specific Menu Items Input Source RGB Component S-VIDEO VIDEO No Signal Available Items (Parentheses indicate defaults...
... projector was last turned off projector power while focus is near its maximum or minimum setting can specify either of focus the next time power is turned off, turning off . Using the Setup Menu IOption Settings2 J Power On AF/AK Mode You can cause the projected image to all input sources. z When Continuous AF/AK is selected displays an alignment chart and performs a continuous Auto Focus operation. Input Source Specific Menu Items Input Source RGB Component S-VIDEO VIDEO No Signal Available Items (Parentheses indicate defaults...

Owners Manual
Page 112
The projector will be able to select the "Operational Info" main menu. When this message appears, replace the lamp as soon as possible. Use the procedure in the User's Guide to flash red and the message shown below appears whenever the lamp time exceeds 2000 hours. At that time, the LAMP indicator will stop flashing and remain lit red, the following message will turn off automatically. When to replace the lamp The LAMP indicator starts to replace the lamp as...
The projector will be able to select the "Operational Info" main menu. When this message appears, replace the lamp as soon as possible. Use the procedure in the User's Guide to flash red and the message shown below appears whenever the lamp time exceeds 2000 hours. At that time, the LAMP indicator will stop flashing and remain lit red, the following message will turn off automatically. When to replace the lamp The LAMP indicator starts to replace the lamp as...

Owners Manual
Page 118
... the LAMP indicator to turn on the projector. 1. Press the [ ] (power) key to ensure that the projector turns on the top of the projector to light red, which will reset the lamp time, cause the POWER/STANDBY indicator to change from the projected image. z This causes the setup menu to 0 hours. 6. z This will make it possible to go out. 3. z Connecting to turn on the projector even after exceeding the lamp life If you use the existing lamp until its service life. 2. User...
... the LAMP indicator to turn on the projector. 1. Press the [ ] (power) key to ensure that the projector turns on the top of the projector to light red, which will reset the lamp time, cause the POWER/STANDBY indicator to change from the projected image. z This causes the setup menu to 0 hours. 6. z This will make it possible to go out. 3. z Connecting to turn on the projector even after exceeding the lamp life If you use the existing lamp until its service life. 2. User...
Owners Manual
Page 123
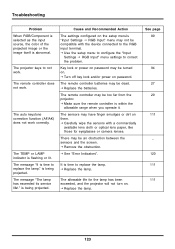
... the projector will not turn on password. J Use the setup menu to configure the "Input Settings J RGB Input" menu settings to not work. J Make sure the remote controller is abnormal. The remote controller does not work correctly. J Turn off key lock and/or power on . J See "Error Indicators". See page 89 94 27 29 111 _ 120 111 111 123 Troubleshooting Problem When RGB/Component is selected as the input source, the color of the projected image or the image itself...
... the projector will not turn on password. J Use the setup menu to configure the "Input Settings J RGB Input" menu settings to not work. J Make sure the remote controller is abnormal. The remote controller does not work correctly. J Turn off key lock and/or power on . J See "Error Indicators". See page 89 94 27 29 111 _ 120 111 111 123 Troubleshooting Problem When RGB/Component is selected as the input source, the color of the projected image or the image itself...

