
Owners Manual
Page 1
E DATA PROJECTOR XJ-450 User's Guide Keep this manual in a safe place for future reference.
E DATA PROJECTOR XJ-450 User's Guide Keep this manual in a safe place for future reference.

Owners Manual
Page 12
... can leak, which leads to malfunction of and damage to change without the permission of CASIO COMPUTER CO., LTD. • CASIO COMPUTER CO., LTD. Batteries can remove its entirety, is forbidden without notice. • Copying of this manual, either in a weak solution of the case. Operating Precautions GNever leave dead batteries inside the...
... can leak, which leads to malfunction of and damage to change without the permission of CASIO COMPUTER CO., LTD. • CASIO COMPUTER CO., LTD. Batteries can remove its entirety, is forbidden without notice. • Copying of this manual, either in a weak solution of the case. Operating Precautions GNever leave dead batteries inside the...
Owners Manual
Page 22
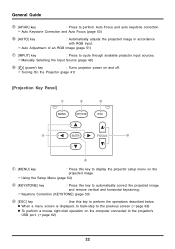
... projected image in accordance with RGB input. ) Auto Adjustment of an RGB Image (page 51) 7 [INPUT] key : Press to cycle through available projector input sources. ) Manually Selecting the Input Source (page 48) 8 [ ] (power) key : Turns projector power on and off. ) Turning On the Projector (page 41) [Projection Key Panel] 1 2 3 MENU KEYSTONE...
... projected image in accordance with RGB input. ) Auto Adjustment of an RGB Image (page 51) 7 [INPUT] key : Press to cycle through available projector input sources. ) Manually Selecting the Input Source (page 48) 8 [ ] (power) key : Turns projector power on and off. ) Turning On the Projector (page 41) [Projection Key Panel] 1 2 3 MENU KEYSTONE...

Owners Manual
Page 23
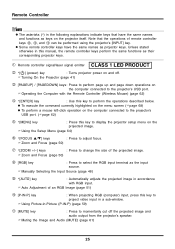
... (selection cursor) on the menu screen ()page 68) z To perform mouse operations on the computer connected to the projector's USB por ()page 62) *In this manual, cursor key operations are indicated as [S], [T], [X], [W]. 5 [ENTER] key : Use this key to perform the operations described below . z To execute the command currently highlighted on the...
... (selection cursor) on the menu screen ()page 68) z To perform mouse operations on the computer connected to the projector's USB por ()page 62) *In this manual, cursor key operations are indicated as [S], [T], [X], [W]. 5 [ENTER] key : Use this key to perform the operations described below . z To execute the command currently highlighted on the...
Owners Manual
Page 25
... a mouse left-click operation on the computer connected to the projector's USB port. ()page 62) 5 *[MENU] key : Press this manual, the remote controller keys perform the same functions as the input source. ) Manually Selecting the Input Source (page 48) 9 *[AUTO] key : Automatically adjusts the projected image in -Picture (P-IN-P) (page 59) bl...
... a mouse left-click operation on the computer connected to the projector's USB port. ()page 62) 5 *[MENU] key : Press this manual, the remote controller keys perform the same functions as the input source. ) Manually Selecting the Input Source (page 48) 9 *[AUTO] key : Automatically adjusts the projected image in -Picture (P-IN-P) (page 59) bl...

Owners Manual
Page 26
... on the computer connected to increase the size of sight. bt [S-VIDEO] key : Press to select the S-VIDEO input terminal as the input source. ) Manually Selecting the Input Source (page 48) ck [VOL +] / [VOL -] keys : Press the [+] key to increase volume, and the [-] key to ...) (page 53) br [D-ZOOM +] / [D-ZOOM -] keys: Press the [+] key to the projector's USB port. ()page 62) bq *[KEYSTONE] key : Press this manual, cursor key operations are indicated as [S], [T], [X], [W]. The [AF/AK] key lights red while this key to select the VIDEO input terminal as a pointer. Doing so...
... on the computer connected to increase the size of sight. bt [S-VIDEO] key : Press to select the S-VIDEO input terminal as the input source. ) Manually Selecting the Input Source (page 48) ck [VOL +] / [VOL -] keys : Press the [+] key to increase volume, and the [-] key to ...) (page 53) br [D-ZOOM +] / [D-ZOOM -] keys: Press the [+] key to the projector's USB port. ()page 62) bq *[KEYSTONE] key : Press this manual, cursor key operations are indicated as [S], [T], [X], [W]. The [AF/AK] key lights red while this key to select the VIDEO input terminal as a pointer. Doing so...

Owners Manual
Page 32
... correction are smaller. z Note that the distances provided above table define the ranges within ±5% of those provided. 32 Actual distances will be within which manual focus is possible. Getting Ready The following table shows the relationship between the distance and projected image size. The ranges for reference only.
... correction are smaller. z Note that the distances provided above table define the ranges within ±5% of those provided. 32 Actual distances will be within which manual focus is possible. Getting Ready The following table shows the relationship between the distance and projected image size. The ranges for reference only.

Owners Manual
Page 46
.... • Use the projector's various functions to projection of the projection position and angle. ) "Adjusting the Projector Elevation Angle" (page 35) Select the input source. ) "Manually Selecting the Input Source" (page 48) Adjust the projected image size and focus the image. ) "Zoom and Focus" (page 50) Start projection (presentation, video, etc...
.... • Use the projector's various functions to projection of the projection position and angle. ) "Adjusting the Projector Elevation Angle" (page 35) Select the input source. ) "Manually Selecting the Input Source" (page 48) Adjust the projected image size and focus the image. ) "Zoom and Focus" (page 50) Start projection (presentation, video, etc...

Owners Manual
Page 48
Projection Operations Manually Selecting the Input Source The procedure you should use to select the input source depends on whether you are using projector keys or remote controller ...
Projection Operations Manually Selecting the Input Source The procedure you should use to select the input source depends on whether you are using projector keys or remote controller ...

Owners Manual
Page 51
... in progress. z If an image is unclear following input source selection, power up, etc.) You can use the menu to disable auto adjustment and maintain manual settings. Projection Operations Auto Adjustment of an RGB Image When the input source is RGB (computer), the projector automatically adjusts vertical and horizontal positioning, frequency...
... in progress. z If an image is unclear following input source selection, power up, etc.) You can use the menu to disable auto adjustment and maintain manual settings. Projection Operations Auto Adjustment of an RGB Image When the input source is RGB (computer), the projector automatically adjusts vertical and horizontal positioning, frequency...
Owners Manual
Page 53
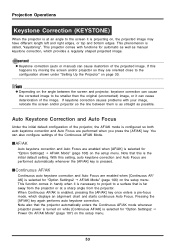
...) on , the projected image may have different length left and right edges, or top and bottom edges. This phenomenon is pressed. z Keystone correction (auto or manual) can also configure settings of the projected image. IContinuous AF/AK Continuous auto keystone correction and Auto Focus are performed when you press the [AF... oriented close to a surface that this happens try moving the screen and/or projector so they are enabled when [AF/AK] is as straight as manual keystone correction, which displays an alignment chart and starts continuous Auto Focus.
...) on , the projected image may have different length left and right edges, or top and bottom edges. This phenomenon is pressed. z Keystone correction (auto or manual) can also configure settings of the projected image. IContinuous AF/AK Continuous auto keystone correction and Auto Focus are performed when you press the [AF... oriented close to a surface that this happens try moving the screen and/or projector so they are enabled when [AF/AK] is as straight as manual keystone correction, which displays an alignment chart and starts continuous Auto Focus.

Owners Manual
Page 55
Relocate the projector to change the distance from step 2 under "Getting Ready" (page 30). Manual Keystone Correction Manual keystone correction can be used to select either "Vertical Keystone Correction" or "Horizontal Keystone Correction". 55 Perform the procedure starting..., in accordance with the information under "Performing Auto Keystone Correction and Auto Focus while Continuous AF/AK is outside the auto focus range, use manual keystone correction 1. Projection Operations Auto Adjustment at Power On While [Continuous AF/AK] is pressed. z When [AF] is selected for "Option...
Relocate the projector to change the distance from step 2 under "Getting Ready" (page 30). Manual Keystone Correction Manual keystone correction can be used to select either "Vertical Keystone Correction" or "Horizontal Keystone Correction". 55 Perform the procedure starting..., in accordance with the information under "Performing Auto Keystone Correction and Auto Focus while Continuous AF/AK is outside the auto focus range, use manual keystone correction 1. Projection Operations Auto Adjustment at Power On While [Continuous AF/AK] is pressed. z When [AF] is selected for "Option...

Owners Manual
Page 56
.... After the settings are -30 to +30 degrees vertically, and -30 to appear on the currently selected bar left or right. z The allowable ranges for manual keystone correction are the way you want , press the [ESC] key or the [KEYSTONE] key. To adjust the volume level 1. z This causes the [Volume] screen...
.... After the settings are -30 to +30 degrees vertically, and -30 to appear on the currently selected bar left or right. z The allowable ranges for manual keystone correction are the way you want , press the [ESC] key or the [KEYSTONE] key. To adjust the volume level 1. z This causes the [Volume] screen...

Owners Manual
Page 63
..." is complete. To do this remote controller key: Cursor key [PAGE UP] [PAGE DOWN] [ENTER] [ESC] z Note that wireless mouse operations are not possible while a manual keystone correction (page 55), volume adjustment (page 56), image enlargement (page 57), or P-IN-P (page 59) operation is in progress, or while the menu is...
..." is complete. To do this remote controller key: Cursor key [PAGE UP] [PAGE DOWN] [ENTER] [ESC] z Note that wireless mouse operations are not possible while a manual keystone correction (page 55), volume adjustment (page 56), image enlargement (page 57), or P-IN-P (page 59) operation is in progress, or while the menu is...

Owners Manual
Page 81
...for some reason. When this happens use this setting to adjust the image frequency. z See "Image Adjustment J Frequency" for some reason, your manual frequency settings cause the image input from the computer to reappear. z This setting is possible only when RGB is selected as the input source. z... selected as the input source. Note that automatic adjustment is saved for some reason. IImage Adjustment J Phase This sub-menu lets you manually control the frequency of digital noise. The setting is not possible for the RGB input source only. If there are color errors or...
...for some reason. When this happens use this setting to adjust the image frequency. z See "Image Adjustment J Frequency" for some reason, your manual frequency settings cause the image input from the computer to reappear. z This setting is possible only when RGB is selected as the input source. z... selected as the input source. Note that automatic adjustment is saved for some reason. IImage Adjustment J Phase This sub-menu lets you manually control the frequency of digital noise. The setting is not possible for the RGB input source only. If there are color errors or...

Owners Manual
Page 107
... . For information about the focus setting, see "Auto Keystone Correction and Auto Focus" (page 53). Pressing the [AF/AK] key at this happens, adjust focus manually or press the [AF/AK] key. 107 z For more information about Continuous AF/AK, see "To focus the image" (page 50). Setting Storage A single setting...
... . For information about the focus setting, see "Auto Keystone Correction and Auto Focus" (page 53). Pressing the [AF/AK] key at this happens, adjust focus manually or press the [AF/AK] key. 107 z For more information about Continuous AF/AK, see "To focus the image" (page 50). Setting Storage A single setting...