Owners Manual
Page 3
... image 23 To delete an image 24 25 GETTING READY About This Manual 25 General Guide 26 Monitor Screen Contents 28 REC mode 28 PLAY mode 30 Changing the Contents of the Monitor Screen 31 Indicator Lamps 31 Attaching the Strap 32 Power Requirements 32 Charging Batteries 33 To load batteries 37... the batteries from the camera 37 Using AC Power 41 Turning the Camera On and Off 42 Configuring Power Saving Settings 44 Using the On-screen Menus 45 Configuring Display Language and Clock Settings ... 47 To configure display language and clock settings 48 3
... image 23 To delete an image 24 25 GETTING READY About This Manual 25 General Guide 26 Monitor Screen Contents 28 REC mode 28 PLAY mode 30 Changing the Contents of the Monitor Screen 31 Indicator Lamps 31 Attaching the Strap 32 Power Requirements 32 Charging Batteries 33 To load batteries 37... the batteries from the camera 37 Using AC Power 41 Turning the Camera On and Off 42 Configuring Power Saving Settings 44 Using the On-screen Menus 45 Configuring Display Language and Clock Settings ... 47 To configure display language and clock settings 48 3
Owners Manual
Page 4
...Recording an Image 51 Aiming the Camera 51 Recording an Image 52 Recording Precautions 54 About Auto Focus 54 About the REC Mode Monitor Screen 55 Using the Optical Viewfinder 55 Using Zoom 56 Optical Zoom 56 Digital Zoom 57 Using the Flash 58 Flash Unit Status 60 ...86 Selecting the Metering Mode 87 Using the Filter Function 88 Specifying Color Saturation 88 Specifying Contrast 89 Specifying Outline Sharpness 89 Turning the On-screen Grid On and Off 90 Turning Image Review On and Off 90 Assigning Functions to the [̇] and [̈] Keys 91 Specifying ...
...Recording an Image 51 Aiming the Camera 51 Recording an Image 52 Recording Precautions 54 About Auto Focus 54 About the REC Mode Monitor Screen 55 Using the Optical Viewfinder 55 Using Zoom 56 Optical Zoom 56 Digital Zoom 57 Using the Flash 58 Flash Unit Status 60 ...86 Selecting the Metering Mode 87 Using the Filter Function 88 Specifying Color Saturation 88 Specifying Contrast 89 Specifying Outline Sharpness 89 Turning the On-screen Grid On and Off 90 Turning Image Review On and Off 90 Assigning Functions to the [̇] and [̈] Keys 91 Specifying ...

Owners Manual
Page 5
... Image 96 Cropping an Image 97 Playing a Movie 99 Displaying the 9-image View 100 Selecting a Specific Image in the 9-image View 101 Displaying the Calendar Screen 101 Playing a Slide Show 102 To specify the slideshow images 104 To specify the slideshow time 105 To set the slideshow interval 105 Rotating the...
... Image 96 Cropping an Image 97 Playing a Movie 99 Displaying the 9-image View 100 Selecting a Specific Image in the 9-image View 101 Displaying the Calendar Screen 101 Playing a Slide Show 102 To specify the slideshow images 104 To specify the slideshow time 105 To set the slideshow interval 105 Rotating the...
Owners Manual
Page 6
...SETTINGS Specifying the File Name Serial Number Generation Method 123 Turning the Key Tone On and Off 124 Specifying an Image for the Startup Screen 124 Configuring Power Down Image Settings 125 Using the Alarm 127 To set an alarm 127 Stopping the Alarm 128 Setting the Clock 129... Time zone 129 To set the current time and date 130 Changing the Date Format 130 Using World Time 131 To display the World Time screen 131 To configure World Time settings 131 To configure summer time (DST) settings 132 Changing the Display Language 133 Configuring [ ] (REC) and [ ] (PLAY...
...SETTINGS Specifying the File Name Serial Number Generation Method 123 Turning the Key Tone On and Off 124 Specifying an Image for the Startup Screen 124 Configuring Power Down Image Settings 125 Using the Alarm 127 To set an alarm 127 Stopping the Alarm 128 Setting the Clock 129... Time zone 129 To set the current time and date 130 Changing the Date Format 130 Using World Time 131 To display the World Time screen 131 To configure World Time settings 131 To configure summer time (DST) settings 132 Changing the Display Language 133 Configuring [ ] (REC) and [ ] (PLAY...

Owners Manual
Page 9
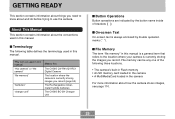
... image, while Pre-shot lets you and your current location. INTRODUCTION Features • Effective Pixels QV-R41: 4.00 million pixels (4.13 million total pixels) QV-R51: 5.00 million pixels (5.25 million total pixels) • 2.0-inch TFT color LCD monitor screen • 12X seamless zoom 3X optical zoom, 4X digital zoom • 9.7MB Flash memory...
... image, while Pre-shot lets you and your current location. INTRODUCTION Features • Effective Pixels QV-R41: 4.00 million pixels (4.13 million total pixels) QV-R51: 5.00 million pixels (5.25 million total pixels) • 2.0-inch TFT color LCD monitor screen • 12X seamless zoom 3X optical zoom, 4X digital zoom • 9.7MB Flash memory...
Owners Manual
Page 10
...other camera setup information). You can also be incorporated into Web pages quickly and easily. • Calendar screen A simple operation displays a full-month calendar on the monitor screen when the alarm time is reached. • Album Function HTML files are generated automatically to create an album... of an alarm clock. DPOF can also have a specific image appear on the camera's monitor screen. When connected directly to a printer that automatically loads images from your camera to your images come out just the way you intended...
...other camera setup information). You can also be incorporated into Web pages quickly and easily. • Calendar screen A simple operation displays a full-month calendar on the monitor screen when the alarm time is reached. • Album Function HTML files are generated automatically to create an album... of an alarm clock. DPOF can also have a specific image appear on the camera's monitor screen. When connected directly to a printer that automatically loads images from your camera to your images come out just the way you intended...

Owners Manual
Page 18
...;C to 40°C (32°F to 104°F). • Do not use of weak batteries can cause an error message to appear on the monitor screen (page 178). In areas subject to direct sunlight -
...;C to 40°C (32°F to 104°F). • Do not use of weak batteries can cause an error message to appear on the monitor screen (page 178). In areas subject to direct sunlight -

Owners Manual
Page 22
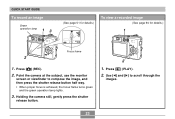
...;] and [̄] to select the language you want , and then press [SET]. 8. Use [̆] and [̄] to register the clock settings and exit the setting screen. 22 Use [̆] and [̄] to register the language setting. 4. Press the power button to record images. (See page 47 for details.) 1 2, 3, 4, 5, 6, 7, 8, 9 1. QUICK START GUIDE...
...;] and [̄] to select the language you want , and then press [SET]. 8. Use [̆] and [̄] to register the clock settings and exit the setting screen. 22 Use [̆] and [̄] to register the language setting. 4. Press the power button to record images. (See page 47 for details.) 1 2, 3, 4, 5, 6, 7, 8, 9 1. QUICK START GUIDE...
Owners Manual
Page 23
...; When proper focus is achieved, the focus frame turns green and the green operation lamp lights. 3. Point the camera at the subject, use the monitor screen or viewfinder to scroll through the images. 23 Holding the camera still, gently press the shutter release button. 2 1. QUICK START GUIDE To record an image...
...; When proper focus is achieved, the focus frame turns green and the green operation lamp lights. 3. Point the camera at the subject, use the monitor screen or viewfinder to scroll through the images. 23 Holding the camera still, gently press the shutter release button. 2 1. QUICK START GUIDE To record an image...
Owners Manual
Page 25
... brackets ([ ]). I File Memory The term "file memory" in this : The CASIO QV-R41/QV-R51 Digital Camera The location where the camera is currently storing images you record (page 52) The Rechargeable nickelmetal hydride batteries The CASIO BC-5H Charger Unit I On-screen Text On-screen text is currently storing the images you need to know about...
... brackets ([ ]). I File Memory The term "file memory" in this : The CASIO QV-R41/QV-R51 Digital Camera The location where the camera is currently storing images you record (page 52) The Rechargeable nickelmetal hydride batteries The CASIO BC-5H Charger Unit I On-screen Text On-screen text is currently storing the images you need to know about...

Owners Manual
Page 26
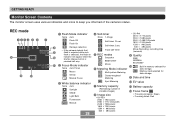
I Front 1 23 5 6 4 1 Shutter release button 2 Power button 3 Flash 4 Terminal cover 5 Self-timer lamp 6 Lens 7 [USB] port 7 I Back 890A B C D JIH G F E 8 Viewfinder 9 Operation lamp : [ ] (PLAY mode) A [ ] (REC mode) B Zoom controller C Terminal cover D Strap ring E [DC IN 3V] terminal F G [DISP] button H [SET] button I [MENU] button J Monitor Screen 26 GETTING READY General Guide The following illustrations show the names of each component, button, and switch on the camera.
I Front 1 23 5 6 4 1 Shutter release button 2 Power button 3 Flash 4 Terminal cover 5 Self-timer lamp 6 Lens 7 [USB] port 7 I Back 890A B C D JIH G F E 8 Viewfinder 9 Operation lamp : [ ] (PLAY mode) A [ ] (REC mode) B Zoom controller C Terminal cover D Strap ring E [DC IN 3V] terminal F G [DISP] button H [SET] button I [MENU] button J Monitor Screen 26 GETTING READY General Guide The following illustrations show the names of each component, button, and switch on the camera.
Owners Manual
Page 28
... card selected for None Auto Focus 6 Metering Mode indicator data storage. GETTING READY Monitor Screen Contents The monitor screen uses various indicators and icons to keep you informed of storable images) 8 Image size • QV-R51 2560 ҂ 1920 pixels 2560 ҂ 1712 (3:2)pixels 2048 ҂ 1536 ...way. 10s Self-timer 10 sec 2s Self-timer 2 sec x3 Triple self-timer 5 REC modes Snapshot BESTSHOT A 2 Focus Mode indicator Movie • QV-R41 2304 ҂ 1712 pixels 2240 ҂ 1680 pixels 2240 ҂ 1488 (3:2)pixels 1600 ҂ 1200 pixels 1280 ҂ 960 pixels 640 ҂...
... card selected for None Auto Focus 6 Metering Mode indicator data storage. GETTING READY Monitor Screen Contents The monitor screen uses various indicators and icons to keep you informed of storable images) 8 Image size • QV-R51 2560 ҂ 1920 pixels 2560 ҂ 1712 (3:2)pixels 2048 ҂ 1536 ...way. 10s Self-timer 10 sec 2s Self-timer 2 sec x3 Triple self-timer 5 REC modes Snapshot BESTSHOT A 2 Focus Mode indicator Movie • QV-R41 2304 ҂ 1712 pixels 2240 ҂ 1680 pixels 2240 ҂ 1488 (3:2)pixels 1600 ҂ 1200 pixels 1280 ҂ 960 pixels 640 ҂...

Owners Manual
Page 29
GETTING READY 1 5 1 Digital zoom indicator 2 Shutter speed value 2 • An out of range aperture or shutter speed causes the corresponding monitor screen 3 value to turn amber. 4 3 Aperture value 4 ISO sensitivity 5 Zoom indicator • Left side indicates optical zoom. • Right side indicates digital zoom. 29
GETTING READY 1 5 1 Digital zoom indicator 2 Shutter speed value 2 • An out of range aperture or shutter speed causes the corresponding monitor screen 3 value to turn amber. 4 3 Aperture value 4 ISO sensitivity 5 Zoom indicator • Left side indicates optical zoom. • Right side indicates digital zoom. 29

Owners Manual
Page 31
...and whether a lamp is being recorded. Red operation lamp 31 For details, see "Indicator Lamp Reference" on (page 84) Indicators off Monitor screen off the monitor screen in the following cases: In the PLAY mode, in the BESTSHOT mode, when not recording in the Movie mode • You cannot use ...the [DISP] button to change the contents of the monitor screen while a movie is lit or flashing. Indicators on (page 28) Histogram on page 172. Self-timer lamp Green operation lamp IMPORTANT! • You ...
...and whether a lamp is being recorded. Red operation lamp 31 For details, see "Indicator Lamp Reference" on (page 84) Indicators off Monitor screen off the monitor screen in the following cases: In the PLAY mode, in the BESTSHOT mode, when not recording in the Movie mode • You cannot use ...the [DISP] button to change the contents of the monitor screen while a movie is lit or flashing. Indicators on (page 28) Histogram on page 172. Self-timer lamp Green operation lamp IMPORTANT! • You ...
Owners Manual
Page 38
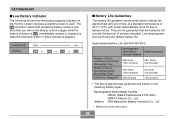
... on the following shows how the battery capacity indicator on the monitor screen changes as battery power is low. Alkaline :LR6 Matsushita Battery Industrial Co., Ltd. * Battery life varies with brand. 38 Charge Level Indicator High Approximate Battery Life (QV-R41/QV-R51) Low Rechargeable Nickel-Metal Hydride batteries Alkaline batteries Number of Shots...
... on the following shows how the battery capacity indicator on the monitor screen changes as battery power is low. Alkaline :LR6 Matsushita Battery Industrial Co., Ltd. * Battery life varies with brand. 38 Charge Level Indicator High Approximate Battery Life (QV-R41/QV-R51) Low Rechargeable Nickel-Metal Hydride batteries Alkaline batteries Number of Shots...
Owners Manual
Page 39
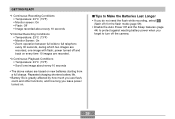
... • Flash: Off • Image recorded about every 10 seconds *2 Normal Recording Conditions • Temperature: 23°C (73°F) • Monitor Screen: On • Zoom operation between full wide to full telephoto every 30 seconds, during which two images are recorded, one image about every 10 seconds &#...
... • Flash: Off • Image recorded about every 10 seconds *2 Normal Recording Conditions • Temperature: 23°C (73°F) • Monitor Screen: On • Zoom operation between full wide to full telephoto every 30 seconds, during which two images are recorded, one image about every 10 seconds &#...
Owners Manual
Page 44
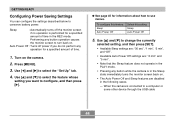
... [̄] to select the feature whose setting you do not perform any button while the camera is in the Sleep state immediately turns the monitor screen back on. • The Auto Power Off and Sleep features are : "2 min" and "5 min". • Note that the Sleep feature does not operate in... "30 sec", "1 min", "2 min", and "Off". • Available Auto Power Off settings are disabled in the REC mode. Auto Power Off : Turns off the monitor screen if no operation is connected to select the "Set Up" tab. 4. Use [̇] and [̈] to a computer or some other device through the USB cable...
... [̄] to select the feature whose setting you do not perform any button while the camera is in the Sleep state immediately turns the monitor screen back on. • The Auto Power Off and Sleep features are : "2 min" and "5 min". • Note that the Sleep feature does not operate in... "30 sec", "1 min", "2 min", and "Off". • Available Auto Power Off settings are disabled in the REC mode. Auto Power Off : Turns off the monitor screen if no operation is connected to select the "Set Up" tab. 4. Use [̇] and [̈] to a computer or some other device through the USB cable...

Owners Manual
Page 45
Press the power button or the [ ] (REC) button. • If you want to perform various operations. Press [MENU]. The menu that you can use to enter the PLAY mode instead, press the [ ] (PLAY) button. [ ][ ] 2. The following shows an example menu procedure in the REC mode or the PLAY mode. Tab [MENU] [SET] Settings Selection cursor (indicates the currently selected item) Power button 45 GETTING READY Using the On-screen Menus Pressing [MENU] displays menus on the monitor screen that appears depends on whether you are in the REC mode. 1.
Press the power button or the [ ] (REC) button. • If you want to perform various operations. Press [MENU]. The menu that you can use to enter the PLAY mode instead, press the [ ] (PLAY) button. [ ][ ] 2. The following shows an example menu procedure in the REC mode or the PLAY mode. Tab [MENU] [SET] Settings Selection cursor (indicates the currently selected item) Power button 45 GETTING READY Using the On-screen Menus Pressing [MENU] displays menus on the monitor screen that appears depends on whether you are in the REC mode. 1.

Owners Manual
Page 46
...[SET]. Press [̇]. Press the [MENU] button. 3. Example: To select the "REC Mode" item. 5. Press [̈] or press [SET]. GETTING READY G Menu Screen Operations When you want , and then press [SET] to move the selection cursor from the settings to the tab Move between the settings Display the ...options available for a setting Select an option Register an option selection and exit the menu screen Register an option selection and return to the menu screen Exit the menu screen Do this : Move between tabs Move from the tab to the settings Move from the tab to the...
...[SET]. Press [̇]. Press the [MENU] button. 3. Example: To select the "REC Mode" item. 5. Press [̈] or press [SET]. GETTING READY G Menu Screen Operations When you want , and then press [SET] to move the selection cursor from the settings to the tab Move between the settings Display the ...options available for a setting Select an option Register an option selection and exit the menu screen Register an option selection and return to the menu screen Exit the menu screen Do this : Move between tabs Move from the tab to the settings Move from the tab to the...

Owners Manual
Page 47
GETTING READY 6. Apply the setting and return to feature selection in step 3. Perform this : Apply the setting and exit the menu screen. Apply the setting and return to tab selection in step 4. Perform one of the following settings before using the camera to record images. • Display ...
GETTING READY 6. Apply the setting and return to feature selection in step 3. Perform this : Apply the setting and exit the menu screen. Apply the setting and return to tab selection in step 4. Perform one of the following settings before using the camera to record images. • Display ...


