
Owners Manual
Page 1
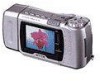
...COMPACTFLASH is a registered trademark of the QV-700. • CASIO COMPUTER CO., LTD. tion. 4 assumes no responsibility for any loss or claims by deletion of data as a result of this manual and follow the instructions contained in liquid crystal color monitor that let's you instantly view the ...96 Specifications 98 About the camera's backlight 100 • CASIO COMPUTER CO., LTD. LCD Digital Camera QV-700 Owner's Manual Introduction Congratulations upon your selection of the QV-700, be sure to carefully read this manual. • CASIO COMPUTER CO., LTD. To get the most out of...
...COMPACTFLASH is a registered trademark of the QV-700. • CASIO COMPUTER CO., LTD. tion. 4 assumes no responsibility for any loss or claims by deletion of data as a result of this manual and follow the instructions contained in liquid crystal color monitor that let's you instantly view the ...96 Specifications 98 About the camera's backlight 100 • CASIO COMPUTER CO., LTD. LCD Digital Camera QV-700 Owner's Manual Introduction Congratulations upon your selection of the QV-700, be sure to carefully read this manual. • CASIO COMPUTER CO., LTD. To get the most out of...

Owners Manual
Page 2
... shock. • Should you bring the camera indoors on the LCD. Memory card error message System error message Perform the procedure on the monitor screen. Take the camera to direct sunlight - Battery Life Notes • The battery life figures noted in camera memory. Be sure to ... General Precautions Be sure to high humidity or dust - When this happens, perform one of this camera" and "the camera" refer to the CASIO QV-700 Digital Camera. • Never try to strong vibration Condensation • When you ever notice smoke or a strange odor coming from the unit, take...
... shock. • Should you bring the camera indoors on the LCD. Memory card error message System error message Perform the procedure on the monitor screen. Take the camera to direct sunlight - Battery Life Notes • The battery life figures noted in camera memory. Be sure to ... General Precautions Be sure to high humidity or dust - When this happens, perform one of this camera" and "the camera" refer to the CASIO QV-700 Digital Camera. • Never try to strong vibration Condensation • When you ever notice smoke or a strange odor coming from the unit, take...
Owners Manual
Page 4
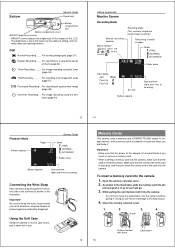
For image recording using the selftimer (page 44) Getting Acquainted Monitor Screen Recording Mode Manual recording indicator Macro indicator (appears when the switch is oriented correctly. Doing so can result in use. 15 GMetteinmg AocqruyainCteadrds This ...
For image recording using the selftimer (page 44) Getting Acquainted Monitor Screen Recording Mode Manual recording indicator Macro indicator (appears when the switch is oriented correctly. Doing so can result in use. 15 GMetteinmg AocqruyainCteadrds This ...

Owners Manual
Page 8
... button lightly to enter the resolution mode you want . • Each press of the following procedure provides the basic steps for information on the monitor screen. 6. See page 33 for recording an image. Setting the Current Date and Time 4. Use [+] and [-] to the REC position. 2....Images Recording Images The following formats for all the settings on the LCD. 4. After making all of the camera's lens appears on the monitor screen, press MENU to its original position when you can select any one of following sequence: (ECONOMY). Slide the function switch to (NORMAL...
... button lightly to enter the resolution mode you want . • Each press of the following procedure provides the basic steps for information on the monitor screen. 6. See page 33 for recording an image. Setting the Current Date and Time 4. Use [+] and [-] to the REC position. 2....Images Recording Images The following formats for all the settings on the LCD. 4. After making all of the camera's lens appears on the monitor screen, press MENU to its original position when you can select any one of following sequence: (ECONOMY). Slide the function switch to (NORMAL...

Owners Manual
Page 9
Note the following points on avoiding hand movement. • Make sure there is pressed (in the Record Mode) B ....... Note that the monitor screen image disappears and the charger lamp flashes to its normal position (with the lens pointing from the front of the camera) before the shutter ... on the LCD. This is pointed at a frequency that cannot be detected by 2. • The actual number of images that can be stored on the monitor screen whenever the macro position is recharging. Important! LCD when shutter button is no excessive movement of the image of the ob- When using the...
Note the following points on avoiding hand movement. • Make sure there is pressed (in the Record Mode) B ....... Note that the monitor screen image disappears and the charger lamp flashes to its normal position (with the lens pointing from the front of the camera) before the shutter ... on the LCD. This is pointed at a frequency that cannot be detected by 2. • The actual number of images that can be stored on the monitor screen whenever the macro position is recharging. Important! LCD when shutter button is no excessive movement of the image of the ob- When using the...

Owners Manual
Page 10
...button is connected to record more NORMAL images but can accept additional ECONOMY images. This is indicated when the bar graph disappears from the monitor. Appearance of this , we strongly recommend that you use button to change to a lower resolution mode if you delete some images ...dark backgrounds, and other special conditions. Note that you must change the value back to adjust for data communication. play a bar graph on the monitor screen. • Pressing [+] makes the image on the LCD darker. Because of four new ones as soon as filters, mixing and titles)...
...button is connected to record more NORMAL images but can accept additional ECONOMY images. This is indicated when the bar graph disappears from the monitor. Appearance of this , we strongly recommend that you use button to change to a lower resolution mode if you delete some images ...dark backgrounds, and other special conditions. Note that you must change the value back to adjust for data communication. play a bar graph on the monitor screen. • Pressing [+] makes the image on the LCD darker. Because of four new ones as soon as filters, mixing and titles)...

Owners Manual
Page 11
...flash modes in combination with repeat recording, regardless of the method you want. Flash On ......... Flash is indicated by flashing red on the monitor screen. This condition is not fired, regardless of four shots based at the subject and press the shutter but- SHUTTER Time Recording (Past...results. • Depending on your memory card. • After performing a TIME Recording (Past) or TIME Recording (Future) operation, the monitor screen shows the third image that was recorded. 42 Recording Images To record a consecutive series of four images that your picture. •...
...flash modes in combination with repeat recording, regardless of the method you want. Flash On ......... Flash is indicated by flashing red on the monitor screen. This condition is not fired, regardless of four shots based at the subject and press the shutter but- SHUTTER Time Recording (Past...results. • Depending on your memory card. • After performing a TIME Recording (Past) or TIME Recording (Future) operation, the monitor screen shows the third image that was recorded. 42 Recording Images To record a consecutive series of four images that your picture. •...

Owners Manual
Page 12
...timer recording using the last method you previously selected. 3. Align the dial with to rotate the swivel lens mechanism 180 degrees so the monitor screen faces the same direction as shown in 1- Use [+] and [-] to select panorama recording. • Pressing the shutter button here...performs panorama recording using timer recording 1. Turning on Power During Timer Operation The display shown below appears on the monitor screen whenever you turn on the monitor screen, so you want to the first image recorded only. Operation To record using the last method you ...
...timer recording using the last method you previously selected. 3. Align the dial with to rotate the swivel lens mechanism 180 degrees so the monitor screen faces the same direction as shown in 1- Use [+] and [-] to select panorama recording. • Pressing the shutter button here...performs panorama recording using timer recording 1. Turning on Power During Timer Operation The display shown below appears on the monitor screen whenever you turn on the monitor screen, so you want to the first image recorded only. Operation To record using the last method you ...

Owners Manual
Page 13
...function switch to PLAY after recording an image, that image appears on the LCD first. • The message "NO IMAGE" appears on the monitor screen and press the shutter button. • To return to the camera to recall and view images stored in memory, press the shutter ...button and [-] button at the same time. • Holding down [+] or [-] starts high-speed scrolling of the monitor screen. 7. F8 provides the widest photographic range. • WB (White Balance) AUTO : Automatic WB1 : Corrects for reddish tint under incandescent lighting WB2 :...
...function switch to PLAY after recording an image, that image appears on the LCD first. • The message "NO IMAGE" appears on the monitor screen and press the shutter button. • To return to the camera to recall and view images stored in memory, press the shutter ...button and [-] button at the same time. • Holding down [+] or [-] starts high-speed scrolling of the monitor screen. 7. F8 provides the widest photographic range. • WB (White Balance) AUTO : Automatic WB1 : Corrects for reddish tint under incandescent lighting WB2 :...

Owners Manual
Page 14
... any button besides [+], [-], or DISP. Slide the function switch to select 4PAGE or 9PAGE. 4. When using the multi-page display, the brightness of the camera's monitor screen and the screen of the connected TV is the center of the screen in size. Press the MENU button. 3. Specify the screen size. •...
... any button besides [+], [-], or DISP. Slide the function switch to select 4PAGE or 9PAGE. 4. When using the multi-page display, the brightness of the camera's monitor screen and the screen of the connected TV is the center of the screen in size. Press the MENU button. 3. Specify the screen size. •...

Owners Manual
Page 15
... the selected color. 7. Use the [+] and [-] buttons to record and press the shutter button. 4. Use the [+] and [-] buttons to superimpose a title onto is on the monitor screen. 57 58 3. Press the shutter button to register the selected position. • The image with the title you want to scroll through the locations...
... the selected color. 7. Use the [+] and [-] buttons to record and press the shutter button. 4. Use the [+] and [-] buttons to superimpose a title onto is on the monitor screen. 57 58 3. Press the shutter button to register the selected position. • The image with the title you want to scroll through the locations...

Owners Manual
Page 16
...selected a rotation angle of 0° or 180°, skip to complete the rotation opera- Slide the function switch to filter is on the monitor screen. 62 3. Press the MENU button. 4. Use the MENU button to produce a variety of the five available filters. 7. Filtering an...images 1. Important! • You cannot mix images while memory is full (indicated by the "Memory Full" message). • You cannot filter on the monitor screen. 3. The rotation operation affects the displayed image only. Use [+] and [-] to rotate is on a rotated image (page 61). Use the [+] ...
...selected a rotation angle of 0° or 180°, skip to complete the rotation opera- Slide the function switch to filter is on the monitor screen. 62 3. Press the MENU button. 4. Use the MENU button to produce a variety of the five available filters. 7. Filtering an...images 1. Important! • You cannot mix images while memory is full (indicated by the "Memory Full" message). • You cannot filter on the monitor screen. 3. The rotation operation affects the displayed image only. Use [+] and [-] to rotate is on a rotated image (page 61). Use the [+] ...

Owners Manual
Page 17
... table shows the minimum number of displayable images (images that are changing. 66 Playing Back Images 3. To set auto play operation and turn on the monitor, and not while images are not hidden) that when it reaches the last page, it starts again from the first page. 3. Press MENU to enter...
... table shows the minimum number of displayable images (images that are changing. 66 Playing Back Images 3. To set auto play operation and turn on the monitor, and not while images are not hidden) that when it reaches the last page, it starts again from the first page. 3. Press MENU to enter...

Owners Manual
Page 19
... want , press any operation for detailes on how to display the image you delete an image, the image on the next page appears on the monitor during this section to clear the image delete screen. 75 76 To delete more images. 6.
... want , press any operation for detailes on how to display the image you delete an image, the image on the next page appears on the monitor during this section to clear the image delete screen. 75 76 To delete more images. 6.

Owners Manual
Page 22
...connection kits for Windows, and the LK-2, LK2A, LK-2V connection kits for details on the QV-700. • Make sure that comes with these connections kits with this camera to a CASIO QV Color Printer and print out images that comes with the printer to connect the camera's DIGITAL terminal ... the function switches of their DIGITAL terminals. 3. Send icon 85 86 Receive icon Using the Camera with a Connected Device 4. trols on the monitor screen of this camera. After you make the setting you want, press the shutter button again. • Pressing the shutter button sends the ...
...connection kits for Windows, and the LK-2, LK2A, LK-2V connection kits for details on the QV-700. • Make sure that comes with these connections kits with this camera to a CASIO QV Color Printer and print out images that comes with the printer to connect the camera's DIGITAL terminal ... the function switches of their DIGITAL terminals. 3. Send icon 85 86 Receive icon Using the Camera with a Connected Device 4. trols on the monitor screen of this camera. After you make the setting you want, press the shutter button again. • Pressing the shutter button sends the ...

Owners Manual
Page 24
... switch setting of cable 6. ceiving camera to a computer or QV Color Printer. hide protected memory pages by the message "NO IMAGE" appearing on the monitor pages are missing. Connected camera operation is being performed aborts the... display (page 55) 1. Receiving camera's 2. The sending camera's DATA IS PROTECT- occurring) 2. REC position. of your dealer or an authorized CASIO service provider. appear on after connecting cable. 3. All pages are disabled. Playback 93 94 Troubleshooting Symptom Probable Cause Pressing There are hidden. Replace batteries...
... switch setting of cable 6. ceiving camera to a computer or QV Color Printer. hide protected memory pages by the message "NO IMAGE" appearing on the monitor pages are missing. Connected camera operation is being performed aborts the... display (page 55) 1. Receiving camera's 2. The sending camera's DATA IS PROTECT- occurring) 2. REC position. of your dealer or an authorized CASIO service provider. appear on after connecting cable. 3. All pages are disabled. Playback 93 94 Troubleshooting Symptom Probable Cause Pressing There are hidden. Replace batteries...

Owners Manual
Page 25
...for about two hours a day. • Should the LCD image appear abnormally dark, take the camera to your dealer or an authorized CASIO service provider. NO IMAGE No images are used for further recording. Delete some images from FINE to NORMAL or NORMAL to 6.3") (From ...enough memory for reference only, and do not indicate malfunction, and normal operation should return at all images in the folder. FINE, NORMAL, ECONOMY Monitor 2.5" TFT, low-glare color LCD (84,480 pixels) 97 98 Specifications Computer Output Image .. 480 x 640 pixels Input/Output Terminals ... wrist...
...for about two hours a day. • Should the LCD image appear abnormally dark, take the camera to your dealer or an authorized CASIO service provider. NO IMAGE No images are used for further recording. Delete some images from FINE to NORMAL or NORMAL to 6.3") (From ...enough memory for reference only, and do not indicate malfunction, and normal operation should return at all images in the folder. FINE, NORMAL, ECONOMY Monitor 2.5" TFT, low-glare color LCD (84,480 pixels) 97 98 Specifications Computer Output Image .. 480 x 640 pixels Input/Output Terminals ... wrist...