
User Guide
Page 3
... Playing a Tone E-7 To adjust the brilliance of a tone E-8 Layering Two Tones E-9 Using Effects E-10 Using the Metronome E-10 Playing a Piano Duet E-11 Playing Back Built-in Songs .......... E-1 E-20 Parameter List E-21 Reverb E-21 Chorus E-21 Tone selection E-21 Brilliance (BRILLIANCE E-21... E-23 Connecting to a Computer E-24 Minimum Computer System Requirements E-24 Connecting the Digital Piano to the playback of the other track E-17 Playing Back from Digital Piano Memory E-17 Deleting Recorded Data E-18 Configuring Settings with the Keyboard E-19 To configure settings...
... Playing a Tone E-7 To adjust the brilliance of a tone E-8 Layering Two Tones E-9 Using Effects E-10 Using the Metronome E-10 Playing a Piano Duet E-11 Playing Back Built-in Songs .......... E-1 E-20 Parameter List E-21 Reverb E-21 Chorus E-21 Tone selection E-21 Brilliance (BRILLIANCE E-21... E-23 Connecting to a Computer E-24 Minimum Computer System Requirements E-24 Connecting the Digital Piano to the playback of the other track E-17 Playing Back from Digital Piano Memory E-17 Deleting Recorded Data E-18 Configuring Settings with the Keyboard E-19 To configure settings...
User Guide
Page 4
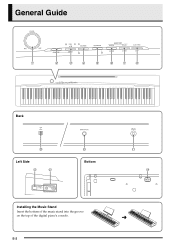
General Guide 1 2 34 5 678 Back 9 Left Side bm bn bk Bottom Installing the Music Stand Insert the bottom of the music stand into the groove on the top of the digital piano's console. E-2 bl bo
General Guide 1 2 34 5 678 Back 9 Left Side bm bn bk Bottom Installing the Music Stand Insert the bottom of the music stand into the groove on the top of the digital piano's console. E-2 bl bo
User Guide
Page 5
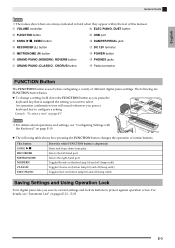
... save its current settings and lock its buttons to select. E-3 This button: SONG a RECORDER METRONOME MODERN CLASSIC ELEC PIANO Does this manual. 1 VOLUME controller 8 ELEC PIANO, DUET button 2 FUNCTION button 9 USB port 3 SONG a, DEMO button bk DAMPER PEDAL jack 4 RECORDER (L) button... bl DC 12V terminal 5 METRONOME (R) button bm POWER button 6 GRAND PIANO (MODERN), REVERB button bn PHONES jacks 7 GRAND PIANO (CLASSIC), CHORUS button bo Pedal connector FUNCTION Button The FUNCTION button is used when configuring a variety of different...
... save its current settings and lock its buttons to select. E-3 This button: SONG a RECORDER METRONOME MODERN CLASSIC ELEC PIANO Does this manual. 1 VOLUME controller 8 ELEC PIANO, DUET button 2 FUNCTION button 9 USB port 3 SONG a, DEMO button bk DAMPER PEDAL jack 4 RECORDER (L) button... bl DC 12V terminal 5 METRONOME (R) button bm POWER button 6 GRAND PIANO (MODERN), REVERB button bn PHONES jacks 7 GRAND PIANO (CLASSIC), CHORUS button bo Pedal connector FUNCTION Button The FUNCTION button is used when configuring a variety of different...
User Guide
Page 6
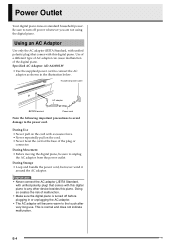
...-A12150LW • Use the supplied power cord to the touch after very long use. During Use • Never pull on the cord with this digital piano. During Storage • Loop and bundle the power cord, but never wind it around the AC adaptor. Doing so creates the risk of malfunction. &#... or connector. Be sure to unplug the AC adaptor from the power outlet. This is turned off power whenever you are not using the digital piano. Using an AC Adaptor Use only the AC adaptor (JEITA Standard, with unified polarity plug) that comes with excessive force. • Never repeatedly pull on...
...-A12150LW • Use the supplied power cord to the touch after very long use. During Use • Never pull on the cord with this digital piano. During Storage • Loop and bundle the power cord, but never wind it around the AC adaptor. Doing so creates the risk of malfunction. &#... or connector. Be sure to unplug the AC adaptor from the power outlet. This is turned off power whenever you are not using the digital piano. Using an AC Adaptor Use only the AC adaptor (JEITA Standard, with unified polarity plug) that comes with excessive force. • Never repeatedly pull on...

User Guide
Page 7
...If the plug of the cord that you connect to the level you want. A monaural standard plug will go. Adjust volume using the digital piano's VOLUME controller. Make sure that require an adaptor plug, make sure that you do not set the volume level too high when using headphones...Figure 2. To protect your hearing, make sure you do , nothing will result in output of only one of the types of the digital piano's PHONES jack Pin plug Audio amplifier AUX IN jack, etc. Connecting Headphones Left side Commercially available headphones PHONES jacks Stereo mini plug Connect ...
...If the plug of the cord that you connect to the level you want. A monaural standard plug will go. Adjust volume using the digital piano's VOLUME controller. Make sure that require an adaptor plug, make sure that you do not set the volume level too high when using headphones...Figure 2. To protect your hearing, make sure you do , nothing will result in output of only one of the types of the digital piano's PHONES jack Pin plug Audio amplifier AUX IN jack, etc. Connecting Headphones Left side Commercially available headphones PHONES jacks Stereo mini plug Connect ...

User Guide
Page 8
... the CASIO website at the following URL. z Soft Pedal Pressing this pedal suppresses notes played on the keyboard after the pedal was pressed, and makes them sound softer. z Sostenuto Pedal Only the notes that are played while this pedal are depressed are specified for use with this digital piano. SP...SP-32 Pedal Functions z Damper Pedal In addition to the damper pedal functions described in order to use the SP-32 Pedal Unit. http://world.casio.com/ E-6 Connections Connecting a Pedal Connecting the supplied pedal (SP-3) to the DAMPER PEDAL jack makes it possible to use the pedal as the ...
... the CASIO website at the following URL. z Soft Pedal Pressing this pedal suppresses notes played on the keyboard after the pedal was pressed, and makes them sound softer. z Sostenuto Pedal Only the notes that are played while this pedal are depressed are specified for use with this digital piano. SP...SP-32 Pedal Functions z Damper Pedal In addition to the damper pedal functions described in order to use the SP-32 Pedal Unit. http://world.casio.com/ E-6 Connections Connecting a Pedal Connecting the supplied pedal (SP-3) to the DAMPER PEDAL jack makes it possible to use the pedal as the ...
User Guide
Page 9
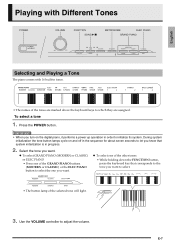
... system initialization is in tones. • The names of the selected tone will light. 3. E-7 During system initialization the tone button lamps cycle on the digital piano, it performs a power up operation in order to which they are marked above the keyboard keys to initialize its system. z To select one you want...
... system initialization is in tones. • The names of the selected tone will light. 3. E-7 During system initialization the tone button lamps cycle on the digital piano, it performs a power up operation in order to which they are marked above the keyboard keys to initialize its system. z To select one you want...

User Guide
Page 10
...tone, select any tone other effects are stereo sampled tones that can be assigned the tone that closely resembles the sound of an acoustic grand piano. Split Point Low Range High Range To adjust the brilliance of a tone 1. While holding down the FUNCTION button, use the BRILLIANCE keys ... musically delicate expressions. Bass Tones (BASS 1, BASS 2) Selecting either of the two BASS (LOWER) tones (1 or 2) in tones. This tone is a natural piano tone that was selected when you pressed the BASS 1 or BASS 2 key. • BASS 1 and BASS 2 let you effectively split the keyboard between two...
...tone, select any tone other effects are stereo sampled tones that can be assigned the tone that closely resembles the sound of an acoustic grand piano. Split Point Low Range High Range To adjust the brilliance of a tone 1. While holding down the FUNCTION button, use the BRILLIANCE keys ... musically delicate expressions. Bass Tones (BASS 1, BASS 2) Selecting either of the two BASS (LOWER) tones (1 or 2) in tones. This tone is a natural piano tone that was selected when you pressed the BASS 1 or BASS 2 key. • BASS 1 and BASS 2 let you effectively split the keyboard between two...

User Guide
Page 11
... (MODERN or CLASSIC) as you press the keyboard key for layering, first tone you press the ELEC PIANO button. • You cannot layer the BASS 1 or BASS 2 tone with Different Tones To adjust the volume balance between two layered tones 1. While holding down .... • You cannot perform the layer operation when recording to Track 2. E-9 Example: To layer HARPSICHORD and STRINGS 1 Playing with another tone by pressing the GRAND PIANO button or by holding down the keyboard key for the main tone as you select will be the main tone, while the second tone will...
... (MODERN or CLASSIC) as you press the keyboard key for layering, first tone you press the ELEC PIANO button. • You cannot layer the BASS 1 or BASS 2 tone with Different Tones To adjust the volume balance between two layered tones 1. While holding down .... • You cannot perform the layer operation when recording to Track 2. E-9 Example: To layer HARPSICHORD and STRINGS 1 Playing with another tone by pressing the GRAND PIANO button or by holding down the keyboard key for the main tone as you select will be the main tone, while the second tone will...

User Guide
Page 12
... starts the metronome. • The lamp above the SONG a button flash in time with a steady beat. Chorus : Adds more breadth to toggle chorus on digital piano power. While holding down the FUNCTION button, press the CLASSIC button to your notes resonate. Playing with Different Tones Using Effects Reverb : Makes your notes...
... starts the metronome. • The lamp above the SONG a button flash in time with a steady beat. Chorus : Adds more breadth to toggle chorus on digital piano power. While holding down the FUNCTION button, press the CLASSIC button to your notes resonate. Playing with Different Tones Using Effects Reverb : Makes your notes...
User Guide
Page 13
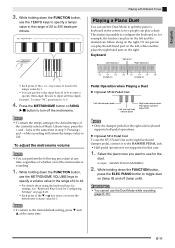
... it possible to toggle duet on page E-20. • Each press of the currently selected Music Library tune, press the + and - Select the piano tone you want to the initial default setting, press T and S at the same time. E-11 While holding down the FUNCTION button, press the ELEC...sounding. 1. z Optional SP-3 Pedal Unit To use for example, the teacher can perform the following procedure at the same time in step 3. Example: GRAND PIANO (MODERN) 2. IMPORTANT! • You cannot use the METRONOME VOLUME keys to specify a volume value in the range of whether or not the metronome is ...
... it possible to toggle duet on page E-20. • Each press of the currently selected Music Library tune, press the + and - Select the piano tone you want to the initial default setting, press T and S at the same time. E-11 While holding down the FUNCTION button, press the ELEC...sounding. 1. z Optional SP-3 Pedal Unit To use for example, the teacher can perform the following procedure at the same time in step 3. Example: GRAND PIANO (MODERN) 2. IMPORTANT! • You cannot use the METRONOME VOLUME keys to specify a volume value in the range of whether or not the metronome is ...

User Guide
Page 14
...example, if the initial default range is not enough when one person is playing the right hand part. 1. While holding down the FUNCTION and ELEC PIANO buttons, press the keyboard C key that you want located at C4 (middle C) of the left keyboard. NOTE • You can change the ... keyboards in octave units from their initial default ranges by exiting and then re-entering the Duet Mode. While holding down the FUNCTION and ELEC PIANO buttons, press the keyboard C key that you want located at C4 (middle C) of the right keyboard. Playing with Different Tones Changing the ...
...example, if the initial default range is not enough when one person is playing the right hand part. 1. While holding down the FUNCTION and ELEC PIANO buttons, press the keyboard C key that you want located at C4 (middle C) of the left keyboard. NOTE • You can change the ... keyboards in octave units from their initial default ranges by exiting and then re-entering the Duet Mode. While holding down the FUNCTION and ELEC PIANO buttons, press the keyboard C key that you want located at C4 (middle C) of the right keyboard. Playing with Different Tones Changing the ...

User Guide
Page 15
You can use the procedure below to select one song (61) that have been saved to digital piano memory from a computer*. key raises or lowers the song number by 1. • You can use the SONG SELECT keys ...keyboard is the one that is preset for more information. 1. Playing Back Built-in Songs FUNCTION RECORDER SONG a METRONOME English Your digital piano comes with a Music Library of 60 built-in song, it can take a number of seconds for the song data to be ...can download music data from the Internet and then transfer it from beginning to end. To change to digital piano memory.
You can use the procedure below to select one song (61) that have been saved to digital piano memory from a computer*. key raises or lowers the song number by 1. • You can use the SONG SELECT keys ...keyboard is the one that is preset for more information. 1. Playing Back Built-in Songs FUNCTION RECORDER SONG a METRONOME English Your digital piano comes with a Music Library of 60 built-in song, it can take a number of seconds for the song data to be ...can download music data from the Internet and then transfer it from beginning to end. To change to digital piano memory.

User Guide
Page 16
... will stop playback, press the SONG a button again. See "Configuring Settings with the song. PREPARATION • Select the song you turned off the first piano or second piano tone and play along with the Keyboard" on Right hand part off Left hand part off ). Press the SONG a button. • This starts playback... through in Songs 3. Press the SONG a button. • This starts the playback of duets. NOTE • Pressing the + and - Practicing with the Keyboard" on the piano. While a duet is reached.
... will stop playback, press the SONG a button again. See "Configuring Settings with the song. PREPARATION • Select the song you turned off the first piano or second piano tone and play along with the Keyboard" on Right hand part off Left hand part off ). Press the SONG a button. • This starts playback... through in Songs 3. Press the SONG a button. • This starts the playback of duets. NOTE • Pressing the + and - Practicing with the Keyboard" on the piano. While a duet is reached.

User Guide
Page 17
...or for later playback. Lit Flashing Off Playback Standby Record Standby Normal E-15 IMPORTANT! • CASIO COMPUTER CO., LTD. Using the RECORDER Button Each press of the data in digital piano memory. • The RECORDER button lamp will be deleted. You can record approximately 5,000 ... While playing back. . . Record Memory Capacity • You can record each track separately and then combine them so they play in digital piano memory for any other reason. Tracks A track is a container of recorded data, and a song consists of notes in the sequence shown below...
...or for later playback. Lit Flashing Off Playback Standby Record Standby Normal E-15 IMPORTANT! • CASIO COMPUTER CO., LTD. Using the RECORDER Button Each press of the data in digital piano memory. • The RECORDER button lamp will be deleted. You can record approximately 5,000 ... While playing back. . . Record Memory Capacity • You can record each track separately and then combine them so they play in digital piano memory for any other reason. Tracks A track is a container of recorded data, and a song consists of notes in the sequence shown below...

User Guide
Page 18
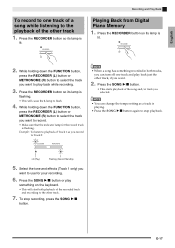
... RECORDER button lamp and the lamp of a song, you can record to the other track while listening to record. • Make sure that the digital piano is standing by for more information. While holding down the FUNCTION button, press the RECORDER (L) button or METRONOME (R) button to select the track you want...
... RECORDER button lamp and the lamp of a song, you can record to the other track while listening to record. • Make sure that the digital piano is standing by for more information. While holding down the FUNCTION button, press the RECORDER (L) button or METRONOME (R) button to select the track you want...
User Guide
Page 19
Recording and Play Back Playing Back from Digital Piano Memory 1. While holding down the FUNCTION button, press the RECORDER (L) button or METRONOME (R) button to select the track you want to play something recorded in ...
Recording and Play Back Playing Back from Digital Piano Memory 1. While holding down the FUNCTION button, press the RECORDER (L) button or METRONOME (R) button to select the track you want to play something recorded in ...

User Guide
Page 20
...RECORDER (L) button or METRONOME (R) button to select the track you selected in step 2 of this procedure to flash. NOTE • Only the digital piano's METRONOME (R) button and RECORDER (L) button are operational from step 3 until its lamp is lit. • This will cause the lamp of the ...2. Recording and Play Back Deleting Recorded Data The following steps. 1. Press the RECORDER button until you actually perform the delete operation in digital piano memory before you really do not need the data in step 4. Note that corresponds to delete. 3. Example: If you want to the track...
...RECORDER (L) button or METRONOME (R) button to select the track you selected in step 2 of this procedure to flash. NOTE • Only the digital piano's METRONOME (R) button and RECORDER (L) button are operational from step 3 until its lamp is lit. • This will cause the lamp of the ...2. Recording and Play Back Deleting Recorded Data The following steps. 1. Press the RECORDER button until you actually perform the delete operation in digital piano memory before you really do not need the data in step 4. Note that corresponds to delete. 3. Example: If you want to the track...

User Guide
Page 21
... Operation Tone" under "Parameter List" on the keyboard for Configuring Settings" on page E-20 to find the setting you want to configure. • The digital piano will sound an operation tone after it configures the setting. E-23. Release the FUNCTION button to complete the setting procedure. NOTE • You can use... setting you want. 3. English Configuring Settings with the Keyboard FUNCTION In addition to selecting tones and Music Library tunes, you also can configure the digital piano so no operation tone sounds in step 3. Type C: Value input using the + and -
... Operation Tone" under "Parameter List" on the keyboard for Configuring Settings" on page E-20 to find the setting you want to configure. • The digital piano will sound an operation tone after it configures the setting. E-23. Release the FUNCTION button to complete the setting procedure. NOTE • You can use... setting you want. 3. English Configuring Settings with the Keyboard FUNCTION In addition to selecting tones and Music Library tunes, you also can configure the digital piano so no operation tone sounds in step 3. Type C: Value input using the + and -

User Guide
Page 23
... input 8, enter 0, 8 (leading zero required). • This setting cannot be changed while recording. • This setting cannot be (page E-10) changed while recording. Default: GRAND PIANO (MODERN) -3 to 0 to 3 Default: 0 -24 to 0 to 24 Default: 0 Operation Type (page E-19) Description A Specifies the reverb of notes. (page E-10) A Controls the breadth of...
... input 8, enter 0, 8 (leading zero required). • This setting cannot be changed while recording. • This setting cannot be (page E-10) changed while recording. Default: GRAND PIANO (MODERN) -3 to 0 to 3 Default: 0 -24 to 0 to 24 Default: 0 Operation Type (page E-19) Description A Specifies the reverb of notes. (page E-10) A Controls the breadth of...


