

User Guide
Page 3
... Song, Auto Accompaniment volume E-26 Metronome Volume E-26 Auto Accompaniment mode (MODE E-26 Touch Response (TOUCH RESPONSE E-27 Keyboard Key (TRANSPOSE E-27 Keyboard tuning (TUNING E-27 Send Channel E-28 Local Control E-28 Operation Tone E-28 Back Up E-28 Operation Lock E-28 ...Using Auto Accompaniment E-16 Recording and Play Back E-20 Tracks E-20 Recording Your Keyboard Play E-21 Playing Back from Digital Piano Memory E-22 Deleting Recorded Data E-23 Configuring Settings with the Keyboard E-24 To configure settings with Different Tones E-7 Selecting and Playing a Tone ...
... Song, Auto Accompaniment volume E-26 Metronome Volume E-26 Auto Accompaniment mode (MODE E-26 Touch Response (TOUCH RESPONSE E-27 Keyboard Key (TRANSPOSE E-27 Keyboard tuning (TUNING E-27 Send Channel E-28 Local Control E-28 Operation Tone E-28 Back Up E-28 Operation Lock E-28 ...Using Auto Accompaniment E-16 Recording and Play Back E-20 Tracks E-20 Recording Your Keyboard Play E-21 Playing Back from Digital Piano Memory E-22 Deleting Recorded Data E-23 Configuring Settings with the Keyboard E-24 To configure settings with Different Tones E-7 Selecting and Playing a Tone ...

User Guide
Page 5
... to configure a setting. z To change a setting, hold down the TONE/SETTING button as you press the keyboard key that is used when configuring a variety of different digital piano settings. An operation confirmation tone will sound whenever you press... a keyboard key to protect against operation errors. E-3 For details, see "Configuring Settings with the Keyboard" on page E-24. z For details about operations and settings, see "Parameter List" on page E-8....
... to configure a setting. z To change a setting, hold down the TONE/SETTING button as you press the keyboard key that is used when configuring a variety of different digital piano settings. An operation confirmation tone will sound whenever you press... a keyboard key to protect against operation errors. E-3 For details, see "Configuring Settings with the Keyboard" on page E-24. z For details about operations and settings, see "Parameter List" on page E-8....
User Guide
Page 7
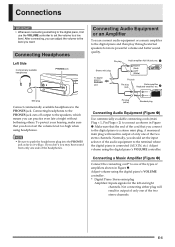
... types of the two stereo channels. Stereo mini plug RIGHT (Red) LEFT (White) To digital piano's PHONES jack Pin jack Pin plug (red) Guitar amplifier Keyboard amplifier, etc. Make sure that you may hear sound from only one of the audio equipment to the terminal where the digital piano is a stereo...
... types of the two stereo channels. Stereo mini plug RIGHT (Red) LEFT (White) To digital piano's PHONES jack Pin jack Pin plug (red) Guitar amplifier Keyboard amplifier, etc. Make sure that you may hear sound from only one of the audio equipment to the terminal where the digital piano is a stereo...

User Guide
Page 8
... Bundled and Optional Accessories Use only accessories that are played while this pedal will cause notes to reverberate just like the damper pedal on the keyboard after the pedal was pressed, and makes them sound softer. Connections Connecting a Pedal DAMPER PEDAL jack Connecting the supplied pedal (SP-3) to the DAMPER PEDAL...
... Bundled and Optional Accessories Use only accessories that are played while this pedal will cause notes to reverberate just like the damper pedal on the keyboard after the pedal was pressed, and makes them sound softer. Connections Connecting a Pedal DAMPER PEDAL jack Connecting the supplied pedal (SP-3) to the DAMPER PEDAL...

User Guide
Page 9
... on page E-8 for information about six seconds to let you know that can select these tones, see "Selecting a Tone Using the Keyboard Keys" on the digital piano. The MODERN and CLASSIC tones are kept to familiarize yourself with Different Tones / METRONOME POWER VOLUME TONE... effects are stereo sampled tones that system initialization is marked above the currently selected button. • See "Selecting a Tone Using the Keyboard Keys" on the piano, it has relatively strong reverb. During system initialization, the LR button lamps flash for lesson and practice sessions....
... on page E-8 for information about six seconds to let you know that can select these tones, see "Selecting a Tone Using the Keyboard Keys" on the digital piano. The MODERN and CLASSIC tones are kept to familiarize yourself with Different Tones / METRONOME POWER VOLUME TONE... effects are stereo sampled tones that system initialization is marked above the currently selected button. • See "Selecting a Tone Using the Keyboard Keys" on the piano, it has relatively strong reverb. During system initialization, the LR button lamps flash for lesson and practice sessions....

User Guide
Page 10
...) will assign the selected bass tone to select. Split Point Low Range High Range BASS 1 PIPE ORGAN (Currently selected tone.) NOTE • To return the keyboard to a single tone, select any tone other than BASS 1 or BASS 2. • You cannot select BASS 1 or BASS 2 when recording to the tone ...when you pressed the BASS 1 or BASS 2 key. • The BASS 1 and BASS 2 keys let you want to the low range (left side) of the keyboard. E-8 Example: Pipe Organ TONE/SETTING button Tone Setting Keys Bass Tones (BASS 1, BASS 2) Selecting either of the two bass tones (BASS 1, BASS 2) on the...
...) will assign the selected bass tone to select. Split Point Low Range High Range BASS 1 PIPE ORGAN (Currently selected tone.) NOTE • To return the keyboard to a single tone, select any tone other than BASS 1 or BASS 2. • You cannot select BASS 1 or BASS 2 when recording to the tone ...when you pressed the BASS 1 or BASS 2 key. • The BASS 1 and BASS 2 keys let you want to the low range (left side) of the keyboard. E-8 Example: Pipe Organ TONE/SETTING button Tone Setting Keys Bass Tones (BASS 1, BASS 2) Selecting either of the two bass tones (BASS 1, BASS 2) on the...

User Guide
Page 11
...; You cannot perform the layer operation when recording to layer. HARPSICHORD STRINGS 2. E-9 For this type of sound: Mellower and softer Brighter and harder Press this keyboard key: T S NOTE • To return a tone to its initial default setting, press T and S at the same time. 1. NOTE •...or BASS 2 tone with Different Tones Adjusting the Brilliance of -3 to 3. While holding down the TONE/SETTING button, simultaneously press the keyboard keys that correspond to the two tones that you want to Track 2. Example: To layer HARPSICHORD and STRINGS. Playing with another tone by...
...; You cannot perform the layer operation when recording to layer. HARPSICHORD STRINGS 2. E-9 For this type of sound: Mellower and softer Brighter and harder Press this keyboard key: T S NOTE • To return a tone to its initial default setting, press T and S at the same time. 1. NOTE •...or BASS 2 tone with Different Tones Adjusting the Brilliance of -3 to 3. While holding down the TONE/SETTING button, simultaneously press the keyboard keys that correspond to the two tones that you want to Track 2. Example: To layer HARPSICHORD and STRINGS. Playing with another tone by...

User Guide
Page 12
... specify a beat value of 20 to input all three digits. To change the beat, hold down the TONE/SETTING button, press the REVERB or CHORUS keyboard key.
... specify a beat value of 20 to input all three digits. To change the beat, hold down the TONE/SETTING button, press the REVERB or CHORUS keyboard key.

User Guide
Page 13
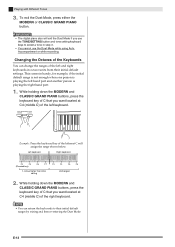
...installed, the left side damper pedal, while the right pedal is sounding. 1. The GRAND PIANO lamp will enter the Duet Mode and split the keyboard. Press the METRONOME button or X/„ button to select the piano tone you have virtually the same range. To adjust the metronome volume NOTE...time. If you want to use the Duet Mode to conduct lessons, with Different Tones Playing a Piano Duet You can play a duet. Keyboard Left keyboard Split point Right keyboard C3 C4 C5 C6 C3 C4 C5 C6 (middle C) (middle C) Pedals z Using the Optional SP-30 Pedal Unit Left side damper ...
...installed, the left side damper pedal, while the right pedal is sounding. 1. The GRAND PIANO lamp will enter the Duet Mode and split the keyboard. Press the METRONOME button or X/„ button to select the piano tone you have virtually the same range. To adjust the metronome volume NOTE...time. If you want to use the Duet Mode to conduct lessons, with Different Tones Playing a Piano Duet You can play a duet. Keyboard Left keyboard Split point Right keyboard C3 C4 C5 C6 C3 C4 C5 C6 (middle C) (middle C) Pedals z Using the Optional SP-30 Pedal Unit Left side damper ...
User Guide
Page 14
...by exiting and then re-entering the Duet Mode. This comes in step 3. • You cannot use the TONE/SETTING button and tone setting keyboard keys to their initial default settings. IMPORTANT! • The digital piano also will assign the range shown below. Playing with Different Tones 3. ...Changing the Octaves of the Keyboards You can return the keyboards to select a tone in handy, for example, if the initial default range is not enough when one person is playing the left...
...by exiting and then re-entering the Duet Mode. This comes in step 3. • You cannot use the TONE/SETTING button and tone setting keyboard keys to their initial default settings. IMPORTANT! • The digital piano also will assign the range shown below. Playing with Different Tones 3. ...Changing the Octaves of the Keyboards You can return the keyboards to select a tone in handy, for example, if the initial default range is not enough when one person is playing the left...

User Guide
Page 15
... the song number of the song you want to specify a song number. • Each press of seconds for the song that is being loaded, the keyboard keys and button operations will be loaded. E-13 While the data is playing. • You can use the SONG/RHYTHM SELECT keys to play . ... sequence, from 01 through 60. • The MUSIC LIBRARY button and X/„ button lamps flash during demo tune play in the song list on the keyboard as you use the value input keys (0 to 9) to stop operations described above the button is playing. If you are possible during playback. •...
... the song number of the song you want to specify a song number. • Each press of seconds for the song that is being loaded, the keyboard keys and button operations will be loaded. E-13 While the data is playing. • You can use the SONG/RHYTHM SELECT keys to play . ... sequence, from 01 through 60. • The MUSIC LIBRARY button and X/„ button lamps flash during demo tune play in the song list on the keyboard as you use the value input keys (0 to 9) to stop operations described above the button is playing. If you are possible during playback. •...

User Guide
Page 16
...the song number you want to turn off the left hand part or right hand part of a song and play along on the keyboard. 4. See "Configuring Settings with the Keyboard" on page E-24. 1. Left hand Right hand Both parts on page E-24 for more information. Practicing with a Music Library ... • You also can turn off in step 1. 3. Playing Back Built-in order to produce specific musical effects. See "Configuring Settings with the Keyboard" on Right hand part off Left hand part off . key operations too quickly can turn off the first piano or second piano tone and play...
...the song number you want to turn off the left hand part or right hand part of a song and play along on the keyboard. 4. See "Configuring Settings with the Keyboard" on page E-24. 1. Left hand Right hand Both parts on page E-24 for more information. Practicing with a Music Library ... • You also can turn off in step 1. 3. Playing Back Built-in order to produce specific musical effects. See "Configuring Settings with the Keyboard" on Right hand part off Left hand part off . key operations too quickly can turn off the first piano or second piano tone and play...

User Guide
Page 18
... while no chord is selected before you try playing chords. NOTE • With the rhythms listed below, make sure that CASIO CHORD, FINGERED, or FULL RANGE CHORD is fingered on the keyboard. 10 ROCK'N'ROLL 14 ARPEGGIO 1 15 ARPEGGIO 2 16 MARCH 1 17 MARCH 2 18 STRIDE PIANO 19 WALTZ 1 20...To enter "96", press keys 0, 9, 6. Auto Accompaniment makes it feel like you have your own private backup group with chords you select using simplified keyboard fingerings, or chords you all three digits. NOTE • Pressing the + and - While holding down the TONE/SETTING button, use the value input ...
... while no chord is selected before you try playing chords. NOTE • With the rhythms listed below, make sure that CASIO CHORD, FINGERED, or FULL RANGE CHORD is fingered on the keyboard. 10 ROCK'N'ROLL 14 ARPEGGIO 1 15 ARPEGGIO 2 16 MARCH 1 17 MARCH 2 18 STRIDE PIANO 19 WALTZ 1 20...To enter "96", press keys 0, 9, 6. Auto Accompaniment makes it feel like you have your own private backup group with chords you select using simplified keyboard fingerings, or chords you all three digits. NOTE • Pressing the + and - While holding down the TONE/SETTING button, use the value input ...

User Guide
Page 19
... their chord fingerings. 2. To stop accompaniment, press the X/„ button. Accompaniment keyboard range Melody keyboard range IMPORTANT! • In the CASIO CHORD mode, the keys in the CASIO CHORD mode. If you play four different types of chords using simplified fingerings in ...button to play chords normally, this keyboard range to play notes. While holding down the TONE/SETTING button, press a MODE keyboard key to Play Chords" on page E-24 for details about adjusting accompaniment volume. Example: Fingered NORMAL CASIO CHORD FULL RANGE CHORD FINGERED MODE Playing...
... their chord fingerings. 2. To stop accompaniment, press the X/„ button. Accompaniment keyboard range Melody keyboard range IMPORTANT! • In the CASIO CHORD mode, the keys in the CASIO CHORD mode. If you play four different types of chords using simplified fingerings in ...button to play chords normally, this keyboard range to play notes. While holding down the TONE/SETTING button, press a MODE keyboard key to Play Chords" on page E-24 for details about adjusting accompaniment volume. Example: Fingered NORMAL CASIO CHORD FULL RANGE CHORD FINGERED MODE Playing...

User Guide
Page 20
Playing a Rhythm Chord Types Example: Major Chords Pressing a single accompaniment keyboard range key in the CASIO CHORD mode will play a minor chord, press the accompaniment keyboard range key that corresponds to the major chord, while also pressing one other accompaniment keyboard range key to the right. C (C Major) Note names J C C#DEb E F F#GAbABb B C C#DEb E F Minor Chords To...
Playing a Rhythm Chord Types Example: Major Chords Pressing a single accompaniment keyboard range key in the CASIO CHORD mode will play a minor chord, press the accompaniment keyboard range key that corresponds to the major chord, while also pressing one other accompaniment keyboard range key to the right. C (C Major) Note names J C C#DEb E F F#GAbABb B C C#DEb E F Minor Chords To...

User Guide
Page 21
...notes. FULL RANGE CHORD recognizes the pressing of three or more ). FULL RANGE CHORD Mode Keyboard Accompaniment Keyboard/Melody Keyboard z Recognized Chords Type FINGERED Mode Chords Other Chords Chord Types 15 (See "FINGERED" on the keyboard as the bass note. Playing a Rhythm E-19 Fingered Chord Notes • Except for... above examples, you play a total of 38 different types of chords (the same chords available in the FINGERED mode plus 23 more keyboard keys anywhere on page E-18.) 23 For example, the following are at least six semitones between the lowest note and the next note...
...notes. FULL RANGE CHORD recognizes the pressing of three or more ). FULL RANGE CHORD Mode Keyboard Accompaniment Keyboard/Melody Keyboard z Recognized Chords Type FINGERED Mode Chords Other Chords Chord Types 15 (See "FINGERED" on the keyboard as the bass note. Playing a Rhythm E-19 Fingered Chord Notes • Except for... above examples, you play a total of 38 different types of chords (the same chords available in the FINGERED mode plus 23 more keyboard keys anywhere on page E-18.) 23 For example, the following are at least six semitones between the lowest note and the next note...
User Guide
Page 22
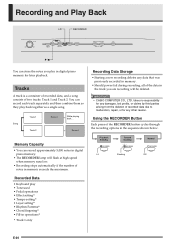
IMPORTANT! • CASIO COMPUTER CO., LTD. Using the RECORDER Button Each press of the data in the sequence shown below. Recorded Data • Keyboard play • Tone used • Pedal operations • Effect setting* • Tempo setting* • Layer setting* • Rhythm Patterns* • Chord fingering* • Fill-in ...
IMPORTANT! • CASIO COMPUTER CO., LTD. Using the RECORDER Button Each press of the data in the sequence shown below. Recorded Data • Keyboard play • Tone used • Pedal operations • Effect setting* • Tempo setting* • Layer setting* • Rhythm Patterns* • Chord fingering* • Fill-in ...

User Guide
Page 23
... This will start recording. Use the LR button to select the track to which you just recorded, press the X/„ button. 6. Recording Your Keyboard Play After recording to either of the tracks of a song 1. Start playing something on page E-10 for the record track is standing by pressing the... SYNCHRO/ FILL-IN button, and then play back the track you want . See "Using the Metronome" on the keyboard. • Recording will cause the RECORDER button and LR button lamps to change from flashing to lit. • To play a chord. •...
... This will start recording. Use the LR button to select the track to which you just recorded, press the X/„ button. 6. Recording Your Keyboard Play After recording to either of the tracks of a song 1. Start playing something on page E-10 for the record track is standing by pressing the... SYNCHRO/ FILL-IN button, and then play back the track you want . See "Using the Metronome" on the keyboard. • Recording will cause the RECORDER button and LR button lamps to change from flashing to lit. • To play a chord. •...

User Guide
Page 24
... button so its lamp is lit. Press the LR button until the lamp of the LR button cycles through the different possible track on the keyboard. • This will cause the L lamp to which you selected. Each press of only the track to flash. 4.
... button so its lamp is lit. Press the LR button until the lamp of the LR button cycles through the different possible track on the keyboard. • This will cause the L lamp to which you selected. Each press of only the track to flash. 4.

User Guide
Page 26
... by checking the "Operation Type" in the "Parameter List" on pages E-26 - Release the TONE/SETTING button to complete the setting procedure. Keyboard Setting Operation Types There are three types of operations that you want to configure. • The digital piano will sound an operation tone after it... on page E-25 to find the location on page E-26 to find out what operation type applies to each setting by pressing the T keyboard key once 4. Use "Keyboard Keys Used for the setting you want to configure, and note its details. 2. For details, see "bq Operation Tone" under "Parameter ...
... by checking the "Operation Type" in the "Parameter List" on pages E-26 - Release the TONE/SETTING button to complete the setting procedure. Keyboard Setting Operation Types There are three types of operations that you want to configure. • The digital piano will sound an operation tone after it... on page E-25 to find the location on page E-26 to find out what operation type applies to each setting by pressing the T keyboard key once 4. Use "Keyboard Keys Used for the setting you want to configure, and note its details. 2. For details, see "bq Operation Tone" under "Parameter ...


