
User Guide
Page 2
... apparatus (including amplifiers) that is seriously damaged. • The product is not intended for children under 3 years. • Use only CASIO AD-12 adaptor. • The AC adaptor is used in a particular installation. FCC WARNING Changes or modifications not expressly approved by one ... polarized or grounding-type plug. Never let children use attachments/accessories specified by the manufacturer, or sold with the cart, stand, tripod, bracket, or table specified by the manufacturer. 12. Read these instructions. 3. IMPORTANT SAFETY INSTRUCTIONS 1. Refer all servicing to...
... apparatus (including amplifiers) that is seriously damaged. • The product is not intended for children under 3 years. • Use only CASIO AD-12 adaptor. • The AC adaptor is used in a particular installation. FCC WARNING Changes or modifications not expressly approved by one ... polarized or grounding-type plug. Never let children use attachments/accessories specified by the manufacturer, or sold with the cart, stand, tripod, bracket, or table specified by the manufacturer. 12. Read these instructions. 3. IMPORTANT SAFETY INSTRUCTIONS 1. Refer all servicing to...

User Guide
Page 3
... E-9 Layering Two Tones E-9 Using Effects E-10 Using the Metronome E-10 Playing a Piano Duet E-11 Playing Back Built-in Songs .......... Contents General Guide E-2 Installing the Music Stand E-2 TONE/SETTING Button E-3 Saving Settings and Using Operation Lock E-3 Power Outlet E-4 Using an AC Adaptor E-4 Connections E-5 Connecting Headphones E-5 Connecting Audio Equipment or an Amplifier E-5 Connecting...
... E-9 Layering Two Tones E-9 Using Effects E-10 Using the Metronome E-10 Playing a Piano Duet E-11 Playing Back Built-in Songs .......... Contents General Guide E-2 Installing the Music Stand E-2 TONE/SETTING Button E-3 Saving Settings and Using Operation Lock E-3 Power Outlet E-4 Using an AC Adaptor E-4 Connections E-5 Connecting Headphones E-5 Connecting Audio Equipment or an Amplifier E-5 Connecting...
User Guide
Page 4
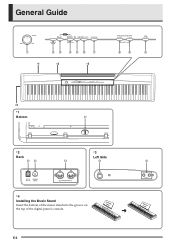
General Guide 1 ∗1 23 456 7 ∗2 ∗4 89 bk ∗3 *1 Bottom bl *2 *3 Back Left Side bm bn bo bp bq *4 Installing the Music Stand Insert the bottom of the music stand into the groove on the top of the digital piano's console. E-2
General Guide 1 ∗1 23 456 7 ∗2 ∗4 89 bk ∗3 *1 Bottom bl *2 *3 Back Left Side bm bn bo bp bq *4 Installing the Music Stand Insert the bottom of the music stand into the groove on the top of the digital piano's console. E-2

User Guide
Page 8
... pressing the pedal part way applies only a partial damper effect. Soft pedal Damper pedal Sostenuto pedal NOTE • The optional CS-65P or CS-66P stand is selected as a damper pedal. Connections Connecting a Pedal DAMPER PEDAL jack Connecting the supplied pedal (SP-3) to the DAMPER PEDAL jack makes it possible to...
... pressing the pedal part way applies only a partial damper effect. Soft pedal Damper pedal Sostenuto pedal NOTE • The optional CS-65P or CS-66P stand is selected as a damper pedal. Connections Connecting a Pedal DAMPER PEDAL jack Connecting the supplied pedal (SP-3) to the DAMPER PEDAL jack makes it possible to...

User Guide
Page 23
... • When recording to Track 1 with rhythm or Auto Accompaniment: Press the X/„ button to indicate that the indicator lamp for the record track is standing by pressing the SYNCHRO/ FILL-IN button, and then play back the track you want the metronome to Track 1. 2. Track 1: L lamp Track 2: R lamp Example: Track...
... • When recording to Track 1 with rhythm or Auto Accompaniment: Press the X/„ button to indicate that the indicator lamp for the record track is standing by pressing the SYNCHRO/ FILL-IN button, and then play back the track you want the metronome to Track 1. 2. Track 1: L lamp Track 2: R lamp Example: Track...


