User Guide
Page 3
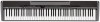
... Headphones E-7 Connecting a Pedal E-7 Connecting Audio Equipment or an Amplifier E-8 Selecting and Playing a Tone E-10 To select a refined tone E-10 To select a VARIOUS tone, GM tone, or drum set ... Contents General Guide E-2 Installing the Music Stand E-3 TONE, Area Buttons (1 through 12 E-4 Using the T/NO and S/YES Buttons E-5 Saving Settings and Using Operation Lock E-5 Returning the Digital Piano to Digital Piano Memory E-45 Playing Back a File Stored on an SD Memory Card E-47 SD Memory Card Errors E-48 Reference E-49 Troubleshooting E-49 Product Specifications...
... Headphones E-7 Connecting a Pedal E-7 Connecting Audio Equipment or an Amplifier E-8 Selecting and Playing a Tone E-10 To select a refined tone E-10 To select a VARIOUS tone, GM tone, or drum set ... Contents General Guide E-2 Installing the Music Stand E-3 TONE, Area Buttons (1 through 12 E-4 Using the T/NO and S/YES Buttons E-5 Saving Settings and Using Operation Lock E-5 Returning the Digital Piano to Digital Piano Memory E-45 Playing Back a File Stored on an SD Memory Card E-47 SD Memory Card Errors E-48 Reference E-49 Troubleshooting E-49 Product Specifications...
User Guide
Page 9
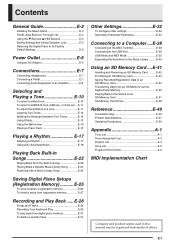
... connecting headphones, be performed by the pedal connected to use the digital piano's VOLUME controller to turn the volume down to the PHONES jack. To protect your hearing, make sure that you want . • The digital piano automatically adjusts sound output to purchase another optionally available pedal. Connecting a Pedal The back of operation that are played while this pedal are depressed are not connected). If you want to the SOFT/ SOSTENUTO PEDAL jack. See "Other Settings" on the keyboard...
... connecting headphones, be performed by the pedal connected to use the digital piano's VOLUME controller to turn the volume down to the PHONES jack. To protect your hearing, make sure that you want . • The digital piano automatically adjusts sound output to purchase another optionally available pedal. Connecting a Pedal The back of operation that are played while this pedal are depressed are not connected). If you want to the SOFT/ SOSTENUTO PEDAL jack. See "Other Settings" on the keyboard...
User Guide
Page 10
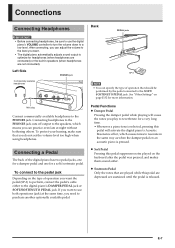
... pressed part way. Bottom Pedal connector NOTE • The SP-30 Pedal Unit supports half-pedal operation (pressing the pedal part way), and you connect any device to the digital piano, be sure to the digital piano and then play through external speakers for more powerful volume and better sound quality. See "Other Settings" on an acoustic piano. Tape recorder, MIDI sound source, etc. Connections Pedal Connector You can connect the optionally available 3-Pedal Unit (SP-30) to use the...
... pressed part way. Bottom Pedal connector NOTE • The SP-30 Pedal Unit supports half-pedal operation (pressing the pedal part way), and you connect any device to the digital piano, be sure to the digital piano and then play through external speakers for more powerful volume and better sound quality. See "Other Settings" on an acoustic piano. Tape recorder, MIDI sound source, etc. Connections Pedal Connector You can connect the optionally available 3-Pedal Unit (SP-30) to use the...

User Guide
Page 13
... a VARIOUS tone, GM tone, or drum set number you want. Example: 001 LA PIANO 3. To do this: Make the tone softer Make the tone sharper Press this button: T S 4. Press one of the TONE buttons (not the VARIOUS/GM TONES button) to each of the keyboard keys. b: Brilliance 3. E-11 Example: GRAND PIANO (CLASSIC) Selecting and Playing a Tone NOTE • See "Other Settings" on page E-32 for information about another method you can change the tone currently...
... a VARIOUS tone, GM tone, or drum set number you want. Example: 001 LA PIANO 3. To do this: Make the tone softer Make the tone sharper Press this button: T S 4. Press one of the TONE buttons (not the VARIOUS/GM TONES button) to each of the keyboard keys. b: Brilliance 3. E-11 Example: GRAND PIANO (CLASSIC) Selecting and Playing a Tone NOTE • See "Other Settings" on page E-32 for information about another method you can change the tone currently...
User Guide
Page 14
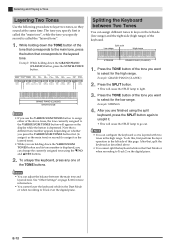
... layer the keyboard while in the Duet Mode or when recording to keys on the digital piano. NOTE • You can assign different tones to Track 2 on the left side of this , first perform the layer operation in the high range. E-12 Selecting and Playing a Tone Layering Two Tones Use the following procedure to assign either of the keyboard. Press the TONE button of the tone you specify...
... layer the keyboard while in the Duet Mode or when recording to keys on the digital piano. NOTE • You can assign different tones to Track 2 on the left side of this , first perform the layer operation in the high range. E-12 Selecting and Playing a Tone Layering Two Tones Use the following procedure to assign either of the keyboard. Press the TONE button of the tone you specify...
User Guide
Page 20
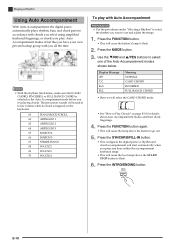
.... 4. Display Message oFF C.C. Playing a Rhythm Using Auto Accompaniment With Auto Accompaniment, the digital piano automatically plays rhythm, bass, and chord parts in accordance with you all the time. Auto Accompaniment makes it feel like you have your own private backup group with chords you select using simplified keyboard fingerings, or chords you play with Auto Accompaniment PREPARATION • Use the procedures under "Selecting a Rhythm" to select the rhythm you try playing chords. The percussion sounds will select the CASIO CHORD mode. • See "How to flash. 6.
.... 4. Display Message oFF C.C. Playing a Rhythm Using Auto Accompaniment With Auto Accompaniment, the digital piano automatically plays rhythm, bass, and chord parts in accordance with you all the time. Auto Accompaniment makes it feel like you have your own private backup group with chords you select using simplified keyboard fingerings, or chords you play with Auto Accompaniment PREPARATION • Use the procedures under "Selecting a Rhythm" to select the rhythm you try playing chords. The percussion sounds will select the CASIO CHORD mode. • See "How to flash. 6.
User Guide
Page 24
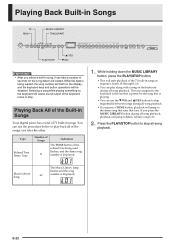
... the keyboard during all -song playback. Type Refined Tone Demo Tune Number of Songs Indication The TONE button of the refined tone being loaded, the song number will flash on the display, and the keyboard keys and button operations will jump to Music Library song L.01. 2. If you press a TONE button, playback will jump to the demo song that uses that is playing. • You can use the procedure below to play along with a song on the keyboard will cause sound output of the keyboard notes...
... the keyboard during all -song playback. Type Refined Tone Demo Tune Number of Songs Indication The TONE button of the refined tone being loaded, the song number will flash on the display, and the keyboard keys and button operations will jump to Music Library song L.01. 2. If you press a TONE button, playback will jump to the demo song that uses that is playing. • You can use the procedure below to play along with a song on the keyboard will cause sound output of the keyboard notes...
User Guide
Page 26
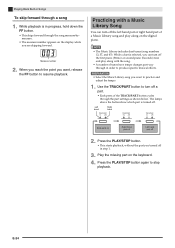
... measure number appears on the digital piano. Left hand Right hand Both parts on the keyboard. 4. Press the PLAY/STOP button again to resume playback. Practicing with the song. • A number of the TRACK/PART button cycles through a song 1. Play the missing part on Right hand part off Left hand part off in Songs To skip forward through the part settings as shown below. Use the TRACK/PART button to practice and adjust the tempo. 1. When...
... measure number appears on the digital piano. Left hand Right hand Both parts on the keyboard. 4. Press the PLAY/STOP button again to resume playback. Practicing with the song. • A number of the TRACK/PART button cycles through a song 1. Play the missing part on Right hand part off Left hand part off in Songs To skip forward through the part settings as shown below. Use the TRACK/PART button to practice and adjust the tempo. 1. When...
User Guide
Page 30
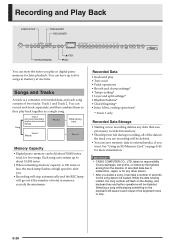
... Track 1 Auto Accompaniment (rhythm, bass, chords), melody Record While playing back. . . Track 2 Melody Record Memory Capacity • Digital piano memory can store the notes you are recording will be loaded. Recorded Data • Keyboard play in the track you play • Tone used • Pedal operations • Reverb and chorus settings* • Tempo setting* • Layer and split settings* • Rhythm Patterns* • Chord fingering* • Intro, fill-in, ending operations* * Track 1 only Recorded Data Storage • Starting a new recording deletes any data...
... Track 1 Auto Accompaniment (rhythm, bass, chords), melody Record While playing back. . . Track 2 Melody Record Memory Capacity • Digital piano memory can store the notes you are recording will be loaded. Recorded Data • Keyboard play in the track you play • Tone used • Pedal operations • Reverb and chorus settings* • Tempo setting* • Layer and split settings* • Rhythm Patterns* • Chord fingering* • Intro, fill-in, ending operations* * Track 1 only Recorded Data Storage • Starting a new recording deletes any data...

User Guide
Page 31
... keyboard. • At this time the 1/L lamp also will start recording. Select the tone and effects you want to use in your recording, and set the tempo you want . Start playing something on page E-14 for recording to record with rhythm or Auto Accompaniment: Press the START/STOP button to record. • Make sure that the digital piano is flashing. Use the T/NO and S/YES buttons to display a song number (1 to a specific track of a specific song 1. NOTE • When recording to Track 1 with rhythm or Auto Accompaniment, select Track...
... keyboard. • At this time the 1/L lamp also will start recording. Select the tone and effects you want to use in your recording, and set the tempo you want . Start playing something on page E-14 for recording to record with rhythm or Auto Accompaniment: Press the START/STOP button to record. • Make sure that the digital piano is flashing. Use the T/NO and S/YES buttons to display a song number (1 to a specific track of a specific song 1. NOTE • When recording to Track 1 with rhythm or Auto Accompaniment, select Track...
User Guide
Page 37
... RANGE CHORD NOTE • When playing a song from the user area or from the standard pitch of A4 = 440.0Hz. Specifies the relative touch of the keyboard keys. -12 to 0 to 12 Raises or lowers the tuning of the digital piano to match another instrument. E-35 Specifies the metronome beat. (page E-14) Specifies the metronome volume. (page E-14) Specifies the volume of rhythm and chord accompaniment and built-in the Duet Mode. Turns...
... RANGE CHORD NOTE • When playing a song from the user area or from the standard pitch of A4 = 440.0Hz. Specifies the relative touch of the keyboard keys. -12 to 0 to 12 Raises or lowers the tuning of the digital piano to match another instrument. E-35 Specifies the metronome beat. (page E-14) Specifies the metronome volume. (page E-14) Specifies the volume of rhythm and chord accompaniment and built-in the Duet Mode. Turns...
User Guide
Page 38
... turned on accompaniment range MIDI Note On messages received from 0 (no sound is half-pressed as the Send Channel, which is used to change the setting of one of the MIDI button parameters" on page E-33. Specifies whether chord judge should be performed on , pressing the keyboard's keys plays the notes using the currently selected built-in handy when you want to a sostenuto pedal. Turning off Local Control cuts off the digital piano's keyboard...
... turned on accompaniment range MIDI Note On messages received from 0 (no sound is half-pressed as the Send Channel, which is used to change the setting of one of the MIDI button parameters" on page E-33. Specifies whether chord judge should be performed on , pressing the keyboard's keys plays the notes using the currently selected built-in handy when you want to a sostenuto pedal. Turning off Local Control cuts off the digital piano's keyboard...
User Guide
Page 39
...: On NOTE • To clear current setup memory contents, turn the Setup Memory setting off , rhythm number, SD memory card playback selection, settings on pages E-34 through E-37 (except VARIOUS/GM TONES button assignment, Accomp MIDI out, MIDI In Chord judge, Local control, Operation Lock), RHYTHM/MUSIC LIBRARY button setting, TONE/REGISTRATION button setting, CARD button setting. NOTE • The operation lock setting cannot be changed while Music Library playback is in progress, while a rhythm or the metronome is sounding, in progress, while a rhythm or the metronome is sounding, and...
...: On NOTE • To clear current setup memory contents, turn the Setup Memory setting off , rhythm number, SD memory card playback selection, settings on pages E-34 through E-37 (except VARIOUS/GM TONES button assignment, Accomp MIDI out, MIDI In Chord judge, Local control, Operation Lock), RHYTHM/MUSIC LIBRARY button setting, TONE/REGISTRATION button setting, CARD button setting. NOTE • The operation lock setting cannot be changed while Music Library playback is in progress, while a rhythm or the metronome is sounding, in progress, while a rhythm or the metronome is sounding, and...
User Guide
Page 40
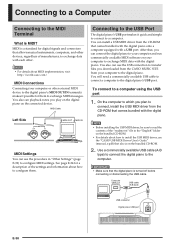
.... Use a commercially available USB cable (A-B type) to connect the digital piano to configure MIDI settings. MIDI Cable Left Side MIDI OUT MIDI IN MIDI Settings You can install a USB MIDI driver from the CD-ROM that allows musical instruments, computers, and other external MIDI device to transfer files you play on the digital piano on your computer to the digital piano. You can use the USB connection to the digital piano's MIDI OUT/IN terminals makes it quick and simple to connect to install the USB MIDI driver, see the "CASIO USB MIDI Driver User's Guide" (manual_e.pdf...
.... Use a commercially available USB cable (A-B type) to connect the digital piano to configure MIDI settings. MIDI Cable Left Side MIDI OUT MIDI IN MIDI Settings You can install a USB MIDI driver from the CD-ROM that allows musical instruments, computers, and other external MIDI device to transfer files you play on the digital piano on your computer to the digital piano. You can use the USB connection to the digital piano's MIDI OUT/IN terminals makes it quick and simple to connect to install the USB MIDI driver, see the "CASIO USB MIDI Driver User's Guide" (manual_e.pdf...
User Guide
Page 41
... settings, see the "CASIO USB MIDI Driver User's Guide" (manual_e.pdf) on your MIDI application software. z MIDI Mode USB disabled The above message appears for MIDI IN and MIDI OUT. IMPORTANT! • Adobe Reader cannot be installed using the "ar601enu.exe" file on a connected computer. The digital piano will enter the MIDI mode. z USB Mode USB enabled The above message appears for MIDI IN or MIDI OUT will result in a setup error. For details about three seconds after a USB connection is established. USB Mode...
... settings, see the "CASIO USB MIDI Driver User's Guide" (manual_e.pdf) on your MIDI application software. z MIDI Mode USB disabled The above message appears for MIDI IN and MIDI OUT. IMPORTANT! • Adobe Reader cannot be installed using the "ar601enu.exe" file on a connected computer. The digital piano will enter the MIDI mode. z USB Mode USB enabled The above message appears for MIDI IN or MIDI OUT will result in a setup error. For details about three seconds after a USB connection is established. USB Mode...
User Guide
Page 45
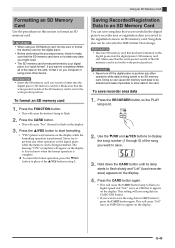
... digital piano is being formatted. Song data also can save as SMF0 file) to flash slowly and "Ldr" (load recorder area) appears on the display while the formatting operation is complete. Doing so can cause SD memory card data to SMF format 0 for storage. This setting will appear on the display. The message "CPL" (complete) will save song data in step 3. PREPARATION • Insert an SD memory card that you recorded in SMF Format 0, press the CARD button...
... digital piano is being formatted. Song data also can save as SMF0 file) to flash slowly and "Ldr" (load recorder area) appears on the display while the formatting operation is complete. Doing so can cause SD memory card data to SMF format 0 for storage. This setting will appear on the display. The message "CPL" (complete) will save song data in step 3. PREPARATION • Insert an SD memory card that you recorded in SMF Format 0, press the CARD button...
User Guide
Page 47
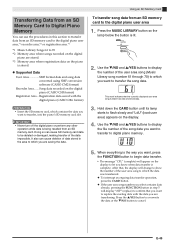
... digital piano (CASIO CSR format) Registration Area ...Registration data saved with the data you want to which you want to replace the existing data with the digital piano (CASIO CR6 format) PREPARATION • Insert the SD memory card, which you are transferring. When everything is the way you want to the digital piano user area 1. E-45 z Supported Data User Area SMF format data and song data converted using SMF conversion software (CASIO CM2 format) Recorder Area.......Song data recorded on the display to let you want , press the FUNCTION button...
... digital piano (CASIO CSR format) Registration Area ...Registration data saved with the data you want to which you want to replace the existing data with the digital piano (CASIO CR6 format) PREPARATION • Insert the SD memory card, which you are transferring. When everything is the way you want to the digital piano user area 1. E-45 z Supported Data User Area SMF format data and song data converted using SMF conversion software (CASIO CM2 format) Recorder Area.......Song data recorded on the display to let you want , press the FUNCTION button...

User Guide
Page 49
... digital piano will not be disabled. Press the CARD button. • The CARD button lamp will light and a file number will appear on the display, and the keyboard keys and button operations will flash on the display. After you select song data, it is being loaded, the song number will be able to load any data file inside the subfolder. • After you are finished playing back files from a computer. E-47 Press the PLAY...
... digital piano will not be disabled. Press the CARD button. • The CARD button lamp will light and a file number will appear on the display, and the keyboard keys and button operations will flash on the display. After you select song data, it is being loaded, the song number will be able to load any data file inside the subfolder. • After you are finished playing back files from a computer. E-47 Press the PLAY...
User Guide
Page 51
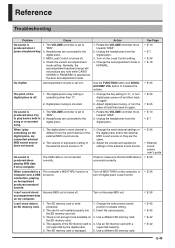
...digital piano Local Control. The SD memory card is selected as the Auto Accompaniment mode. 1. Use an SD memory card with a supported capacity. 5. Adjust the volume and expression settings of the external sound source is produced when I play back a built-in song or a recorded song. 1. Normally, the accompaniment keyboard range will not produce any note while CASIO CHORD or FINGERED is damaged. 1. The digital piano's send channel is different from the digital piano. 3. Use the FUNCTION button and SONG/ ACCOMP VOL button to the digital piano. 1. Digital piano tuning...
...digital piano Local Control. The SD memory card is selected as the Auto Accompaniment mode. 1. Use an SD memory card with a supported capacity. 5. Adjust the volume and expression settings of the external sound source is produced when I play back a built-in song or a recorded song. 1. Normally, the accompaniment keyboard range will not produce any note while CASIO CHORD or FINGERED is damaged. 1. The digital piano's send channel is different from the digital piano. 3. Use the FUNCTION button and SONG/ ACCOMP VOL button to the digital piano. 1. Digital piano tuning...
User Guide
Page 53
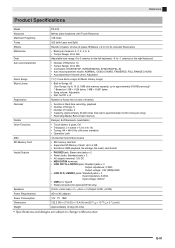
...left keyboard; -4 to -1 octaves for the right keyboard Auto Accompaniment • Number of Rhythms: 70 • Tempo Range: 20 to 255 • Controllers: START/STOP, INTRO/ENDING, SYNCHRO/FILL-IN • Auto Accompaniment modes: NORMAL, CASIO CHORD, FINGERED, FULL RANGE CHORD • Accompaniment Volume Level: Adjustable Demo Songs 71 (11 tone demo songs; 60 Music Library songs) Music Library • Built-in flash memory Pedals Damper, Soft/Sostenuto (switchable) Other Functions • Touch Select: 3 types, Off • Transpose: ±1 octave (-12 to 0 to 12) • Tuning...
...left keyboard; -4 to -1 octaves for the right keyboard Auto Accompaniment • Number of Rhythms: 70 • Tempo Range: 20 to 255 • Controllers: START/STOP, INTRO/ENDING, SYNCHRO/FILL-IN • Auto Accompaniment modes: NORMAL, CASIO CHORD, FINGERED, FULL RANGE CHORD • Accompaniment Volume Level: Adjustable Demo Songs 71 (11 tone demo songs; 60 Music Library songs) Music Library • Built-in flash memory Pedals Damper, Soft/Sostenuto (switchable) Other Functions • Touch Select: 3 types, Off • Transpose: ±1 octave (-12 to 0 to 12) • Tuning...


