User Guide
Page 3
...caution.) This circle with their meanings are shown below. Those symbols along with a line through the instructions contained in this user's guide and on your selection of causing death or serious injury if the product is the likelihood of occurrence of death or serious personal injury... Examples This triangle symbol ( ) means that the user should be performed. CAUTION This indication stipulates matters that have the risk of the CASIO electronic musical instrument. • Before using the instrument, be sure to be performed. (The example at left indicates that the power plug...
...caution.) This circle with their meanings are shown below. Those symbols along with a line through the instructions contained in this user's guide and on your selection of causing death or serious injury if the product is the likelihood of occurrence of death or serious personal injury... Examples This triangle symbol ( ) means that the user should be performed. CAUTION This indication stipulates matters that have the risk of the CASIO electronic musical instrument. • Before using the instrument, be sure to be performed. (The example at left indicates that the power plug...
User Guide
Page 8
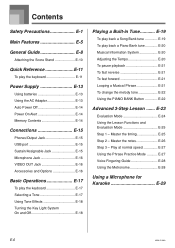
Contents Safety Precautions E-1 Main Features E-5 General Guide E-8 Attaching the Score Stand E-10 Quick Reference E-11 To play the keyboard E-11 Power Supply E-13 Using batteries E-13 Using the AC Adaptor E-13 Auto ... 3-Step Lesson ....... Master the timing E-25 Step 2 - Master the notes E-26 Step 3 - Play at normal speed E-27 Using the Phrase Practice Mode E-27 Voice Fingering Guide E-28 Using the Metronome E-28 Using a Microphone for Karaoke E-29 E-6 655A-E-008A E-23 Evaluation Mode E-24 Using the Lesson Functions and Evaluation Mode E-25 Step 1 -
Contents Safety Precautions E-1 Main Features E-5 General Guide E-8 Attaching the Score Stand E-10 Quick Reference E-11 To play the keyboard E-11 Power Supply E-13 Using batteries E-13 Using the AC Adaptor E-13 Auto ... 3-Step Lesson ....... Master the timing E-25 Step 2 - Master the notes E-26 Step 3 - Play at normal speed E-27 Using the Phrase Practice Mode E-27 Voice Fingering Guide E-28 Using the Metronome E-28 Using a Microphone for Karaoke E-29 E-6 655A-E-008A E-23 Evaluation Mode E-24 Using the Lesson Functions and Evaluation Mode E-25 Step 1 -
User Guide
Page 11
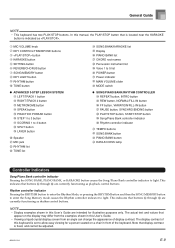
...STOP button that is located near the KARAOKE button is fixed, and cannot be adjusted. 655A-E-011A E-9 The display contrast of this User's Guide are currently functioning as playback control buttons. This indicates that display contrast is indicated as rhythm control buttons. Rhythm controller indicator Pressing the RHYTHM ... the display may differ from an angle can change the appearance of the keyboard. NOTE • Display examples shown in this User's Guide. • Viewing a liquid crystal display screen from the examples shown in this keyboard is set to light.
...STOP button that is located near the KARAOKE button is fixed, and cannot be adjusted. 655A-E-011A E-9 The display contrast of this User's Guide are currently functioning as playback control buttons. This indicates that display contrast is indicated as rhythm control buttons. Rhythm controller indicator Pressing the RHYTHM ... the display may differ from an angle can change the appearance of the keyboard. NOTE • Display examples shown in this User's Guide. • Viewing a liquid crystal display screen from the examples shown in this keyboard is set to light.
User Guide
Page 12
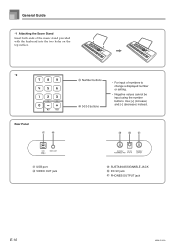
i jk g USB port h VIDEO OUT jack i SUSTAIN/ASSIGNABLE JACK j DC 9V jack k PHONES/OUTPUT jack E-10 655A-E-012A General Guide *1 Attaching the Score Stand Insert both ends of the music stand provided with the keyboard into the two holes on the top surface. *2 Rear Panel g h e Number buttons f [+]/[-] buttons • For input of numbers to change a displayed number or setting. • Negative values cannot be input using the number buttons. Use [+] (increase) and [-] (decrease) instead.
i jk g USB port h VIDEO OUT jack i SUSTAIN/ASSIGNABLE JACK j DC 9V jack k PHONES/OUTPUT jack E-10 655A-E-012A General Guide *1 Attaching the Score Stand Insert both ends of the music stand provided with the keyboard into the two holes on the top surface. *2 Rear Panel g h e Number buttons f [+]/[-] buttons • For input of numbers to change a displayed number or setting. • Negative values cannot be input using the number buttons. Use [+] (increase) and [-] (decrease) instead.
User Guide
Page 26
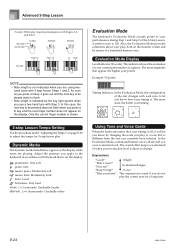
...: Very soft piano: Soft mezzo piano: Moderately soft mezzo forte: Moderately loud forte: Loud fortissimo: Very loud cresc. () decrescendo: Gradually softer Using Tone and Voice Guide When the keyboard senses that is indicated by the key light system when you press a lit key and the next finger number does not appear...
...: Very soft piano: Soft mezzo piano: Moderately soft mezzo forte: Moderately loud forte: Loud fortissimo: Very loud cresc. () decrescendo: Gradually softer Using Tone and Voice Guide When the keyboard senses that is indicated by the key light system when you press a lit key and the next finger number does not appear...

User Guide
Page 27
... that point. Using the Lesson Functions and Evaluation Mode Perform the following steps to master your play is flawless, the message "Perfect!" See "Voice Fingering Guide" on page E-28 for the next note to be obtained. Pressing a key while another key is held down is . Step 1 - "Great!" NOTE • If your...-hand part) waits until you press any key to play a note. • If you to play the first note of the tune. • Voice fingering guide will use . 2 Press the RIGHT/TRACK 2 button or the LEFT/ TRACK 1 button to specify the part you want to practice. • If you want ...
... that point. Using the Lesson Functions and Evaluation Mode Perform the following steps to master your play is flawless, the message "Perfect!" See "Voice Fingering Guide" on page E-28 for the next note to be obtained. Pressing a key while another key is held down is . Step 1 - "Great!" NOTE • If your...-hand part) waits until you press any key to play a note. • If you to play the first note of the tune. • Voice fingering guide will use . 2 Press the RIGHT/TRACK 2 button or the LEFT/ TRACK 1 button to specify the part you want to practice. • If you want ...
User Guide
Page 28
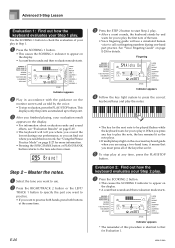
... 2 indicator to appear on page E-28 for more information. • Pressing the SONG BANK button or PIANO BANK button returns to appear on -screen keyboard guide when you are lit. 5 To stop evaluation, press the PLAY/STOP button. Indicator appears 4 Follow the key light system to press the correct keyboard keys... key for the next note to be played flashes while the keyboard waits for you to check the evaluation of the tune. • Voice fingering guide will tell you where you scored the lowest during one-hand part practice. See "Voice Fingering...
... 2 indicator to appear on page E-28 for more information. • Pressing the SONG BANK button or PIANO BANK button returns to appear on -screen keyboard guide when you are lit. 5 To stop evaluation, press the PLAY/STOP button. Indicator appears 4 Follow the key light system to press the correct keyboard keys... key for the next note to be played flashes while the keyboard waits for you to check the evaluation of the tune. • Voice fingering guide will tell you where you scored the lowest during one-hand part practice. See "Voice Fingering...
User Guide
Page 29
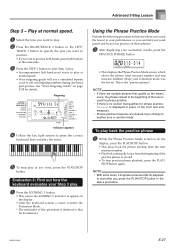
... Fingering A l oha Oe Indicator appears 4 Follow the key light system to press the correct keyboard keys and play at normal speed. • Voice fingering guide will use a simulated human voice to another tune or another mode. Play at normal speed. 1 Select the tune you want to play. 2 Press the ...which shows the phrase (start after you can find your weak points and focus your practice on page E-28 for Evaluation 1. See "Voice Fingering Guide" on those phrases. 1 After displaying your evaluation mode was the lowest. To play at any time, press the PLAY/STOP button.
... Fingering A l oha Oe Indicator appears 4 Follow the key light system to press the correct keyboard keys and play at normal speed. • Voice fingering guide will use a simulated human voice to another tune or another mode. Play at normal speed. 1 Select the tune you want to play. 2 Press the ...which shows the phrase (start after you can find your weak points and focus your practice on page E-28 for Evaluation 1. See "Voice Fingering Guide" on those phrases. 1 After displaying your evaluation mode was the lowest. To play at any time, press the PLAY/STOP button.
User Guide
Page 30
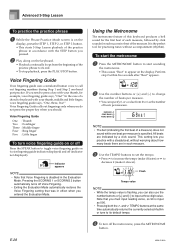
... Pressing the SCORING 1 or SCORING 2 button automatically turns off the metronome, press the METRONOME button. It is the perfect tool for example, voice fingering guide says, "One!" If you need to input a three-digit value. Perform step 2 within five seconds after "Beat" appears. 2 Use the number buttons...measure. • You can also use the number buttons or [+] and [-] to press a key with your thumb, middle and little finger, voice fingering guide says, "One, three, five!" Bea t NOTE • The bell (indicating the first beat of a measure) does not sound while one -hand ...
... Pressing the SCORING 1 or SCORING 2 button automatically turns off the metronome, press the METRONOME button. It is the perfect tool for example, voice fingering guide says, "One!" If you need to input a three-digit value. Perform step 2 within five seconds after "Beat" appears. 2 Use the number buttons...measure. • You can also use the number buttons or [+] and [-] to press a key with your thumb, middle and little finger, voice fingering guide says, "One, three, five!" Bea t NOTE • The bell (indicating the first beat of a measure) does not sound while one -hand ...
User Guide
Page 49
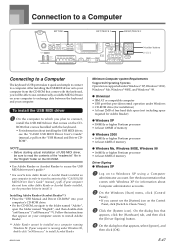
... memory G Windows Me, Windows 98SE, Windows 98 • 166MHz or higher Pentium processor • At least 32MB of the "CASIO USB MIDI Driver User's Guide" (manual_e.pdf). See the documentation that appear on your computer. To install the USB MIDI driver 1 On the computer to which...CDROM". G Universal • IBM AT or compatible computer • USB port that comes bundled with the keyboard, you cannot see the "CASIO USB MIDI Driver User's Guide" (manual_e.pdf) on the CDROM that provides normal operation under Windows® XP, Windows® 2000, Windows® Me, Windows&#...
... memory G Windows Me, Windows 98SE, Windows 98 • 166MHz or higher Pentium processor • At least 32MB of the "CASIO USB MIDI Driver User's Guide" (manual_e.pdf). See the documentation that appear on your computer. To install the USB MIDI driver 1 On the computer to which...CDROM". G Universal • IBM AT or compatible computer • USB port that comes bundled with the keyboard, you cannot see the "CASIO USB MIDI Driver User's Guide" (manual_e.pdf) on the CDROM that provides normal operation under Windows® XP, Windows® 2000, Windows® Me, Windows&#...
User Guide
Page 51
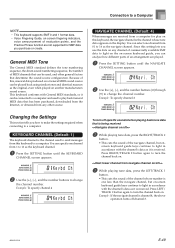
...played. 1 Press the SETTING button until the KEYBOARD CHANNEL screen appears. Ch To turn off channel 3. 655A-E-051A E-49 screen keyboard guide keys continue to light in accordance with the channel's data as the navigate channel. Nav i . Example: If the navigate channel is...NAVIGATE CHANNEL screen appears. Connection to a Computer NOTE • This keyboard supports SMF 0 and 1 format data. • Voice Fingering Guide, on-screen fingering indicators, voice announcement of evaluation points, and the Practice Phrase function are not supported for play back General MIDI data ...
...played. 1 Press the SETTING button until the KEYBOARD CHANNEL screen appears. Ch To turn off channel 3. 655A-E-051A E-49 screen keyboard guide keys continue to light in accordance with the channel's data as the navigate channel. Nav i . Example: If the navigate channel is...NAVIGATE CHANNEL screen appears. Connection to a Computer NOTE • This keyboard supports SMF 0 and 1 format data. • Voice Fingering Guide, on-screen fingering indicators, voice announcement of evaluation points, and the Practice Phrase function are not supported for play back General MIDI data ...
User Guide
Page 55
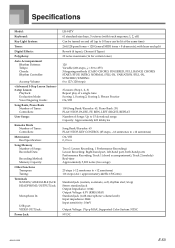
...: Tempo: Chords: Rhythm Controller: Accomp Volume: 3-step Lesson: Playback: Evaluation Mode: Voice Fingering Guide: Song Bank, Piano Bank Number of Tunes: Controllers: User Songs: Karaoke Mode Number of Tunes:...SUSTAIN/ASSIGNABLE JACK: HEADPHONE/OUTPUT Jack: Microphone In: USB port VIDEO OUT Jack: Power Jack: LK-94TV 61 standard-size keys, 5 octaves (with microphone volume knob) Input impedance: 3KΩ Input...(16 for certain tones) 120 Variable (226 steps, = 30 to 255) 3 fingering methods (CASIO CHORD, FINGERED, FULL RANGE CHORD) START/STOP, INTRO, NORMAL/FILL-IN, VARIATION/FILL-IN, SYNCHRO...
...: Tempo: Chords: Rhythm Controller: Accomp Volume: 3-step Lesson: Playback: Evaluation Mode: Voice Fingering Guide: Song Bank, Piano Bank Number of Tunes: Controllers: User Songs: Karaoke Mode Number of Tunes:...SUSTAIN/ASSIGNABLE JACK: HEADPHONE/OUTPUT Jack: Microphone In: USB port VIDEO OUT Jack: Power Jack: LK-94TV 61 standard-size keys, 5 octaves (with microphone volume knob) Input impedance: 3KΩ Input...(16 for certain tones) 120 Variable (226 steps, = 30 to 255) 3 fingering methods (CASIO CHORD, FINGERED, FULL RANGE CHORD) START/STOP, INTRO, NORMAL/FILL-IN, VARIATION/FILL-IN, SYNCHRO...
