Owners Manual
Page 2
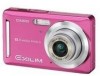
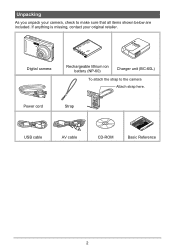
Digital camera Rechargeable lithium ion battery (NP-60) Charger unit (BC-60L) To attach the strap to make sure that all items shown below are included. Power cord Strap USB cable AV cable CD-ROM Basic Reference 2 If anything is missing, contact your camera, check to the camera Attach strap here. Unpacking As you unpack your original retailer.
Digital camera Rechargeable lithium ion battery (NP-60) Charger unit (BC-60L) To attach the strap to make sure that all items shown below are included. Power cord Strap USB cable AV cable CD-ROM Basic Reference 2 If anything is missing, contact your camera, check to the camera Attach strap here. Unpacking As you unpack your original retailer.
Owners Manual
Page 10
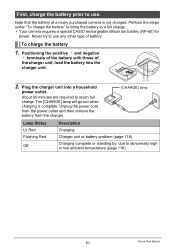
... and then remove the battery from the charger. [CHARGE] lamp Lamp Status Description Lit Red Flashing Red Off Charging Charger unit or battery problem (page 116) Charging complete or standing by, due to a full charge. • Your camera requires a special CASIO rechargeable lithium ion battery (NP-60)... for power. First, charge the battery prior to use any other type of battery. Plug the charger unit into the charger unit. 2. Perform the steps under "To charge the ...
... and then remove the battery from the charger. [CHARGE] lamp Lamp Status Description Lit Red Flashing Red Off Charging Charger unit or battery problem (page 116) Charging complete or standing by, due to a full charge. • Your camera requires a special CASIO rechargeable lithium ion battery (NP-60)... for power. First, charge the battery prior to use any other type of battery. Plug the charger unit into the charger unit. 2. Perform the steps under "To charge the ...
Owners Manual
Page 11
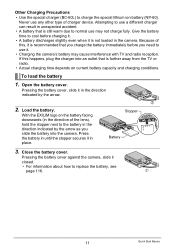
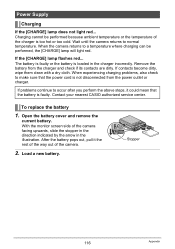
... the charger into the camera. With the EXILIM logo on current battery capacity and charging conditions. Press the battery in until the stopper secures it in the direction indicated by the arrow as you slide the battery into an outlet that is not loaded in the camera. Open... battery, see page 116. 1 11 Quick Start Basics Pressing the battery cover against the camera, slide it . • Charging the camera's battery may not charge fully. Other Charging Precautions • Use the special charger (BC-60L) to the battery in the direction indicated by the arrow. 1 2.
... the charger into the camera. With the EXILIM logo on current battery capacity and charging conditions. Press the battery in until the stopper secures it in the direction indicated by the arrow as you slide the battery into an outlet that is not loaded in the camera. Open... battery, see page 116. 1 11 Quick Start Basics Pressing the battery cover against the camera, slide it . • Charging the camera's battery may not charge fully. Other Charging Precautions • Use the special charger (BC-60L) to the battery in the direction indicated by the arrow. 1 2.
Owners Manual
Page 109
..., fire, and explosion. • Do not expose or immerse the battery in the documentation that comes with a CASIO Digital Camera only. Doing so can be sure to it. Rechargeable Battery • Use only the specified charger unit or the specified device to heat or fire. - Never place the battery into a microwave oven, heater, high...
..., fire, and explosion. • Do not expose or immerse the battery in the documentation that comes with a CASIO Digital Camera only. Doing so can be sure to it. Rechargeable Battery • Use only the specified charger unit or the specified device to heat or fire. - Never place the battery into a microwave oven, heater, high...
Owners Manual
Page 110
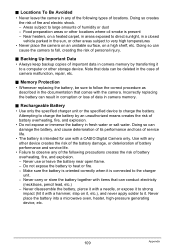
... notice leakage, strange odor, heat generation, discoloration, deformation, or any other abnormal condition while using, charging, or storing a battery, immediately remove it from the camera or charger unit and keep it away from a battery accidentally get into your eyes accidentally, immediately rinse them aware of time before using it. • The low..., and explosion. • Battery fluid can damage the battery, and cause deterioration of its performance and loss of operation. Doing so can damage your local CASIO authorized service center.
... notice leakage, strange odor, heat generation, discoloration, deformation, or any other abnormal condition while using, charging, or storing a battery, immediately remove it from the camera or charger unit and keep it away from a battery accidentally get into your eyes accidentally, immediately rinse them aware of time before using it. • The low..., and explosion. • Battery fluid can damage the battery, and cause deterioration of its performance and loss of operation. Doing so can damage your local CASIO authorized service center.
Owners Manual
Page 113
... shock. 0 Never plug in or unplug the power cord while your original retailer or authorized CASIO authorized service center to the point that marked on the power cord. Other Precautions The camera becomes slightly warm during use of a damaged power cord creates the risk of fire, malfunction... wet. Doing so creates the risk of fire. . . Doing so creates the risk of fire, malfunction, and electric shock. • The charger unit becomes slightly warm during charging. Continued use . Doing so creates the risk of fire, malfunction, and electric shock. 0 Take care to clean...
... shock. 0 Never plug in or unplug the power cord while your original retailer or authorized CASIO authorized service center to the point that marked on the power cord. Other Precautions The camera becomes slightly warm during use of a damaged power cord creates the risk of fire, malfunction... wet. Doing so creates the risk of fire. . . Doing so creates the risk of fire, malfunction, and electric shock. • The charger unit becomes slightly warm during charging. Continued use . Doing so creates the risk of fire, malfunction, and electric shock. 0 Take care to clean...
Owners Manual
Page 116
...can be performed because ambient temperature or the temperature of the camera facing upwards, slide the stopper in the direction indicated by the arrow in the charger incorrectly. Contact your nearest CASIO authorized service center. Wait until the camera returns to occur after you perform the above steps, it... the rest of the way out of the camera. 2. The battery is faulty or the battery is...
...can be performed because ambient temperature or the temperature of the camera facing upwards, slide the stopper in the direction indicated by the arrow in the charger incorrectly. Contact your nearest CASIO authorized service center. Wait until the camera returns to occur after you perform the above steps, it... the rest of the way out of the camera. 2. The battery is faulty or the battery is...
Owners Manual
Page 117
...similar device. Doing so can take longer than operation under cold conditions is within the range of battery characteristics. Before taking the camera and charger along extra fully charged batteries (NP-60) is due to the characteristics of 100V to the battery going dead. 117 Appendix ...This is recommended while on a trip in the range of the battery, not the camera. • Charge the battery in your destination(s). • Do not connect the charger to 95°F). Extra Batteries • Taking along on each country or geographic area. Precautions during...
...similar device. Doing so can take longer than operation under cold conditions is within the range of battery characteristics. Before taking the camera and charger along extra fully charged batteries (NP-60) is due to the characteristics of 100V to the battery going dead. 117 Appendix ...This is recommended while on a trip in the range of the battery, not the camera. • Charge the battery in your destination(s). • Do not connect the charger to 95°F). Extra Batteries • Taking along on each country or geographic area. Precautions during...

Owners Manual
Page 121
clSpeaker 1[CHARGE] Lamp 2+- Contacts 3AC jack 3 121 Appendix Camera Front 1 2 3 4 Back 78 9 bk 5 6 bl [ ] bm [ ] [ ] [ ] [SET] bs br bq bp bo bn 1Shutter button (page 16) 8Zoom button 2[ON/OFF] (Power) (pages 16, 36, ... 19, 22) bsMonitor screen (pages 105, 122) Bottom cl ck bt . General Guide The numbers in parentheses indicate the pages where each item is explained. . Charger Unit 12 btBattery/memory card slots (pages 11, 14, 116, 118) ckTripod hole Use this hole when attaching to a tripod.
clSpeaker 1[CHARGE] Lamp 2+- Contacts 3AC jack 3 121 Appendix Camera Front 1 2 3 4 Back 78 9 bk 5 6 bl [ ] bm [ ] [ ] [ ] [SET] bs br bq bp bo bn 1Shutter button (page 16) 8Zoom button 2[ON/OFF] (Power) (pages 16, 36, ... 19, 22) bsMonitor screen (pages 105, 122) Bottom cl ck bt . General Guide The numbers in parentheses indicate the pages where each item is explained. . Charger Unit 12 btBattery/memory card slots (pages 11, 14, 116, 118) ckTripod hole Use this hole when attaching to a tripod.


